************本文档适用于CentOS7.x从openssh7.4p1升级到openssh8.4p1************
1、升级准备工作
1.1、查看系统版本和ssh版本
cat /etc/redhat-release
ssh -V

1.2、需要将openssh升级到最新版本
直接yum安装即可
yum install openssh -y

可以看已经升级到7.4p1了,下面将从openssh7.4p1升级到openssh8.4p1
1.3、安装需要的依赖包
yum -y install gcc gcc-c++ kernel-devel

2、安装包准备
2.1、下载安装包
zlib-1.2.11.tar.gz 下载地址:http://www.zlib.net/zlib-1.2.11.tar.gz 也可以直接下载:wget http://www.zlib.net/zlib-1.2.11.tar.gz
openssl-1.1.1h.tar.gz 下载地址:https://www.openssl.org/source/openssl-1.1.1h.tar.gz 也可以直接下载:wget https://www.openssl.org/source/openssl-1.1.1h.tar.gz
openssh-8.4p1.tar.gz 下载地址:http://ftp.openbsd.org/pub/OpenBSD/OpenSSH/portable/openssh-8.4p1.tar.gz 也可以直接下载:wget http://ftp.openbsd.org/pub/OpenBSD/OpenSSH/portable/openssh-8.4p1.tar.gz
查看安装包:

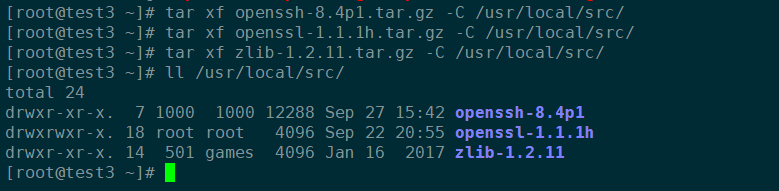
2.2、解压安装包,我习惯将安装包解压到/usr/local/src下面
tar xf openssh-8.4p1.tar.gz -C /usr/local/src/
tar xf openssl-1.1.1h.tar.gz -C /usr/local/src/
tar xf zlib-1.2.11.tar.gz -C /usr/local/src/
ll /usr/local/src/
3、安装
3.1、安装zlib-1.2.11.tar.gz
[root@test3 ~]# cd /usr/local/src/zlib-1.2.11/
[root@test3 zlib-1.2.11]# ./configure --prefix=/usr/local/zlib && make -j 4 && make install
3.2、安装 openssl-1.1.1h.tar.gz
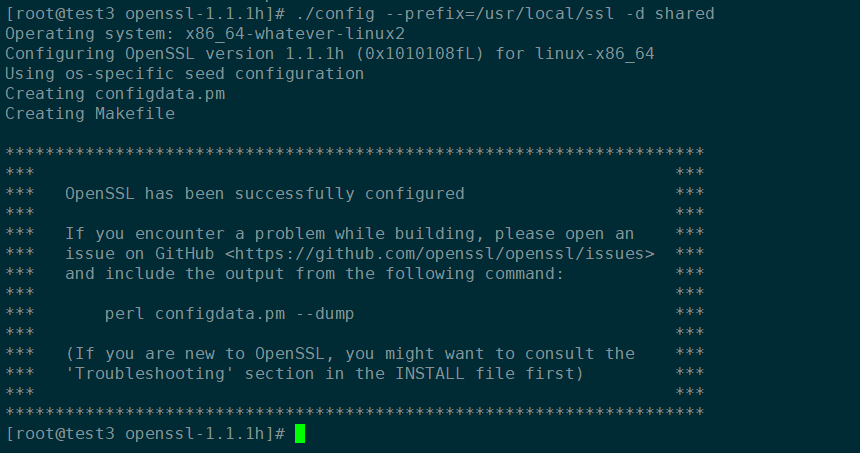
[root@test3 zlib-1.2.11]# cd /usr/local/src/openssl-1.1.1h/
[root@test3 openssl-1.1.1h]# ./config --prefix=/usr/local/ssl -d shared
[root@test3 openssl-1.1.1h]# make -j 4 && make install
[root@test3 openssl-1.1.1h]# echo '/usr/local/ssl/lib' >> /etc/ld.so.conf
[root@test3 openssl-1.1.1h]# ldconfig -v
3.3、安装openssh-8.4p1.tar.gz
mv /etc/ssh /etc/ssh.bak
cd /usr/local/src/openssh-8.4p1/
./configure --prefix=/usr/local/openssh --sysconfdir=/etc/ssh --with-ssl-dir=/usr/local/ssl --with-zlib=/usr/local/zlib
make -j 4 && make install
sshd_config文件修改
echo "X11Forwarding yes" >> /etc/ssh/sshd_config
echo "X11UseLocalhost no" >> /etc/ssh/sshd_config
echo "XAuthLocation /usr/bin/xauth" >> /etc/ssh/sshd_config
echo "UseDNS no" >> /etc/ssh/sshd_config
echo 'PermitRootLogin yes' >> /etc/ssh/sshd_config
echo 'PubkeyAuthentication yes' >> /etc/ssh/sshd_config
echo 'PasswordAuthentication yes' >> /etc/ssh/sshd_config
需要添加X11Forwarding yes开启X11转发,调用图形界面,如oracle安装等操作需要图形界面
***必须添加X11UseLocalhost no 和 XAuthLocation /usr/bin/xauth 这两项,否则X11转发不好使
验证X11转发是否好使,xhost + 出现下面的是可以正常使用的

出现下面的内容是不能正常使用的

备份 /etc/ssh 原有文件,并将新的配置复制到指定目录
mv /usr/sbin/sshd /usr/sbin/sshd.bak
cp -rf /usr/local/openssh/sbin/sshd /usr/sbin/sshd
mv /usr/bin/ssh /usr/bin/ssh.bak
cp -rf /usr/local/openssh/bin/ssh /usr/bin/ssh
mv /usr/bin/ssh-keygen /usr/bin/ssh-keygen.bak
cp -rf /usr/local/openssh/bin/ssh-keygen /usr/bin/ssh-keygen
查看版本ssh -V

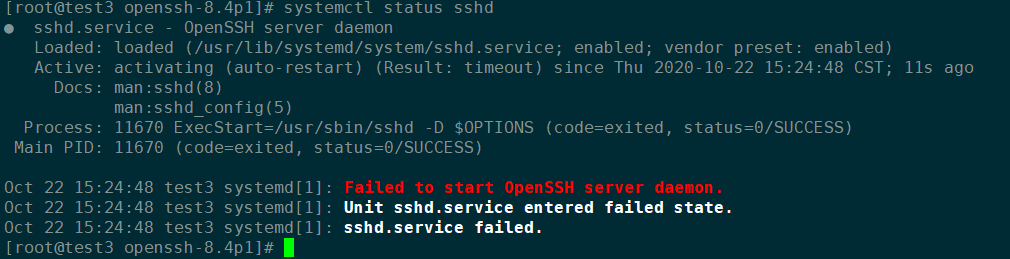
4、启动sshd
直接systemctl start sshd,启动不起来,报错,但用sshd -t检查也没有啥错误,就提示timeout
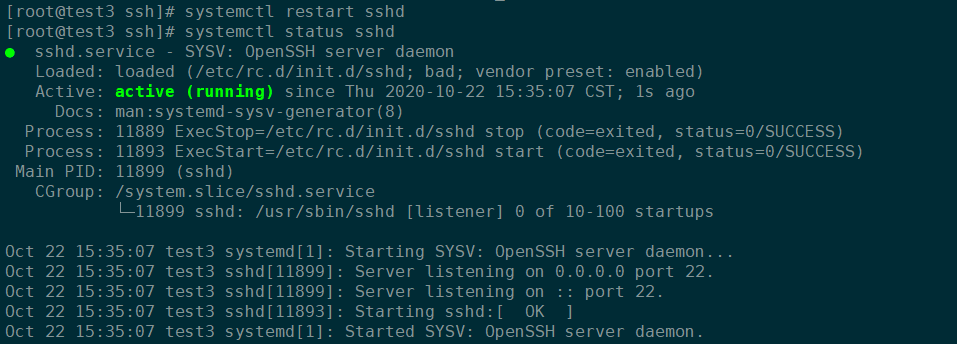
问题解决:先停掉sshd服务,将systemctl原服务器删除,使用安装包里自带的sshd.init,复制到/etc/init.d/sshd,重启即可
systemctl stop sshd.service
rm -rf /lib/systemd/system/sshd.service
systemctl daemon-reload
cp /usr/local/src/openssh-8.4p1/contrib/redhat/sshd.init /etc/init.d/sshd
/etc/init.d/sshd restart
systemctl status sshd
启动不起来,可以使用/etc/init.d/sshd restart重启即可
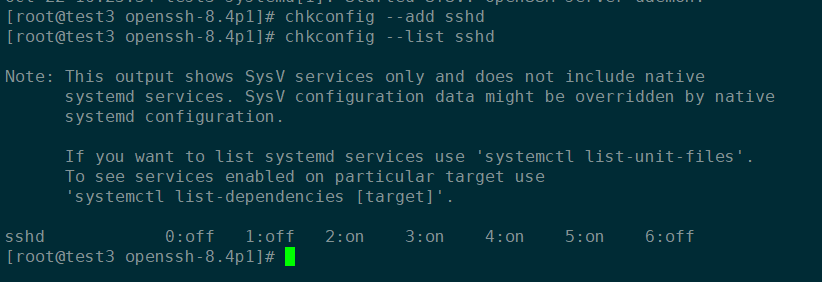
添加开机启动
chkconfig --add sshd
chkconfig --list sshd
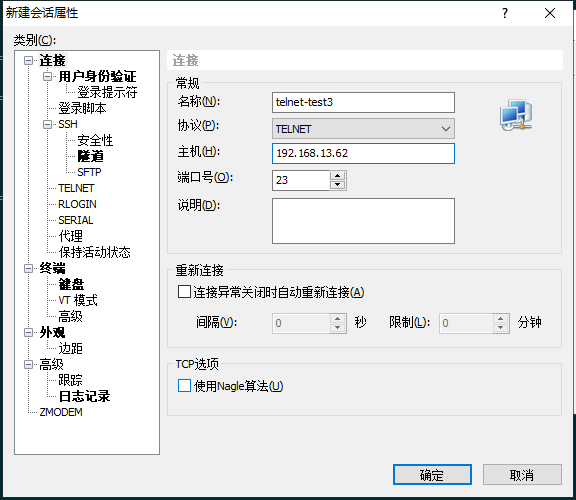
5、为了防止升级失败,可以在升级之前安装telnet服务,通过Telnet连接服务器进行升级
5.1、安装telnet-server以及xinetd
yum install xinetd telnet-server -y
vim /etc/xinetd.d/telnet
service telnet
{
    disable = yes
    flags       = REUSE
    socket_type = stream
    wait        = no
    user        = root
    server      = /usr/sbin/in.telnetd
    log_on_failure  += USERID
}
配置telnet登录的终端类型,在/etc/securetty文件末尾增加一些pts终端,如下
vim /etc/securetty
pts/0
pts/1
pts/2
pts/3
tail -5 /etc/securetty
xvc0
pts/0
pts/1
pts/2
pts/3
systemctl enable xinetd
systemctl enable telnet.socket
systemctl start telnet.socket
systemctl start xinetd
netstat -lntp|grep 23
netstat可能会报错,原因是没有安装net-tools工具包
yum install net-tools -y
再次查看

切换到telnet方式登录,以后的操作都在telnet终端下操作,防止ssh连接意外中断造成升级失败

5.2、删除Telnet服务
systemctl disable xinetd.service
systemctl stop xinetd.service
systemctl disable telnet.socket
systemctl stop telnet.socket
netstat -lntp
卸载yum remove telnet-server xinetd -y