首先声明我是一个菜鸟。下面也只是我个人的见解。
我觉得不管学习什么,要把握三个大的方向,一是,这个东东是什么,二是,这个东东怎么用,三是这个这个东东为什么这样用。
因为我也是一个初学者,对于第三个境界还达不到,只能勉强达到前面的两个。下面介绍一下fragment!
1.从网上看到,Fragment的出现是为了解决一个APP可以同时适应手机和平板而产生的,可以把他理解为Activity的界面的组成部分。
换句话说,再用到Fragment时,把Activity界面想象成是由Fragment以及其他控件组成的,你可以通过对Fragment的修改(比如动态添加,替换,删除某个fragment),完善相应功能。
2.如果你会使用了,上面说的就没什么用了,因为每个人的理解都不一样,还是说最关键的怎么使用吧!
在使用之前必须了解一下Fragment的生命周期,
Fragment必须依存于Activity的,Activity生命周期会直接影响到Fragmnet 的生命周期。
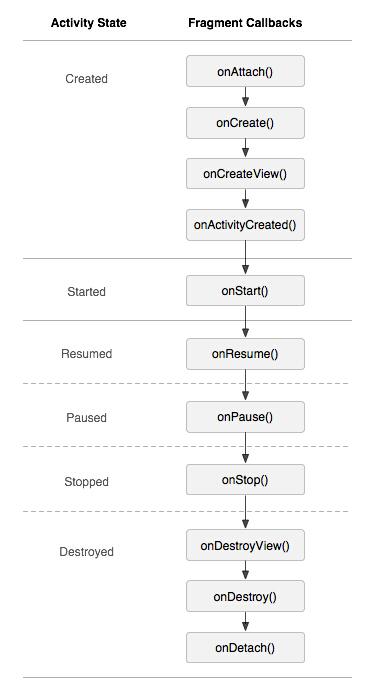
然后对他的生命周期简单了解:
onAttach(Activity) //这个是Fragment与Activity关联时调用,attach的汉语意思是伴随,从属,联在一起。
onCreateView() //创建Fragment视图
onActivityCreated() //当Activity中onCreated()方法返回时调用
onDestory() //当Fragment被移除时调用
onDetach() //当Activity和Fragment取消关联时调用
第一步:先在Activity布局文件中添加FragmentLayout,正常设置id,layout_height,layout_weight即可(这里添加Fragment也可以但是跟Fragment是有区别的,这个自己去查一下吧,属于细节)
<?xml version="1.0" encoding="utf-8"?>
<LinearLayout xmlns:android="http://schemas.android.com/apk/res/android"
        android:orientation="vertical" android:layout_width="match_parent"
        android:layout_height="match_parent">
        <FrameLayout
            android:id="@+id/frame"
            android:layout_weight="9"
            android:layout_height="wrap_content"
            android:layout_width="match_parent"/>
        <LinearLayout
            android:layout_weight="1"
            android:layout_width="match_parent"
            android:layout_height="wrap_content"
            android:orientation="horizontal">
            <TextView
                android:id="@+id/tv_boke"
                android:layout_width="wrap_content"
                android:layout_height="match_parent"
                android:layout_weight="1"
                android:gravity="center"
                android:text="博客"/>
            <TextView
                android:id="@+id/tv_friend"
                android:layout_width="wrap_content"
                android:layout_height="match_parent"
                android:layout_weight="1"
                android:gravity="center"
                android:text="好友"/>
            <TextView
                android:id="@+id/tv_setting"
                android:layout_width="wrap_content"
                android:layout_height="match_parent"
                android:layout_weight="1"
                android:gravity="center"
                android:text="设置"/>
        </LinearLayout>
    </LinearLayout>

第二步,添加Fragment类继承Fragment,并重写OnCreateView方法,我这里添加了三个,分别对应上面的博客,好友,设置
BokeFragment
package com.example.administrator.fragment;

import android.app.Fragment;
import android.os.Bundle;
import android.support.annotation.Nullable;
import android.view.LayoutInflater;
import android.view.View;
import android.view.ViewGroup;
/**
 * Created by Administrator on 2017-08-21 .
 */
public class BokeFragment extends Fragment {
    @Nullable
    @Override
    public View onCreateView(LayoutInflater inflater,ViewGroup container, Bundle savedInstanceState) {
        return inflater.inflate(R.layout.boke,container,false);
    }
}
FriendFragment
package com.example.administrator.fragment;
import android.app.Fragment;
import android.os.Bundle;
import android.support.annotation.Nullable;
import android.view.LayoutInflater;
import android.view.View;
import android.view.ViewGroup;
/**
 * Created by Administrator on 2017-08-21 .
 */
public class FriendFragment extends Fragment {
    @Nullable
    @Override
    public View onCreateView(LayoutInflater inflater, @Nullable ViewGroup container, Bundle savedInstanceState) {
        return inflater.inflate(R.layout.friend,container,false);
    }
}
SettingFragment
package com.example.administrator.fragment;

import android.app.Fragment;
import android.os.Bundle;
import android.support.annotation.Nullable;
import android.view.LayoutInflater;
import android.view.View;
import android.view.ViewGroup;
/**
 * Created by Administrator on 2017-08-21 .
 */

public class SettingFragment extends Fragment {
    @Nullable
    @Override
    public View onCreateView(LayoutInflater inflater, @Nullable ViewGroup container, Bundle savedInstanceState) {
        return inflater.inflate(R.layout.setting,container,false);
    }
}
第三步:设置每个Fragment对应的布局;这里我列举一个博客的就OK,好友和设置跟博客的类似。
boke.xml
<?xml version="1.0" encoding="utf-8"?>
<LinearLayout xmlns:android="http://schemas.android.com/apk/res/android"
    android:orientation="vertical" android:layout_width="match_parent"
    android:layout_height="match_parent">

    <TextView
        android:layout_width="match_parent"
        android:layout_height="match_parent"
        android:gravity="center"
        android:layout_gravity="center"
        android:text="我是痴王,我会加油!"
        android:textAlignment="center"
        android:textColor="#FF0000" />

</LinearLayout>
第四步就是在Activity中对Fragment做需要的操作。
package com.example.administrator.fragment;
import android.app.Fragment;
import android.support.v4.app.FragmentManager;
import android.support.v4.app.FragmentTransaction;
import android.support.v7.app.AppCompatActivity;
import android.os.Bundle;
import android.view.View;
import android.widget.TextView;
public class MainActivity extends AppCompatActivity implements View.OnClickListener {
private TextView boke;
private TextView friend;
private TextView setting;
private BokeFragment bokefragment;
private FriendFragment friendfragment;
private SettingFragment settingfragment;
@Override
protected void onCreate(Bundle savedInstanceState) {
super.onCreate(savedInstanceState);
setContentView(R.layout.activity_main);
boke = (TextView) findViewById(R.id.tv_boke);
friend = (TextView) findViewById(R.id.tv_friend);
setting = (TextView) findViewById(R.id.tv_setting);
boke.setOnClickListener(this);
friend.setOnClickListener(this);
setting.setOnClickListener(this);
}
public void onClick(View view){
android.app.FragmentManager fm = getFragmentManager();
android.app.FragmentTransaction transaction = fm.beginTransaction();
switch (view.getId()){
case R.id.tv_boke:
bokefragment = new BokeFragment();
transaction.replace(R.id.frame,bokefragment);
break;
case R.id.tv_friend:
friendfragment = new FriendFragment();
transaction.replace(R.id.frame,friendfragment);
break;
case R.id.tv_setting:
settingfragment = new SettingFragment();
transaction.replace(R.id.frame,settingfragment);
break;
}
transaction.commit();
}
}
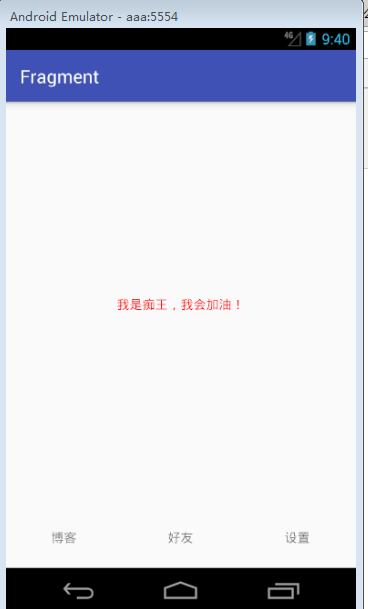
下面是运行结果
不会弄动态的图片,有人教教我吗?我就搞两个静态的图片吧
1.点击博客出现的结果:
2.点击好友出现的界面:
