搞理论之前先把identity配置起来。
1、新建一个mvc项目
2、引入Identity.EntityFrameworkCore,EntityFrameworkCore,EntityFrameworkCore.sqlserver,EntityFrameworkCore.Tools
3、配置数据库连接
4、配置数据库上下文
1、配置数据库连接
 "ConnectionStrings": {
    "conn": "Data Source=127.0.0.1;User ID=sa;Password=62;database=IdentityTest;Connect Timeout=30;Encrypt=False;TrustServerCertificate=False;ApplicationIntent=ReadWrite;MultiSubnetFailover=False"
  }
2、注入管道
  services.AddDbContext<ApplicationDbContext>(options =>
            {
                //配置文件前面必须是;ConnectionStrings
                //因为默认是:GetSection("ConnectionStrings")[name].
                 options.UseSqlServer(Configuration.GetConnectionString("conn"));
                //options.UseSqlServer(Configuration["Data:DefaultConnection:ConnectionString"]));
            });

            services.AddIdentity<ApplicationUser, ApplicationRole>()
                .AddEntityFrameworkStores<ApplicationDbContext>()
                .AddDefaultTokenProviders();
3、配置数据库上下文
namespace IdentityTest.Data
{
    public class ApplicationDbContext : IdentityDbContext<ApplicationUser>
    {
        public ApplicationDbContext(DbContextOptions<ApplicationDbContext> options) : base(options)
        {

        }
    }
}
4、新增相关模型类
 public class ApplicationRole: IdentityRole
    {
    }
  public class ApplicationUser: IdentityUser
    {
    }
 public class RegisterViewModel
    {
        public string UserName { get; set; }

        public string PassWord { get; set; }
    }
5、新增Login的Controller
 public class LoginController : Controller
    {
        private readonly UserManager<ApplicationUser> _userManager;
        private readonly SignInManager<ApplicationUser> _signinManager;
        public LoginController(UserManager<ApplicationUser> userManager, SignInManager<ApplicationUser> signinManager)
        {
            _userManager = userManager;
            _signinManager = signinManager;
        }
        public IActionResult Index()
        {
            return View();
        }

        [HttpPost]
        public async Task<IActionResult> Register(RegisterViewModel model)
        {
            var identityUser = new ApplicationUser
            {
                UserName = model.UserName,
                PasswordHash = model.PassWord,
                NormalizedEmail = model.UserName
            };

            var identityResult = await _userManager.CreateAsync(identityUser, model.PassWord);
            if (identityResult.Succeeded)
            {
                return RedirectToAction("Index", "Home");
            }
            return View();
        }

    }
6、新增Index.cshtml的注册页面
<div>

    <form asp-controller="Login" asp-action="Register" method="post">

        <div>

            <label class="control-label">用户名</label>

            <input class="form-control" type="text" name="UserName" />

        </div>

        <div>

            <label class="control-label">密码</label>

            <input class="form-control" type="password" name="PassWord" />

        </div>

        <div class="form-group">

            <input type="submit" value="登录" class="btn btn-primary" />

        </div>
    </form>

</div>
7、数据库迁移,控制台执行如下命令
1、 Add-Migration
2、 Update-Database
8、执行完后数据库会生成如下表
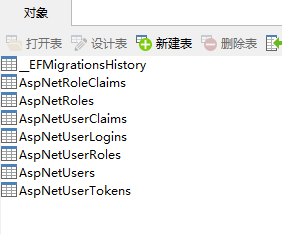
9、运行注册页面点击注册成功后,数据库注册表会生成一条test的账户,就此,identity的配置就成功了
