2019-10-31
关键字:SwitchButton、状态开关
完整源码在文末。
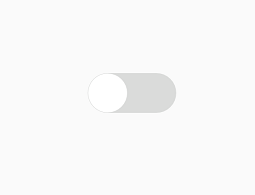
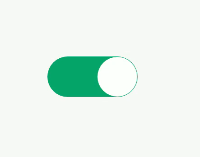
状态切换开关就是是一个拥有两种或多种状态的开关按钮,可以通过单击来改变状态的View。如下图:
虽然Android官方也有提供了一个 SwitchButton 可以提供两种状态之间的切换,但官方嘛,向来是只追求实用,在视觉效果上自然是差强人意。
想要一个既实用又美观的 SwitchButton,还是自己动手,丰衣足食的好啊。下面就记录一下笔者通过自定义View 的方式来实现上图中的SwitchButton。
1、厘需求
在动手写代码之前,先要充分厘清我们的需求。只有有了明确的目标才不会在前进过程中迷失方向。
首先笔者这个开关只有两种状态:
1、关闭状态
2、开启状态
整个View呈现一个狭长的椭圆形状,里头有一个白色小圆圈用于指示开关状态。当这个小圆圈位于View左侧时表示当前处于“关闭”状态,同时View的背景以灰色显示。当小圆圈处于View右侧时表示当前处于“开启”状态,同时View的背景以草绿色表示。
以上是View的静态需求。
动态需求则是当View的任意位置被点击时,即自动切换到与当前状态相反的状态。同时还支持在状态切换过程中再次点击也可以立即响应再切换到另外一个状态,这种现象用语言比较难描述,直接看下动图:
2、UI准备
UI 准备其实没啥,因为这个 View 完全不需要任何外部图片,只用Android的画笔就能实现。
唯一需要准备的就是几种颜色值了。
如上效果图所示,灰色背景所使用的颜色值为:
<color name="view_switchbtn_shape">#dadbda</color>
草绿色背景的颜色值为:
<color name="view_switchbtn_green_bg">#14b96d</color>
白色小圆圈的颜色值为默认白,即纯白色:
android.R.color.white
3、写代码
我们的这个View是一个纯粹的自定义View,它不是通过组合其它View或图片或加载.xml来实现的,而是通过继承 android.view.View 类自行绘制实现的。
首先,我们根据上面厘出来的需求可以知道,我们至少需要三支画笔:
1、外形画笔
2、绿色背景画笔
3、小圆圈画笔
这三支画笔的实现如下所示:
private Paint shapePainter;
private Paint greenBgPainter;
private Paint circlePainter;

shapePainter = new Paint();
shapePainter.setColor(ResourcesManager.getColor(R.color.view_switchbtn_shape));
shapePainter.setAntiAlias(true);

greenBgPainter = new Paint();
greenBgPainter.setColor(ResourcesManager.getColor(R.color.view_switchbtn_green_bg));
greenBgPainter.setAntiAlias(true);
greenBgPainter.setStyle(Paint.Style.FILL);

circlePainter = new Paint();
circlePainter.setAntiAlias(true);
circlePainter.setColor(ResourcesManager.getColor(android.R.color.white));
上面代码中的 ResourManager 其实就是简单地封装了 Context.getResource 而已,就不贴出它的代码了。
其次,由于灰色背景和绿色背景都属于圆角矩形,因此我们还需要为它们分别定义 RectF 实例:
private RectF shapeRecf;
private RectF greenRecf;

shapeRecf = new RectF();
greenRecf = new RectF();
而它们的尺寸则需要在View自身的尺寸被确定之后才能计算,即得在 onMeasure() 方法里去设置值:
@Override
protected void onMeasure(int widthMeasureSpec, int heightMeasureSpec) {
    super.onMeasure(widthMeasureSpec, heightMeasureSpec);

    int specWidthSize = MeasureSpec.getSize(widthMeasureSpec);//宽
    int specHeightSize = MeasureSpec.getSize(heightMeasureSpec);//高

    circleRadius = (float)specHeightSize / 2 - 1;
    cy = (float)specHeightSize / 2;
    cx = circleRadius + 1;

    shapeRecf.left = 0;
    shapeRecf.top = 0;
    shapeRecf.right = specWidthSize;
    shapeRecf.bottom = specHeightSize;

    greenRecf.left = shapeRecf.left;
    greenRecf.top = shapeRecf.top;
    greenRecf.bottom = shapeRecf.bottom;

    middleHori = (float)specWidthSize / 2;
    moveDistance = (float)specWidthSize / (float)(SWITCH_DURATION_MS / SWITCH_MOVING_INTERVAL);

    setMeasuredDimension(specWidthSize, specHeightSize);
}
关注上面红色加粗部分的代码。其中由于绿色背景的宽度是需要跟着小圆圈走的,需要动态计算,因此 greenRecf 的 right 值需要放到 onDraw() 中计算。
然后是定义小圆圈的位置:
@Override
protected void onMeasure(int widthMeasureSpec, int heightMeasureSpec) {
    super.onMeasure(widthMeasureSpec, heightMeasureSpec);

    int specWidthSize = MeasureSpec.getSize(widthMeasureSpec);//宽
    int specHeightSize = MeasureSpec.getSize(heightMeasureSpec);//高

    circleRadius = (float)specHeightSize / 2 - 1;
    cy = (float)specHeightSize / 2;
    cx = circleRadius + 1;

    shapeRecf.left = 0;
    shapeRecf.top = 0;
    shapeRecf.right = specWidthSize;
    shapeRecf.bottom = specHeightSize;

    greenRecf.left = shapeRecf.left;
    greenRecf.top = shapeRecf.top;
    greenRecf.bottom = shapeRecf.bottom;

    middleHori = (float)specWidthSize / 2;
    moveDistance = (float)specWidthSize / (float)(SWITCH_DURATION_MS / SWITCH_MOVING_INTERVAL);

    setMeasuredDimension(specWidthSize, specHeightSize);
}
同样关注上面红色加粗部分的代码。
circleRadius 即是白色小圆圈的半径,它的值应该是灰色背景即整个View的高度的一半,但为了增加效果体验,将它的半径再减小了 1 个 pixel。同学们有兴趣的话可以试一下,看看减了1个像素点和没减像素点的效果差异。笔者这边是坚决拥护要减去至少一个像素点的做法的。
然后就是定义小圆圈的圆心坐标 cx, cy 了。按钮默认处于关闭状态,故默认圆心位于视图起始位置。这里同样需要注意 cx 要空出1个像素点的距离来。
接下来就是绘制这个按钮了。
@Override
protected void onDraw(Canvas canvas) {
    super.onDraw(canvas);
    greenRecf.right = cx + circleRadius + 1;
    if(cx <= circleRadius + 3){
        greenBgPainter.setColor(ResourcesManager.getColor(android.R.color.transparent));
    }else{
        greenBgPainter.setColor(ResourcesManager.getColor(R.color.view_switchbtn_green_bg));
    }

    canvas.drawRoundRect(shapeRecf, ROUND_CORNER_RADIUS, ROUND_CORNER_RADIUS, shapePainter);
    canvas.drawRoundRect(greenRecf, ROUND_CORNER_RADIUS, ROUND_CORNER_RADIUS, greenBgPainter);
    canvas.drawCircle(cx, cy, circleRadius, circlePainter);
}
绘制就简单了,绿色背景的 right 值就是跟着白色小圆圈跑的。同时,因为绿色背景与灰色背景的高度一样,并且白色小圆圈没有填满整个高度,这样就会造成开关处于关闭状态时能看到小圆圈外有一层绿色圆环,这种体验不好。因此笔者这里加了一个条件判断,当开关处于关闭状态时,将绿色背景的颜色直接变成透明色。
效果出其的好。
在将白色小圆圈的圆心坐标和绿色背景的 right 值准备好以后就可以绘制了。如上代码所示,首先绘制最外层灰色背景,其次是绿色背景,最后才是白色小圆圈。上面的 ROUND_CORNER_RADIUS 的值为整个视图高度的一半,大家自行设定或调试即可。
以上是静态部分。
动态部分则是要处理View的点击切换事件与效果。
首先我们得拦截掉View自身的 setOnClickListener 方法,不要让用户使用这些老掉牙的方法:
@Override
public void setOnClickListener(@Nullable OnClickListener l) {
    Logger.i(TAG, "Cannot set click listener in this view.");
}

@Override
public void setOnTouchListener(OnTouchListener l) {
}

@Override
public void setOnLongClickListener(@Nullable OnLongClickListener l) {
}
做法很简单,直接重写这几个方法,然后置空即可。如果想要增强些体验,可以再加些提示信息。
然后在这个自定义View的构造方法里主动设置 OnClickedListener 事件的监听:
public SwitchButton(Context context, AttributeSet attrs) {
    super(context, attrs);

    ...

super.setOnClickListener(this);
}
这个做法是有点骚,相当于强行拦截了View原本的点击事件,只给自己用:
@Override
public void onClick(View v) {
    // 1.检查当前的状态
    // 2.切换到另一状态
    // 3.通知状态切换结果
}
然后不要忘记要开放出自己的事件监听接口出来,不然用户就没法知道状态切换结果了:
public void setOnToggleSwitchListener(OnToggleSwitchListener listener){
    this.listener = listener;
}

public interface OnToggleSwitchListener {
    /**
     * 开关拨到左边是未选中状态,拨到右边是选中状态。
     * 没有中间态。
     * */
    void onToggleSwitched(boolean isSwitched);
}
好,事件监听的问题解决了。下面是切换过程的实现。
所谓切换过程,就是不断地改变白色小圆圈的位置,再重绘整个View,进而达到在视觉上小圆圈与绿色背景动态变化的效果。
这里我们需要一个定时器,我们还需要定义整个切换过程动画所持续的时长:
private static final int SWITCH_DURATION_MS = 100;
private static final int SWITCH_MOVING_INTERVAL = 10;
以上是切换动画时长的设定。笔者这里设定的是状态切换动画在 100 毫秒内完成,且每 10 毫秒重绘一下状态。
private class Timer extends CountDownTimer {

    private boolean is2Right;

    private Timer(long millisInFuture, long countDownInterval) {
        super(millisInFuture, countDownInterval);
    }

    private void setDirection(boolean isToRight){
        is2Right = isToRight;
    }

    @Override
    public void onTick(long millisUntilFinished) {
        if(is2Right) {
            cx += moveDistance;
            if(cx > (shapeRecf.right - circleRadius - 1)){
                cx = shapeRecf.right - circleRadius - 1;
            }
        }else{
            cx -= moveDistance;
            if(cx < circleRadius + 1){
                cx = circleRadius + 1;
            }
        }

        invalidate();
    }

    @Override
    public void onFinish() {
        if(is2Right) {
            cx = shapeRecf.right - circleRadius - 1;
        }else{
            cx = circleRadius + 1;
        }

        if(listener != null) {
            listener.onToggleSwitched(is2Right);
        }
    }
}
以上是定时器的实现。整个定时器的责任就是根据设定的方向将小圆圈的圆心坐标不断地改变。上面有一个变量 moveDistance,它就是根据设定的时长、重绘间隔以及View的宽度计算出来的,它的目的就是计算小圆圈每一位置切换时要移动多少距离。
最后,就是View的点击事件的实现了,简单:
@Override
public void onClick(View v) {
    timer.cancel();
    if(isCurrentChecked()) {
        timer.setDirection(false);
    }else{
        timer.setDirection(true);
    }
    timer.start();
}
好了,整个状态切换按钮的思路就是这样子了。
以下是完整源码:
package com.demo.apk.views;

import android.content.Context;
import android.graphics.Canvas;
import android.graphics.Paint;
import android.graphics.RectF;
import android.os.CountDownTimer;
import android.util.AttributeSet;
import android.view.View;

import androidx.annotation.Nullable;

import com.unionman.locator.R;
import com.unionman.locator.utils.Logger;
import com.unionman.locator.utils.ResourcesManager;
import com.unionman.locator.utils.UnitManager;


public class SwitchButton extends View implements View.OnClickListener {

    private static final String TAG = "SwitchButton";

    private static final float ROUND_CORNER_RADIUS = UnitManager.px2dp(9.0f);
    private static final int SWITCH_DURATION_MS = 100;
    private static final int SWITCH_MOVING_INTERVAL = 10;

    private float circleRadius;
    private float cx;
    private float cy;
    private float middleHori;
    private float moveDistance;


    private Paint shapePainter;
    private Paint greenBgPainter;
    private Paint circlePainter;

    private RectF shapeRecf;
    private RectF greenRecf;

    private OnToggleSwitchListener listener;
    private Timer timer;

    public SwitchButton(Context context) {
        this(context, null);
    }

    public SwitchButton(Context context, AttributeSet attrs) {
        super(context, attrs);

        shapePainter = new Paint();
        shapePainter.setColor(ResourcesManager.getColor(R.color.view_switchbtn_shape));
        shapePainter.setAntiAlias(true);

        greenBgPainter = new Paint();
        greenBgPainter.setColor(ResourcesManager.getColor(R.color.view_switchbtn_green_bg));
        greenBgPainter.setAntiAlias(true);
        greenBgPainter.setStyle(Paint.Style.FILL);

        circlePainter = new Paint();
        circlePainter.setAntiAlias(true);
        circlePainter.setColor(ResourcesManager.getColor(android.R.color.white));

        shapeRecf = new RectF();
        greenRecf = new RectF();

        timer = new Timer(SWITCH_DURATION_MS, SWITCH_MOVING_INTERVAL);

        super.setOnClickListener(this);
    }

    @Override
    protected void onMeasure(int widthMeasureSpec, int heightMeasureSpec) {
        super.onMeasure(widthMeasureSpec, heightMeasureSpec);

        int specWidthSize = MeasureSpec.getSize(widthMeasureSpec);//宽
        int specHeightSize = MeasureSpec.getSize(heightMeasureSpec);//高

        circleRadius = (float)specHeightSize / 2 - 1;
        cy = (float)specHeightSize / 2;
        cx = circleRadius + 1;

        shapeRecf.left = 0;
        shapeRecf.top = 0;
        shapeRecf.right = specWidthSize;
        shapeRecf.bottom = specHeightSize;

        greenRecf.left = shapeRecf.left;
        greenRecf.top = shapeRecf.top;
        greenRecf.bottom = shapeRecf.bottom;

        middleHori = (float)specWidthSize / 2;
        moveDistance = (float)specWidthSize / (float)(SWITCH_DURATION_MS / SWITCH_MOVING_INTERVAL);

        setMeasuredDimension(specWidthSize, specHeightSize);
    }

    @Override
    protected void onDraw(Canvas canvas) {
        super.onDraw(canvas);
        greenRecf.right = cx + circleRadius + 1;
        if(cx <= circleRadius + 3){
            greenBgPainter.setColor(ResourcesManager.getColor(android.R.color.transparent));
        }else{
            greenBgPainter.setColor(ResourcesManager.getColor(R.color.view_switchbtn_green_bg));
        }


        canvas.drawRoundRect(shapeRecf, ROUND_CORNER_RADIUS, ROUND_CORNER_RADIUS, shapePainter);
        canvas.drawRoundRect(greenRecf, ROUND_CORNER_RADIUS, ROUND_CORNER_RADIUS, greenBgPainter);
        canvas.drawCircle(cx, cy, circleRadius, circlePainter);
    }

    @Override
    public void setOnClickListener(@Nullable OnClickListener l) {
        Logger.i(TAG, "Cannot set click listener in this view.");
    }

    @Override
    public void setOnTouchListener(OnTouchListener l) {

    }

    @Override
    public void setOnLongClickListener(@Nullable OnLongClickListener l) {

    }

    public void setOnToggleSwitchListener(OnToggleSwitchListener listener){
        this.listener = listener;
    }

    @Override
    public void onClick(View v) {
        timer.cancel();
        if(isCurrentChecked()) {
            timer.setDirection(false);
        }else{
            timer.setDirection(true);
        }
        timer.start();
    }

    /**
     * @return  true means the button in 'checked' status.
     * */
    public boolean isCurrentChecked(){
        return cx > middleHori;
    }

    private class Timer extends CountDownTimer {

        private boolean is2Right;

        private Timer(long millisInFuture, long countDownInterval) {
            super(millisInFuture, countDownInterval);
        }

        private void setDirection(boolean isToRight){
            is2Right = isToRight;
        }

        @Override
        public void onTick(long millisUntilFinished) {
            if(is2Right) {
                cx += moveDistance;
                if(cx > (shapeRecf.right - circleRadius - 1)){
                    cx = shapeRecf.right - circleRadius - 1;
                }
            }else{
                cx -= moveDistance;
                if(cx < circleRadius + 1){
                    cx = circleRadius + 1;
                }
            }

            invalidate();
        }

        @Override
        public void onFinish() {
            if(is2Right) {
                cx = shapeRecf.right - circleRadius - 1;
            }else{
                cx = circleRadius + 1;
            }

            if(listener != null) {
                listener.onToggleSwitched(is2Right);
            }
        }
    }

    public interface OnToggleSwitchListener {
        /**
         * 开关拨到左边是未选中状态,拨到右边是选中状态。
         * 没有中间态。
         * */
        void onToggleSwitched(boolean isSwitched);
    }

}