In earlier versions of Windows, TLS cipher suites and elliptical curves were configured by using a single string:


Best Practice会自动把一些比较弱的cipher排除掉

TLS Handshake Protocol
Establishing a Secure Session by Using TLS
The TLS Handshake Protocol involves the following steps:
- The client sends a "Client hello" message to the server, along with the client's random value and supported cipher suites.
- The server responds by sending a "Server hello" message to the client, along with the server's random value.
- The server sends its certificate to the client for authentication and may request a certificate from the client. The server sends the "Server hello done" message.
- If the server has requested a certificate from the client, the client sends it.
- The client creates a random Pre-Master Secret and encrypts it with the public key from the server's certificate, sending the encrypted Pre-Master Secret to the server.
- The server receives the Pre-Master Secret. The server and client each generate the Master Secret and session keys based on the Pre-Master Secret.
- The client sends "Change cipher spec" notification to server to indicate that the client will start using the new session keys for hashing and encrypting messages. Client also sends "Client finished" message.
- Server receives "Change cipher spec" and switches its record layer security state to symmetric encryption using the session keys. Server sends "Server finished" message to the client.
- Client and server can now exchange application data over the secured channel they have established. All messages sent from client to server and from server to client are encrypted using session key.

点击ClientHello那个请求,可以展开看Transport Security Layer

TLS Security 5: Establishing a TLS Connection
The process of establishing a secure SSL/TLS connection involves several steps. SSL/TLS security protocols use a combination of asymmetric and symmetric encryption. The client and the server must negotiate the algorithms used and exchange key information.
For the purpose of explaining this complex process, we use a TLS 1.2 connection, not the most recent TLS 1.3 protocol. The process used in TLS 1.2 was almost the same for all previous versions of SSL/TLS. However, it was greatly simplified in the latest version of Transport Layer Security.
The most important part of establishing a secure connection is called the handshake. During the TLS Handshake, the server and the client exchange important information used to determine connection properties. This example is based on a web browser handshake, but the same applies to all other SSL/TLS handshakes.
Step 1: Client Hello (Client → Server)
Step 2: Server Hello (Server → Client)
Step 3: Server Certificate (Server → Client)
The server now sends a signed TLS/SSL certificate that proves its identity to the client. It also contains the public key of the server.
Step 4: Client Certificate (Client → Server, Optional)
In rare cases, the server may require the client to be authenticated with a client certificate. If so, the client provides its signed certificate to the server.
Step 5: Server Key Exchange (Server → Client)
The server key exchange message is sent only if the certificate provided by the server is not sufficient for the client to exchange a pre-master secret. (This is true for DHE_DSS, DHE_RSA, and DH_anon).
Step 6: Server Hello Done (Server → Client)
he server sends this to the client to confirm that the Server Hello message is finished.
Step 7: Client Key Exchange (Server → Client)
Step 8: Client Change Cipher Spec (Client → Server)
Step 9: Client Handshake Finished (Client → Server)
Step 10: Server Change Cipher Spec (Server → Client)
The server is also ready to switch to an encrypted environment. Any data sent by the server from now on will be encrypted using the symmetric shared key.
Step 11: Server Handshake Finished (Server → Client)
The request was aborted: Could not create SSL/TLS secure channel
You need to create a system.net log for your app. You will need to create a myapp.exe.config config file and put the following into it.
<?xml version="1.0" encoding="UTF-8"?>

<configuration>
    <system.diagnostics>
        <trace autoflush="true" />
        <sources>
            <source name="System.Net">
                <listeners>
                    <add name="System.Net" />
                </listeners>
            </source>
            <source name="System.Net.Sockets">
                <listeners>
                    <add name="System.Net" />
                </listeners>
            </source>
            <source name="System.Net.Cache">
                <listeners>
                    <add name="System.Net" />
                </listeners>
            </source>
        </sources>
        <sharedListeners>
            <add
                name="System.Net"
                type="System.Diagnostics.TextWriterTraceListener"
                initializeData="System.Net.trace.log"
            />
        </sharedListeners>
        <switches>
            <add name="System.Net" value="Verbose" />
            <add name="System.Net.Sockets" value="Verbose" />
            <add name="System.Net.Cache" value="Verbose" />
        </switches>
    </system.diagnostics>
</configuration>
If you run with this config file, it will create a logfile called system.net.trace.log. That file will have more details on why this is failing.
How to enable Schannel event logging in Windows and Windows Server
When you enable Schannel event logging on a machine that is running any version of Windows listed in the "applies to" section of this article, detailed information from Schannel events can be written to the Event Viewer logs, in particular the System event log. This article describes how to enable and configure Schannel event logging.
Note: This registry key is present already in Windows and Windows Server.
- Start Registry Editor. To do this, click Start, click Run, type regedit, and then click OK.
- Locate the following key in the registry:
HKEY_LOCAL_MACHINESystemCurrentControlSetControlSecurityProvidersSCHANNEL
- Double click the EventLogging key or right click it and select Modify.
Value Name: EventLogging
Data Type: REG_DWORD
Value: See "Logging options" table below - Exit Registry Editor.
- Reboot the machine (Logging does not take effect until after you restart the computer).
Logging options
The default value for Schannel event logging is 0x00000001 in Windows, which means that error messages are logged. Additionally, you can log multiple events by specifying the hexadecimal value that equates to the logging options that you want. This is a combination DWORD, which combines individual values for the desired result. For example, to log error messages (0x00000001) and warnings (0x00000002), set the value to 0x00000003.
| Value | Description |
|---|---|
| 0x0000 | Do not log |
| 0x0001 | Log error messages |
| 0x0002 | Log warnings |
| 0x0003 | Log warnings and error messages |
| 0x0004 | Log informational and success events |
| 0x0005 | Log informational, success events and error messages |
| 0x0006 | Log informational, success events and warnings |
| 0x0007 | Log informational, success events, warnings and error messages (all log levels) |
How to Fix the “SSL Handshake Failed” Error (5 Methods)
4. Verify That Your Server Is Properly Configured to Support SNI
It’s also possible that the SSL handshake failure is being caused by improper Server Name Indication (SNI) configuration. The SNI is what enables a web server to securely host several TLS certificates for one IP address.
Each website on a server has its own certificate. However, if the server isn’t SNI-enabled, that can result in an SSL handshake failure, because the server may not know which certificate to present.
There are a few ways to check and see whether a site requires SNI. One option is to use Qualys’ SSL Server Test, which we discussed in the previous section. Input your site’s domain name, and then click on the Submit button.
On the results page, look for a message that reads “This site works only in browsers with SNI support”:
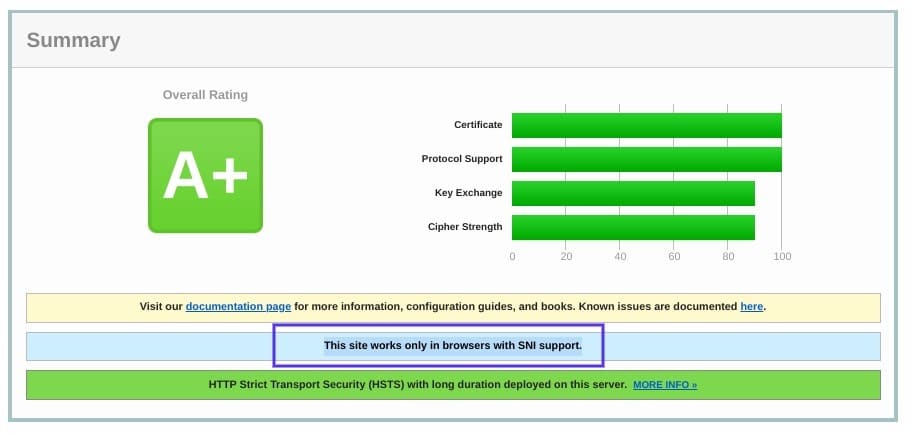
The summary results page of the Qualys SSL checker tool
Another approach for detecting if a server is using SNI is to browse the server names in the ‘ClientHello’ message. This is a more technical process, but it can offer a lot of information.
It involves checking the extended hello header for a ‘server_name’ field, to see if the correct certifications are presented.
If you’re familiar with using tools such as the OpenSSL toolkit and Wireshark, you might find this method preferable. You can use openssl s_client with and without the -servername option:
# without SNI
 $ openssl s_client -connect host:port

 # use SNI
 $ openssl s_client -connect host:port -servername host
If you get two different certificates with the same name, it means that the SNI is supported and properly configured.
However, if the output in the returned certificates is different, or the call without SNI cannot establish an SSL connection, it indicates that SNI is required but not correctly configured. Resolving this issue may require switching to a dedicated IP address.
Cipher Suites in TLS/SSL (Schannel SSP) 各个服务器上的cipher suites
Windows Server 2012 R2 and Windows 8.1: For information about supported cipher suites, see TLS Cipher Suites in Windows 8.1
Windows Server 2012 and Windows 8: For information about supported cipher suites, see TLS Cipher Suites in Windows 8
TLS Cipher Suites in Windows 10 v1903, v1909, and v2004
通过powershell查看系统所支持的cipher suites
https://docs.microsoft.com/en-us/powershell/module/tls/?view=win10-ps
Get-TlsCipherSuite > CipherList.txt
Manage Transport Layer Security (TLS)
Configuring TLS Cipher Suite Order
Different Windows versions support different TLS cipher suites and priority order. See Cipher Suites in TLS/SSL (Schannel SSP) for the default order supported by the Microsoft Schannel Provider in different Windows versions.
You can also modify the list of cipher suites by using CNG functions, see Prioritizing Schannel Cipher Suites for details.
Changes to the TLS cipher suite order will take effect on the next boot. Until restart or shutdown, the existing order will be in effect.
https://www.nartac.com/Products/IISCrypto/Download
IIS Crypto is a free tool that gives administrators the ability to enable or disable protocols, ciphers, hashes and key exchange algorithms on Windows Server 2008, 2012, 2016 and 2019. It also lets you reorder SSL/TLS cipher suites offered by IIS, change advanced settings, implement Best Practices with a single click, create custom templates and test your website.
The request was aborted: Could not create SSL/TLS secure channel when activating
Note that most modern browsers have their own cipher suites. However Internet Explorer relies on Windows' own list. We have set up a page that you can try in Internet Explorer as a before and after:
eventlog里面的日志
A fatal alert was received from the remote endpoint. The TLS protocol defined fatal alert code is 40.
https://docs.microsoft.com/en-us/archive/blogs/kaushal/ssltls-alert-protocol-the-alert-codes
|
40 |
handshake_failure |
Indicates that the sender was unable to negotiate an acceptable set of security parameters given the options available. This is a fatal error. |
How to: Configure network tracing
Configure network tracing
To configure network tracing, add the following lines to the appropriate configuration file. The values and options for these settings are described in the tables below.
需要在输出的log里面直接搜error
System.Net Error: 0 : [11644] Can't retrieve proxy settings for Uri 'https://'. Error code: 12180.
System.Net Error: 0 : [11644] Can't retrieve proxy settings for Uri 'https://'. Error code: 12180.
System.Net Error: 0 : [11644] Exception in HttpWebRequest#33675143:: - The request was aborted: Could not create SSL/TLS secure channel..
System.Net Error: 0 : [11644] Exception in HttpWebRequest#33675143::GetResponse - The request was aborted: Could not create SSL/TLS secure channel..
<configuration>
  <system.diagnostics>
    <sources>
      <source name="System.Net" tracemode="includehex" maxdatasize="1024">
        <listeners>
          <add name="System.Net"/>
        </listeners>
      </source>
      <source name="System.Net.Cache">
        <listeners>
          <add name="System.Net"/>
        </listeners>
      </source>
      <source name="System.Net.Http">
        <listeners>
          <add name="System.Net"/>
        </listeners>
      </source>
      <source name="System.Net.Sockets">
        <listeners>
          <add name="System.Net"/>
        </listeners>
      </source>
      <source name="System.Net.WebSockets">
        <listeners>
          <add name="System.Net"/>
        </listeners>
      </source>
   </sources>
    <switches>
      <add name="System.Net" value="Verbose"/>
      <add name="System.Net.Cache" value="Verbose"/>
      <add name="System.Net.Http" value="Verbose"/>
      <add name="System.Net.Sockets" value="Verbose"/>
      <add name="System.Net.WebSockets" value="Verbose"/>
    </switches>
    <sharedListeners>
      <add name="System.Net"
        type="System.Diagnostics.TextWriterTraceListener"
        initializeData="network.log"
        traceOutputOptions="ProcessId, DateTime"
      />
    </sharedListeners>
    <trace autoflush="true"/>
  </system.diagnostics>
</configuration>
How to troubleshoot SSLTSL or x509 Certificate Validation in .NET
It takes 2sec to find proxy. But since I have no proxy, I disabled it for application. Just add to the <configuration> section next few lines:
<system.net>
 <defaultProxy enabled="false" useDefaultCredentials="false">
  <proxy/>
  <bypasslist/>
  <module/>
 </defaultProxy>
</system.net>
SSL error code -12180 when connecting to secure Webservice
| Cause |
|
| Resolution |
|