一、项目结构
1. 新建一个工程,工程名为:sales_interface_auto
2. 在工程的根目录新建一个py脚本:runAll.py 执行接口自动化的入口,项目工程部署完毕后直接运行该文件即可
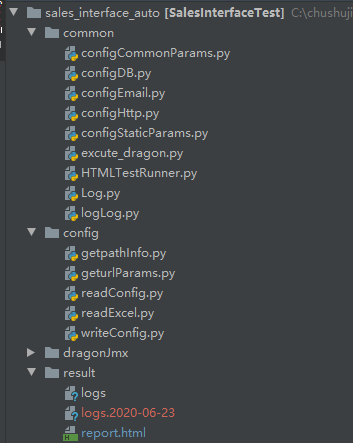
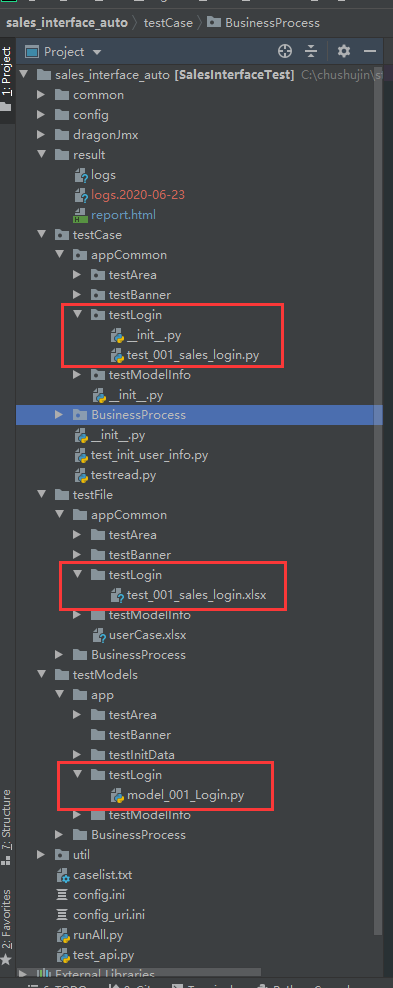
3. 在项目下创建几个package包:
----common:这个包放置一些公共的方法,例如:读取excel,读取mysql,get和post请求的封装,发送Email的封装,读取手机公共参数的封装,Log.py是封装日志的输入
----config:这个包里是放置一些获取根文件夹目录,接口服务器地址,读写配置文件封装的方法
----result: 该包里存放日志,截图,HTML报告
----testCase:这个包放test开头的测试用例,也可以放一些封装接口的方法
----testFile/case:存放excel测试用例
----testModels :存放对应接口脚本的装饰器提取器
----util/generator:接口测试中用到的一些数据的生成,如:身份证号,名字,手机号,随机字符串等
----caselist.txt :顺序存放testCase中test打头的用例,切记注意顺序,无需执行时,首位加#号即可
----config.ini :这里是配置文件,如邮箱的一些参数,数据库,手机静态参数,以及存放测试过程生成的参数
----config_url.ini:这里是配置文件,存放接口地址
二、详细介绍个目录
1.runAll.py
源码如下:
import os
import common.HTMLTestRunner as HTMLTestRunner
from config import readConfig, getpathInfo
import unittest
from common.configEmail import send_email
import common.Log
from testCase.test_init_user_info import InitUserInfo
from config import readConfig as readConfig, writeConfig as writeConfig, readExcel, geturlParams

writeconfig = writeConfig.WriteConfig()


send_mail = send_email()
path = getpathInfo.get_Path()
report_path = os.path.join(path, 'result')
on_off = readConfig.ReadConfig().get_email('on_off')
loggger = common.Log.logger

#定义一个类AllTest
class AllTest:

    # 初始化一些参数和数据
    def __init__(self):

        global resultPath

        # result/report.html
        resultPath = os.path.join(report_path, "report.html")

        # 配置执行哪些测试文件的配置文件路径
        self.caseListFile = os.path.join(path, "caselist.txt")

        # 真正的测试断言文件路径
        self.caseFile = os.path.join(path, "testCase")

        # 初始化一下测试中用到的数据,并存储到配置文件
        self.idno = InitUserInfo().generate_id_no()
        self.c_name = InitUserInfo().generate_c_name()
        self.c_mobile = InitUserInfo().generate_mobile()
        self.caseList = []
        writeconfig.write_potentiall_user_info(self.idno,self.c_name,self.c_mobile)

        loggger.info('resultPath'+resultPath)# 将resultPath的值输入到日志,方便定位查看问题
        loggger.info('caseListFile'+self.caseListFile)
        loggger.info('caseList'+str(self.caseList))


    def set_case_list(self):
        """
        读取caselist.txt文件中的用例名称,并添加到caselist元素组
        :return:
        """
        fb = open(self.caseListFile)
        for value in fb.readlines():
            data = str(value)
            if data != '' and not data.startswith("#"):# 如果data非空且不以#开头
                self.caseList.append(data.replace("
", ""))# 读取每行数据会将换行转换为
,去掉每行数据中的

        fb.close()

    def set_case_suite(self):
        """

        :return:
        """
        self.set_case_list()# 通过set_case_list()拿到caselist元素组
        test_suite = unittest.TestSuite()
        suite_module = []
        for case in self.caseList:# 从caselist元素组中循环取出case
            case_name = case.split("/")[-1]# 通过split函数来将aaa/bbb分割字符串,-1取后面,0取前面
            print(case_name+".py")# 打印出取出来的名称
            # 批量加载用例,第一个参数为用例存放路径,第一个参数为路径文件名
            discover = unittest.defaultTestLoader.discover(self.caseFile, pattern=case_name + '.py', top_level_dir=None)
            suite_module.append(discover)# 将discover存入suite_module元素组
            print('suite_module:'+str(suite_module))
        if len(suite_module) > 0:# 判断suite_module元素组是否存在元素
            for suite in suite_module:# 如果存在,循环取出元素组内容,命名为suite
                for test_name in suite:# 从discover中取出test_name,使用addTest添加到测试集
                    test_suite.addTest(test_name)
        else:
            print('测试套件中无可用的测试用例')
            return None
        return test_suite

    def run(self):
        """
        run test
        :return:
        """
        try:
            suit = self.set_case_suite()#调用set_case_suite获取test_suite
            print('try')
            print(str(suit))
            if suit is not None:#判断test_suite是否为空
                print('if-suit')
                fp = open(resultPath, 'wb')# 打开result/20181108/report.html测试报告文件,如果不存在就创建
                # 调用HTMLTestRunner
                runner = HTMLTestRunner.HTMLTestRunner(stream=fp, title='Test Report', description='Test Description')
                runner.run(suit)
            else:
                print("Have no case to test.")
        except Exception as ex:
            print(str(ex))
            # log.info(str(ex))

        finally:
            print("*********TEST END*********")
            # log.info("*********TEST END*********")
            fp.close()
        # 判断邮件发送的开关
        if on_off == 'on':
            send_mail.outlook()
        else:
            print("邮件发送开关配置关闭,请打开开关后可正常自动发送测试报告")
# pythoncom.CoInitialize()
# scheduler = BlockingScheduler()
# scheduler.add_job(AllTest().run, 'cron', day_of_week='1-5', hour=14, minute=59)
# scheduler.start()

if __name__ == '__main__':
    AllTest().run()
1.1 __init__ 初始化数据
  # 定义全局变量
    global resultPath

    # 取到report.html绝对路径
    resultPath = os.path.join(report_path, "report.html")

    # 拿到caselist.txt的绝对路径
    self.caseListFile = os.path.join(path, "caselist.txt")

    # 拿到testCase的绝对路径
    self.caseFile = os.path.join(path, "testCase")

    # 初始化一下测试中用到的数据,并存储到配置文件
    self.idno = InitUserInfo().generate_id_no()
    self.c_name = InitUserInfo().generate_c_name()
    self.c_mobile = InitUserInfo().generate_mobile()
    self.caseList = []
    writeconfig.write_potentiall_user_info(self.idno,self.c_name,self.c_mobile)
# 将resultPath等的值输入到日志,方便定位查看问题
loggger.info('resultPath'+resultPath)
    loggger.info('caseListFile'+self.caseListFile)
    loggger.info('caseList'+str(self.caseList))


1.2 set_case_list :读取caselist.txt文件中的用例名称,并添加到caselist元素组
read()                  #一次性读取文本中全部的内容,以字符串的形式返回结果

readline()           #只读取文本第一行的内容,以字符串的形式返回结果

readlines()          #读取文本所有内容,并且以数列的格式返回结果,一般配合for in使用
# 打开caselist.txt文件,
fb = open(self.caseListFile)

for value in fb.readlines():
    data = str(value)
# 如果data非空且不以#开头
if data != '' and not data.startswith("#"):
        # 读取每行数据会将换行转换为
,去掉每行数据中的
self.caseList.append(data.replace("
", ""))
fb.close()

1.3  set_case_suite 设置测试套件
# 通过set_case_list()拿到caselist元素组
self.set_case_list()
test_suite = unittest.TestSuite()
suite_module = []

# 从caselist元素组中循环取出case
for case in self.caseList:

    case_name = case
    # 打印出取出来的名称
    print(case_name+".py")
    # 批量加载用例,第一个参数self.caseFile为用例存放路径,第二个参数case_name为路径文件名
    discover = unittest.defaultTestLoader.discover(self.caseFile, pattern=case_name + '.py', top_level_dir=None)
    # 将discover存入suite_module元素组
    suite_module.append(discover)

输出为此模式:找到测试用例文件中的test开头的方法
suite_module:[<unittest.suite.TestSuite tests=[<unittest.suite.TestSuite tests=[<unittest.suite.TestSuite tests=[<paramunittest.TestLogin_0 testMethod=test01case>]>]>]>]
    print('suite_module:'+str(suite_module))

# 判断suite_module元素组是否存在元素
if len(suite_module) > 0:
    # 如果存在,循环取出元素组内容,命名为suite
    for suite in suite_module:
        # 从discover中取出test_name,使用addTest添加到测试集
        for test_name in suite:
            test_suite.addTest(test_name)
else:
    print('测试套件中无可执行的测试用例')
    return None
return test_suite


1.4 run 执行测试用例套件
try:

    # 调用set_case_suite获取test_suite
    suit = self.set_case_suite()
    # print('try')
    # print(str(suit))

    # 判断test_suite是否为空
    if suit is not None:
        # print('if-suit')

        # 打开result/report.html测试报告文件,如果不存在就创建
        fp = open(resultPath, 'wb')
        # 调用HTMLTestRunner
        runner = HTMLTestRunner.HTMLTestRunner(stream=fp, title='UU队长 测试报告', description='测试用例执行结果')

        # 通过HTMLTestRunner的run()方法来运行测试套件中的测试用例,并写入测试报告
        runner.run(suit)
    else:
        print("Have no case to test.")
except Exception as ex:
    print(str(ex))
    # log.info(str(ex))

finally:
    print("*********TEST END*********")
    # log.info("*********TEST END*********")
    fp.close()
# 判断邮件发送的开关
if on_off == 'on':
    send_mail.outlook()
else:
    print("邮件发送开关配置关闭,请打开开关后可正常自动发送测试报告")

2.  readConfig.py  读取配置文件

代码如下:
import os
import configparser
from config import getpathInfo

path = getpathInfo.get_Path()# 项目路径
config_path = os.path.join(path, 'config.ini')# config.ini的绝对路径
config_uri_path = os.path.join(path, 'config_uri.ini')# config_uri.ini的绝对路径
config = configparser.ConfigParser()# 调用外部的读取配置文件的方法
config_uri = configparser.ConfigParser()# 调用外部的读取配置文件的方法
config.read(config_path, encoding='utf-8')
config_uri.read(config_uri_path, encoding='utf-8')

class ReadConfig():


    def get_http(self, name):

        value = config.get('HTTP', name)
        return value
    def get_email(self, name):

        value = config.get('EMAIL', name)
        return value
    def get_mysql(self, name):
        value = config.get('DATABASE', name)
        return value

    def get_static_params(self,name):

        value = config.get("StaticParams",name)
        return value

    def get_interface_uri(self,name):

        value = config_uri.get("URI",name)

        return value

    def get_common_params(self,name):

        path = getpathInfo.get_Path()  # 调用实例化,还记得这个类返回的路径为
        config_path = os.path.join(path, 'config.ini')  # 这句话是在path路径下再加一级,最后变成
        config = configparser.ConfigParser()  # 调用外部的读取配置文件的方法
        config.read(config_path, encoding='utf-8')
        value = config.get("CommonParams",name)
        print(value)
        # logger.info("=========readconfig===="+value)
        return value

    def get_personal_information(self,name):

        value = config.get("PersonalInformation", name)
        # print(value)
        # logger.info("=========readconfig===="+value)
        return value


if __name__ == '__main__':# 测试一下,我们读取配置文件的方法是否可用

    print('HTTP中的baseurl值为:', ReadConfig().get_http('baseurl'))
    print('EMAIL中的开关on_off值为:', ReadConfig().get_email('on_off'))
    print('StaticParams中的开关clientIp值为:', ReadConfig().get_static_params('clientIp'))
2.1 静态调用
# 项目路径
path = getpathInfo.get_Path()

# config.ini的绝对路径
config_path = os.path.join(path, 'config.ini')
# config_uri.ini的绝对路径
config_uri_path = os.path.join(path, 'config_uri.ini')
# 调用外部的读取配置文件的方法
config = configparser.ConfigParser()
config_uri = configparser.ConfigParser()
# utf-8的方式读取配置文件
config.read(config_path, encoding='utf-8')
config_uri.read(config_uri_path, encoding='utf-8')

2.2 具体实现
[StaticParams]
clientmac = 9e:ee:fb:0f:5b:b8
clientdensity = 3.0
latitude = 255
longitude = 255
isjailbroken = 0
jailreason = NO Jail
clientversion = 3.2.5
deviceid = 9e:ee:fb:0f:5b:b8
platform = Android
deviceinfo = {"deviceModel":"MI 5","deviceOs":"23_6.0.1"}
network = wifi
screensize = 1920*1080
clientip = 10.0.3.15
读取代码
class ReadConfig():
  # 封装读取静态参数
    def get_static_params(self,name):

        value = config.get("StaticParams",name)
        return value
3. 写入配置文件
import os,sys
import configparser
from config import getpathInfo

path = getpathInfo.get_Path()# 调用实例化,还记得这个类返回的路径为
config_path = os.path.join(path, 'config.ini')# 这句话是在path路径下再加一级,最后变成
config = configparser.ConfigParser()# 调用外部的读取配置文件的方法
config.read(config_path, encoding='utf-8')

class WriteConfig():


    def write_common_params(self,token,id,username,secret):

        # print(config.options("CommonParams"))

        config.set("CommonParams",'customer_token',token)
        config.set("CommonParams",'user_id',id)
        config.set("CommonParams",'username',username)
        config.set("CommonParams",'secret',secret)
        # logger.info("======writeconfig======"+token)

        with open(config_path,'w',encoding="utf-8") as f:

            config.write(f)
            # sys.stdout.flush()

if __name__ == '__main__':# 测试一下,我们读取配置文件的方法是否可用


     WriteConfig().write_common_params("123","哈哈","1232323")
4. Log.py日志文件
代码如下:
import os
import logging
from logging.handlers import TimedRotatingFileHandler
from config import getpathInfo

path = getpathInfo.get_Path()
log_path = os.path.join(path, 'result')  # 存放log文件的路径


class Logger(object):
    def __init__(self, logger_name='logs…'):
        self.logger = logging.getLogger(logger_name)
        logging.root.setLevel(logging.NOTSET)
        self.log_file_name = 'logs'  # 日志文件的名称
        self.backup_count = 5  # 最多存放日志的数量
        # 日志输出级别
        self.console_output_level = 'WARNING'
        self.file_output_level = 'DEBUG'
        # 日志输出格式
        self.formatter = logging.Formatter('%(asctime)s - %(name)s - %(levelname)s - %(message)s')

    def get_logger(self):
        """在logger中添加日志句柄并返回,如果logger已有句柄,则直接返回"""
        if not self.logger.handlers:  # 避免重复日志
            console_handler = logging.StreamHandler()
            console_handler.setFormatter(self.formatter)
            console_handler.setLevel(self.console_output_level)
            self.logger.addHandler(console_handler)

            # 每天重新创建一个日志文件,最多保留backup_count份
            file_handler = TimedRotatingFileHandler(filename=os.path.join(log_path, self.log_file_name), when='D',
                                                    interval=1, backupCount=self.backup_count, delay=True,
                                                    encoding='utf-8')
            file_handler.setFormatter(self.formatter)
            file_handler.setLevel(self.file_output_level)
            self.logger.addHandler(file_handler)
        return self.logger


logger = Logger().get_logger()
5. 装饰器提取响应,类似Java中的getter和setter方法
__author__ = 'csjin'

# 定义@property装饰器
class Login(object):

    @property
    def code(self):

        return self.__code

    @code.setter
    def code(self,code):

        self.__code = code

    @property
    def msg(self):

        return self.__msg

    @msg.setter
    def msg(self,msg):

        self.__msg = msg

    @property
    def customer_token(self):

        return self.__token

    @customer_token.setter
    def customer_token(self,token):

        self.__token = token