MySQL安装的三种方式
Mysql安装方式对比
| 安装方式 | 安装简易度 | 使用简易度 | 定制化程度 | 适合范围 |
|---|---|---|---|---|
| rpm包安装 | 简单 | 简单 | 低 | 仅适合redhat/centos系列linux |
| 二进制安装 | 安装简单,配置稍微复杂 | 中,需要自己管理起停 | 中 | 适合大部分Linux |
| mysql编译安装 | 复杂 | 复杂 | 高 | 几乎所有Linux, 以及自己需要特定模块的场景 |
环境说明
- 时间: 2017年8月6号
- 系统: CentOS-6.9-x86_64 最小化安装
- Mysql版本: 5.7.19
- 原创作品,允许转载,转载时请务必以超链接形式标明文章 原始出处 、作者信息和本声明。否则将追究法律责任。
- 您的点赞将会是我最大的动力。谢谢
RPM安装
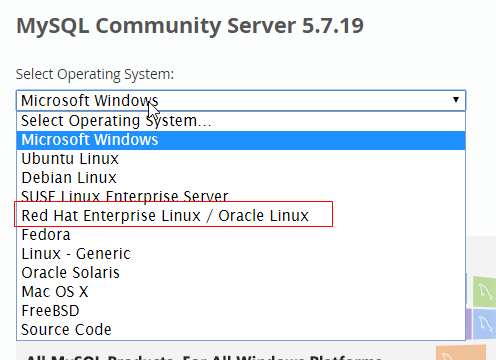
1、下载
- 下载地址: https://dev.mysql.com/downloads/mysql/
- 下载方式

2、安装
- 上传至服务器任意位置
[root@mysql ~]# ls -lh
total 181M
-rw-------. 1 root root 1.1K Jul 15 18:29 anaconda-ks.cfg
-rw-r--r--. 1 root root 9.7K Jul 15 18:29 install.log
-rw-r--r--. 1 root root 3.3K Jul 15 18:29 install.log.syslog
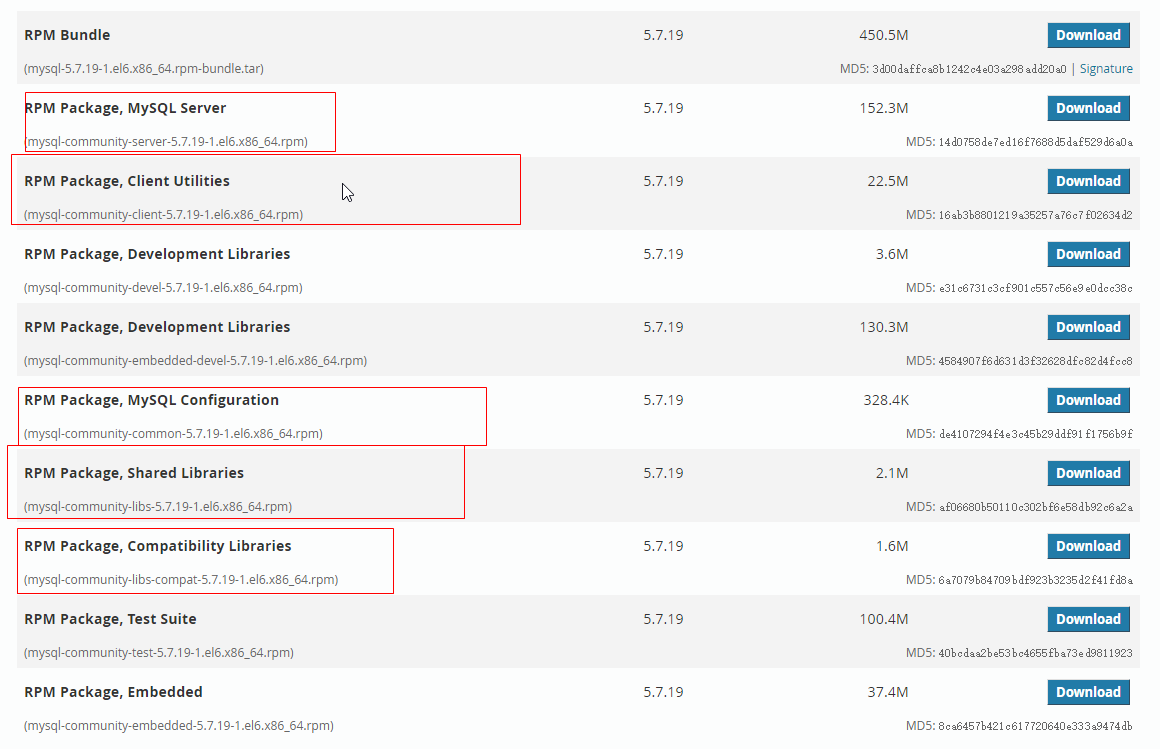
-rw-r--r-- 1 root root 23M Aug 6 18:40 mysql-community-client-5.7.19-1.el6.x86_64.rpm
-rw-r--r-- 1 root root 329K Aug 6 18:40 mysql-community-common-5.7.19-1.el6.x86_64.rpm
-rw-r--r-- 1 root root 2.1M Aug 6 18:40 mysql-community-libs-5.7.19-1.el6.x86_64.rpm
-rw-r--r-- 1 root root 1.7M Aug 6 18:40 mysql-community-libs-compat-5.7.19-1.el6.x86_64.rpm
-rw-r--r-- 1 root root 153M Aug 6 18:40 mysql-community-server-5.7.19-1.el6.x86_64.rpm
-rw-r--r-- 1 root root 2.1M Aug 6 18:40 postfix-2.6.6-8.el6.x86_64.rpm
- yum 安装,会自动安装关联包
[root@mysql ~]# yum -y install mysql-community-*
Loaded plugins: fastestmirror
Setting up Install Process
Examining mysql-community-client-5.7.19-1.el6.x86_64.rpm: mysql-community-client-5.7.19-1.el6.x86_64
Marking mysql-community-client-5.7.19-1.el6.x86_64.rpm to be installed
...
...
...
Installed:
  mysql-community-client.x86_64 0:5.7.19-1.el6                  mysql-community-common.x86_64 0:5.7.19-1.el6             mysql-community-libs.x86_64 0:5.7.19-1.el6
  mysql-community-libs-compat.x86_64 0:5.7.19-1.el6             mysql-community-server.x86_64 0:5.7.19-1.el6

Dependency Installed:
  numactl.x86_64 0:2.0.9-2.el6

Replaced:
  mysql-libs.x86_64 0:5.1.73-8.el6_8

Complete!
3、配置
- 查看配置文件路径
[root@mysql ~]# rpm -qc mysql-community-server-5.7.19
/etc/logrotate.d/mysql
/etc/my.cnf
- 启动mysql
[root@mysql ~]# service mysqld start
Initializing MySQL database:                               [  OK  ]
Starting mysqld:                                           [  OK  ]
- 根据配置文件找到mysql的错误日志路径
[root@mysql mysql]# grep "temporary password" /var/log/mysqld.log
2017-08-06T10:50:48.543649Z 1 [Note] A temporary password is generated for root@localhost: 5U2tMJBw8d-m
- 使用密码连接
[root@mysql mysql]# mysql -uroot -p
Enter password:
Welcome to the MySQL monitor.  Commands end with ; or g.
Your MySQL connection id is 7
Server version: 5.7.19

Copyright (c) 2000, 2017, Oracle and/or its affiliates. All rights reserved.

Oracle is a registered trademark of Oracle Corporation and/or its
affiliates. Other names may be trademarks of their respective
owners.

Type 'help;' or 'h' for help. Type 'c' to clear the current input statement.

mysql>
3、其他rpm安装方式
即是rpm, 那么肯定有提供rpm的镜像站。配置好后即可直接yum install。本人暂时没发现可靠的。
二进制安装
1、下载
- 下载地址: https://dev.mysql.com/downloads/mysql/
- 下载方式

2、安装
- 上传包至服务器任意路径
[root@mysql ~]# ls -lh
total 611M
-rw-------. 1 root root 1.1K Jul 15 18:29 anaconda-ks.cfg
-rw-r--r--. 1 root root 9.7K Jul 15 18:29 install.log
-rw-r--r--. 1 root root 3.3K Jul 15 18:29 install.log.syslog
-rw-r--r--  1 root root 611M Aug  6 19:36 mysql-5.7.19-linux-glibc2.12-x86_64.tar.gz
- 安装
1. 解压到指定/opt目录,软连接
[root@mysql ~]# tar xf mysql-5.7.19-linux-glibc2.12-x86_64.tar.gz -C /opt/
[root@mysql ~]# cd /opt/
[root@mysql opt]# ls -lh
total 4.0K
drwxr-xr-x 9 root root 4.0K Aug  6 19:38 mysql-5.7.19-linux-glibc2.12-x86_64
[root@mysql opt]# ln -sv mysql-5.7.19-linux-glibc2.12-x86_64 mysql
`mysql' -> `mysql-5.7.19-linux-glibc2.12-x86_64'
[root@mysql opt]# cd mysql

2. 新建mysql用户,并对/opt/mysql目录赋权
[root@mysql mysql]# useradd -s /sbin/nologin -M -u 3306 mysql
[root@mysql mysql]# id mysql
uid=3306(mysql) gid=3306(mysql) groups=3306(mysql)
[root@mysql mysql]# chown mysql.mysql -R /opt/mysql

3.编辑配置文件,这个版本并没有提供默认的配置文件
[root@mysql mysql]# vim my.cnf
[mysqld]
datadir = /opt/mysql/data
port = 3306
socket = /opt/mysql/mysqld.sock
skip_name_resolve

4. 启动脚本
[root@mysql mysql]# cp -av support-files/mysql.server /etc/init.d/mysqld
`support-files/mysql.server' -> `/etc/init.d/mysqld'
[root@mysql mysql]# vim /etc/init.d/mysqld
basedir=/opt/mysql
datadir=${basedir}/data

5. 初始化MySQL数据库
[root@mysql mysql]# /opt/mysql/bin/mysqld --initialize-insecure --user=mysql --basedir=/opt/mysql --datadir=/opt/mysql/data
/opt/mysql/bin/mysqld: error while loading shared libraries: libnuma.so.1: cannot open shared object file: No such file or directory
[root@mysql mysql]# yum provides libnuma.so.1    # 搜索该库是由哪个包提供
Loaded plugins: fastestmirror
Determining fastest mirrors
 * base: mirrors.aliyun.com
 * extras: mirrors.aliyun.com
 * updates: mirrors.aliyun.com
base                                                                                                                                                                  | 3.7 kB     00:00
extras                                                                                                                                                                | 3.4 kB     00:00
updates                                                                                                                                                               | 3.4 kB     00:00
updates/primary_db                                                                                                                                                    | 2.5 MB     00:02
numactl-2.0.9-2.el6.i686 : Library for tuning for Non Uniform Memory Access machines
Repo        : base
Matched from:
Other       : libnuma.so.1
[root@mysql mysql]# yum -y install numactl
Loaded plugins: fastestmirror
Setting up Install Process
Loading mirror speeds from cached hostfile
...
...
...
Installed:
  numactl.x86_64 0:2.0.9-2.el6

Complete!

[root@mysql mysql]# /opt/mysql/bin/mysqld --initialize-insecure --user=mysql --basedir=/opt/mysql --datadir=/opt/mysql/data
2017-08-06T12:45:23.699674Z 0 [Warning] TIMESTAMP with implicit DEFAULT value is deprecated. Please use --explicit_defaults_for_timestamp server option (see documentation for more details).
2017-08-06T12:45:25.059615Z 0 [Warning] InnoDB: New log files created, LSN=45790
2017-08-06T12:45:25.446617Z 0 [Warning] InnoDB: Creating foreign key constraint system tables.
2017-08-06T12:45:25.511614Z 0 [Warning] No existing UUID has been found, so we assume that this is the first time that this server has been started. Generating a new UUID: 1e543114-7aa5-11e7-9a69-000c29d408d3.
2017-08-06T12:45:25.515037Z 0 [Warning] Gtid table is not ready to be used. Table 'mysql.gtid_executed' cannot be opened.
2017-08-06T12:45:25.516517Z 1 [Warning] root@localhost is created with an empty password ! Please consider switching off the --initialize-insecure option.

6. 添加环境变量及MAN配置文件
[root@mysql mysql]# mysql
-bash: mysql: command not found
[root@mysql mysql]# echo 'export PATH=/opt/mysql/bin:$PATH' > /etc/profile.d/mysqld.sh && . /etc/profile.d/mysqld.sh
[root@mysql mysql]# sed -i '43a MANPATH /opt/mysql/man' /etc/man.config

7. 启动并连接mysql
[root@mysql mysql]# service mysqld start
Starting MySQL.. SUCCESS!
[root@mysql mysql]# mysql
ERROR 2002 (HY000): Can't connect to local MySQL server through socket '/tmp/mysql.sock' (2)
[root@mysql mysql]# mysql -uroot -S /opt/mysql/mysqld.sock
Welcome to the MySQL monitor.  Commands end with ; or g.
Your MySQL connection id is 4
Server version: 5.7.19 MySQL Community Server (GPL)

Copyright (c) 2000, 2017, Oracle and/or its affiliates. All rights reserved.

Oracle is a registered trademark of Oracle Corporation and/or its
affiliates. Other names may be trademarks of their respective
owners.

Type 'help;' or 'h' for help. Type 'c' to clear the current input statement.

mysql>

8. 添加至开机启动,并输出MySQL文件头,输出mysql的库文件给系统查找路径
[root@mysql mysql]# chkconfig mysqld on
[root@mysql mysql]# ln -sv /opt/mysql/include /usr/include/mysql
`/usr/include/mysql' -> `/opt/mysql/include'
[root@mysql mysql]# echo '/opt/mysql/lib' >> /etc/ld.so.conf.d/mysql-x86_64.conf
[root@mysql mysql]# ldconfig
编译安装
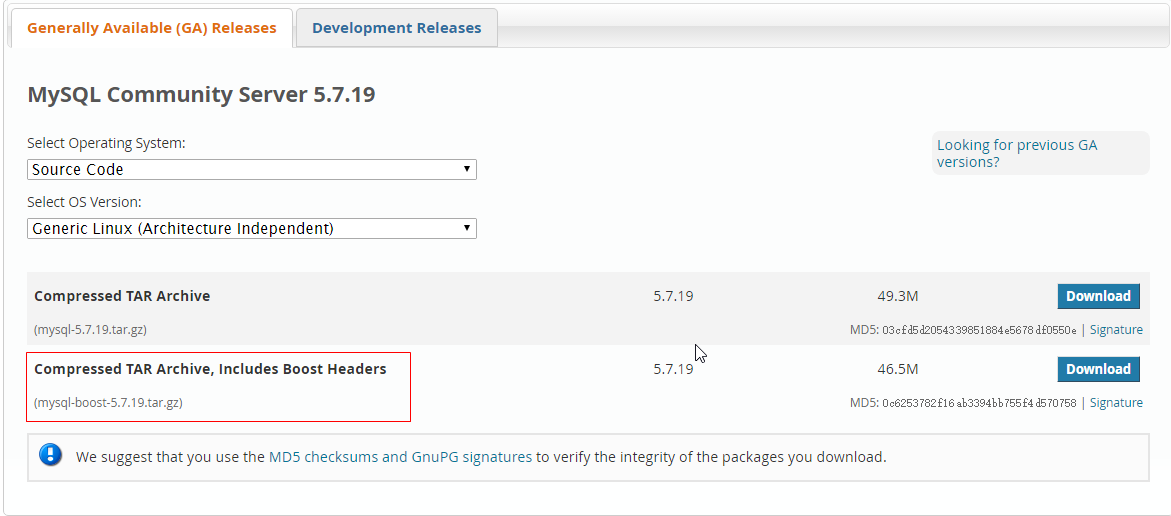
1、下载
- 下载地址: https://dev.mysql.com/downloads/mysql/
- 下载方式
2、安装
CPU越多越好,1核无法编译成功
- 准备依赖环境
[root@1 ~]# yum -y install cmake ncurses-devel gcc-c++
Loaded plugins: fastestmirror
Setting up Install Process
Determining fastest mirrors
 * base: mirrors.zju.edu.cn
 * extras: mirrors.btte.net
 * updates: mirrors.aliyun.com
base                                                                                                                                                                      | 3.7 kB     00:00
extras                                                                                                                                                                    | 3.4 kB     00:00
updates                                                                                                                                                                   | 3.4 kB     00:00
updates/primary_db                                                                                                                                                        | 2.5 MB     00:02
Resolving Dependencies
--> Running transaction check
---> Package cmake.x86_64 0:2.8.12.2-4.el6 will be installed
--> Processing Dependency: libarchive.so.2()(64bit) for package: cmake-2.8.12.2-4.el6.x86_64
...
...
...
Installed:
  cmake.x86_64 0:2.8.12.2-4.el6                               gcc-c++.x86_64 0:4.4.7-18.el6                               ncurses-devel.x86_64 0:5.7-4.20090207.el6

Dependency Installed:
  cloog-ppl.x86_64 0:0.15.7-1.2.el6          cpp.x86_64 0:4.4.7-18.el6         gcc.x86_64 0:4.4.7-18.el6     glibc-devel.x86_64 0:2.12-1.209.el6_9.2 glibc-headers.x86_64 0:2.12-1.209.el6_9.2
  kernel-headers.x86_64 0:2.6.32-696.6.3.el6 libarchive.x86_64 0:2.8.3-7.el6_8 libgomp.x86_64 0:4.4.7-18.el6 libstdc++-devel.x86_64 0:4.4.7-18.el6   mpfr.x86_64 0:2.4.1-6.el6
  ppl.x86_64 0:0.10.2-11.el6

Dependency Updated:
  glibc.x86_64 0:2.12-1.209.el6_9.2                                                           glibc-common.x86_64 0:2.12-1.209.el6_9.2

Complete!
- 上传源码包至linux随意路径
[root@1 ~]# tar xf mysql-boost-5.7.19.tar.gz
[root@1 ~]# cd mysql-5.7.19/
- 开始编译
[root@1 mysql-5.7.19]# cmake -DCMAKE_INSTALL_PREFIX=/opt/mysql
> -DMYSQL_DATADIR=/opt/mysql/data
> -DSYSCONFDIR=/opt/mysql/
> -DWITH_BOOST=boost
> -DWITH_MYISAM_STORAGE_ENGINE=1
> -DWITH_INNOBASE_STORAGE_ENGINE=1
> -DWITH_MEMORY_STORAGE_ENGINE=1
> -DWITH_READLINE=1
> -DMYSQL_UNIX_ADDR=/opt/mysql/mysqld.sock
> -DMYSQL_TCP_PORT=3306
> -DENABLED_LOCAL_INFILE=1
> -DWITH_PARTITION_STORAGE_ENGINE=1
> -DENABLE_DOWNLOADS=1
> -DEXTRA_CHARSETS=all
> -DDEFAULT_CHARSET=utf8
> -DDEFAULT_COLLATION=utf8_general_ci

-- Running cmake version 2.8.12.2
-- Could NOT find Git (missing:  GIT_EXECUTABLE)
-- Configuring with MAX_INDEXES = 64U
-- The C compiler identification is GNU 4.4.7
-- The CXX compiler identification is GNU 4.4.7
-- Check for working C compiler: /usr/bin/cc
...
...
...
-- CMAKE_CXX_FLAGS_RELWITHDEBINFO: -O3 -g -fabi-version=2 -fno-omit-frame-pointer -fno-strict-aliasing -DDBUG_OFF
-- Configuring done
-- Generating done
CMake Warning:
  Manually-specified variables were not used by the project:

    WITH_MEMORY_STORAGE_ENGINE
    WITH_READLINE
-- Build files have been written to: /root/mysql-5.7.19
[root@1 mysql-5.7.19]# echo $?    # 输出状态码可以判断上述命令是否执行成功,为0就成功,其他状态码都是失败
0
[root@1 mysql-5.7.19]# make -j 2 && make install    # -j 2  指定用2核CPU编译
Scanning dependencies of target INFO_BIN
Scanning dependencies of target INFO_SRC
[  0%] Built target INFO_SRC
[  0%] Built target INFO_BIN
Scanning dependencies of target abi_check
Scanning dependencies of target zlib
[  0%] Building C object zlib/CMakeFiles/zlib.dir/adl
...
等待编译
...
-- Installing: /opt/mysql/mysql-test/./mysql-test-run
-- Up-to-date: /opt/mysql/mysql-test/mtr
-- Up-to-date: /opt/mysql/mysql-test/mysql-test-run
-- Installing: /opt/mysql/mysql-test/lib/My/SafeProcess/my_safe_process
-- Up-to-date: /opt/mysql/mysql-test/lib/My/SafeProcess/my_safe_process
-- Installing: /opt/mysql/mysql-test/lib/My/SafeProcess/Base.pm
-- Installing: /opt/mysql/support-files/mysqld_multi.server
-- Installing: /opt/mysql/support-files/mysql-log-rotate
-- Installing: /opt/mysql/support-files/magic
-- Installing: /opt/mysql/share/aclocal/mysql.m4
-- Installing: /opt/mysql/support-files/mysql.server
3、配置
1. 添加mysql用户及将修改相应文件夹属主属组
[root@1 support-files]# useradd -u 3306 -M -s /sbin/nologin mysql
[root@1 support-files]# mkdir -pv /opt/mysql/data && chown mysql.mysql -R /opt/mysql
mkdir: created directory `/opt/mysql/data'

2. 准备my.cnf配置文件及mysql启动脚本,由于5.7.19并没有提供默认的配置文件,只能自己写了
vim /opt/mysql/my.cnf
[mysqld]
datadir = /opt/mysql/data
port = 3306
socket = /opt/mysql/mysqld.sock
skip_name_resolve
[root@1 support-files]# cp /opt/mysql/support-files/mysql.server /etc/init.d/mysqld && chmod +x /etc/init.d/mysqld

3. 执行初始化命令, 5.7集成在mysql命令中
[root@1 support-files]# cp /opt/mysql/support-files/mysql.server /etc/init.d/mysqld && chmod +x /etc/init.d/mysqld
[root@1 support-files]# /opt/mysql/bin/mysqld --initialize-insecure --user=mysql --basedir=/opt/mysql --datadir=/opt/mysql/data
2017-08-06T17:02:01.666326Z 0 [Warning] TIMESTAMP with implicit DEFAULT value is deprecated. Please use --explicit_defaults_for_timestamp server option (see documentation for more details).
2017-08-06T17:02:03.364801Z 0 [Warning] InnoDB: New log files created, LSN=45790
2017-08-06T17:02:03.525083Z 0 [Warning] InnoDB: Creating foreign key constraint system tables.
2017-08-06T17:02:03.697839Z 0 [Warning] No existing UUID has been found, so we assume that this is the first time that this server has been started. Generating a new UUID: f85cf1a8-7ac8-11e7-8e48-000c29d408d3.
2017-08-06T17:02:03.701251Z 0 [Warning] Gtid table is not ready to be used. Table 'mysql.gtid_executed' cannot be opened.
2017-08-06T17:02:03.713104Z 1 [Warning] root@localhost is created with an empty password ! Please consider switching off the --initialize-insecure option.
2017-08-06T17:02:05.479148Z 1 [Warning] 'user' entry 'root@localhost' ignored in --skip-name-resolve mode.
2017-08-06T17:02:05.479171Z 1 [Warning] 'user' entry 'mysql.session@localhost' ignored in --skip-name-resolve mode.
2017-08-06T17:02:05.479178Z 1 [Warning] 'user' entry 'mysql.sys@localhost' ignored in --skip-name-resolve mode.
2017-08-06T17:02:05.479188Z 1 [Warning] 'db' entry 'performance_schema mysql.session@localhost' ignored in --skip-name-resolve mode.
2017-08-06T17:02:05.479192Z 1 [Warning] 'db' entry 'sys mysql.sys@localhost' ignored in --skip-name-resolve mode.
2017-08-06T17:02:05.479198Z 1 [Warning] 'proxies_priv' entry '@ root@localhost' ignored in --skip-name-resolve mode.
2017-08-06T17:02:05.479219Z 1 [Warning] 'tables_priv' entry 'user mysql.session@localhost' ignored in --skip-name-resolve mode.
2017-08-06T17:02:05.479226Z 1 [Warning] 'tables_priv' entry 'sys_config mysql.sys@localhost' ignored in --skip-name-resolve mode.

4. 添加man手册及添加环境变量
[root@1 support-files]# sed -i '43a MANPATH /opt/mysql/man' /etc/man.config
[root@1 support-files]# echo 'export PATH=/opt/mysql/bin:$PATH' > /etc/profile.d/mysqld.sh && . /etc/profile.d/mysqld.sh

5. 添加至开机启动项
[root@1 support-files]# chkconfig mysqld on

6. 输出mysql的头文件至系统头文件路径/usr/include
[root@1 support-files]# ln -sv /opt/mysql/include /usr/include/mysql
`/usr/include/mysql' -> `/opt/mysql/include'

7. 输出mysql的库文件给系统查找路径
[root@1 support-files]# echo '/opt/mysql/lib' >> /etc/ld.so.conf.d/mysql-x86_64.conf
[root@1 support-files]# ldconfig

8. 启动并连接mysql
[root@1 support-files]# service mysqld start
Starting MySQL. SUCCESS!
[root@1 support-files]# mysql
Welcome to the MySQL monitor.  Commands end with ; or g.
Your MySQL connection id is 3
Server version: 5.7.19 Source distribution

Copyright (c) 2000, 2017, Oracle and/or its affiliates. All rights reserved.

Oracle is a registered trademark of Oracle Corporation and/or its
affiliates. Other names may be trademarks of their respective
owners.

Type 'help;' or 'h' for help. Type 'c' to clear the current input statement.

mysql>

9. mysql5.7密码表
select Host,User,authentication_string from mysql.user;