项目github地址:https://github.com/fotocj007/VertxWebApi
前面的项目实现了一个httpserver,上传返回的消息都是json格式。现在开始实现mysql,redis,mongodb的使用。关于mysql,redis,mongodb服务器的创建这里不做详解。
一:添加: gradle.compile group: 'io.vertx', name: 'vertx-mysql-client', version: '3.9.8'
二:新建mysql连接json。在项目外建立资源文件夹,这样就不需要打到包里面去。

{
  "config": [
    {
      "url": "127.0.0.1",
      "port": 3306,
      "user": "root",
      "password": "root123456",
      "max_pool_size": 20,
      "max_idle_time": 1800
    }
  ],
  "configDb": "demo_db"
}
三:创建json文件加载帮助类

 1 public class ConfigUtil {
 2     public static JsonObject loadJsonConfig(Vertx vertx, String path) {
 3         FileSystem fs = vertx.fileSystem();
 4         if (!fs.propsBlocking(path).isDirectory()) {
 5             Buffer buffer = fs.readFileBlocking(path);
 6             if (isJsonArray(buffer)) {
 7                 JsonArray array = new JsonArray(buffer);
 8                 JsonObject ob = new JsonObject();
 9                 ob.put("__CONFIGS__", array);
10                 return ob;
11             } else {
12                 return new JsonObject(buffer);
13             }
14
15         }
16         return new JsonObject();
17     }
18
19     private static boolean isJsonArray(Buffer buffer) {
20         return buffer.getByte(0) == "[".getBytes()[0];
21     }
22 }

 1 public abstract class JsonObjectConfig {
 2     private final String path;
 3
 4     public JsonObjectConfig(Vertx vertx, String path){
 5         this.path = path;
 6         loadJson(vertx);
 7     }
 8
 9     private void loadJson(Vertx vertx){
10         JsonObject configJson = ConfigUtil.loadJsonConfig(vertx, path);
11         decode(configJson);
12     }
13
14     private void decode(JsonObject jsonObject) {
15         parse(jsonObject);
16     }
17
18     public abstract void parse(JsonObject jsonObject);
19 }
四:mysql json文件加载

 1 public class MysqlConfig extends JsonObjectConfig {
 2     public JsonArray configs;
 3
 4     public String configDbName;
 5
 6     public MysqlConfig(Vertx vertx, String path){
 7         super(vertx,path);
 8     }
 9
10     @Override
11     public void parse(JsonObject jsonObject) {
12         configs = jsonObject.getJsonArray("config");
13         configDbName = jsonObject.getString("configDb");
14     }
15 }
五:创建mysql连接

 1 public class MySQLUtil {
 2     private final Logger logger = LoggerFactory.getLogger(MySQLUtil.class);
 3
 4     private final Vertx vertx;
 5
 6     private final int poolSize;
 7
 8     private final List<JsonObject> dataConfig;
 9
10     private List<MySQLPool> clients;
11
12     public MySQLUtil(Vertx vertx, int poolSize, List<JsonObject> dataConfig){
13         this.vertx = vertx;
14         this.poolSize = poolSize;
15         this.dataConfig = dataConfig;
16
17         initPool();
18     }
19
20     private void initPool(){
21         clients = new ArrayList<>();
22         for (JsonObject dataSource : dataConfig) {
23             for (int j = 0; j < poolSize; j++) {
24                 MySQLConnectOptions connectOptions = new MySQLConnectOptions()
25                         .setPort(dataSource.getInteger("port"))
26                         .setHost(dataSource.getString("url"))
27                         .setUser(dataSource.getString("user"))
28                         .setPassword(dataSource.getString("password"))
29                         .setCharset("utf8")
30                         .setCollation("utf8_general_ci")
31                         .setReconnectAttempts(3)//连接无法建立时重试
32                         .setReconnectInterval(1000);
33
34                 // 连接池选项
35                 PoolOptions poolOptions = new PoolOptions()
36                         .setMaxSize(dataSource.getInteger("max_pool_size"))
37                         .setIdleTimeout(dataSource.getInteger("max_idle_time"));
38
39                 // 创建带连接池的客户端
40                 MySQLPool client = MySQLPool.pool(vertx,connectOptions, poolOptions);
41
42                 clients.add(client);
43             }
44         }
45     }
46
47     public MySQLPool getConfigClient(){
48         return clients.get(ThreadLocalRandom.current().nextInt(clients.size()));
49     }
50
51     public void close(){
52         for(MySQLPool client : clients){
53             client.close();
54         }
55
56         logger.warn("mysql 关闭连接池---");
57     }
58 }
六:创建mysql查询帮助类

 1 public class PlayerDao {
 2     protected Logger logger = LoggerFactory.getLogger(PlayerDao.class);
 3
 4     protected String DB_SPLIT = "";
 5     protected MySQLUtil mySQLPool;
 6
 7     public PlayerDao(String DB_SPLIT, MySQLUtil mySQLPool) {
 8         this.DB_SPLIT = DB_SPLIT;
 9         this.mySQLPool = mySQLPool;
10     }
11
12     /*************************
13      * 查询数据
14      * 根据 实体类T获取数据并实例化
15      */
16     public <T> void queryConfigList(String sql, Class<T> classes, Handler<AsyncResult<List<T>>> handler){
17         mySQLPool.getConfigClient().query(sql)
18                 .execute(qRes -> {
19                     if(qRes.succeeded()){
20                         List<T> lists = new ArrayList<>();
21
22                         RowSet<Row> result = qRes.result();
23                         List<String> col = qRes.result().columnsNames();
24
25                         for (Row row : result) {
26                             JsonObject json = new JsonObject();
27                             for (String str : col) {
28                                 json.put(str,row.getValue(str));
29                             }
30                             T entity = new JsonObject(json.toString()).mapTo(classes);
31                             lists.add(entity);
32                         }
33
34                         handler.handle(Future.succeededFuture(lists));
35                     }else {
36                         handler.handle(Future.failedFuture(qRes.cause()));
37                         logger.error("--error queryConfigList----- " + sql, qRes.cause());
38                     }
39                 });
40     }
41 }
七:创建mysql管理类,管理查询帮助类。

 1 public class DaoManager {
 2     private final MysqlConfig mysqlConfig;
 3
 4     private final MySQLUtil mySQLPool;
 5
 6     private PlayerDao playerDao;
 7
 8     public DaoManager(MysqlConfig mysqlConfig, MySQLUtil mySQLPool){
 9         this.mysqlConfig = mysqlConfig;
10         this.mySQLPool = mySQLPool;
11
12         init();
13     }
14
15     private void init(){
16         playerDao = new PlayerDao(mysqlConfig.configDbName,mySQLPool);
17     }
18
19     public PlayerDao getPlayerDao(){return playerDao;}
20 }
八:修改Configure配置文件,加载json和初始化mysql
public class Configure {
    private static final Configure ourInstance = new Configure();

    public static Configure getInstance() {
        return ourInstance;
    }

    protected Vertx vertx;

    public MysqlConfig mysqlConfig;
    private MySQLUtil mySQLPool;
    public DaoManager daoManager;

    public void init(Vertx vertx){
        this.vertx = vertx;

        initHandler();

        loadConfig();

        initDb();
    }

    private void initHandler(){
        HandlerManager.getInstance().addHandler(new DemoHandler());
    }

    /**
     *  加载db和Redis配置文件
     */
    protected void loadConfig(){
        mysqlConfig = new MysqlConfig(vertx, "res/mysql.json");
    }

    protected void initDb(){
        List<JsonObject> list = new ArrayList<>();
        for(int i = 0; i< mysqlConfig.configs.size();i++){
            list.add(mysqlConfig.configs.getJsonObject(i));
        }
        mySQLPool = new MySQLUtil(vertx,2,list);

        daoManager = new DaoManager(mysqlConfig,mySQLPool);
    }
}
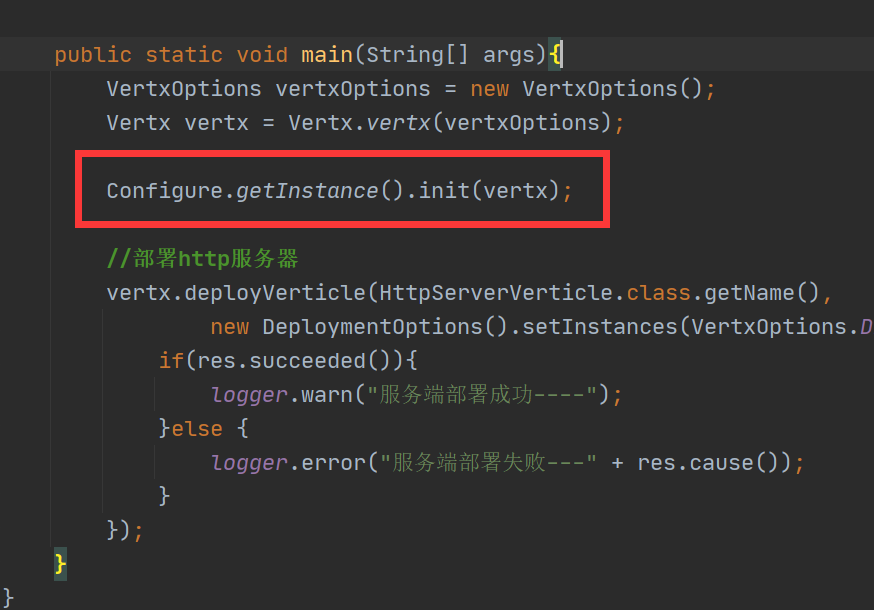
九:修改启动类

十:测试一下
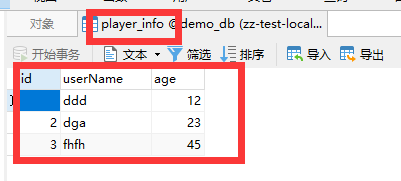
1:新建数据库表

2:新建个实体类 PlayerInfo

 1 public class PlayerInfo {
 2     private long id;
 3
 4     private String userName;
 5
 6     private int age;
 7
 8     public long getId() {
 9         return id;
10     }
11
12     public void setId(long id) {
13         this.id = id;
14     }
15
16     public String getUserName() {
17         return userName;
18     }
19
20     public void setUserName(String userName) {
21         this.userName = userName;
22     }
23
24     public int getAge() {
25         return age;
26     }
27
28     public void setAge(int age) {
29         this.age = age;
30     }
31 }
3:修改DemoHandler,重新数据库
 1 public class DemoHandler implements InterHandler {
 2     @Override
 3     public void handler(AbstractUpMessage up, HttpServerResponse resp) {
 4         //上传参数
 5         DemoRequest request = (DemoRequest)up;
 6         System.out.println("上传参数:"+ request.name + "-" + request.age);
 7
 8
 9         String sql = "select * from " + Configure.getInstance().mysqlConfig.configDbName + ".player_info ";
10         PlayerDao client = Configure.getInstance().daoManager.getPlayerDao();
11         client.queryConfigList(sql, PlayerInfo.class, res -> {
12             List<PlayerInfo> lists = res.result();
13             for(PlayerInfo item : lists){
14                 System.out.println(item.getUserName()+"---" + item.getAge());
15             }
16         });
17
18
19         //返回数据
20         String n = "cscscs---";
21         String in = "info ---";
22         //编码返回json
23         DemoResponse response = new DemoResponse(getMessageId(),n,in);
24         response.encode();
25         resp.end(response.SendMessage());
26     }
27
28     @Override
29     public short getMessageId() {
30         return HandlerCode.DEMO_V1;
31     }
32 }
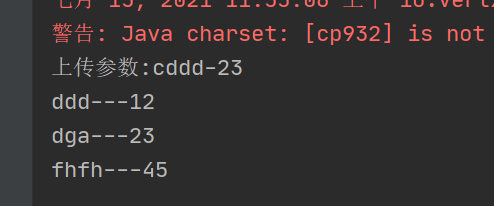
4:运行,调用接口试试

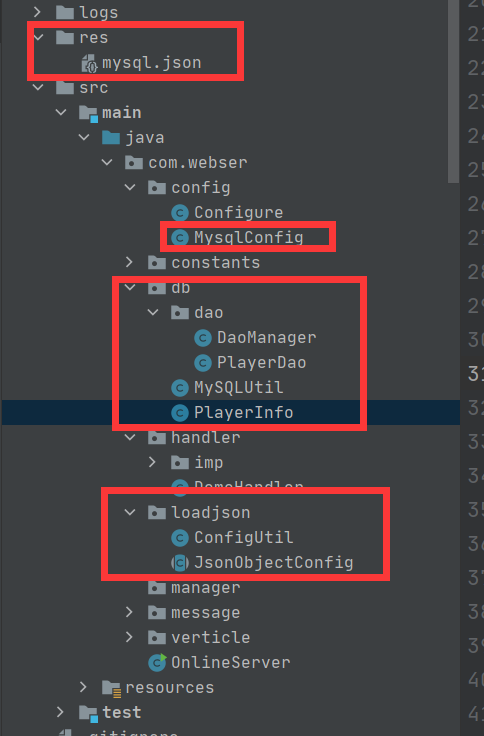
项目结构

