1. OAuth 2.0
OAuth(Open Authorization)为用户资源的授权提供了一个安全的、开放而又简易的标准。最简单的理解,我们可以看一下微信OAuth2.0授权登录流程:
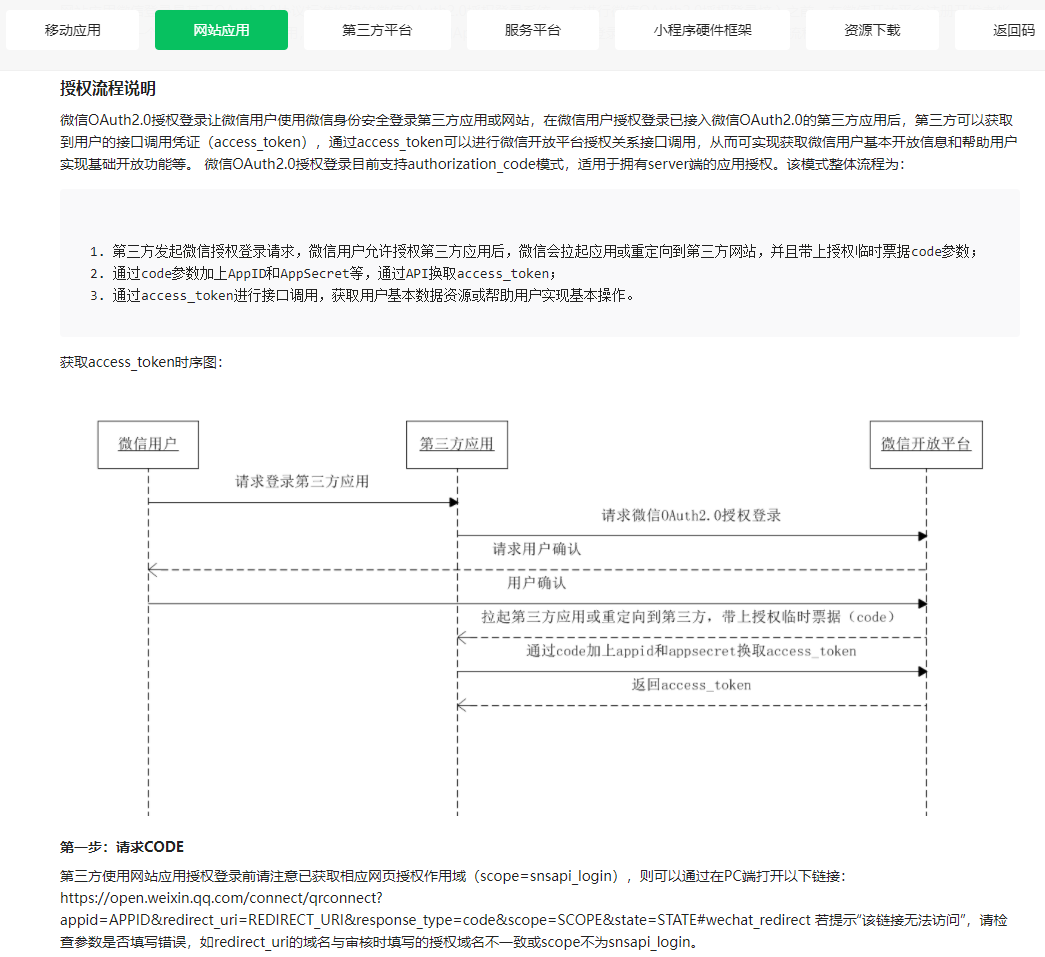
通过OAuth2可以授权第三方应用访问资源拥有者在这个平台的资源。举个例子,用微信登录某个手机APP,此时会让弹窗让用户授权,用户同意以后,这个APP就可以获取用户的资源(比如:昵称、头像、openid等)进行登录了。在这个过程中,用户的微信账户就是资源,资源的所有者是用户,第三方应用是这个APP。
常用的授权类型(Authorization Grant)有如下种:
- 授权码(Authorization Code): 用户授权后获取授权码,通过授权码获取access_token
- 密码(Resource Owner Password Credentials):不用先获取授权码,而是直接拿着资源所有者的密码去获取access_token
下面重点关注授权码模式,因为接下来会利用OAuth2实现单店的登录
关于OAuth 2.0请参考下面的文档
https://datatracker.ietf.org/doc/html/rfc6749
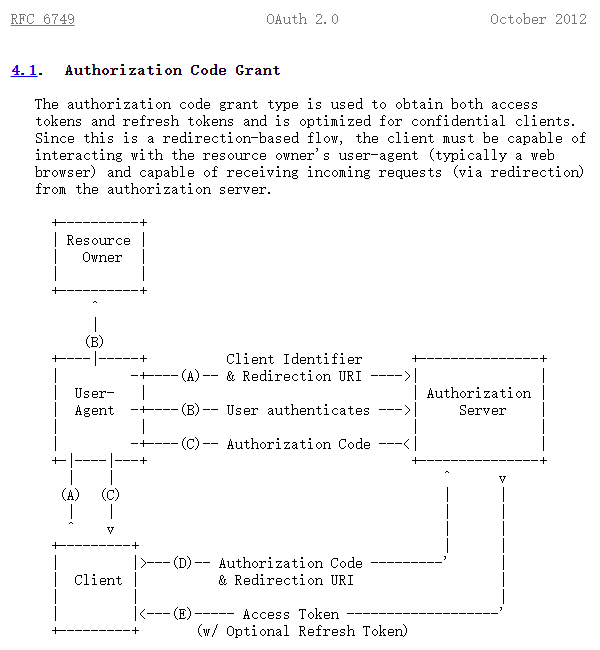
Client 可以理解为第三方应用,比如:微博
User-Agent 可以理解为浏览器,比如:用户的Chrome浏览器
Resource-Owner 可以理解为用户,比如:微信用户
Authorization Server 可以理解为认证中心,比如:微信开放平台
整个过程可以表述为,用户打开浏览器访问微博,选择微信登录,用户扫码后在手机端进行授权,微博拿到授权码并向微信开放平台获取令牌,之后微博变可以获取到用户的昵称和头像等资源,然后登录成功。
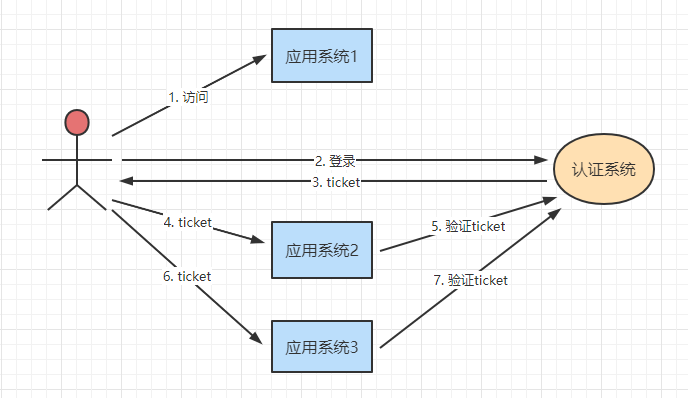
2. 单点登录
单点登录(Single Sign On),简称为 SSO,是比较流行的企业业务整合的解决方案之一。SSO的定义是在多个应用系统中,用户只需要登录一次就可以访问所有相互信任的应用系统。
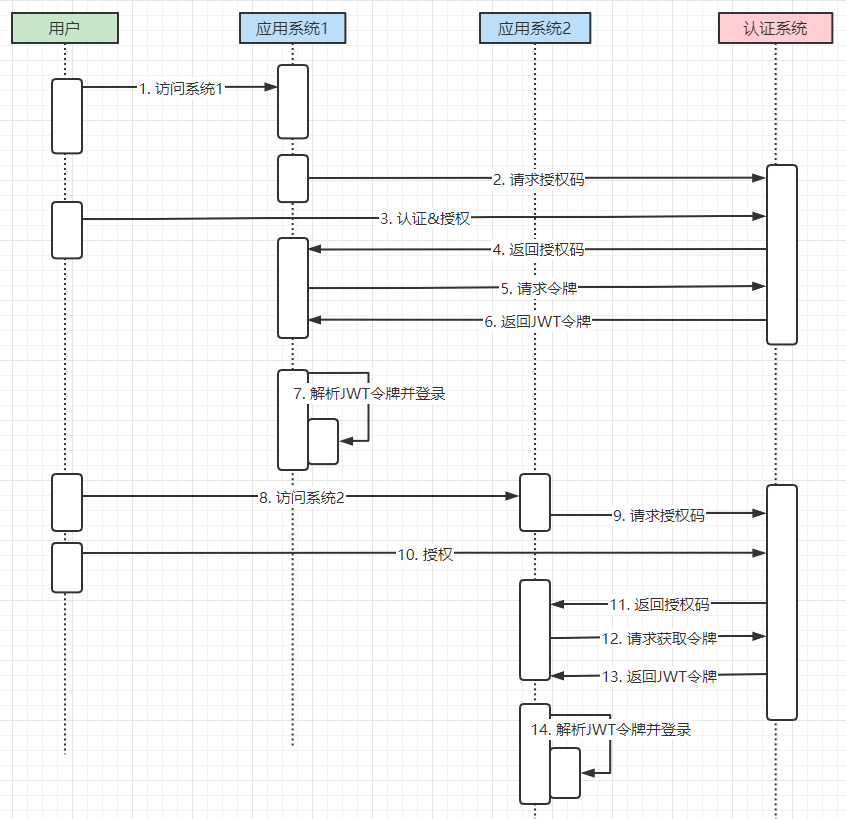
利用Spring Security OAuth2的话,流程大概是这样的,我自己画了一个时序图:
3. Spring Security OAuth 2
首先,明确几个角色
Authorization Server :授权服务器
Resource Server :资源服务器,就是用户可以访问的资源,那我们接下来单点登录来讲,订单管理系统、用户管理系统、商品管理系统、客服管理系统等等这些都是资源服务器
Client :客户端,它是需要访问资源服务器的。如果是传统的那种,可以把它理解成一个Java应用,如果是前后端分离的,可以把它理解为一个浏览器
3.1. 授权服务器配置
最重要的依赖
<dependency>
    <groupId>org.springframework.security.oauth.boot</groupId>
    <artifactId>spring-security-oauth2-autoconfigure</artifactId>
    <version>2.5.5</version>
</dependency>
完整的pom.xml如下:
<?xml version="1.0" encoding="UTF-8"?>
<project xmlns="http://maven.apache.org/POM/4.0.0" xmlns:xsi="http://www.w3.org/2001/XMLSchema-instance"
         xsi:schemaLocation="http://maven.apache.org/POM/4.0.0 https://maven.apache.org/xsd/maven-4.0.0.xsd">
    <modelVersion>4.0.0</modelVersion>
    <parent>
        <groupId>org.springframework.boot</groupId>
        <artifactId>spring-boot-starter-parent</artifactId>
        <version>2.5.6</version>
        <relativePath/> <!-- lookup parent from repository -->
    </parent>
    <groupId>com.example</groupId>
    <artifactId>auth-server</artifactId>
    <version>0.0.1-SNAPSHOT</version>
    <name>auth-server</name>

    <properties>
        <java.version>1.8</java.version>
    </properties>
    <dependencies>
        <dependency>
            <groupId>org.springframework.boot</groupId>
            <artifactId>spring-boot-starter-data-jpa</artifactId>
        </dependency>
        <dependency>
            <groupId>org.springframework.boot</groupId>
            <artifactId>spring-boot-starter-data-redis</artifactId>
        </dependency>
        <dependency>
            <groupId>org.springframework.boot</groupId>
            <artifactId>spring-boot-starter-security</artifactId>
        </dependency>
        <dependency>
            <groupId>org.springframework.boot</groupId>
            <artifactId>spring-boot-starter-web</artifactId>
        </dependency>
        <dependency>
            <groupId>org.springframework.security.oauth.boot</groupId>
            <artifactId>spring-security-oauth2-autoconfigure</artifactId>
            <version>2.5.5</version>
        </dependency>

        <dependency>
            <groupId>mysql</groupId>
            <artifactId>mysql-connector-java</artifactId>
            <scope>runtime</scope>
        </dependency>
        <dependency>
            <groupId>org.projectlombok</groupId>
            <artifactId>lombok</artifactId>
            <optional>true</optional>
        </dependency>
        <dependency>
            <groupId>org.springframework.boot</groupId>
            <artifactId>spring-boot-starter-test</artifactId>
            <scope>test</scope>
        </dependency>
        <dependency>
            <groupId>org.springframework.security</groupId>
            <artifactId>spring-security-test</artifactId>
            <scope>test</scope>
        </dependency>
    </dependencies>

    <build>
        <plugins>
            <plugin>
                <groupId>org.springframework.boot</groupId>
                <artifactId>spring-boot-maven-plugin</artifactId>
                <configuration>
                    <excludes>
                        <exclude>
                            <groupId>org.projectlombok</groupId>
                            <artifactId>lombok</artifactId>
                        </exclude>
                    </excludes>
                </configuration>
            </plugin>
        </plugins>
    </build>

</project>
application.yml
server:
  port: 8080
  servlet:
    context-path: /auth   # User Accounts and Authentication (UAA)
spring:
  datasource:
    url: jdbc:mysql://localhost:3306/sso?serverTimezone=Asia/Shanghai&characterEncoding=utf8&useSSL=false
    driver-class-name: com.mysql.jdbc.Driver
    username: root
    password: 123456
  jpa:
    database: mysql
    show-sql: true
  redis:
    host: 192.168.10.31
    port: 6379
    password: 123456
logging:
  level:
    org:
      springframework:
        security: debug
启动类
package com.example.authserver;

import org.springframework.boot.SpringApplication;
import org.springframework.boot.autoconfigure.SpringBootApplication;

/**
 * User Accounts and Authentication (UAA)
 *
 * @Author ChengJianSheng
 * @Date 2021/11/2
 */
@SpringBootApplication
public class AuthServerApplication {

    public static void main(String[] args) {
        SpringApplication.run(AuthServerApplication.class, args);
    }

}
AuthorizationServerConfig.java
package com.example.authserver.config;
import org.springframework.beans.factory.annotation.Autowired;
import org.springframework.context.annotation.Configuration;
import org.springframework.data.redis.connection.RedisConnectionFactory;
import org.springframework.security.oauth2.config.annotation.configurers.ClientDetailsServiceConfigurer;
import org.springframework.security.oauth2.config.annotation.web.configuration.AuthorizationServerConfigurerAdapter;
import org.springframework.security.oauth2.config.annotation.web.configuration.EnableAuthorizationServer;
import org.springframework.security.oauth2.config.annotation.web.configurers.AuthorizationServerEndpointsConfigurer;
import org.springframework.security.oauth2.config.annotation.web.configurers.AuthorizationServerSecurityConfigurer;
import org.springframework.security.oauth2.provider.ClientDetailsService;
import org.springframework.security.oauth2.provider.client.JdbcClientDetailsService;
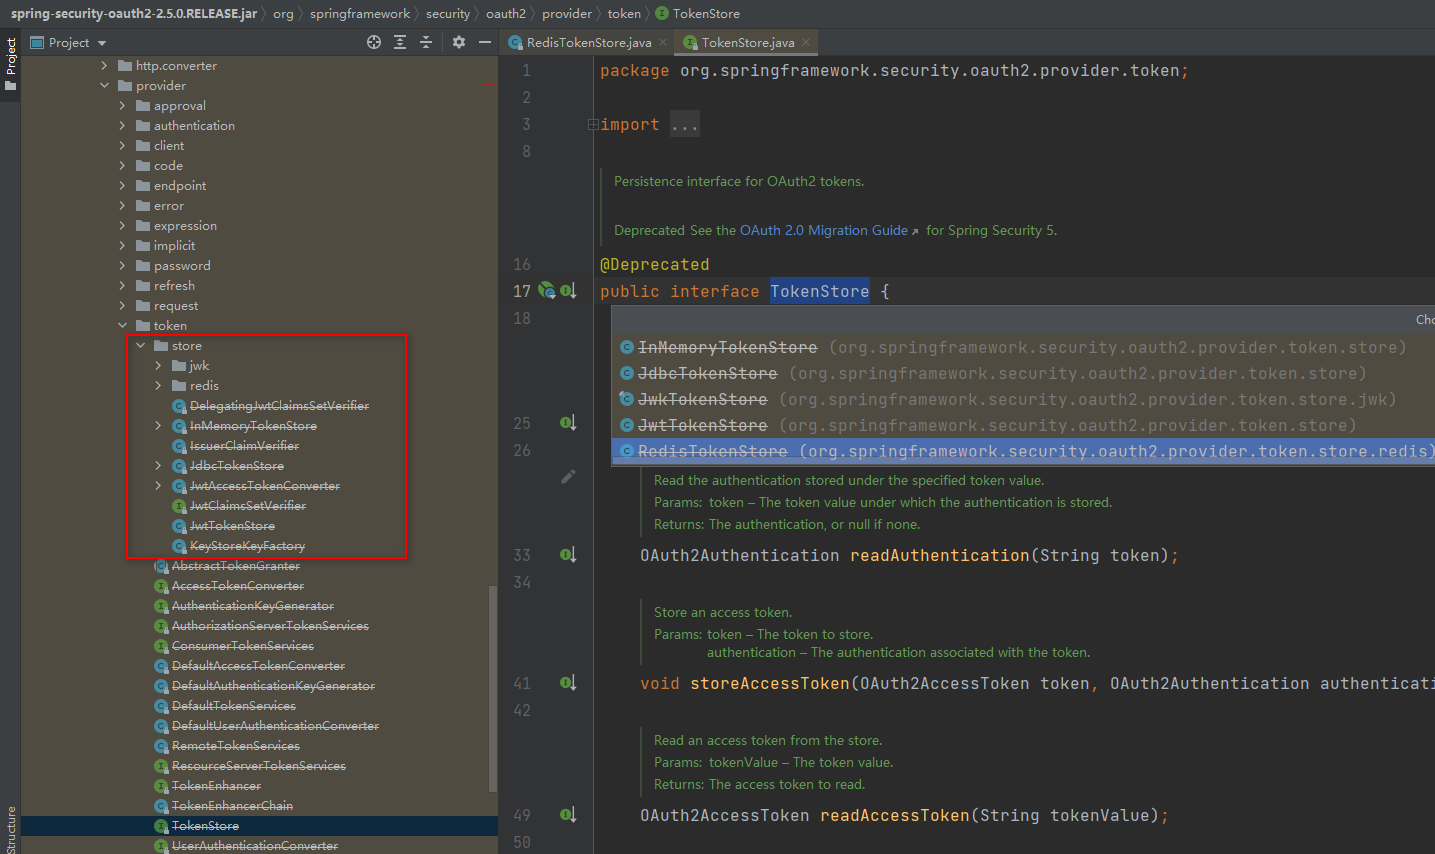
import org.springframework.security.oauth2.provider.token.TokenStore;
import org.springframework.security.oauth2.provider.token.store.redis.RedisTokenStore;
import javax.annotation.Resource;
import javax.sql.DataSource;
/**
* @Author ChengJianSheng
* @Date 2021/11/2
*/
@Configuration
@EnableAuthorizationServer
public class AuthorizationServerConfig extends AuthorizationServerConfigurerAdapter {
@Resource
private DataSource dataSource;
@Autowired
private RedisConnectionFactory redisConnectionFactory;
@Override
public void configure(ClientDetailsServiceConfigurer clients) throws Exception {
clients.withClientDetails(clientDetailsService());
}
@Override
public void configure(AuthorizationServerEndpointsConfigurer endpoints) throws Exception {
endpoints.tokenStore(tokenStore());
}
@Override
public void configure(AuthorizationServerSecurityConfigurer security) throws Exception {
security.checkTokenAccess("permitAll()") // isAuthenticated()
.tokenKeyAccess("permitAll()")
.allowFormAuthenticationForClients();
}
public ClientDetailsService clientDetailsService() {
return new JdbcClientDetailsService(dataSource);
}
public TokenStore tokenStore() {
return new RedisTokenStore(redisConnectionFactory);
}
}这里,利用JdbcClientDetailsService从数据读取客户端

表结构如下:
CREATE TABLE `oauth_client_details`  (
  `client_id` varchar(256) COMMENT '客户端ID',
  `resource_ids` varchar(256),
  `client_secret` varchar(256) COMMENT '客户端密钥',
  `scope` varchar(256),
  `authorized_grant_types` varchar(256) COMMENT '授权类型',
  `web_server_redirect_uri` varchar(256),
  `authorities` varchar(256),
  `access_token_validity` int(11) COMMENT 'access_token的有效时间',
  `refresh_token_validity` int(11) COMMENT 'refresh_token的有效时间',
  `additional_information` varchar(4096),
  `autoapprove` varchar(256) COMMENT '是否允许自动授权',
  PRIMARY KEY (`client_id`) USING BTREE
) ENGINE = InnoDB CHARACTER SET = utf8 COLLATE = utf8_general_ci ROW_FORMAT = Dynamic; 
此处,先把token存储到redis中
最后是WebSecurityConfig.java
package com.example.authserver.config;

import org.springframework.context.annotation.Bean;
import org.springframework.context.annotation.Configuration;
import org.springframework.security.config.annotation.authentication.builders.AuthenticationManagerBuilder;
import org.springframework.security.config.annotation.web.configuration.WebSecurityConfigurerAdapter;
import org.springframework.security.crypto.bcrypt.BCryptPasswordEncoder;
import org.springframework.security.crypto.password.PasswordEncoder;

/**
 * @Author ChengJianSheng
 * @Date 2021/11/2
 */
@Configuration
public class WebSecurityConfig extends WebSecurityConfigurerAdapter {

    @Override
    protected void configure(AuthenticationManagerBuilder auth) throws Exception {
        auth.inMemoryAuthentication().withUser("zhangsan")
                .password(passwordEncoder().encode("123456")).roles("ADMIN")
                .and()
                .passwordEncoder(passwordEncoder());
    }

    @Bean
    public PasswordEncoder passwordEncoder() {
        return new BCryptPasswordEncoder();
    }

}
浏览器中输入
http://localhost:8080/auth/oauth/authorize?response_type=code&client_id=hello&redirect_uri=http://www.baidu.com&scope=all输入用户名和密码后

然后,就可以获取token了
curl -d "client_id=hello&client_secret=123456&grant_type=authorization_code&code=CdQFnL&redirect_uri=http://www.baidu.com" -X POST http://localhost:8080/auth/oauth/token
3.2. 资源服务器配置
一般来讲,资源服务器和授权服务器是分开的,所以,这里我们也分成两个项目
maven依赖和签名授权服务器一样,不再赘述
这里定义了Controller,它就是我们接下来要访问的资源
package com.example.resourceserver.controller;

import org.springframework.security.core.Authentication;
import org.springframework.web.bind.annotation.GetMapping;
import org.springframework.web.bind.annotation.RestController;

import java.security.Principal;

/**
 * @Author ChengJianSheng
 * @Date 2021/11/2
 */
@RestController
public class OrderController {

    @GetMapping("/info")
    public String info(Principal principal, Authentication authentication) {
        System.out.println(principal);
        System.out.println(authentication.getPrincipal());
        System.out.println(authentication.getAuthorities());
        return "hello world";
    }
}
当用户拿着access_token访问我们的资源的时候,资源服务器应该首先校验此access_token的合法性,那它去哪儿校验呢?当然是授权服务器,因为token是授权服务器发放的,验证自然也应该去授权服务器那里验证。
授权服务器有几个端点需要记住:
- /oauth/authorize :授权
- /oauth/token :发放令牌
- /oauth/check_token :校验令牌
由于资源服务和授权服务是分开的,所以,为了校验令牌,需要远程调用授权服务的校验令牌端点,于是乎:
package com.example.resourceserver.config;

import org.springframework.context.annotation.Configuration;
import org.springframework.security.config.annotation.web.builders.HttpSecurity;
import org.springframework.security.config.http.SessionCreationPolicy;
import org.springframework.security.oauth2.config.annotation.web.configuration.EnableResourceServer;
import org.springframework.security.oauth2.config.annotation.web.configuration.ResourceServerConfigurerAdapter;
import org.springframework.security.oauth2.config.annotation.web.configurers.ResourceServerSecurityConfigurer;
import org.springframework.security.oauth2.provider.token.RemoteTokenServices;
import org.springframework.security.oauth2.provider.token.ResourceServerTokenServices;

/**
 * @Author ChengJianSheng
 * @Date 2021/11/2
 */
@Configuration
@EnableResourceServer
public class ResourceServerConfig extends ResourceServerConfigurerAdapter {

    private static final String RESOURCE_ID = "order-resource";

    @Override
    public void configure(ResourceServerSecurityConfigurer resources) throws Exception {
        resources.resourceId(RESOURCE_ID)
                .tokenServices(resourceServerTokenServices())
                .stateless(true);
    }

    @Override
    public void configure(HttpSecurity http) throws Exception {
        http.authorizeRequests()
                .antMatchers("/order/**").access("#oauth2.hasScope('all')")
                .anyRequest().authenticated()
                .and()
                .sessionManagement().sessionCreationPolicy(SessionCreationPolicy.STATELESS)
                .and()
                .csrf().disable();
    }

    public ResourceServerTokenServices resourceServerTokenServices() {
        RemoteTokenServices remoteTokenServices = new RemoteTokenServices();
        remoteTokenServices.setCheckTokenEndpointUrl("http://localhost:8080/auth/oauth/check_token");
        remoteTokenServices.setClientId("hello");
        remoteTokenServices.setClientSecret("123456");
        return remoteTokenServices;
    }
}
启动资源服务器后,访问 http://localhost:8081/order/info
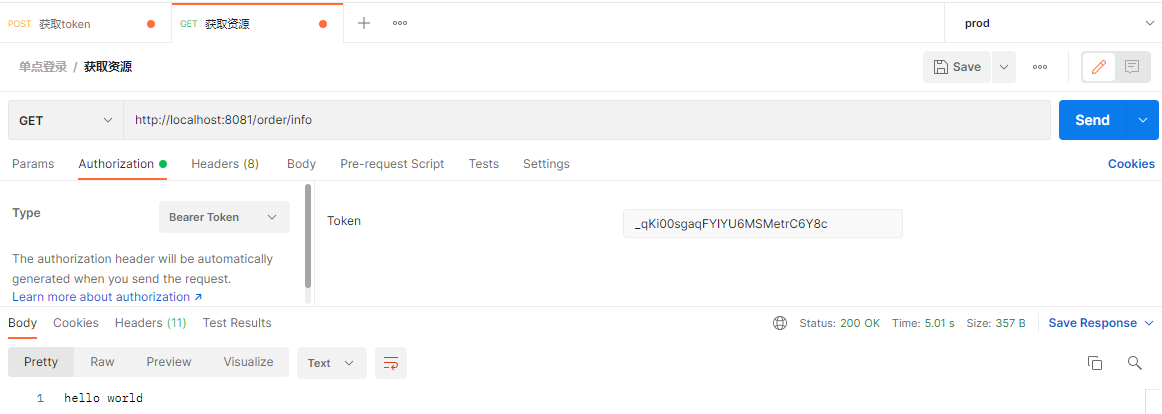

至此,授权服务和资源服务都配置完成
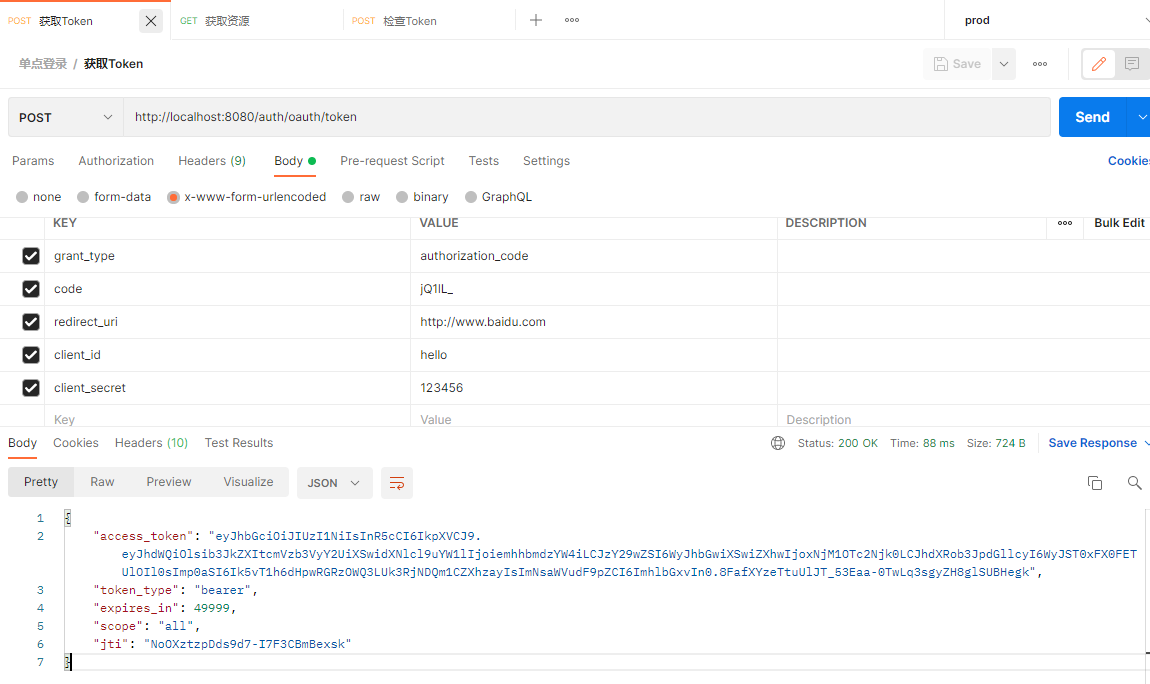
4. JWT
前面我们知道,为了校验客户端传过来的token,资源服务器需要远程访问授权服务器的/oauth/check_token端点。这样的话,客户端每请求一次,资源服务器就要远程调用一次授权服务器,这对授权服务器来说压力还是很大的。
因为现在授权服务器生成的令牌仅仅只是一个标识,没有任何实际的意义,为了知道这个token代表的信息是什么,就必须远程调用/oauth/check_token查询数据库才知道,这样的话客户端每次访问资源服务器都要去授权服务器那里查一下这个token代表啥含义,随着访问量的上升这对授权服务器来说是一个不小的压力。为了解决这个问题,为了每次不再需要去远程调用授权服务器来校验token,需要使用jwt来生成token。当然,jwt有也有一个缺点,那就是jwt生成的token很难撤销。废话就不多说了,直接改造之前的代码:
首先是授权服务器的改造
新增一个TokenStore的配置类
package com.example.authserver.config;

import org.springframework.context.annotation.Bean;
import org.springframework.context.annotation.Configuration;
import org.springframework.security.oauth2.provider.token.TokenStore;
import org.springframework.security.oauth2.provider.token.store.JwtAccessTokenConverter;
import org.springframework.security.oauth2.provider.token.store.JwtTokenStore;

/**
 * @Author ChengJianSheng
 * @Date 2021/11/3
 */
@Configuration
public class TokenStoreConfig {

    private static final String SIGN_KEY = "123123";

    @Bean
    public TokenStore tokenStore() {
        return new JwtTokenStore(jwtAccessTokenConverter());
    }

    @Bean
    public JwtAccessTokenConverter jwtAccessTokenConverter() {
        JwtAccessTokenConverter jwtAccessTokenConverter = new JwtAccessTokenConverter();
        jwtAccessTokenConverter.setSigningKey(SIGN_KEY);
        return jwtAccessTokenConverter;
    }
}
然后是AuthorizationServerConfig
package com.example.authserver.config;

import org.springframework.beans.factory.annotation.Autowired;
import org.springframework.context.annotation.Configuration;
import org.springframework.security.oauth2.config.annotation.configurers.ClientDetailsServiceConfigurer;
import org.springframework.security.oauth2.config.annotation.web.configuration.AuthorizationServerConfigurerAdapter;
import org.springframework.security.oauth2.config.annotation.web.configuration.EnableAuthorizationServer;
import org.springframework.security.oauth2.config.annotation.web.configurers.AuthorizationServerEndpointsConfigurer;
import org.springframework.security.oauth2.config.annotation.web.configurers.AuthorizationServerSecurityConfigurer;
import org.springframework.security.oauth2.provider.ClientDetailsService;
import org.springframework.security.oauth2.provider.client.JdbcClientDetailsService;
import org.springframework.security.oauth2.provider.token.TokenStore;
import org.springframework.security.oauth2.provider.token.store.JwtAccessTokenConverter;

import javax.annotation.Resource;
import javax.sql.DataSource;

/**
 * @Author ChengJianSheng
 * @Date 2021/11/2
 */
@Configuration
@EnableAuthorizationServer
public class AuthorizationServerConfig extends AuthorizationServerConfigurerAdapter {

    @Resource
    private DataSource dataSource;
    @Autowired
    private TokenStore tokenStore;
    @Autowired
    private JwtAccessTokenConverter jwtAccessTokenConverter;

    @Override
    public void configure(ClientDetailsServiceConfigurer clients) throws Exception {
        clients.withClientDetails(clientDetailsService());
    }

    @Override
    public void configure(AuthorizationServerEndpointsConfigurer endpoints) throws Exception {
        endpoints.tokenStore(tokenStore).accessTokenConverter(jwtAccessTokenConverter);
    }

    @Override
    public void configure(AuthorizationServerSecurityConfigurer security) throws Exception {
        security.checkTokenAccess("permitAll()")   // isAuthenticated()
                .tokenKeyAccess("permitAll()")
                .allowFormAuthenticationForClients();
    }

    public ClientDetailsService clientDetailsService() {
        return new JdbcClientDetailsService(dataSource);
    }


}
有一点需要注意,如果采用密码模式的话,就需要在端点配置那里配上 authenticationManager 和 userDetailsService ,因为密码模式是客户端直接拿着资源拥有者的用户名和密码来获取access_token,因此需要对客户端传的用户名密码进行验证,也就是执行认证过程,所以需要authenticationManager 和 userDetailsService。如果业务上授权类型只支持授权码的话,就没有必要设置它们。
@Autowired
private UserDetailsService userDetailsService;
@Autowired
private AuthenticationManager authenticationManager;

@Override
public void configure(ClientDetailsServiceConfigurer clients) throws Exception {
    clients.withClientDetails(clientDetailsService());
}

@Override
public void configure(AuthorizationServerEndpointsConfigurer endpoints) throws Exception {
    endpoints //.authenticationManager(authenticationManager)   如果授权类型支持密码模式,就需要配置
              //.userDetailsService(userDetailsService)         如果采用密码模式,就需要配置
            .tokenStore(tokenStore)
            .accessTokenConverter(jwtAccessTokenConverter);

}
接下来是资源服务器的改造
我们不再需要RemoteTokenServices来远程调用授权服务器了,也不需要配置tokenServices了
首先是,把授权服务器中的TokenStoreConfig.java拷贝过来
package com.example.resourceserver.config;

import org.springframework.context.annotation.Bean;
import org.springframework.context.annotation.Configuration;
import org.springframework.security.oauth2.provider.token.TokenStore;
import org.springframework.security.oauth2.provider.token.store.JwtAccessTokenConverter;
import org.springframework.security.oauth2.provider.token.store.JwtTokenStore;

/**
 * @Author ChengJianSheng
 * @Date 2021/11/3
 */
@Configuration
public class TokenStoreConfig {

    private static final String SIGN_KEY = "123123";

    @Bean
    public TokenStore tokenStore() {
        return new JwtTokenStore(jwtAccessTokenConverter());
    }

    @Bean
    public JwtAccessTokenConverter jwtAccessTokenConverter() {
        JwtAccessTokenConverter jwtAccessTokenConverter = new JwtAccessTokenConverter();
        jwtAccessTokenConverter.setSigningKey(SIGN_KEY);
        return jwtAccessTokenConverter;
    }
}
然后是ResourceServerConfig
package com.example.resourceserver.config;
import org.springframework.beans.factory.annotation.Autowired;
import org.springframework.context.annotation.Configuration;
import org.springframework.security.config.annotation.web.builders.HttpSecurity;
import org.springframework.security.config.http.SessionCreationPolicy;
import org.springframework.security.oauth2.config.annotation.web.configuration.EnableResourceServer;
import org.springframework.security.oauth2.config.annotation.web.configuration.ResourceServerConfigurerAdapter;
import org.springframework.security.oauth2.config.annotation.web.configurers.ResourceServerSecurityConfigurer;
import org.springframework.security.oauth2.provider.token.TokenStore;
/**
* @Author ChengJianSheng
* @Date 2021/11/2
*/
@Configuration
@EnableResourceServer
public class ResourceServerConfig extends ResourceServerConfigurerAdapter {
private static final String RESOURCE_ID = "order-resource";
@Autowired
private TokenStore tokenStore;
@Override
public void configure(ResourceServerSecurityConfigurer resources) throws Exception {
resources.resourceId(RESOURCE_ID)
.tokenStore(tokenStore)
.stateless(true);
}
@Override
public void configure(HttpSecurity http) throws Exception {
http.authorizeRequests()
.antMatchers("/order/**").access("#oauth2.hasScope('all')")
.anyRequest().authenticated()
.and()
.sessionManagement().sessionCreationPolicy(SessionCreationPolicy.STATELESS)
.and()
.csrf().disable();
}
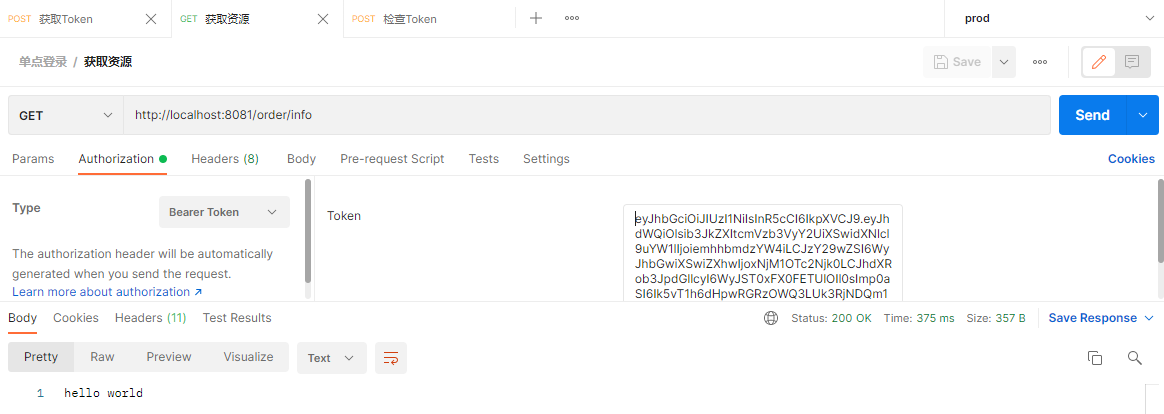
}配置了tokenStore了以后,就可以自己解析客户端传的token了,再也不用去访问授权服务器了。这个可以打端点调试,或者日志开debug,都可以看得到的。
改造完成,用postman试一下
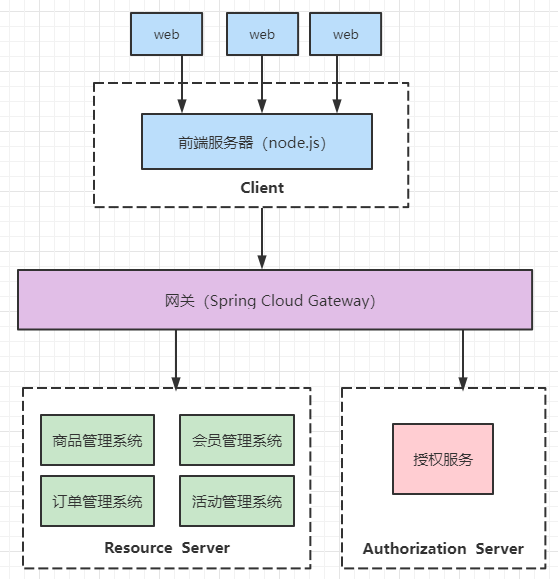
5. 前后端分离
如果是传统的那种没有做前后端分离的,页面都写在服务端的那种应用,那么那个Java Web应用就是OAuth2中的一个Client, 这个时候用 @EnableOAuth2Sso 就好了,不再赘述,也不是重点,现在的项目基本都是前后端分离的,所以我们的重点应该在前后端分离的项目中如何利用OAuth2实现单点登录。
前后端分离的话,OAuth2的客户端就不再是一个Java Web应用了,而是前端服务器,我们可以简单的理解成浏览器。这个时候,网关除了做路由转发以外,还要负责校验token,至于鉴权可以放在网关,也可以放在各资源服务器去做,推荐在网关做。
6. 推荐阅读
https://projects.spring.io/spring-security-oauth/docs/oauth2.html
https://docs.spring.io/spring-security/site/docs/current/reference/html5/#oauth2
https://docs.spring.io/spring-security-oauth2-boot/docs/current/reference/html5/
https://github.com/spring-projects/spring-security/wiki/OAuth-2.0-Migration-Guide