该文章主要介绍 testNG(testing next generation,下一代测试技术)框架的使用。
1.首先安装testNG


2.安装完成后,创建maven项目,导入TESTNG和selenium依赖。

3.此时就可以直接创建testNG的测试类了


4.下面通过 百度页面打开、输入关键字、进行搜索,来简单演示一下testNG的使用


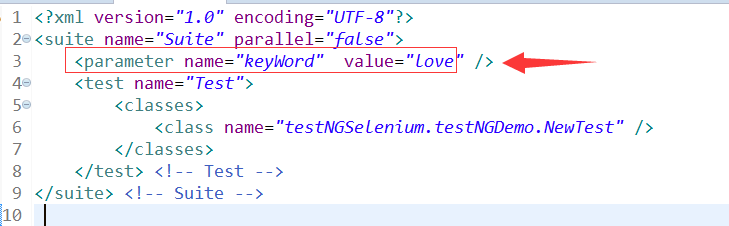
 1 package testNGSelenium.testNGDemo;
 2
 3 import org.testng.annotations.Test;
 4 import org.testng.annotations.BeforeTest;
 5 import org.testng.annotations.DataProvider;
 6 import org.testng.annotations.Parameters;
 7
 8 import java.util.Date;
 9 import java.util.concurrent.TimeUnit;
10
11 import org.apache.bcel.generic.NEW;
12 import org.apache.commons.collections.map.StaticBucketMap;
13 import org.openqa.selenium.By;
14 import org.openqa.selenium.WebDriver;
15 import org.openqa.selenium.WebElement;
16 import org.openqa.selenium.chrome.ChromeDriver;
17 import org.openqa.selenium.support.ui.ExpectedCondition;
18 import org.openqa.selenium.support.ui.WebDriverWait;
19 import org.testng.annotations.AfterTest;
20
21 public class NewTest {
22     //声明一个全局变量
23     private WebDriver driver;
24
25
26
27   @Test
28   @Parameters({"keyWord"})
29   public void f(String keywords) {
30       final By input1 = By.id("kw");
31       final By button1 = By.id("su");
32
33       //智能等待页面的输入框加载出来
34       try {
35
36           (new WebDriverWait(driver, 3)).until(new ExpectedCondition<Boolean>() {
37
38             public Boolean apply(WebDriver input) {
39                 WebElement element = input.findElement(input1);
40                 System.out.println(new Date());
41                 return element!= null;
42             }
43         });
44
45     } catch (Exception e) {
46         System.out.println("输入框3S还没加载出来!!!");
47         e.printStackTrace();
48     }
49
50
51       //智能等待页面的搜索按钮加载出来
52       try {
53           (new WebDriverWait(driver, 3)).until(new ExpectedCondition<Boolean>() {
54
55                 public Boolean apply(WebDriver input) {
56                     WebElement element = input.findElement(button1);
57                     System.out.println(new Date());
58                     return element!= null;
59                 }
60             });
61     } catch (Exception e) {
62         System.out.println("搜索按钮等待了3秒还未加载出来");
63         e.printStackTrace();
64     }
65
66
67       driver.findElement(input1).sendKeys(keywords);
68       driver.findElement(button1).click();
69
70       //等待10S,便于观察结果
71       try {
72         Thread.sleep(10000);
73     } catch (InterruptedException e) {
74
75         e.printStackTrace();
76     }
77
78
79   }
80   @BeforeTest
81   public void beforeTest()  {
82       driver = new ChromeDriver();
83       //窗口最大化
84       driver.manage().window().maximize();
85
86       //加载页面
87       driver.get("http://www.baidu.com");
88
89       //设置页面完全加载时间为3秒,第二个参数TimeUnit.SECONDS是指定时间单位
90         driver.manage().timeouts().pageLoadTimeout(3, TimeUnit.SECONDS);
91
92   }
93
94   @AfterTest
95   public void afterTest() {
96       driver.quit();
97   }
98
99 }
上面代码中用到了参数化,是需要在xml文件中设置的:
注意:
1.如果使用了参数化,则必须在XML文件上run as TestNG,否则会提示得不到参数的。
2.运行完成后,我们可以在项目目录中看到多了一个test-output

对其中的emailable-report.html右键---open with---web browser,就可以打开如下的测试报告:

关于配置文件的简单介绍:
通过上面的配置文件介绍,你可能会问,如果parallelism设置为true,是不是就可以跑多线程了??
是的!!!激不激动,开不开心!这个多线程可以支持我们做两件事:
1.多个线程来跑同一套件中的不同方法、不同类、不同组件---------------------这样,当我们的测试代码很庞大的时候,会非常节省运行时间
2.用来测试多线程同步问题。举个栗子-----------当有段代码涉及到:不同线程访问同一对象,并且会对该对象作出修改的时候,我们就可以针对这段代码来设计:多个线程同时跑这段代码,来测试下开发的线程同步是不是已经处理好啦。
下面来介绍下TestNG提供的多线程测试的不同使用方法,为了便于理解,这里使用的都是笔者写的最简单的demo:
一:并行的执行某方法
package testNGSelenium.testMethodParallelism;

import org.testng.annotations.Test;
import org.testng.annotations.BeforeMethod;
import org.testng.annotations.AfterMethod;

public class MethodParallelismTest {
  @Test
  public void f1() {
      System.out.println("这里是方法1,执行该方法的当前线程ID为"+ Thread.currentThread().getId());

  }

  @Test
  public void f2() {
      System.out.println("这里是方法2,执行该方法的当前线程ID为"+ Thread.currentThread().getId());
  }

  @BeforeMethod
  public void beforeMethod() {
      System.out.println("这里是before,执行该方法的当前线程ID为"+ Thread.currentThread().getId());

  }

  @AfterMethod
  public void afterMethod() {
      System.out.println("这里是after,执行该方法的当前线程ID为"+ Thread.currentThread().getId());
  }

}
对应修改XML文件为:

该代码的执行结果为:

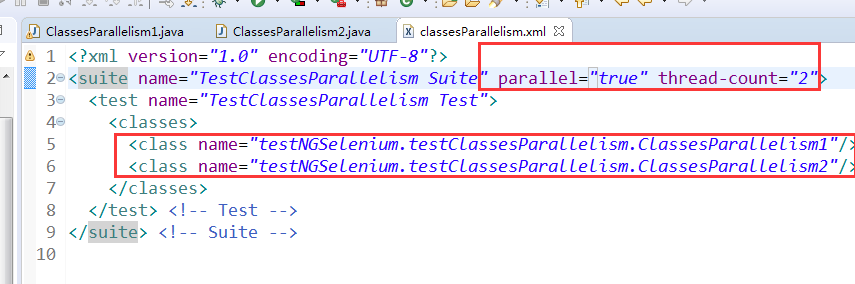
二:并行的执行同一套间下同一组件中的不同class
package testNGSelenium.testClassesParallelism;

import org.testng.annotations.Test;
import org.testng.annotations.BeforeClass;
import org.testng.annotations.BeforeMethod;
import org.testng.annotations.DataProvider;
import org.testng.annotations.AfterClass;
import org.testng.annotations.AfterMethod;

public class ClassesParallelism1 {


    @Test
    public void f() {
        System.out.println("test1" + Thread.currentThread().getId());
    }


    @BeforeClass
    public void beforeClass() {
        System.out.println("beforeClass1" + Thread.currentThread().getId());
    }

    @AfterClass
    public void afterClass() {
        System.out.println("afterClass2" + Thread.currentThread().getId());
    }

}
package testNGSelenium.testClassesParallelism;

import org.testng.annotations.AfterClass;
import org.testng.annotations.BeforeClass;
import org.testng.annotations.Test;

public class ClassesParallelism2 {
      @Test
      public void f() {
          System.out.println("test2" + Thread.currentThread().getId());
      }

      @BeforeClass
      public void beforeClass() {
          System.out.println("beforeClass2" + Thread.currentThread().getId());
      }

      @AfterClass
      public void afterClass() {
          System.out.println("afterClass2" + Thread.currentThread().getId());
      }

}
对应XML的设置:
该代码的执行结果为:

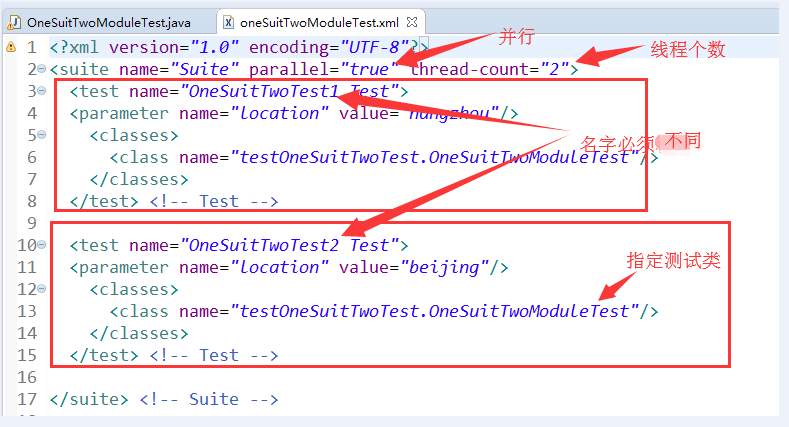
三:同一套间中的不同组件并行
package testOneSuitTwoTest;

import org.testng.annotations.Test;
import org.testng.annotations.BeforeMethod;
import org.testng.annotations.AfterMethod;
import org.testng.annotations.DataProvider;
import org.testng.annotations.Parameters;
import org.testng.annotations.BeforeClass;
import org.testng.annotations.AfterClass;
import org.testng.annotations.BeforeTest;
import org.testng.annotations.AfterTest;
import org.testng.annotations.BeforeSuite;
import org.testng.annotations.AfterSuite;

public class OneSuitTwoModuleTest {


    @Test
    @Parameters({"location"})
    public void f(String p) {
        System.out.println(p);
        System.out.println("Test---thread" + Thread.currentThread().getId());
    }

    @BeforeMethod
    public void beforeMethod() {
        System.out.println("beforeMethod---thread" + Thread.currentThread().getId());
    }

    @AfterMethod
    public void afterMethod() {
        System.out.println("afterMethod---thread" + Thread.currentThread().getId());
    }

/*    @DataProvider
    public Object[][] dp() {
        return new Object[][] { new Object[] { 1, "a" }, new Object[] { 2, "b" }, };
    }*/

    @BeforeClass
    public void beforeClass() {
        System.out.println("beforeClass---thread" + Thread.currentThread().getId());
    }

    @AfterClass
    public void afterClass() {
        System.out.println("afterClass---thread" + Thread.currentThread().getId());
    }

    @BeforeTest
    public void beforeTest() {
        System.out.println("beforeTest---thread" + Thread.currentThread().getId());
    }

    @AfterTest
    public void afterTest() {
        System.out.println("afterTest---thread" + Thread.currentThread().getId());
    }

    @BeforeSuite
    public void beforeSuite() {
        System.out.println("beforeSuite---thread" + Thread.currentThread().getId());
    }

    @AfterSuite
    public void afterSuite() {
        System.out.println("afterSuite---thread" + Thread.currentThread().getId());
    }

}
对应的XML设置为:

上面代码的执行结果为;

四:多线程执行某方法
package testNGSelenium.moreThreadTest;

import org.testng.annotations.Test;
import org.testng.annotations.BeforeTest;
import org.testng.annotations.AfterTest;

public class MoreThreadTest {
    //这里代表 启动三个线程,该方法总共执行9遍,设置整个测试方法的超时时间为2S
  @Test(threadPoolSize=3,invocationCount=9,timeOut=2000)
  public void f() {
      System.out.println("Test---threadId:"+Thread.currentThread().getId());
  }

  @BeforeTest
  public void beforeTest() {
  }

  @AfterTest
  public void afterTest() {
  }

}
对应的XML文件并没有特别设置啥参数。

执行结果为:
注意点:
1.如果有童鞋在运行TESTNG套件的时候,遇到了ElementTravelsal找不到的问题,则在自己的pom.xml文件中引入依赖包:xml-apis
<!-- https://mvnrepository.com/artifact/xml-apis/xml-apis -->
<dependency>
<groupId>xml-apis</groupId>
<artifactId>xml-apis</artifactId>
<version>1.4.01</version>
</dependency>
2.如果遇到运行程序之后,在console窗口遇到了乱码:
请打开eclipse.ini文件,并添加: -Dfile.encoding=UTF-8
3.一个xml中间,只能有一个suite标签;
一个suite可以有多个test,test名称必须不同(否则报错:Two tests in the same suite cannot have the same name);
一个test中间可以包含多个class,
一个class里面可以包含多个方法
4.在testNg的 suite file中,添加上
<!DOCTYPE suite SYSTEM "http://testng.org/testng-1.0.dtd">
相当于标签控制,只有合法标签才能输入。否则报错。
5.如果读者使用的开发工具是IDEA,那么久不需要安装testNG的插件了。IDEA是自带了testNG的插件的。只要在maven中添加testNg的包就可以了。
6.老的版本中
<suite name="suitname1" parallel="true" thread-count="2">
parallel的值是没有“true”的。
分为tests,classes,methods级别
tests:不同test tag下的用例可以在不同的线程执行,相同test tag下的用例只能在同一个线程中执行
classes:不同class tag下的用例可以在不同的线程执行,相同class tag下的用例只能在同一个线程中执行。
methods:所有用例都可以在不同的线程去执行。


7.关于dataprovider的并发
https://www.cnblogs.com/znicy/p/6534893.html