第一、创建新闻Component(视图组件)
export class News{
    id:number;
    title:string;
    create_date:string;
    click:number;
}
接着我们创建一个模拟新闻列表的类
2)mock-news.ts
import {News} from './news';

export const NewList: News[] =
[
    { id: 1, title: '十九大最新報道', create_date: '2017-11-10', click: 10 },
    { id: 2, title: '西二旗地铁空车', create_date: '2017-10-10', click: 11 },
    { id: 3, title: '日本有开始找事了', create_date: '2017-11-12', click: 12 }
]
准备好上面的工作,我们真正需要创建component了,
3)创建newslist.component.ts
import { Component } from '@angular/core';
import { News } from './news';
import { NewList } from './mock-news';

@Component({
    selector:'news',
    templateUrl:'./newslist.component.html',
    styleUrls:['./newslist.component.css']
})
export class NewsListComponent{
    newlist = NewList;
}
4)创建 newslist.component.html
<h2>新闻列表</h2>
<ul class="ul_news">
    <li *ngFor="let n of newlist"  >
        {{n.id}}.{{n.title}} <span>{{n.create_date}}</span>
    </li>
</ul>
5)创建newslist.component.css
*{margin: 0px; padding: 0;}
.ul_news{list-style: none; margin-bottom: 10px; }
.ul_news li {  300px; height: 30px; line-height: 30px; text-align: left; padding:5px;
    border-bottom: 1px dashed #ccc;
cursor:pointer;}

.ul_news li:hover{background:blanchedalmond;}
.ul_news li span{float:right;}
至此,我们已经创建完成,目录结果如下图,此时运行npm start 并不能看到我们的新闻列表
第二、集成到app.module上
想在运行时预览需要把我们的NewListComponent 装载到 app.module.ts中,因为他是根模块,启动从这里开始
具体调整入下
app.component.ts
import { BrowserModule } from '@angular/platform-browser';
import { NgModule } from '@angular/core';
import { FormsModule } from '@angular/forms';

import { NewsListComponent } from './news/newslist.component';
import { AppComponent } from './app.component';

@NgModule({
  declarations: [
    AppComponent,
    NewsListComponent
  ],
  imports: [
    BrowserModule,
    FormsModule
  ],
  providers: [],
  bootstrap: [AppComponent]
})
export class AppModule { }
可以看到,我们增加了NewsListComponent ,同时在NgModule的declarations中加入NewsListComponent
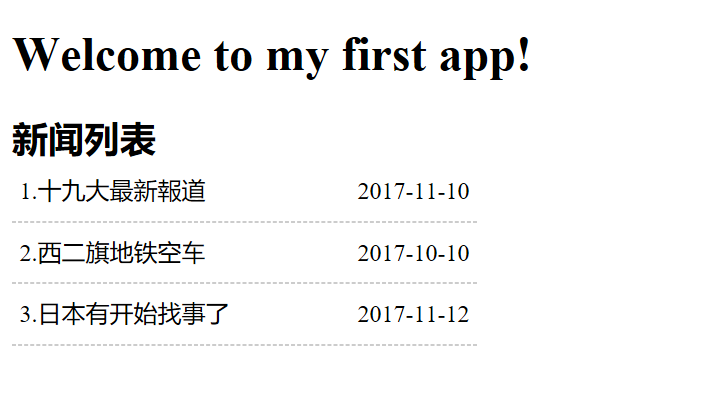
另外在app.component.html增加上我们的新视图标签 news
 <h1>
    Welcome to {{title}}!
  </h1>
  <news>

  </news>
在命令行中 运行npm start ,运行结果如下
第三、增加新闻明细
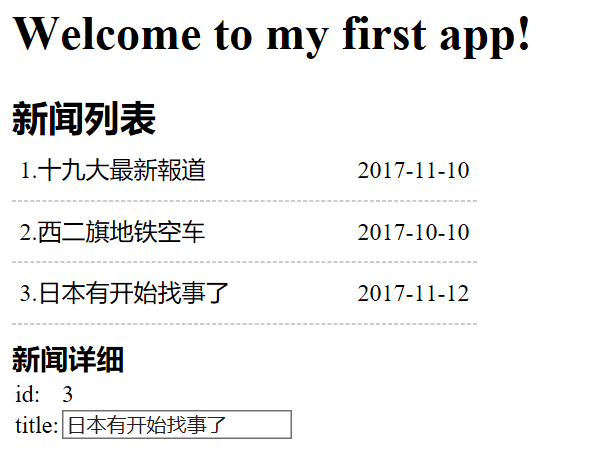
我们想在用户点击新闻列表的时候下面展示新闻的详细信息,该如何操作那
1)修改 newslist.component.ts
import { Component } from '@angular/core';
import { News } from './news';
import { NewList } from './mock-news';

@Component({
    selector:'news',
    templateUrl:'./newslist.component.html',
    styleUrls:['./newslist.component.css']
})
export class NewsListComponent{
    newlist = NewList;
    selectedNew:News;
    onSelected(n:News):void{
        this.selectedNew=n;
    }
}
增加属性selectedNew 和事件 onSelected 方法。
同时记得在newlist.component.html 的新闻项上增加
2)修改newlist.component.html
在后面追加代码
<div *ngIf="selectedNew">
    <h3>新闻详细</h3>
    <table>
        <tr>
            <td>id:</td>
            <td> {{selectedNew.id}}</td>
        </tr>
        <tr>
            <td>title:</td>
            <td>
                <input [(ngModel)]="selectedNew.title" placeholder="title" />
            </td>
        </tr>
    </table>

</div>
此时要注意,[(ngModel)] 是Angular的双向绑定(先会用,以后再慢慢了解其中的原理),需要在app.module.ts中引入FormsModule ,否则页面会报错。
3)再次运行 npm start 可以看到如下结果
第四、总结
1.熟悉Component的创建,注意装饰器的写法@Component 中的标签,另外templateUrl,可以自己使用 template:,通常简单的时候可以直接使用
2.熟悉指令*ngFor,*ngIF,(click)的绑定,双向绑定[(ngModle)] 的用法
3.了解NgModule 和Component的关系,一个app的根模块通常都是app.module.ts