前言
有一个Spring源码阅读环境是学习Spring的基础。笔者借鉴了网上很多搭建环境的方法,也尝试了很多,接下来总结两种个人认为比较简便实用的方法。读者可根据自己的需要自行选择。
方法一:搭建基础Spring项目
思路就是创建一个最基本的spring项目,通过下载源码,可以实现阅读源码的需求。优点是非常简单快捷,缺点是无法对源码进行注释和二次开发。
1. 在IDEA中创建一个maven项目
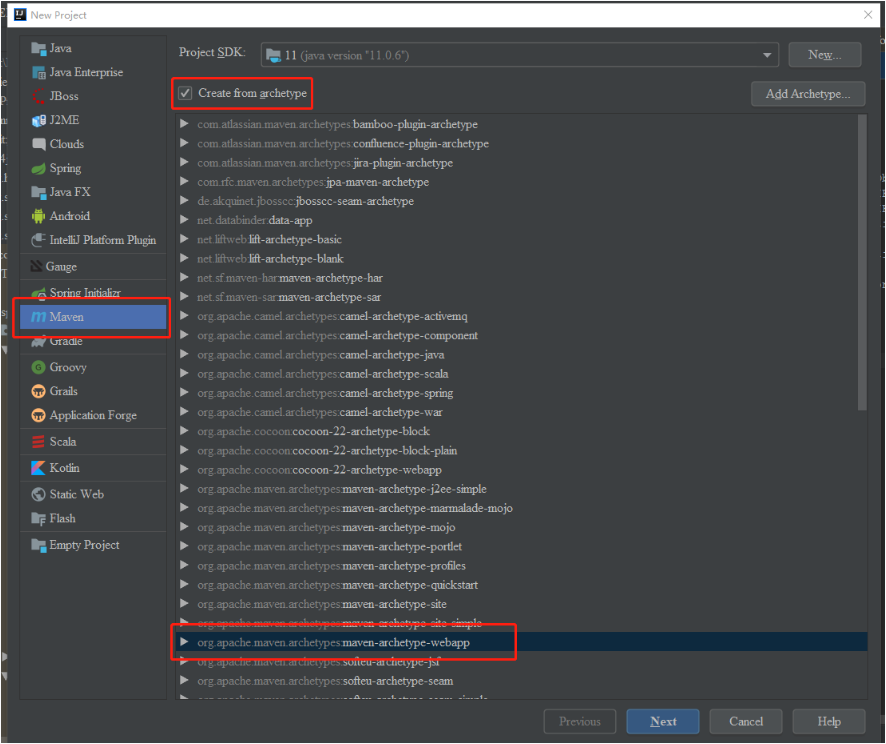
这里我们利用模板创建一个web项目
按照提示填写相关信息,然后一直next即可。
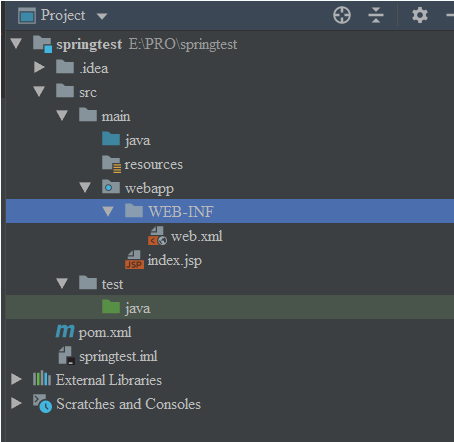
2. 创建包目录结构
包完整目录结构如下:
注意要将几个文件夹标记一下

3. 配置文件
首先pom.xml
<?xml version="1.0" encoding="UTF-8"?>

<project xmlns="http://maven.apache.org/POM/4.0.0" xmlns:xsi="http://www.w3.org/2001/XMLSchema-instance"
  xsi:schemaLocation="http://maven.apache.org/POM/4.0.0 http://maven.apache.org/xsd/maven-4.0.0.xsd">
  <modelVersion>4.0.0</modelVersion>

  <groupId>com.test</groupId>
  <artifactId>spring-test</artifactId>
  <version>1.0-SNAPSHOT</version>
  <packaging>war</packaging>

  <name>spring-test Maven Webapp</name>
  <!-- FIXME change it to the project's website -->
  <url>http://www.example.com</url>

  <properties>
    <project.build.sourceEncoding>UTF-8</project.build.sourceEncoding>
    <maven.compiler.source>1.7</maven.compiler.source>
    <maven.compiler.target>1.7</maven.compiler.target>
  </properties>

  <dependencies>
    <dependency>
      <groupId>junit</groupId>
      <artifactId>junit</artifactId>
      <version>4.11</version>
      <scope>test</scope>
    </dependency>
    <!--Spring核心基础依赖-->
    <!-- https://mvnrepository.com/artifact/org.springframework/spring-core -->
    <dependency>
      <groupId>org.springframework</groupId>
      <artifactId>spring-core</artifactId>
      <version>5.1.5.RELEASE</version>
    </dependency>
    <!-- https://mvnrepository.com/artifact/org.springframework/spring-context -->
    <dependency>
      <groupId>org.springframework</groupId>
      <artifactId>spring-context</artifactId>
      <version>5.1.3.RELEASE</version>
    </dependency>
    <dependency>
      <groupId>org.springframework</groupId>
      <artifactId>spring-beans</artifactId>
      <version>5.0.2.RELEASE</version>
    </dependency>
    <dependency>
      <groupId>org.springframework</groupId>
      <artifactId>spring-expression</artifactId>
      <version>5.0.2.RELEASE</version>
    </dependency>
    <!--日志相关-->
    <dependency>
      <groupId>commons-logging</groupId>
      <artifactId>commons-logging</artifactId>
      <version>1.2</version>
    </dependency>
    <dependency>
      <groupId>log4j</groupId>
      <artifactId>log4j</artifactId>
      <version>1.2.17</version>
    </dependency>
  </dependencies>

  <build>
    <finalName>spring-test</finalName>
    <pluginManagement><!-- lock down plugins versions to avoid using Maven defaults (may be moved to parent pom) -->
      <plugins>
        <plugin>
          <artifactId>maven-clean-plugin</artifactId>
          <version>3.1.0</version>
        </plugin>
        <!-- see http://maven.apache.org/ref/current/maven-core/default-bindings.html#Plugin_bindings_for_war_packaging -->
        <plugin>
          <artifactId>maven-resources-plugin</artifactId>
          <version>3.0.2</version>
        </plugin>
        <plugin>
          <artifactId>maven-compiler-plugin</artifactId>
          <version>3.8.0</version>
        </plugin>
        <plugin>
          <artifactId>maven-surefire-plugin</artifactId>
          <version>2.22.1</version>
        </plugin>
        <plugin>
          <artifactId>maven-war-plugin</artifactId>
          <version>3.2.2</version>
        </plugin>
        <plugin>
          <artifactId>maven-install-plugin</artifactId>
          <version>2.5.2</version>
        </plugin>
        <plugin>
          <artifactId>maven-deploy-plugin</artifactId>
          <version>2.8.2</version>
        </plugin>
      </plugins>
    </pluginManagement>
  </build>
</project>
接着是spring的配置文件,一般命名为:applicationContext.xml
<?xml version="1.0" encoding="UTF-8"?>
<beans xmlns="http://www.springframework.org/schema/beans"
       xmlns:xsi="http://www.w3.org/2001/XMLSchema-instance"
       xmlns:aop="http://www.springframework.org/schema/aop"
       xmlns:context="http://www.springframework.org/schema/context"
       xsi:schemaLocation="http://www.springframework.org/schema/beans http://www.springframework.org/schema/beans/spring-beans.xsd http://www.springframework.org/schema/context http://www.springframework.org/schema/context/spring-context.xsd">

    <!-- 扫描注解Bean -->
    <context:component-scan base-package="com.leng"/>

    <aop:aspectj-autoproxy expose-proxy="true" />

    <context:annotation-config/>
</beans>
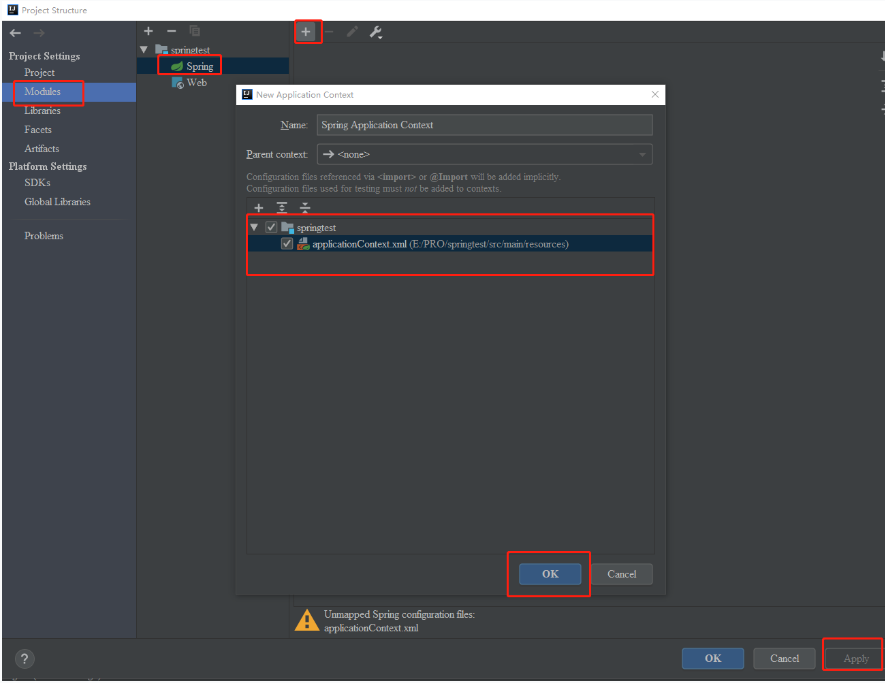
配置完applicationContext.xml后可能会在该文件的上方报“Application cotext not configured for this file”。按以下方法处理即可:
project structure -> Modules -> 展开项目点击Spring -> 如图
4. 测试
UserServiceImpl.java
/**
 * @Classname UserServiceImpl
 * @Date 2020/9/22 21:58
 * @Autor lengxuezhang
 */
public class UserServiceImpl {

    public void login() {
        System.out.println("用户登录......");
    }

    public void sayHello() {
        System.out.println("Hello World!!!");
    }
}
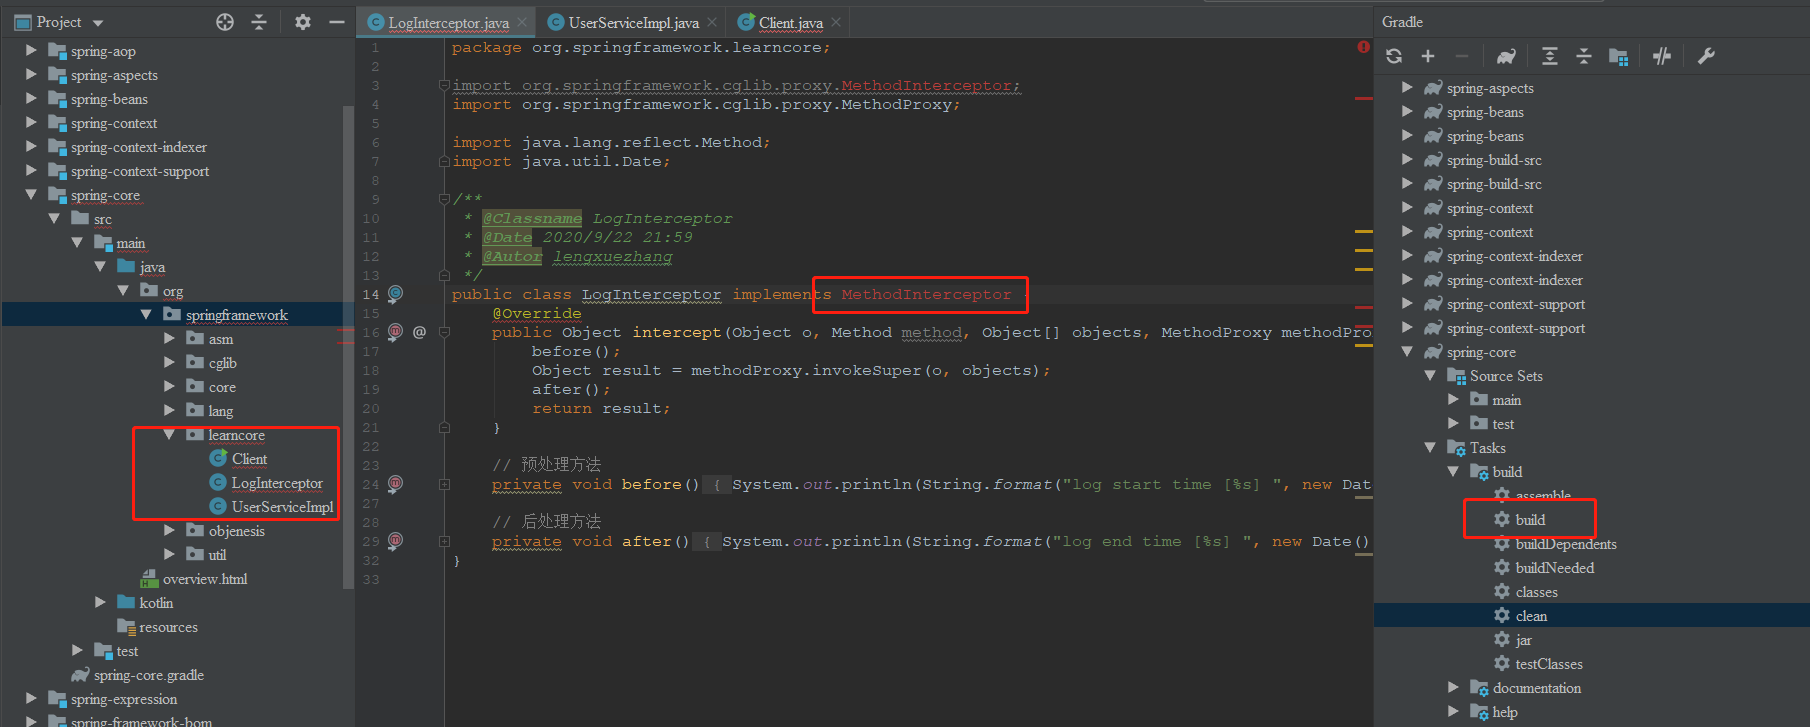
LogInterceptor.java
/**
 * @Classname LogInterceptor
 * @Date 2020/9/22 21:59
 * @Autor lengxuezhang
 */
public class LogInterceptor implements MethodInterceptor {
    @Override
    public Object intercept(Object o, Method method, Object[] objects, MethodProxy methodProxy) throws Throwable {
        before();
        Object result = methodProxy.invokeSuper(o, objects);
        after();
        return result;
    }

    // 预处理方法
    private void before() {
        System.out.println(String.format("log start time [%s] ", new Date()));
    }

    // 后处理方法
    private void after() {
        System.out.println(String.format("log end time [%s] ", new Date()));
    }
}
Client.java
/**
 * @Classname Client
 * @Date 2020/9/12 2:40
 * @Autor lengxuezhang
 */
public class Client {
    public static void main(String[] args) {
        Enhancer enhancer = new Enhancer();
        enhancer.setSuperclass(UserServiceImpl.class);
        enhancer.setCallback(new LogInterceptor());

        UserServiceImpl userService = (UserServiceImpl) enhancer.create();
        userService.login();
        userService.sayHello();
    }
}
运行结果:
log start time [Wed Sep 23 23:47:37 CST 2020]
用户登录......
log end time [Wed Sep 23 23:47:37 CST 2020]
log start time [Wed Sep 23 23:47:37 CST 2020]
Hello World!!!
log end time [Wed Sep 23 23:47:37 CST 2020]
方法二:下载Spring官方源码
这种方式需要电脑必须安装 gradle,安装方式自行百度,这里需要提醒一下的是,版本不需要安装很高,我这里安装的是 5.1.1。
另外我在使用官方源码编译时,总是编译失败,因此我使用了码云上的一个项目,地址:https://gitee.com/tiandong123/SpringFrameWork_5.1.8RELEASE.git
1. 下载并解压后,用IDEA open项目
选择“build.gradle”

open as project:
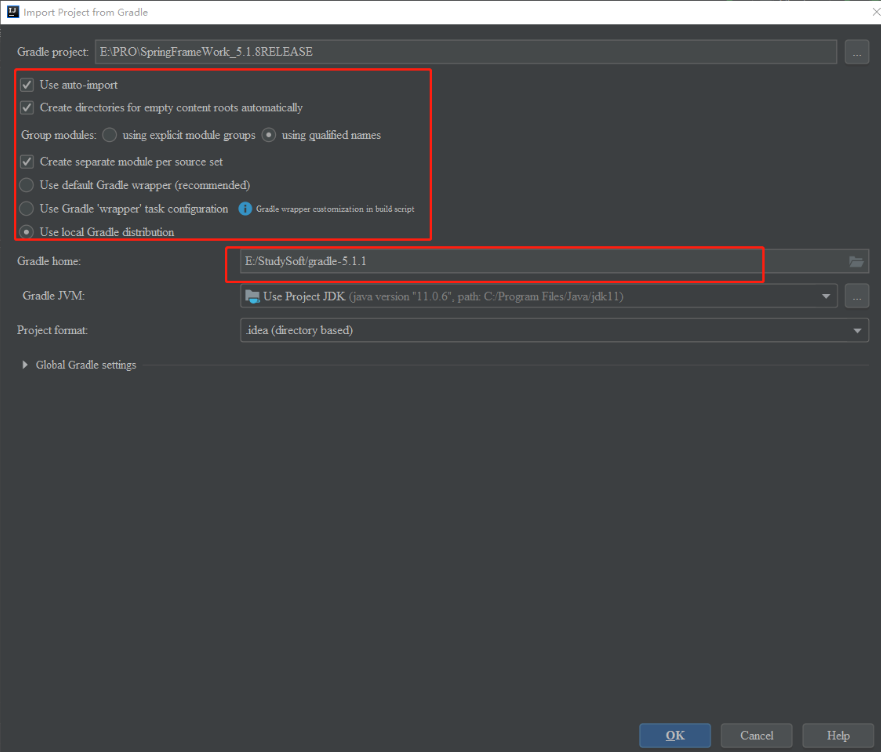
按照上图配置,这里就要选择上面安装好的gradle工具。点击 ok 后等待项目自动编译,这个过程可能需要一些时间,耐心等待。
编译成功后如图:
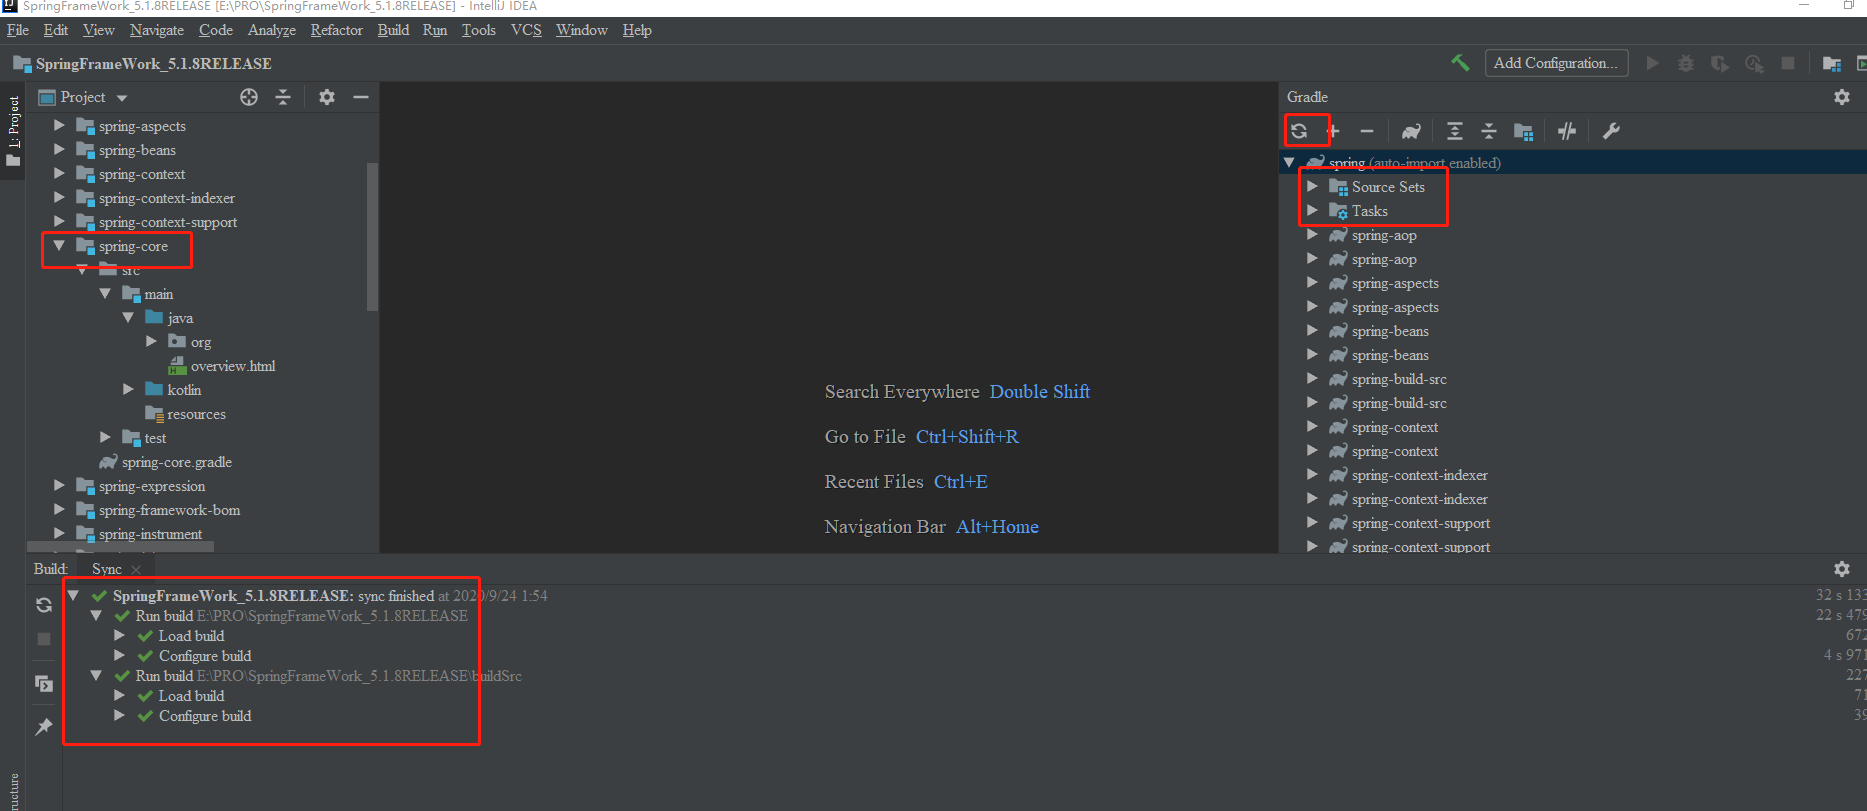
编译成功后,各个Module的包图标的右下角是有个小绿块的,且包目录下的包都被marked了。如果不是,那么可以点击右上角Gradle的“refresh all gradle projects”
2. 测试
为区分个人的测试代码和源码,你可以新建一个全新的module,但笔者在新建module的过程中又发现了很多新的坑,直到最后也没有解决。这里其实不需要新建module,直接在原来module中新建文件夹就可以开始测试了。
- 在spring-core包下新建自己的测试文件夹
- 写测试代码,仍然是上面写的cglib动态代理的内容,这里不再贴出来。
写完测试代码后会发现有一些类会报错,这是因为项目没有构建,点击右侧的“build”即可