目录
1. 主从简介
1.1 主从作用及条件
作用:
- 实时灾备,用于故障切换
- 读写分离,提供查询服务
- 备份,避免影响业务
主从部署必要条件:
- 主库开启binlog日志(设置log-bin参数)
- 主从server-id不同
- 从库服务器能连通主库
1.2 主从形式
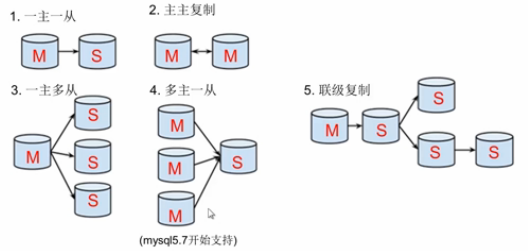
- 一主一从
- 主主复制
- 一主多从---扩展系统读取的性能,因为读是在从库读取的
- 多主一从---5.7开始支持
- 联级复制
2. 主从复制原理
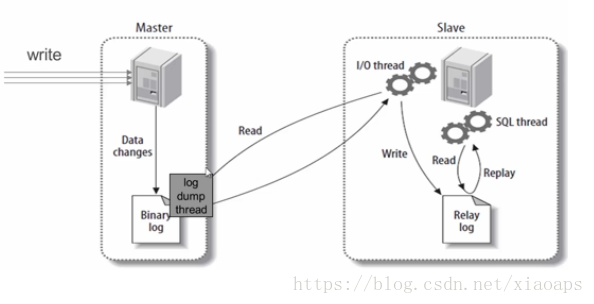
1.从库的IO线程向主库的主进程发送请求,主库验证从库,交给主库IO线程负责数据传输;
2.主库IO线程对比从库发送过来的master.info里的信息,将binlog文件信息,偏移量和binlog文件名等发送给从库
3.从库接收到信息后,将binlog信息保存到relay-bin中,同时更新master.info的偏移量和binlog文件名
4.从库的SQL线程不断的读取relay-bin的信息,同时将读到的偏移量和文件名写道relay-log.info文件,binlog信息写进自己的数据库,一次同步操作完成。
5.完成上次同步后,从库IO线程不断的向主库IO线程要binlog信息
6.从库如果也要做主库,也要打开log_bin 和log-slave-update参数
3. 主从复制配置
主从复制配置步骤:
- 确保从数据库与主数据库里的数据一样
- 在主数据库里创建一个同步账号授权给从数据库使用
- 配置主数据库(修改配置文件)
- 配置从数据库(修改配置文件)
需求:
搭建两台MySQL服务器,一台作为主服务器,一台作为从服务器,主服务器进行写操作,从服务器进行读操作
环境说明:
| 数据库角色 | IP | 应用与系统版本 | 有无数据 |
|---|---|---|---|
| 主数据库 | 192.168.163.128 | centos7/redhat7 mysql-5.7 | 有数据 |
| 从数据库 | 192.168.163.130 | centos7/redhat7 mysql-5.7 | 与主库数据相同 |
| 从数据库 | 192.168.163.129 | centos7/redhat7 mysql-5.7 | 无数据 |
3.1mysql主从配置
为确保从数据库与主数据库里的数据一样,先全备主数据库并还原到从数据库中
3.2 mysql主从配置
3.2.1 确保从数据库与主数据库里的数据一样
//先查看主库有哪些库

[root@cl ~]# mysql -uroot -pcl

mysql> show databases;
+--------------------+
| Database           |
+--------------------+
| information_schema |
| chen               |
| cljhfy             |
| liang              |
| mysql              |
| performance_schema |
| sys                |
+--------------------+
7 rows in set (0.01 sec)

//再查看从库有哪些库

[root@cl130 ~]# mysql -uroot -pcljhfy

mysql> show databases;
+--------------------+
| Database           |
+--------------------+
| information_schema |
| chen               |
| cljhfy             |
| liang              |
| mysql              |
| performance_schema |
| sys                |
+--------------------+
7 rows in set (0.00 sec)
3.2.2 在主数据库里创建一个同步账号授权给从数据库使用
mysql> CREATE USER 'repl'@'172.16.12.129' IDENTIFIED BY 'repl123';
Query OK, 0 rows affected (0.00 sec)

mysql> GRANT REPLICATION SLAVE ON *.* TO 'repl'@'172.16.12.129';
Query OK, 0 rows affected (0.00 sec)

mysql> flush privileges;
Query OK, 0 rows affected (0.00 sec)
3.2.3 配置主数据库
[root@cl ~]# vim /etc/my.cnf
//在[mysqld]这段的后面加上如下内容
[mysqld]
datadir=/var/lib/mysql
socket=/var/lib/mysql/mysql.sock
log-bin=mysql-bin   //启用binlog日志
server-id=1     //数据库服务器唯一标识符,主库的server-id值必须比从库的小

symbolic-links=0

log-error=/var/log/mysqld.log
pid-file=/var/run/mysqld/mysqld.pid


//重启mysql服务
[root@cl ~]# systemctl restart mysqld
[root@cl ~]# ss -antl
State       Recv-Q Send-Q      Local Address:Port                     Peer Address:Port
LISTEN      0      128                     *:22                                  *:*
LISTEN      0      100             127.0.0.1:25                                  *:*
LISTEN      0      128                    :::22                                 :::*
LISTEN      0      100                   ::1:25                                 :::*
LISTEN      0      80                     :::3306                               :::*


//查看主库的状态
mysql> show master status;
+------------------+----------+--------------+------------------+-------------------+
| File             | Position | Binlog_Do_DB | Binlog_Ignore_DB | Executed_Gtid_Set |
+------------------+----------+--------------+------------------+-------------------+
| mysql-bin.000001 |      989 |              |                  |                   |
+------------------+----------+--------------+------------------+-------------------+
1 row in set (0.01 sec)
3.2.4 配置从数据库
[root@cl130 ~]# vim /etc/my.cnf
//添加如下内容
[mysqld]
datadir=/var/lib/mysql
socket=/var/lib/mysql/mysql.sock
server-id=2     //设置从库的唯一标识符,从库的server-id值必须小于主库的该值
relay-log=mysql-relay-bin       //启用中继日志relay-log

symbolic-links=0

log-error=/var/log/mysqld.log
pid-file=/var/run/mysqld/mysqld.pid


//重启从库的mysql服务
[root@cl130 ~]# systemctl restart mysqld
[root@cl130 ~]# ss -antl
State      Recv-Q Send-Q           Local Address:Port                          Peer Address:Port
LISTEN     0      128                          *:22                                       *:*
LISTEN     0      100                  127.0.0.1:25                                       *:*
LISTEN     0      128                         :::22                                      :::*
LISTEN     0      100                        ::1:25                                      :::*
LISTEN     0      80                          :::3306                                    :::*


//配置并启动主从复制
mysql> CHANGE MASTER TO
    -> MASTER_HOST='192.168.163.128',
    -> MASTER_USER='repl',
    -> MASTER_PASSWORD='repl123',
    -> MASTER_LOG_FILE='mysql-bin.000001',
    -> MASTER_LOG_POS=989;
Query OK, 0 rows affected, 2 warnings (0.33 sec)

mysql> start slave;
Query OK, 0 rows affected (0.01 sec)


//查看从服务器状态
mysql> show slave status G
*************************** 1. row ***************************
               Slave_IO_State: Waiting for master to send event
                  Master_Host: 172.16.12.128
                  Master_User: repl
                  Master_Port: 3306
                Connect_Retry: 60
              Master_Log_File: mysql-bin.000001
          Read_Master_Log_Pos: 154
               Relay_Log_File: mysql-relay-bin.000002
                Relay_Log_Pos: 320
        Relay_Master_Log_File: mysql-bin.000001
             Slave_IO_Running: Yes      //此处必须为Yes
            Slave_SQL_Running: Yes      //此处必须为Yes
              Replicate_Do_DB:
          Replicate_Ignore_DB:
3.2.5 测试验证
在主服务器的student库的name表中插入数据:
//主库
mysql>
mysql> use chen;
Reading table information for completion of table and column names
You can turn off this feature to get a quicker startup with -A

Database changed
mysql> select * from name;
Empty set (0.00 sec)

mysql> insert name values('tom',35),('jerry',33);
Query OK, 2 rows affected (0.00 sec)
Records: 2  Duplicates: 0  Warnings: 0

mysql> select * from name;
+-------+------+
| name  | age  |
+-------+------+
| tom   |   35 |
| jerry |   33 |
+-------+------+
2 rows in set (0.00 sec)

mysql>
在从数据库中查看数据是否同步:
//从库

[root@cl130 ~]# mysql -uroot -pcljhfy

mysql> use chen;
Reading table information for completion of table and column names
You can turn off this feature to get a quicker startup with -A

Database changed
mysql> select * from name;
+-------+------+
| name  | age  |
+-------+------+
| tom   |   35 |
| jerry |   33 |
+-------+------+
2 rows in set (0.00 sec)
3.3.6 拓展--从库与主库数据不同时
//全备主库
//全备主库时需要另开一个终端,给数据库加上读锁,避免在备份期间有其他人在写入导致数据不一致
mysql> FLUSH TABLES WITH READ LOCK;
Query OK, 0 rows affected (0.00 sec)
//此锁表的终端必须在主从配置完成以后才能退出

//备份主库并将备份文件传送到从库
[root@cl ~]# mysqldump -uroot -pcl --all-databases > /opt/all-201905151700.sql
mysqldump: [Warning] Using a password on the command line interface can be insecure.
[root@cl ~]# ls /opt/
all-201905151700.sql
[root@cl ~]# scp /opt/all-201905151700.sql root@192.168.163.129:/opt/
root@192.168.163.129's password:
all-201905151700.sql                              100%  786KB  10.6MB/s   00:00

//在从库上恢复主库的备份并查看从库有哪些库,确保与主库一致
[root@cl129 ~]# mysql -uroot -pcljhfy! < /opt/all-201905151700.sql
mysql: [Warning] Using a password on the command line interface can be insecure.
[root@cl129 ~]# mysql -uroot -pcljhfy! -e 'show databases;'
mysql: [Warning] Using a password on the command line interface can be insecure.
+--------------------+
| Database           |
+--------------------+
| information_schema |
| chen               |
| cljhfy             |
| liang              |
| mysql              |
| performance_schema |
| sys                |
+--------------------+

//进行上面3.2.1---->3.2.5 的操作,然后验证是否同步

//验证:在主库的name表添加数据

mysql> insert name values('kele',35),('lisi',33);
Query OK, 2 rows affected (0.01 sec)
Records: 2  Duplicates: 0  Warnings: 0

mysql> select * from name;
+-------+------+
| name  | age  |
+-------+------+
| tom   |   35 |
| jerry |   33 |
| kele  |   35 |
| lisi  |   33 |
+-------+------+
4 rows in set (0.00 sec)

//在从库上验证

[root@cl129 ~]# mysql -uroot -pcljhfy -e 'select * from chen.name;'
mysql: [Warning] Using a password on the command line interface can be insecure.
+-------+------+
| name  | age  |
+-------+------+
| tom   |   35 |
| jerry |   33 |
| kele  |   35 |
| lisi  |   33 |
+-------+------+


//最后解除主库的锁表状态,直接退出交互式界面即可
mysql> quit
Bye