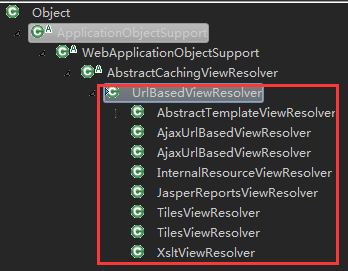
SpringMVC 的 Controller 可以返回各种各样的视图。比如 JSP, JSON, Velocity, FreeMarker, XML, PDF, Excel, 还有Html字符流 等等。那它们该如何的进行处理的呢?这里就涉及到 各种视图(View)对应的各种视图解析器(ViewResolver). 基本上上面说的每一种视图就对应用一种视图解析器来处理。基本上各种视图解析器大致上可以分为两类:一是基于URL的视图解析器;一种是其它解析器;所谓的UrlBasedViewResolver,就是将返回值作为最终视图的url的一部分,然后和相关配置组合起来,就是最终的视图地址url. 我们看下UrlBasedViewResolver的解析器有哪些:

1. 返回JSP
返回JSP是最简单的,JSP视图的视图解析器为 InternalResourceViewResolver,也是一个UrlBasedViewResolver解析器。其对应的解析器的配置一般如下:
<bean id="viewResolver" class="org.springframework.web.servlet.view.InternalResourceViewResolver">
    <property name="viewClass" value="org.springframework.web.servlet.view.JstlView"/>
    <property name="prefix" value="/WEB-INF/jsp/"/>
    <property name="suffix" value=".jsp"/>
</bean>
使用该例子,我们好好理解下什么是 “基于URL” 的视图解析器,比如我们的 Controller 中最后的返回的处理代码为: return "index"; 那么“基于URL” 的视图解析器就会将返回值 “index” 作为最后视图的URL的一部分,然后结合上面的配置 <property name="prefix"value="/WEB-INF/jsp/"/> 和 <property name="suffix" value=".jsp"/>,最后得到最终的URL: "/WEB-INF/jsp/" + "index" + ".jsp" == "/WEB-INF/jsp/index.jsp"
这就是所谓的 “基于URL” 的视图解析器的工作方式。
2. 返回 HTML 页面
我们知道在Servlet中,我们是可以直接在其中打印输出HTML字符流到最终页面
protected void doPost(HttpServletRequest request, HttpServletResponse response) throws ServletException, IOException {
        request.setCharacterEncoding("utf-8");
        response.setCharacterEncoding("utf-8");
                // ... ...
        //建立请求
        String sHtmlText = AlipaySubmit.buildRequest(sParaTemp,"get","确认");
        response.getWriter().println(sHtmlText);
    }
    /**
     * 建立请求,以表单HTML形式构造(默认)
     * @param sParaTemp 请求参数数组
     * @param strMethod 提交方式。两个值可选:post、get
     * @param strButtonName 确认按钮显示文字
     * @return 提交表单HTML文本
     */
    public static String buildRequest(Map<String, String> sParaTemp, String strMethod, String strButtonName) {
        //待请求参数数组
        Map<String, String> sPara = buildRequestPara(sParaTemp);
        List<String> keys = new ArrayList<String>(sPara.keySet());

        StringBuffer sbHtml = new StringBuffer();
        sbHtml.append("<!doctype html><html><head><meta http-equiv="Content-Type" content="text/html; charset=UTF-8">");
        sbHtml.append("<title>支付宝即时到账交易接口</title></head><body>");
        sbHtml.append("<form id="alipaysubmit" name="alipaysubmit" action="" + ALIPAY_GATEWAY_NEW
                      + "_input_charset=" + AlipayConfig.input_charset + "" method="" + strMethod
                      + "">");

        for (int i = 0; i < keys.size(); i++) {
            String name = (String) keys.get(i);
            String value = (String) sPara.get(name);

            sbHtml.append("<input type="hidden" name="" + name + "" value="" + value + ""/>");
        }

        //submit按钮控件请不要含有name属性
        sbHtml.append("<input type="submit" value="" + strButtonName + "" style="display:none;"></form>");
        sbHtml.append("<script>document.forms['alipaysubmit'].submit();</script>");
        sbHtml.append("</body></html>");
        return sbHtml.toString();
    }
很显然,Servlet直接将HTML的字符流输出到了浏览器端,那么在SpringMVC中该如何做呢?其实在SpringMVC中我们也是可以如下实现的:
    @RequestMapping(value="/getPage")
    public void writeSubmitHtml(Reader reader, Writer writer, HttpSession session) throws IOException {
        User user = (User) session.getAttribute(ConstantConfig.LONGIN_USER);
        StringBuffer sbHtml = new StringBuffer();
        sbHtml.append("<!doctype html><html><head><meta http-equiv="Content-Type" content="text/html; charset=UTF-8">");
        sbHtml.append("<title>支付宝即时到账交易接口</title></head><body>"+ user.getNo() +"</body></html>");
        writer.write(sbHtml.toString());
    }
我们看到我们直接使用了参数 Writer writer,返回值为 void, 其实参数 Writer writer 也可以换成 PrintWriter writer; 直接写出HTML的字符流。
我们也知道在Servlet中,我们是可以直接forward或者redirecit到html页面,所以我们也可以如下在springmvc中返回到html页面:
    @RequestMapping(value="/htmlView")
    public void htmlView(HttpServletRequest request, HttpServletResponse response) throws ServletException, IOException{
        // ...
        request.getRequestDispatcher("index.html").forward(request, response);
     //response.sendRedirect("http://www.baidu.com");
    }
这里,我们体会到了:springmvc他是建立在servlet之上的,所以在servlet中能够做到的,同样在springmvc一样有效。
3. 返回JSON格式
返回JSON格式在SpringMVC中有多种处理方式,一种是使用SpirngMVC自带的 MappingJackson2JsonView 来处理,一种是自己写代码将返回值JSON格式化,然后直接用PrintWrite类型的对象写出就行了。
1)直接用PrintWrite类型的对象写出JSON格式
    @RequiresRoles(value={"student"})
    @RequestMapping(value="/queryScoreForStudent")
    public void queryScoreForStudent(ScoreQueryParam param, HttpSession sesion, PrintWriter printWriter){
        Student student = (Student)sesion.getAttribute(ConstantConfig.LONGIN_STUDENT);
        param.setStudentId(student.getId());
        PageBean<StudentScore> scoreList = this.studentCourseService.queryScoreForStudent(param);
        if(scoreList != null && scoreList.getSize() > 0){
            Map<String, Object> map = new HashMap<>();
            map.put("result", "ok");
            map.put("data", scoreList);
            printWriter.write(JSON.toJSONString(map));
        }
    }
如上代码所示,我们在方法中加入了 PrintWriter printWriter 参数,最后的返回结果使用了fastjson库来格式化最后的返回的对象map. 然后使用printWriter写出,就行了。我们看到方法上的注解并没有使用 @ResponseBody. 当然最好这里是在方法上加上 @ResponseBody,但是因为返回的map已经是JSON格式的,所以并不需要配置 MappingJackson2JsonView !
2)使用MappingJackson2JsonView 配合@ResponseBody来返回JSON格式
首先需要进行相关的视图解析器的配置:
     <bean class="org.springframework.web.servlet.view.ContentNegotiatingViewResolver">
        <property name="mediaTypes">
            <map>
                <entry key="atom" value="application/atom+xml"/>
                <entry key="html" value="text/html"/>
                <entry key="json" value="application/json"/>
            </map>
        </property>
        <property name="viewResolvers">
            <list>
                <!-- <bean class="org.springframework.web.servlet.view.BeanNameViewResolver"/> -->
                <bean class="org.springframework.web.servlet.view.InternalResourceViewResolver">
                    <property name="prefix" value="/"/>
                    <property name="suffix" value=".jsp"/>
                </bean>
            </list>
        </property>
        <property name="defaultViews">
            <list>
                <bean class="org.springframework.web.servlet.view.json.MappingJackson2JsonView" />
            </list>
        </property>
    </bean>
这里用到了 ContentNegotiatingViewResolver ,“内容协商视图解析器”,其实就是根据返回什么类型的视图,就协商使用哪种视图解析器。如果返回jsp就使用InternalResourceViewResolver视图解析器,如果返回JSON格式就使用MappingJackson2JsonView来处理。如此而已。在 <property name="viewResolvers"> 下的<list> 标签下,还可以加入其他的各种视图解析器的配置。
配置了 MappingJackson2JsonView 之后,就没有必要在自己手动 JSON格式化了,上面的例子,可以改成:
    @RequiresRoles(value={"student"})
    @RequestMapping(value="/queryScoreForStudent")
    @ResponseBody
    public Map<String, Object> queryScoreForStudent(ScoreQueryParam param, HttpSession sesion){
        Student student = (Student)sesion.getAttribute(ConstantConfig.LONGIN_STUDENT);
        param.setStudentId(student.getId());
        PageBean<StudentScore> scoreList = this.studentCourseService.queryScoreForStudent(param);
        System.out.println(JSON.toJSONString(scoreList));
        if(scoreList != null && scoreList.getSize() > 0){
            Map<String, Object> map = new HashMap<>();
            map.put("result", "ok");
            map.put("data", scoreList);
            return map;
        }
    }