转载自FreeBuf.COM
简介
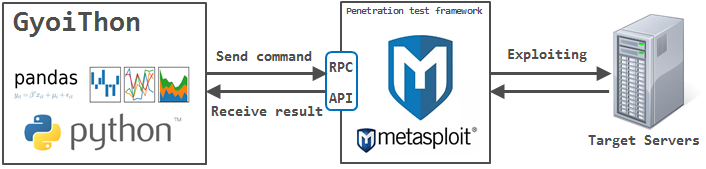
GyoiThon是一款基于机器学习的渗透测试工具。
GyoiThon根据学习数据识别安装在Web服务器上的软件(操作系统,中间件,框架,CMS等)。之后,GyoiThon为已识别的软件执行有效的攻击。最终,GyoiThon会自动生成扫描结果报告。上述处理均由GyoiThon自动执行。
处理步骤

GyoiThon会自动执行上述“Step1”-“Step4”。
用户唯一的操作就是在GyoiThon中,输入目标web服务器的首页URL。
这非常的简单,几乎不花费你任何的时间和精力,就能让你轻松的识别Web服务器上的漏洞。
处理流程
第1步:收集HTTP响应。
GyoiThon在抓取时会收集目标网站的几个HTTP响应。以下是GyoiThon获取的HTTP响应示例。
示例1
HTTP/1.1 200 OK
Date: Tue, 06 Mar 2018 03:01:57 GMT
Connection: close
Content-Type: text/html; charset=UTF-8
Etag: "409ed-183-53c5f732641c0"
Content-Length: 15271
...snip...
示例2
HTTP/1.1 200 OK
Date: Tue, 06 Mar 2018 06:56:17 GMT
Connection: close
Content-Type: text/html; charset=UTF-8
Set-Cookie: f00e68432b68050dee9abe33c389831e=0eba9cd0f75ca0912b4849777677f587;
path=/;
Content-Length: 37496
...snip...
示例3
HTTP/1.1 200 OK
Date: Tue, 06 Mar 2018 04:19:19 GMT
Connection: close
Content-Type: text/html; charset=UTF-8
Content-Length: 11819
...snip...
 <script src="/core/misc/drupal.js?v=8.3.1"></script>
第2步:识别产品名称
GyoiThon使用以下两种方法,来识别安装在Web服务器上的产品名称。
1.基于机器学习
通过使用机器学习(朴素贝叶斯),GyoiThon基于每个软件的略微不同的特征(ETAG值、Cookie值、特定HTML标签等)的组合来进行识别。朴素贝叶斯使用以下示例(训练数据)的训练数据来学习。与签名库不同的是,当在一个特征中不能识别软件时,朴素贝叶斯是基于HTTP响应中包含的各种特征随机识别的。
示例1
Etag: "409ed-183-53c5f732641c0"GyoiThon可以识别Web服务器软件Apache。
这是因为GyoiThon学习了Apache的特性,例如“Etag头值(409ed-183-53c5f732641c0)”。在我们的研究测试中发现,Apache使用数字和小写字母的组合作为Etag值。并且,Etag值分开4-5位和3-4位和12位,最终位在多数情况下为0。
示例2
Set-Cookie: f00e68432b68050dee9abe33c389831e=0eba9cd0f75ca0912b4849777677f587;GyoiThon可以识别CMS Joomla !
这是因为GyoiThon学习了Joomla的特性!如“Cookie名称(f00e6 … 9831e)”和“Cookie值(0eba9 … 7f587)”。在我们研究测试中发现,Joomla!在多数情况下使用32个小写字母作为Cookie名称以及Cookie值。
训练数据(示例)
Joomla! (CMS)
Set-Cookie: ([a-z0-9]{32})=[a-z0-9]{26,32};
Set-Cookie: [a-z0-9]{32}=([a-z0-9]{26,32});
...snip...
HeartCore (日本知名CMS)
Set-Cookie:.*=([A-Z0-9]{32});.*
<meta name=["'](author)["'] content=["']{2}.*
...snip...
Apache (Web服务器软件)
Etag:.*".*-[0-9a-z]{3,4}-[0-9a-z]{13}")[
]
...snip...
2.基于字符串匹配。
当然,GyoiThon也可以通过传统渗透测试工具中使用的字符串匹配来识别软件。示例如下。
示例3
<script src="/core/misc/drupal.js?v=8.3.1"></script>GyoiThon可以识别CMS Drupal。
这很容易。
第3步:使用Metasploit进行利用。
GyoiThon使用Metasploit执行与识别软件相对应的漏洞利用,并检查软件是否受此漏洞影响。
运行示例
[*] exploit/multi/http/struts_code_exec_exception_delegator, target: 1, payload: linux/x86/shell/reverse_nonx_tcp, result: failure
[*] exploit/multi/http/struts_code_exec_exception_delegator, target: 1, payload: linux/x86/shell/reverse_tcp, result: failure
[*] exploit/multi/http/struts_code_exec_exception_delegator, target: 1, payload: linux/x86/shell/reverse_tcp_uuid, result: failure
[*] exploit/multi/http/struts_code_exec_exception_delegator, target: 1, payload: linux/x86/shell_bind_ipv6_tcp, result: failure
[*] exploit/multi/http/struts_code_exec_exception_delegator, target: 1, payload: linux/x86/shell_bind_tcp, result: failure
...snip...
[*] exploit/linux/http/apache_continuum_cmd_exec, target: 0, payload: generic/custom, result: failure
[*] exploit/linux/http/apache_continuum_cmd_exec, target: 0, payload: generic/debug_trap, result: failure
[*] exploit/linux/http/apache_continuum_cmd_exec, target: 0, payload: generic/shell_bind_tcp, result: failure
[*] exploit/linux/http/apache_continuum_cmd_exec, target: 0, payload: generic/shell_reverse_tcp, result: failure
[*] exploit/linux/http/apache_continuum_cmd_exec, target: 0, payload: generic/tight_loop, result: bingo!!
第4步:生成扫描报告。
GyoiThon生成汇总漏洞的报告。
报告的样式为html。
样板
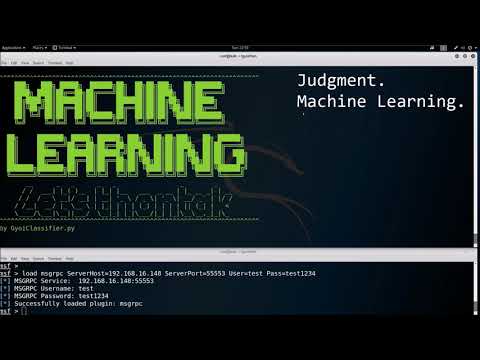
视频演示:https://www.youtube.com/watch?v=jmi43eZOE9w
使用
Step.0初始化Metasploit DB
首先,使用msfdb命令初始化metasploit db(postgreSQL)。
root@kali:~# msfdb initStep.1启动Metasploit框架
你可以在安装Metasploit Framework的远程服务器(如Kali Linux)上启动Metasploit。
root@kali:~# msfconsole
______________________________________________________________________________
|                                                                              |
|                   METASPLOIT CYBER MISSILE COMMAND V4                        |
|______________________________________________________________________________|
     \                                  /                      /
      \     .                          /                      /            x
       \                              /                      /
        \                            /          +           /
         \            +             /                      /
          *                        /                      /
                                  /      .               /
   X                             /                      /            X
                                /                     ###
                               /                     # % #
                              /                       ###
                     .       /
    .                       /      .            *           .
                           /
                          *
                 +                       *
                                      ^
####      __     __     __          #######         __     __     __        ####
####    /    \ /    \ /    \      ###########     /    \ /    \ /    \      ####
################################################################################
################################################################################
# WAVE 4 ######## SCORE 31337 ################################## HIGH FFFFFFFF #
################################################################################

https://metasploit.com

      =[ metasploit v4.16.15-dev                         ]
+ -- --=[ 1699 exploits - 968 auxiliary - 299 post        ]
+ -- --=[ 503 payloads - 40 encoders - 10 nops            ]
+ -- --=[ Free Metasploit Pro trial: http://r-7.co/trymsp ]
msf >
Step.2启动RPC服务器
启动Metasploit的RPC服务器。
msf> load msgrpc ServerHost=192.168.220.144 ServerPort=55553 User=test Pass=test1234
[*] MSGRPC Service: 192.168.220.144:55553
[*] MSGRPC Username: test
[*] MSGRPC Password: test1234
[*] Successfully loaded plugin: msgrpc| msgrpc选项 | 描述 |
|---|---|
| ServerHost | Metasploit启动的服务器IP地址。上面的例子为:192.168.220.144。 |
| ServerPort | Metasploit启动的服务器端口号。上面的例子为:55553。 |
| User | 身份验证用户名 (默认 => msf)。上面的例子为:test。 |
| Pass | 身份验证密码 (默认 => 随机字符串)。上面的例子为:test1234。 |
Step.3编辑配置文件。
你必须在config.ini中更改以下值
...snip...
[GyoiExploit]
server_host      : 192.168.220.144
server_port      : 55553
msgrpc_user      : test
msgrpc_pass      : test1234
timeout          : 10
LHOST            : 192.168.220.144
LPORT            : 4444
...snip...| 配置 | 描述 |
|---|---|
| server_host | Metasploit启动的服务器IP地址。你在Step2中设置的ServerHost值。 |
| server_port | Metasploit启动的服务器端口号。你在Step2中设置的ServerPort值。 |
| msgrpc_user | 身份验证用户名。你在Step2中设置的User值。 |
| msgrpc_pass | 身份验证密码。你在Step2中设置的Pass值。 |
| LHOST | Metasploit启动的服务器IP地址。你在Step2中设置的ServerHost值。 |
Step.4编辑目标(target)文件。
GyoiThon使用host.txt访问目标服务器。
所以,你必须在执行GyoiThon之前编辑host.txt。
host.txt的样本
target server => 192.168.220.148
target port => 80
target path => /oscommerce/catalog/
192.168.220.148 80 /oscommerce/catalog/你必须使用空格分隔IP地址,端口号和目标路径。
Step.5运行GyoiThon
执行命令如下。
local@client:~$ python gyoithon.pyStep.6查看扫描报告
使用任意浏览器打开并查看报告。
local@client:~$ firefox "gyoithon root path"/classifier4gyoithon/report/gyoithon_report.html提示
1.如何添加字符串匹配模式。
签名路径包括对应于每个产品类别的四个文件。
local@client:~$ ls "gyoithon root path"/signatures/
signature_cms.txt
signature_framework.txt
signature_os.txt
signature_web.txt
signature_cms.txt
这个文件包含CMS的字符串匹配模式。
signature_framework.txt
这个文件包含FrameWork的字符串匹配模式。
signature_os.txt
这个文件包含操作系统的字符串匹配模式。
signature_web.txt
这个文件包含Web服务器软件的字符串匹配模式。
如果你想添加新的字符串匹配模式,你可以在每个文件的最后一行添加新的字符串匹配模式。
例如)在signature_cms.txt中添加CMS的新字符串匹配模式。
tikiwiki@(Powered by TikiWiki)
wordpress@<.*=(.*/wp-).*/.*>
wordpress@(<meta name="generator" content="WordPress).*>
...snip...
typo@.*(href="fileadmin/templates/).*>
typo@(<meta name="generator" content="TYPO3 CMS).*>
"new product name"@"regex pattern"
[EOF]
注意
以上新产品名称必须是Metasploit可识别的名称。你必须使用@分隔新产品名称和正则表达式模式。
2.如何添加学习数据。
签名路径包括对应于每个产品类别的四个文件。
local@client:~$ ls "gyoithon root path"/classifier4gyoithon/train_data/
train_cms_in.txt
train_framework_in.txt
train_os_in.txt
train_web_in.txt
train_cms_in.txt
这个文件包含CMS的学习数据。
train_framework_in.txt
这个文件包含FrameWork的学习数据。
train_os_in.txt
这个文件包含操作系统的学习数据。
train_web_in.txt
这个文件包含Web服务器软件的学习数据。
如果你想添加新的学习数据,你可以在每个文件的最后一行添加学习数据。
例如)在train_cms_in.txt中添加CMS的新学习数据。
joomla@(Set-Cookie: [a-z0-9]{32}=.*);
joomla@(Set-Cookie: .*=[a-z0-9]{26,32});
...snip...
xoops@(xoops.js)
xoops@(xoops.css)
"new product name"@"regex pattern"
[EOF]
注意
以上新产品名称必须是Metasploit可识别的名称。你必须使用@分隔新产品名称和正则表达式模式。
你必须删除训练过的数据(* .pkl)。
local@client:~$ ls "gyoithon root path"/classifier4gyoithon/trained_data/
train_cms_out.pkl
train_framework_out.pkl
train_web_out.pkl
local@client:~$ rm "gyoithon root path"/classifier4gyoithon/trained_data/*.pkl
3.如何更改“利用模块的选项”。
当GyoiThon利用时,它会使用Exploit模块选项的默认值。
如果你想更改选项值,请在exploit_tree.json中输入任意值到“user_specify”,如下所示。
"unix/webapp/joomla_media_upload_exec": {
    "targets": {
        "0": [
            "generic/custom",
            "generic/shell_bind_tcp",
            "generic/shell_reverse_tcp",
...snip...
        "TARGETURI": {
            "type": "string",
            "required": true,
            "advanced": false,
            "evasion": false,
            "desc": "The base path to Joomla",
            "default": "/joomla",
            "user_specify": "/my_original_dir/"
        },
上面的例子是将exploit模块“exploit/unix/webapp/joomla_media_upload_exec”中的TARGETURI选项的值更改为“/joomla”中的“/my_original_dir/”。
*参考来源:GitHub,FB小编 secist 编译,转载自FreeBuf.COM