android ndk-build 编译静态库libxx.a
需求场景:
目前有安卓编码好的现在的openssl的两个.a,我们需要调用openssl的函数,并把功能再封装成.a;
这样使用时,在android studio jni项目 cmake 里面,需要先引用openssl的.a再引用 上面封装的.a;
如果使用so,那么,直接在android studio jni项目的 cpp里面直接调用openssl的方法,对外提供jni java接口,打包成so即可;
先来说用ndk-build 打包 libxx.a吧,并在打包的时候引用openssl的静态库.a
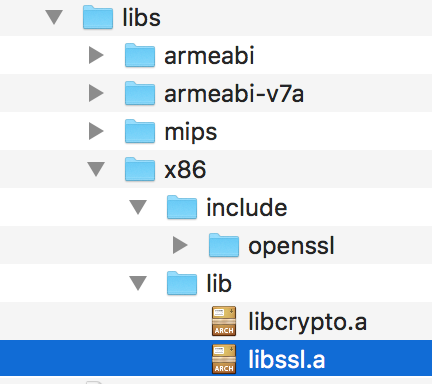
1. 首先当前目录下准备好 编码好的openssl静态库,如下图示,安卓平台的
2. 测试使用的源文件,我这里在.h声明一个封装的方法 ssl_sha,并且在.c 实现里面,调用 openssl 的SHA256接口;如下
加 #ifdef __cplusplus 是为了在jni调用时,cpp里面出现未定义的错误,如下 ssl_hash.h
#ifndef ssl_hash_h
#define ssl_hash_h


# ifdef  __cplusplus
extern "C" {
#endif


#include <stdio.h>

/*
 * openssl sha256
 * */
int ssl_sha256(const char *in_data,int in_len,char *out_hash);


# ifdef  __cplusplus
}
# endif


#endif /* ssl_hash_h */
如下 ssl_hash.c 实现文件
#include "ssl_hash.h"
#include "openssl/sha.h"

int ssl_sha256(const char *in_data,int in_len,char *out_hash)
{
    if (!in_data) {
        return -100;
    }

    if (!SHA256((const unsigned char *)in_data, in_len, (unsigned char *)out_hash)) {
        return -1001;
    }
    return 1;
}
同样这两文件也要放在 .mk的同一目录;
3. 开始编写 Android.mk,Application.mk, 如下示例
#Android.mk文件

LOCAL_PATH := $(call my-dir)
include $(CLEAR_VARS)
#编码后生成的.a的名称
LOCAL_MODULE    := sslhash
#要编码的源文件c或cpp
LOCAL_SRC_FILES := ssl_hash.c
#依赖的静态库.a,若要使用动态库使用LOCAL_SHARED_LIBRARIES .so
LOCAL_STATIC_LIBRARIES := libs/${TARGET_ARCH_ABI}/lib/libssl.a libs/${TARGET_ARCH_ABI}/lib/libcrypto.a
#依赖的静态库的头文件
LOCAL_C_INCLUDES := libs/${TARGET_ARCH_ABI}/include
#最后生成静态库
include $(BUILD_STATIC_LIBRARY)
#Application.mk 这里测试,只编译出x86的

APP_ABI := x86
4. 所有文件都准备好之后如下图示:

5. 调用ndk-build 开始编译
~/Library/Android/sdk/ndk-bundle/ndk-build NDK_PROJECT_PATH=./ NDK_LIBS_OUT=./ APP_BUILD_SCRIPT=./Android.mk NDK_APPLICATION_MK=./Application.mk
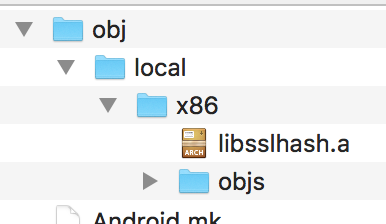
6. 成功之后会在当前目录下生成 obj目录,里面包含生成的 静态库libxx.a
7. 编译好之后,下面需要在Android studio 中测试;用as 创建一个jni项目;
8.在工程build.gradle(Module:app) 里面添加 libs目录 (Android 视图)
    externalNativeBuild {
        cmake {
            path "CMakeLists.txt"
        }
    }

    sourceSets {
        main {
            jniLibs.srcDirs = ['libs']
        }
    }
并且在指定测试只编译 x86
externalNativeBuild {
            cmake {
                cppFlags ""
                abiFilters "x86"
            }
        }

        ndk{
            abiFilters "x86"
        }
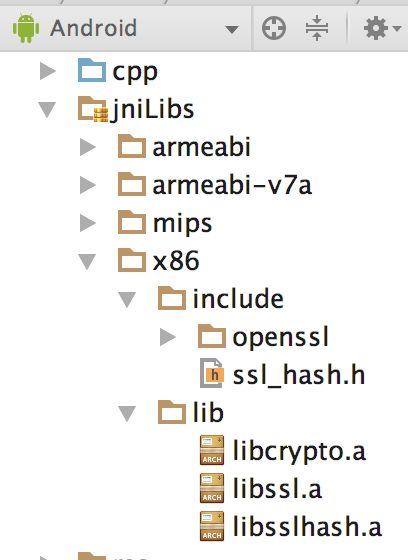
9. 将之前libs目录的openssl库全部copy到 工程 jnilibs目录 (Android 视图)
并把生成的libsslhash.a放到 x86/lib下
并把ssl_hash.h头文件放到x86/include下
放到哪都行,需要在cmake里面指定引用好
10. 打开CmakeList.txt 配置openssl静态库的引用,以及配置引用生成的libsslhash.a
如下完善的cmakelist
cmake_minimum_required(VERSION 3.4.1)
set(CMAKE_CXX_FLAGS "${CMAKE_CXX_FLAGS} -std=gnu++11")
#这里配置指定目录libs
set(OpenSSL_DIR ${CMAKE_SOURCE_DIR}/libs)

# Creates and names a library, sets it as either STATIC
# or SHARED, and provides the relative paths to its source code.
# You can define multiple libraries, and CMake builds them for you.
# Gradle automatically packages shared libraries with your APK.

#这里引用三个静态.a, ssl,sslhash,crypto
add_library(crypto STATIC IMPORTED)
add_library(ssl STATIC IMPORTED)
add_library(sslhash STATIC IMPORTED)


# 这里加载,并且找到相应的 libxxx.a
set_target_properties( # Specifies the target library.
                       crypto

                       # Specifies the parameter you want to define.
                       PROPERTIES IMPORTED_LOCATION

                       # Provides the path to the library you want to import.
                       ${OpenSSL_DIR}/${ANDROID_ABI}/lib/libcrypto.a )

set_target_properties( # Specifies the target library.
                       ssl

                       # Specifies the parameter you want to define.
                       PROPERTIES IMPORTED_LOCATION

                       # Provides the path to the library you want to import.
                       ${OpenSSL_DIR}/${ANDROID_ABI}/lib/libssl.a )

 set_target_properties( # Specifies the target library.
                        sslhash

                        # Specifies the parameter you want to define.
                        PROPERTIES IMPORTED_LOCATION

                        # Provides the path to the library you want to import.
                        ${OpenSSL_DIR}/${ANDROID_ABI}/lib/libsslhash.a)

add_library( # Sets the name of the library.
             native-lib

             # Sets the library as a shared library.
             SHARED

             # Provides a relative path to your source file(s).
             src/main/cpp/native-lib.cpp )

# Searches for a specified prebuilt library and stores the path as a
# variable. Because CMake includes system libraries in the search path by
# default, you only need to specify the name of the public NDK library
# you want to add. CMake verifies that the library exists before
# completing its build.

find_library( # Sets the name of the path variable.
              log-lib

              # Specifies the name of the NDK library that
              # you want CMake to locate.
              log )

# Specifies libraries CMake should link to your target library. You
# can link multiple libraries, such as libraries you define in this
# build script, prebuilt third-party libraries, or system libraries.

#这里openssl需要 zlib库,加载系统的
find_library( z-lib z )

#这里指定一下咱的头文件目录,openssl头文件,以及咱封装的ssl_hash.h头文件
include_directories( ${OpenSSL_DIR}/${ANDROID_ABI}/include
                     ${OpenSSL_DIR}/${ANDROID_ABI}/
)

#最后一步连接,这里注意,一定要把sslhash,咱封装的这个.a放到ssl,crypto的前面,不然报错说方法未定义,可能因为sslhash引用了openssl的东西,
target_link_libraries( # Specifies the target library.
                       native-lib

                       # Links the target library to the log library
                       # included in the NDK.
                        sslhash
                        ssl
                        crypto
                        ${log-lib}
                        ${z-lib})
11. 配置完成,如果编译不出问题就可以写jni调用测试了;
在 MainActitity.java里面,添加一下jni方法
    public native String stringFromJNI();

    //添加的测试方法
    public native int sslsha(byte[] indata,int inlen,byte[] outhash);
12. 在native-lib.cpp 里面实现jni方法
#include "ssl_hash.h"


extern "C"
JNIEXPORT jint JNICALL
Java_androidapp_cocoajin_com_tjni_MainActivity_sslsha(JNIEnv *env, jobject instance,
                                                      jbyteArray indata_, jint inlen,
                                                      jbyteArray outhash_) {
    jbyte *indata = env->GetByteArrayElements(indata_, NULL);
    jbyte *outhash = env->GetByteArrayElements(outhash_, NULL);

    int ret = ssl_sha256((const char *)indata,inlen,(char *)outhash);

    env->ReleaseByteArrayElements(indata_, indata, 0);
    env->ReleaseByteArrayElements(outhash_, outhash, 0);

    return ret;
}

//默认系统的
extern "C"
JNIEXPORT jstring JNICALL
Java_androidapp_cocoajin_com_tjni_MainActivity_stringFromJNI(
        JNIEnv *env,
        jobject /* this */) {
    std::string hello = "Hello from C++";
    return env->NewStringUTF(hello.c_str());
}
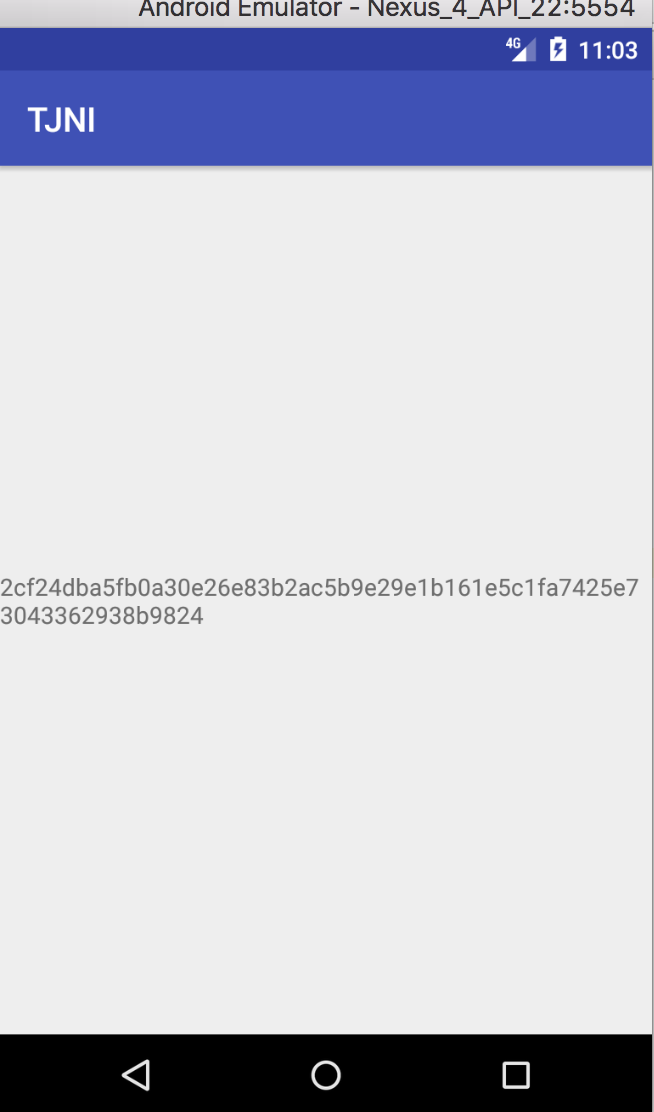
13. 最后调用 ,这里把byte[] 转成了hexString显示在了app上
        // Example of a call to a native method
        TextView tv = (TextView) findViewById(R.id.sample_text);

        String he = "hello";
        byte[] habb = new byte[32];
        sslsha(he.getBytes(),he.length(),habb);

        tv.setText(ByteHexUtil.bytesToHexString(habb));
14. 执行结果,以及验证结果

15: 参考资料与 工程下载