(温馨提示:还未了解 红黑树 的插入、删除节点原理的同学,请先学习本人前一篇博文《【数据结构】红黑树 详解》)
在之前的博文《【数据结构】红黑树 详解》中,
本人讲解了 红黑树 的 数据结构 和 设计理念,并对其 增删查 操作做了 详细 的 讲解
那么,在本篇博文中,本人将结合 JDK1.8 版本的 HashMap 的 内部类 —— TreeNode类 进行下分析:
首先,本人了展示下 TreeNode类 的 源码:
TreeNode类 源码:
下载链接(免费,按需求下载)
相信第一次看到 TreeNode类的源码 的同学,心中一定无比震惊
(这特喵的,将近600行代码,读完怕不是要升天... ...)
首先是 成员变量:
成员变量:
TreeNode<K,V> parent;  // 当前节点的 “父节点”
TreeNode<K,V> left;  // 当前节点的 “左孩子节点”
TreeNode<K,V> right;  // 当前节点的 “右孩子节点”
TreeNode<K,V> prev;    // 当前节点的 “前一个录入节点”
boolean red;	// 当前节点的 颜色
我们看任何类的 方法源码,都应该从其 构造方法 开始解析:
构造方法:
/**
 * 根据参数所传 哈希值、键值对、下一个节点的指针,构造 红黑树节点
 */
TreeNode(int hash, K key, V val, Node<K,V> next) {
    super(hash, key, val, next);	// 这里的super构造,最终生成的是一个 Node类型 的节点
}
当然,在本篇博文中,本人不会对TreeNode类进行全文讲解
还是照往常一样,本人来讲解其中的几个 比较重要 且 被 JDK1.8版本的HashMap类调用 的方法:
说到 JDK1.8的HashMap 和 TreeNode类,
相信我们的脑海中就会出现如下几个方法:
| 方法名 | 功能 |
|---|---|
| treeify | 树化 当前链表 |
| getTreeNode | 在 当前红黑树 中 查找 目标键所在节点 |
| putTreeVal | 向 当前红黑树 中 插入 新节点 |
| removeTreeNode | 在 当前红黑树 中 删除 目标键所在节点 |
| untreeify | 反树化 当前红黑树 |
treeify(树化) :
/**
 * 根据当前哈希表 生成 红黑树
 * @return 红黑树 的 根节点
 */
final void treeify(Node<K, V>[] tab) {
    TreeNode<K, V> root = null;
    for (TreeNode<K, V> x = this, next; x != null; x = next) {
        next = (TreeNode<K, V>) x.next;
        x.left = x.right = null;    // 将当前节点的 左孩子和右孩子 全部置为null
        if (root == null) { // 将当前节点设置为 红黑树的“黑色根节点“”
            x.parent = null;
            x.red = false;
            root = x;
        } else {
            K k = x.key;
            int h = x.hash;
            Class<?> kc = null;
            /*
                根据 当前节点的hash,计算 当前节点应在位置
                    1、根据AVL树的规则:左 < 父 < 右
                    2、若找到,则 插入并平衡
             */
            for (TreeNode<K, V> p = root; ; ) {
                int dir, ph;
                K pk = p.key;
                if ((ph = p.hash) > h)
                    dir = -1;
                else if (ph < h)
                    dir = 1;
                else if ((kc == null &&
                        (kc = comparableClassFor(k)) == null) ||
                        (dir = compareComparables(kc, k, pk)) == 0) //判断 当前键 和 p是否相等
                    dir = tieBreakOrder(k, pk);

                TreeNode<K, V> xp = p;
                if ((p = (dir <= 0) ? p.left : p.right) == null) {
                    x.parent = xp;
                    if (dir <= 0)
                        xp.left = x;
                    else
                        xp.right = x;
                    root = balanceInsertion(root, x);   // 在指定位置插入目标节点,并平衡化 “插入后”的红黑树
                    break;
                }
            }
        }
    }
    moveRootToFront(tab, root);
}
本人现在来总结下 树化 的步骤:
1、将 每个节点 转换为TreeNode类型
2、将 每个节点 插入 当前bin的红黑树中
3、将 当前红黑树的root放入 当前bin中(保证是当前bin的第一个元素)
那么,本人接下来来讲解下 上述方法中所调用的三个方法:
comparableClassFor() 方法:
/**
 * 如果x实现“Comparable接口”,则返回x的类,
 * 否则返回null。
 */
static Class<?> comparableClassFor(Object x) {
    if (x instanceof Comparable) {
        Class<?> c;
        Type[] ts, as;
        Type t;
        ParameterizedType p;
        if ((c = x.getClass()) == String.class) // 绕过检查
            return c;
        if ((ts = c.getGenericInterfaces()) != null) {
            for (int i = 0; i < ts.length; ++i) {
                if (((t = ts[i]) instanceof ParameterizedType) &&
                        ((p = (ParameterizedType) t).getRawType() ==
                                Comparable.class) &&
                        (as = p.getActualTypeArguments()) != null &&
                        as.length == 1 && as[0] == c) // type arg is c
                    return c;
            }
        }
    }
    return null;
}
本人来概括一下:
若 参数的类型 实现了 Comparable接口 或 为String,则返回 参数的类型
否则,返回null
compareComparables() 方法:
/**
 * 如果x匹配kc(k的筛选的可比类),则返回k.compareTo(x),
 * 否则返回0。
 */
@SuppressWarnings({"rawtypes","unchecked"}) // for cast to Comparable
static int compareComparables(Class<?> kc, Object k, Object x) {
    return (x == null || x.getClass() != kc ? 0 :
            ((Comparable)k).compareTo(x));
}
本人来概括一下:
若 参数的类型 实现了 Comparable接口 或 为String,则返回 按照 所传类型 的 比较算法 的 比较结果
否则,返回0
tieBreakOrder() 方法:
/**
 * Tie-breaking utility for ordering insertions when equal
 * hashCodes and non-comparable. We don't require a total
 * order, just a consistent insertion rule to maintain
 * equivalence across rebalancings. Tie-breaking further than
 * necessary simplifies testing a bit.
 */
static int tieBreakOrder(Object a, Object b) {
    int d;
    if (a == null || b == null ||
        (d = a.getClass().getName().
         compareTo(b.getClass().getName())) == 0)
        d = (System.identityHashCode(a) <= System.identityHashCode(b) ?
             -1 : 1);
    return d;
}
以上的代码调用到了 本地方法,本人就来讲解下上述方法的大致作用:
比较 俩参数 的值
balanceInsertion() 方法:
/**
 * 插入 目标节点,并 平衡“插入后”的红黑树
 * @param root 目标根节点
 * @param x 目标节点
 * @param <K> 键类型
 * @param <V> 值类型
 * @return 插入平衡后的 根节点
 */
static <K, V> TreeNode<K, V> balanceInsertion(TreeNode<K, V> root, TreeNode<K, V> x) {
    x.red = true;   // 红黑树规则:新节点默认为“红节点”
    for (TreeNode<K, V> xp, xpp, xppl, xppr; ; ) {
        if ((xp = x.parent) == null) {
            x.red = false;
            return x;
        } else if (!xp.red || (xpp = xp.parent) == null)
            return root;
        if (xp == (xppl = xpp.left)) {
            if ((xppr = xpp.right) != null && xppr.red) {
                xppr.red = false;
                xp.red = false;
                xpp.red = true;
                x = xpp;
            } else {
                if (x == xp.right) {
                    root = rotateLeft(root, x = xp);	// 左旋
                    xpp = (xp = x.parent) == null ? null : xp.parent;
                }
                if (xp != null) {
                    xp.red = false;
                    if (xpp != null) {
                        xpp.red = true;
                        root = rotateRight(root, xpp);	// 右旋
                    }
                }
            }
        } else {
            if (xppl != null && xppl.red) {
                xppl.red = false;
                xp.red = false;
                xpp.red = true;
                x = xpp;
            } else {
                if (x == xp.left) {
                    root = rotateRight(root, x = xp);
                    xpp = (xp = x.parent) == null ? null : xp.parent;
                }
                if (xp != null) {
                    xp.red = false;
                    if (xpp != null) {
                        xpp.red = true;
                        root = rotateLeft(root, xpp);
                    }
                }
            }
        }
    }
}
那么,本人现在来展示下 上述方法中所调用的 左旋/右旋 方法:
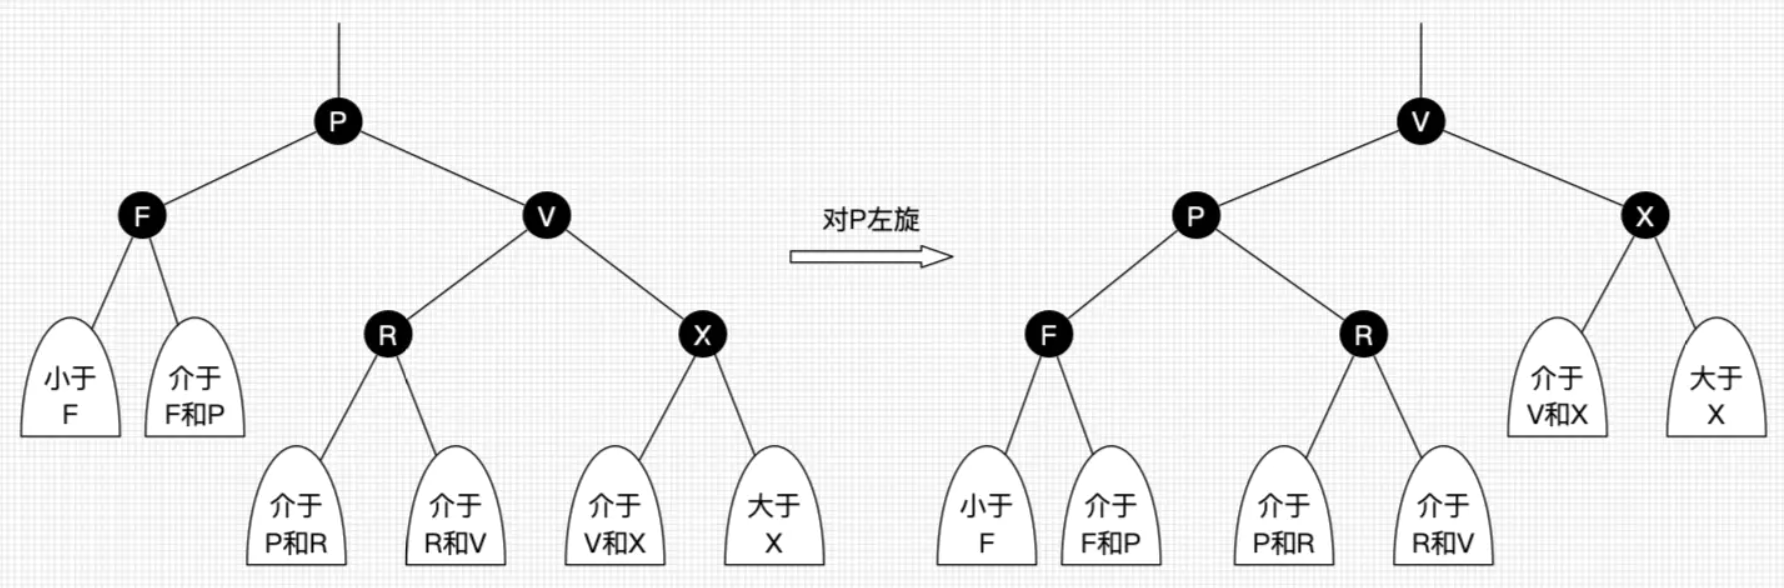
rotateLeft(左旋):
实现代码:
static <K,V> TreeNode<K,V> rotateLeft(TreeNode<K,V> root, TreeNode<K,V> p) {
    TreeNode<K,V> r, pp, rl;
    if (p != null && (r = p.right) != null) {
        if ((rl = p.right = r.left) != null)
            rl.parent = p;
        if ((pp = r.parent = p.parent) == null)
            (root = r).red = false;
        else if (pp.left == p)
            pp.left = r;
        else
            pp.right = r;
        r.left = p;
        p.parent = r;
    }
    return root;
}
示意图:
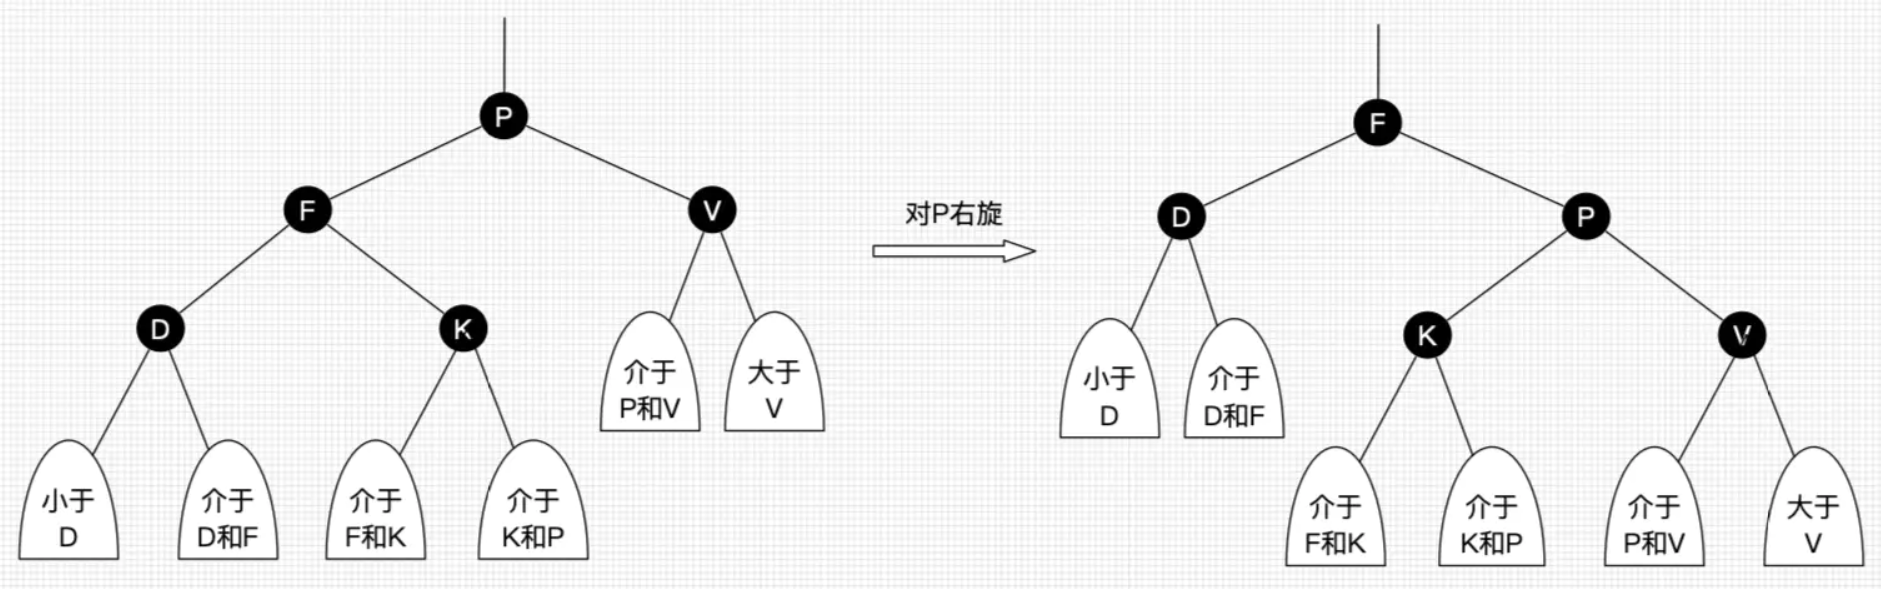
rotateRight(右旋):
实现代码:
static <K,V> TreeNode<K,V> rotateRight(TreeNode<K,V> root, TreeNode<K,V> p) {
    TreeNode<K,V> l, pp, lr;
    if (p != null && (l = p.left) != null) {
        if ((lr = p.left = l.right) != null)
            lr.parent = p;
        if ((pp = l.parent = p.parent) == null)
            (root = l).red = false;
        else if (pp.right == p)
            pp.right = l;
        else
            pp.left = l;
        l.right = p;
        p.parent = l;
    }
    return root;
}
示意图:
至于上述方法的步步解析,本人来给出执行的步骤图:
流程图:
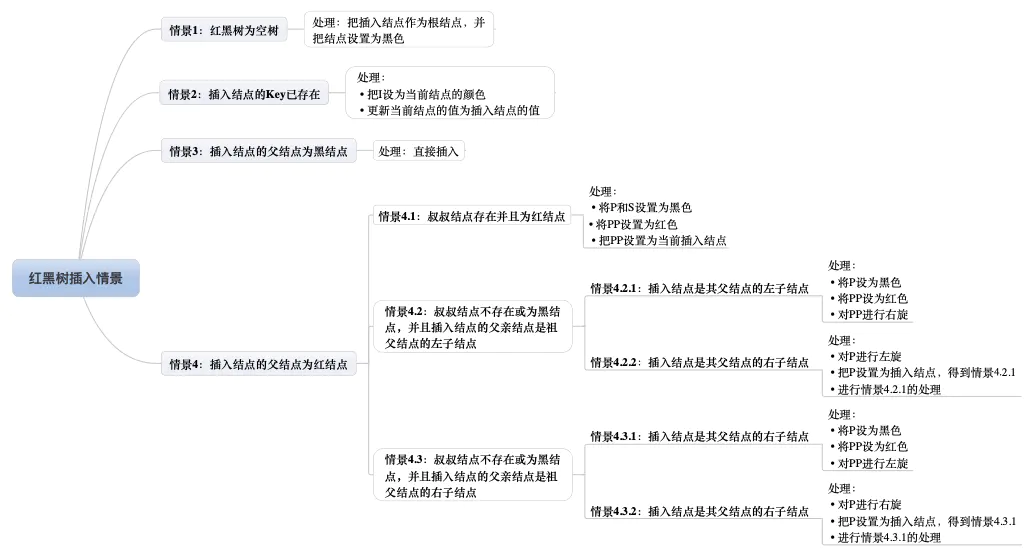
由于在本人之前的博文《【数据结构】红黑树 详解》中进行了讲解
那么,本人就不进行步步解析了,有兴趣的同学请观看《【数据结构】红黑树 详解》

那么,本人现在来讲解下 查找目标节点 的 getTreeNode() 方法:
getTreeNode(搜索):
/**
 * 根据 根节点,调用find()方法
 */
final TreeNode<K,V> getTreeNode(int h, Object k) {
    return ((parent != null) ? root() : this).find(h, k, null);
}
那么,本人现在来展示下上述方法中所调用的两个方法:
root() 方法:
/**
 * 返回 包含当前节点的 根节点
 */
final HashMap.TreeNode<K, V> root() {
    for (HashMap.TreeNode<K, V> r = this, p; ; ) {
        if ((p = r.parent) == null)
            return r;
        r = p;
    }
}
find() 方法:
/**
 * 从根p开始的节点,查找具有给定哈希值和键的节点。
 * 若不存在,则返回null
 * @param h 目标哈希值
 * @param k 目标键
 * @param kc 目标key的Class对象
 * @return 返回 根据 参数及当前红黑树,计算出的 目标节点
 */
final HashMap.TreeNode<K, V> find(int h, Object k, Class<?> kc) {
    HashMap.TreeNode<K, V> p = this;
    do {
        int ph, dir;
        K pk;
        HashMap.TreeNode<K, V> pl = p.left, pr = p.right, q;
        if ((ph = p.hash) > h)
            p = pl;
        else if (ph < h)
            p = pr;
        else if ((pk = p.key) == k || (k != null && k.equals(pk)))
            return p;
        else if (pl == null)
            p = pr;
        else if (pr == null)
            p = pl;
        else if ((kc != null ||
                (kc = comparableClassFor(k)) != null) &&
                (dir = compareComparables(kc, k, pk)) != 0)
            p = (dir < 0) ? pl : pr;
        else if ((q = pr.find(h, k, kc)) != null)
            return q;
        else
            p = pl;
    } while (p != null);
    return null;
}
那么,接下来就是 putTreeVal()方法:
putTreeVal(插入):
/**
 * 在目标红黑树中,插入目标节点
 * @param map 当前HashMap对象
 * @param tab 当前哈希表
 * @param h 目标hash值
 * @param k 目标key
 * @param v 目标value
 * @return 被覆盖的节点
 */
final HashMap.TreeNode<K, V> putTreeVal(HashMap<K, V> map, HashMap.Node<K, V>[] tab,
                                        int h, K k, V v) {
    Class<?> kc = null;
    boolean searched = false;
    HashMap.TreeNode<K, V> root = (parent != null) ? root() : this;
    for (HashMap.TreeNode<K, V> p = root; ; ) {
        /*
            查找 目标节点 应在位置
         */
        int dir, ph;
        K pk;
        if ((ph = p.hash) > h)
            dir = -1;
        else if (ph < h)
            dir = 1;
        else if ((pk = p.key) == k || (k != null && k.equals(pk)))
            return p;
        else if ((kc == null &&
                (kc = comparableClassFor(k)) == null) ||
                (dir = compareComparables(kc, k, pk)) == 0) {
            if (!searched) {
                HashMap.TreeNode<K, V> q, ch;
                searched = true;
                if (((ch = p.left) != null &&
                        (q = ch.find(h, k, kc)) != null) ||
                        ((ch = p.right) != null &&
                                (q = ch.find(h, k, kc)) != null))
                    return q;
            }
            dir = tieBreakOrder(k, pk);
        }

        HashMap.TreeNode<K, V> xp = p;
        if ((p = (dir <= 0) ? p.left : p.right) == null) {
            HashMap.Node<K, V> xpn = xp.next;
            HashMap.TreeNode<K, V> x = map.newTreeNode(h, k, v, xpn);
            if (dir <= 0)
                xp.left = x;
            else
                xp.right = x;
            xp.next = x;
            x.parent = x.prev = xp;
            if (xpn != null)
                ((HashMap.TreeNode<K, V>) xpn).prev = x;
            moveRootToFront(tab, balanceInsertion(root, x));    // 插入并平衡目标节点,且 将目标根放于哈希表的恰当单元的第一个节点
            return null;
        }
    }
}
那么,本人现在来展示下上述方法中所调用的moveRootToFront()方法:
moveRootToFront() 方法:
/**
 * 确保 参数root 是 其bin的第一个节点
 */
static <K, V> void moveRootToFront(HashMap.Node<K, V>[] tab, HashMap.TreeNode<K, V> root) {
    int n;
    if (root != null && tab != null && (n = tab.length) > 0) {
        int index = (n - 1) & root.hash;
        HashMap.TreeNode<K, V> first = (HashMap.TreeNode<K, V>) tab[index];
        if (root != first) {
            HashMap.Node<K, V> rn;
            tab[index] = root;
            HashMap.TreeNode<K, V> rp = root.prev;
            if ((rn = root.next) != null)
                ((HashMap.TreeNode<K, V>) rn).prev = rp;
            if (rp != null)
                rp.next = rn;
            if (first != null)
                first.prev = root;
            root.next = first;
            root.prev = null;
        }
        assert checkInvariants(root);
    }
}
那么,最后就是 代表删除 的 removeTreeNode() 方法:
removeTreeNode(删除):
/**
 * 删除此调用之前必须存在的给定节点。
 * 这比典型的红黑删除代码更为混乱,因为我们无法将内部节点的内容与由在遍历期间可独立访问的“下一个”指针固定的叶子后继对象交换。
 * 因此,我们交换树链接。
 * 如果当前树的节点太少,则将bin转换回普通bin数组。
 * (该方法触发2到6个节点之间的某个位置,具体取决于树的结构)。
 */
final void removeTreeNode(HashMap<K,V> map, Node<K,V>[] tab,
                          boolean movable) {
    int n;
    if (tab == null || (n = tab.length) == 0)
        return;
    int index = (n - 1) & hash;
    TreeNode<K,V> first = (TreeNode<K,V>)tab[index], root = first, rl;
    TreeNode<K,V> succ = (TreeNode<K,V>)next, pred = prev;
    if (pred == null)
        tab[index] = first = succ;
    else
        pred.next = succ;
    if (succ != null)
        succ.prev = pred;
    if (first == null)
        return;
    if (root.parent != null)
        root = root.root();
    if (root == null || root.right == null ||
        (rl = root.left) == null || rl.left == null) {
        tab[index] = first.untreeify(map);  // 节点数过少,反树化
        return;
    }
    TreeNode<K,V> p = this, pl = left, pr = right, replacement;
    if (pl != null && pr != null) {
        TreeNode<K,V> s = pr, sl;
        while ((sl = s.left) != null) // find successor
            s = sl;
        boolean c = s.red; s.red = p.red; p.red = c; // swap colors
        TreeNode<K,V> sr = s.right;
        TreeNode<K,V> pp = p.parent;
        if (s == pr) { // p was s's direct parent
            p.parent = s;
            s.right = p;
        }
        else {
            TreeNode<K,V> sp = s.parent;
            if ((p.parent = sp) != null) {
                if (s == sp.left)
                    sp.left = p;
                else
                    sp.right = p;
            }
            if ((s.right = pr) != null)
                pr.parent = s;
        }
        p.left = null;
        if ((p.right = sr) != null)
            sr.parent = p;
        if ((s.left = pl) != null)
            pl.parent = s;
        if ((s.parent = pp) == null)
            root = s;
        else if (p == pp.left)
            pp.left = s;
        else
            pp.right = s;
        if (sr != null)
            replacement = sr;
        else
            replacement = p;
    }
    else if (pl != null)
        replacement = pl;
    else if (pr != null)
        replacement = pr;
    else
        replacement = p;
    if (replacement != p) {
        TreeNode<K,V> pp = replacement.parent = p.parent;
        if (pp == null)
            root = replacement;
        else if (p == pp.left)
            pp.left = replacement;
        else
            pp.right = replacement;
        p.left = p.right = p.parent = null;
    }

    TreeNode<K,V> r = p.red ? root : balanceDeletion(root, replacement);

    if (replacement == p) {  // detach
        TreeNode<K,V> pp = p.parent;
        p.parent = null;
        if (pp != null) {
            if (p == pp.left)
                pp.left = null;
            else if (p == pp.right)
                pp.right = null;
        }
    }
    if (movable)
        moveRootToFront(tab, r);
}
这里需要注意的是:
当
$$
节点数 == 6
$$
时,将会执行反树化方法()
那么,本人现在来展示下 上述方法中所调用的 balanceDeletion()方法:
balanceDeletion() 方法:
/**
 * 删除 并 平衡 “删除后”的红黑树
 * @return 删除掉的节点
 */
static <K,V> TreeNode<K,V> balanceDeletion(TreeNode<K,V> root, TreeNode<K,V> x) {
   for (TreeNode<K,V> xp, xpl, xpr;;)  {
       if (x == null || x == root)
           return root;
       else if ((xp = x.parent) == null) {
           x.red = false;
           return x;
       }
       else if (x.red) {
           x.red = false;
           return root;
       }
       else if ((xpl = xp.left) == x) {
           if ((xpr = xp.right) != null && xpr.red) {
               xpr.red = false;
               xp.red = true;
               root = rotateLeft(root, xp);
               xpr = (xp = x.parent) == null ? null : xp.right;
           }
           if (xpr == null)
               x = xp;
           else {
               TreeNode<K,V> sl = xpr.left, sr = xpr.right;
               if ((sr == null || !sr.red) &&
                   (sl == null || !sl.red)) {
                   xpr.red = true;
                   x = xp;
               }
               else {
                   if (sr == null || !sr.red) {
                       if (sl != null)
                           sl.red = false;
                       xpr.red = true;
                       root = rotateRight(root, xpr);
                       xpr = (xp = x.parent) == null ?
                           null : xp.right;
                   }
                   if (xpr != null) {
                       xpr.red = (xp == null) ? false : xp.red;
                       if ((sr = xpr.right) != null)
                           sr.red = false;
                   }
                   if (xp != null) {
                       xp.red = false;
                       root = rotateLeft(root, xp);
                   }
                   x = root;
               }
           }
       }
       else { // symmetric
           if (xpl != null && xpl.red) {
               xpl.red = false;
               xp.red = true;
               root = rotateRight(root, xp);
               xpl = (xp = x.parent) == null ? null : xp.left;
           }
           if (xpl == null)
               x = xp;
           else {
               TreeNode<K,V> sl = xpl.left, sr = xpl.right;
               if ((sl == null || !sl.red) &&
                   (sr == null || !sr.red)) {
                   xpl.red = true;
                   x = xp;
               }
               else {
                   if (sl == null || !sl.red) {
                       if (sr != null)
                           sr.red = false;
                       xpl.red = true;
                       root = rotateLeft(root, xpl);
                       xpl = (xp = x.parent) == null ?
                           null : xp.left;
                   }
                   if (xpl != null) {
                       xpl.red = (xp == null) ? false : xp.red;
                       if ((sl = xpl.left) != null)
                           sl.red = false;
                   }
                   if (xp != null) {
                       xp.red = false;
                       root = rotateRight(root, xp);
                   }
                   x = root;
               }
           }
       }
   }
}
至于上述方法的步步解析,本人来给出执行的步骤图:
流程图:
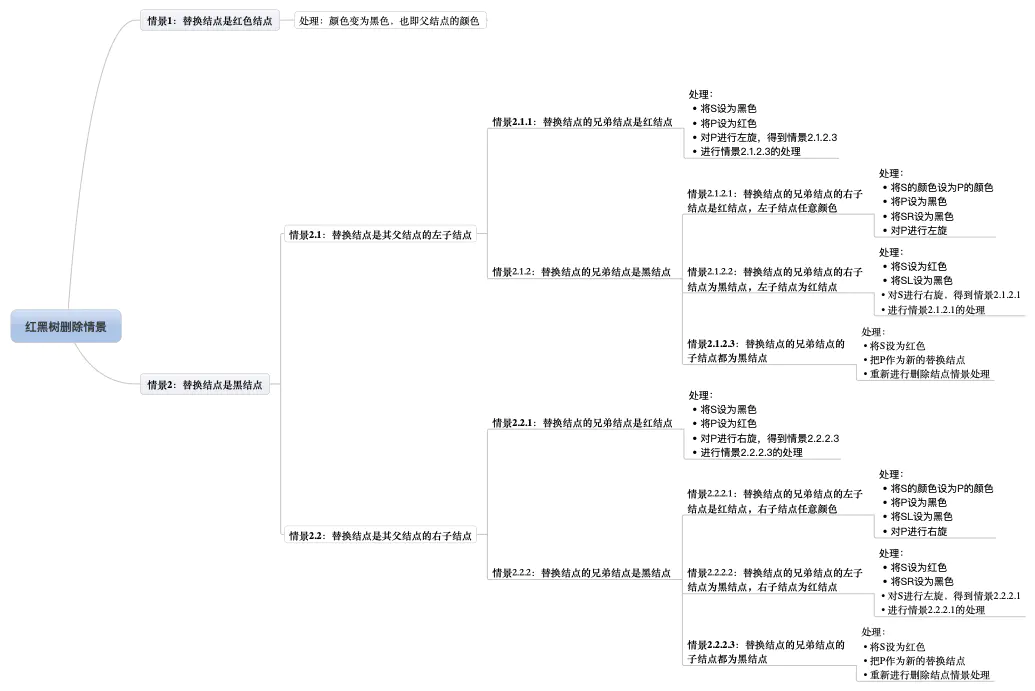
由于在本人之前的博文《【数据结构】红黑树 详解》中进行了讲解
那么,本人就不进行步步解析了,有兴趣的同学请观看《【数据结构】红黑树 详解》

那么,最后本人来讲解下 删除目标节点 中 所调用的反树化方法:
untreeify(反树化):
/**
 * Returns a list of non-TreeNodes replacing those linked from
 * this node.
 */
final Node<K,V> untreeify(HashMap<K,V> map) {
    Node<K,V> hd = null, tl = null;
    for (Node<K,V> q = this; q != null; q = q.next) {
        Node<K,V> p = map.replacementNode(q, null);
        if (tl == null)
            hd = p;
        else
            tl.next = p;
        tl = p;
    }
    return hd;
}
这个方法的 实现过程 也 比较简单:
根据 每个节点的 next属性,
从root开始,重新构造链表
那么,至此,TreeNode类分析完毕!
若是看到这里,还不是很懂TreeNode类大致执行步骤的同学,
本人强力推荐看看本人的博文《【数据结构】红黑树 详解》
相信两篇博文结合着看,就能明白重要方法的实现理念了!