本篇博文接上篇的《Android项目开发全程(一)--创建工程》,主要介绍一下在本项目中用到的一个很重要的框架-Afinal,由于本系列博文重点是项目开发全程,所以在这里就先介绍一下本项目中用到的几个功能:
Afinal简介
- Afinal 是一个android的sqlite orm 和 ioc 框架。同时封装了android中的http框架,使其更加简单易用;
- 使用finalBitmap,无需考虑bitmap在android中加载的时候oom的问题和快速滑动的时候图片加载位置错位等问题。
- Afinal的宗旨是简洁,快速。约定大于配置的方式。尽量一行代码完成所有事情。
Afinal的四大模块
-
FinalDB模块:android中的orm框架,一行代码就可以进行增删改查。支持一对多,多对一等查询。
-
FinalActivity模块:android中的ioc框架,完全注解方式就可以进行UI绑定和事件绑定。无需findViewById和setClickListener等。
-
FinalHttp模块:通过httpclient进行封装http数据请求,支持ajax方式加载。
-
FinalBitmap模块:通过FinalBitmap,imageview加载bitmap的时候无需考虑bitmap加载过程中出现的oom和android容器快速滑动时候出现的图片错位等现象。FinalBitmap可以配置线程加载线程数量,缓存大小,缓存路径,加载显示动画等。FinalBitmap的内存管理使用lru算法,没有使用弱引用(android2.3以后google已经不建议使用弱引用,android2.3后强行回收软引用和弱引用,详情查看android官方文档),更好的管理bitmap内存。FinalBitmap可以自定义下载器,用来扩展其他协议显示网络图片,比如ftp等。同时可以自定义bitmap显示器,在imageview显示图片的时候播放动画等(默认是渐变动画显示)。
使用Afinal开发框架需要用到以下权限
<uses-permission android:name="android.permission.INTERNET" />
<uses-permission android:name="android.permission.WRITE_EXTERNAL_STORAGE" />
以上是github上的Afinal整体介绍,下面介绍一下本项目中需要到的几个功能,由于本次项目很小,仅仅用到了Afinal中的一点点功能:
1、注解方式就可以进行UI绑定和事件绑定,无需使用findViewById和setClickListener等方法,别忘了让Activity继承FinalActivity。
 1 public class TestActivity extends FinalActivity {
 2     @ViewInject(id=R.id.bn_click, click="testClick") Button bnClick;
 3     @ViewInject(id=R.id.tv_show) TextView tvShow;
 4     @Override
 5     protected void onCreate(Bundle savedInstanceState) {
 6         // TODO Auto-generated method stub
 7         super.onCreate(savedInstanceState);
 8         setContentView(R.layout.test_main);
 9     }
10     public void testClick(View v){
11         tvShow.setText("您点击了确定");
12     }
13 }
运行结果:
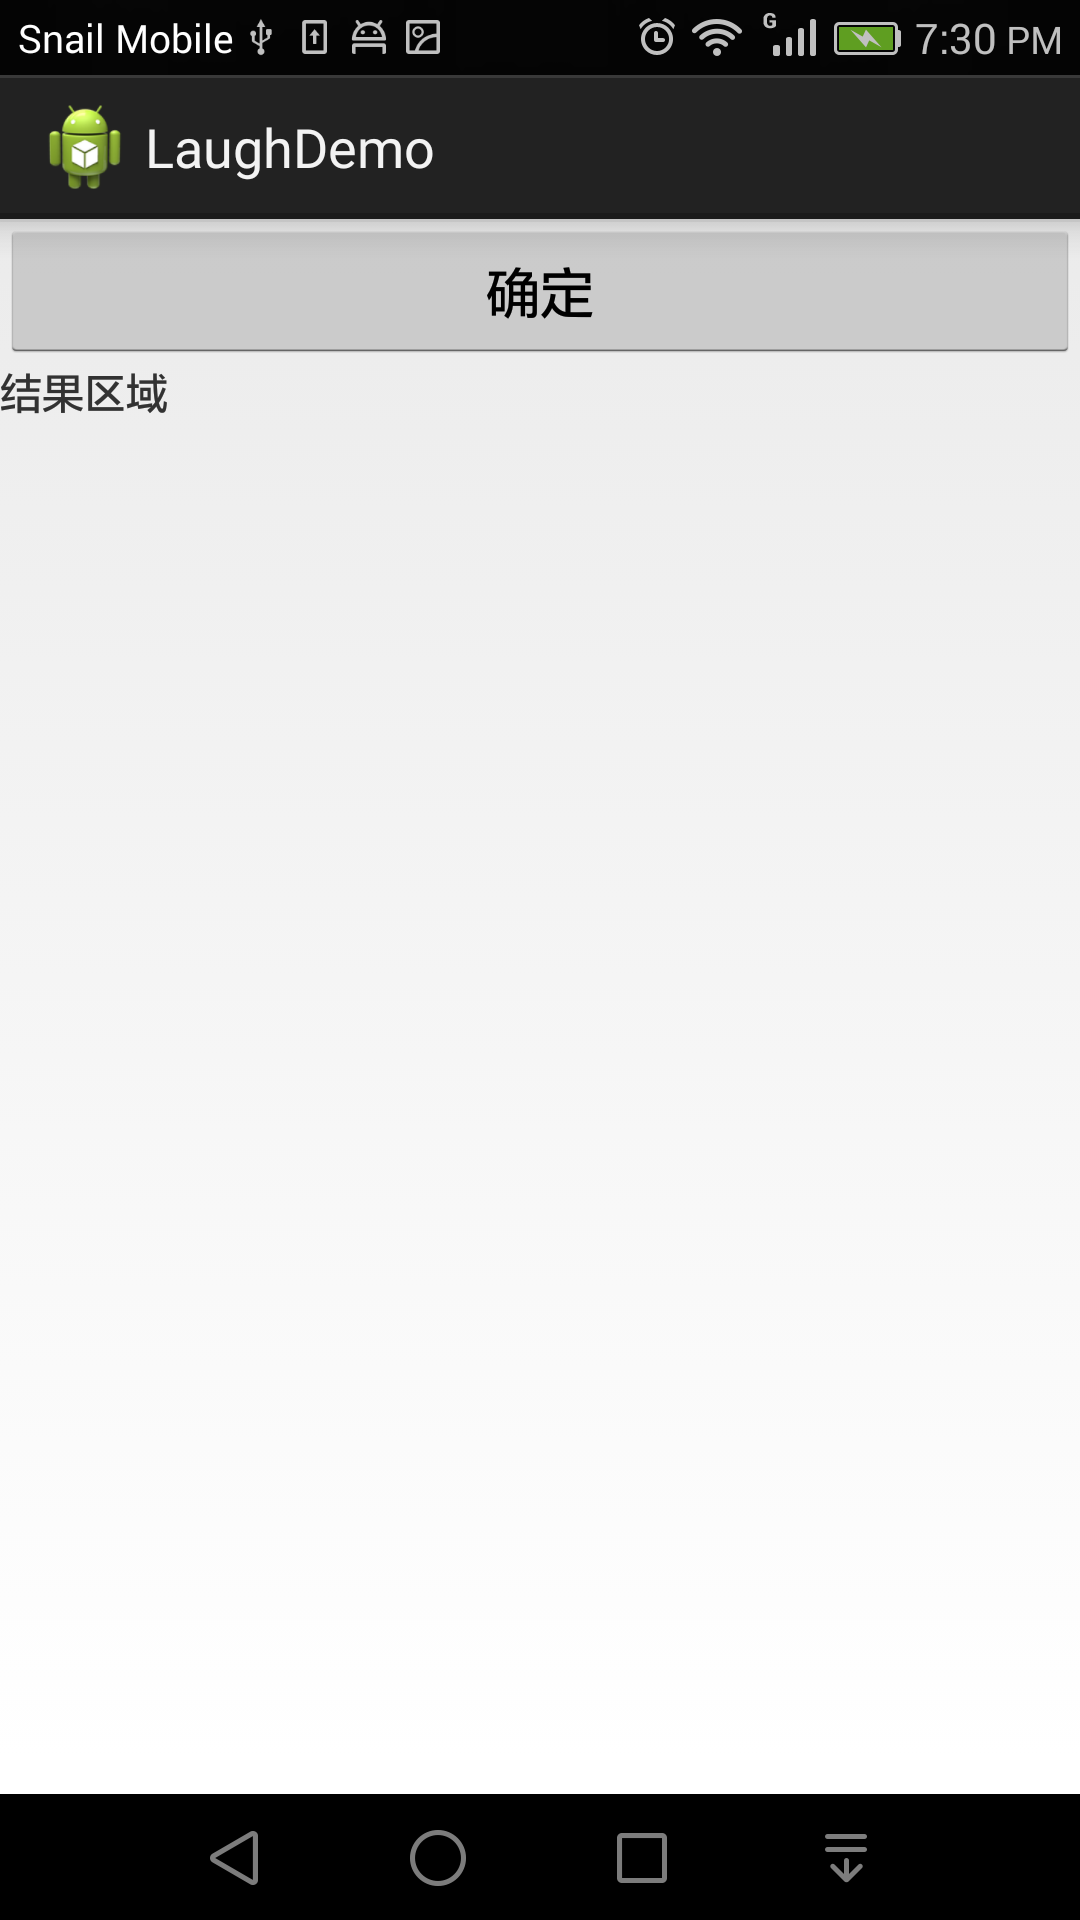 点击确定后->
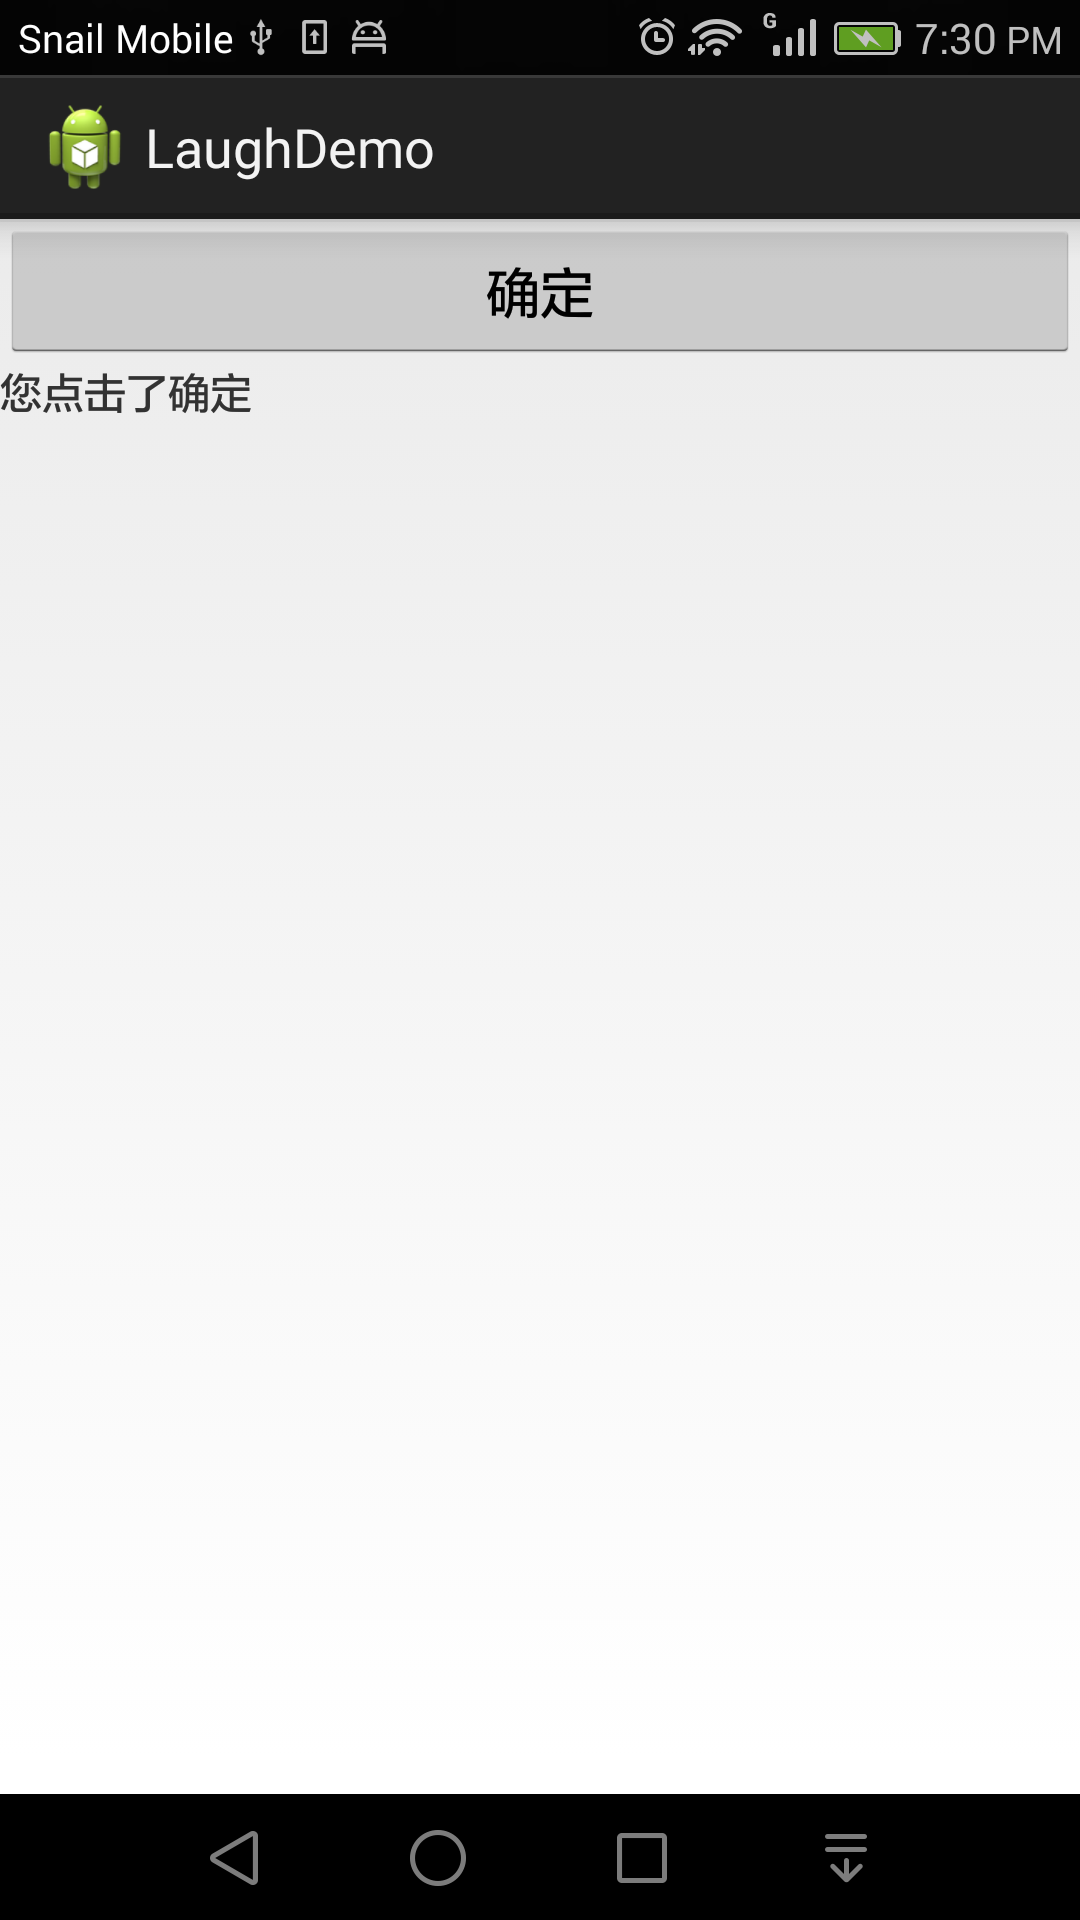
2、FinalHttp的使用,接下来就要开挂了,还是用刚才的Activity,稍作修改让我们来做一下网络请求
get方法: 一行代码搞定,直接使用get方法提交请求地址,然后在相关的回调方法中进行结果操作。上面代码给出了三个回调方法
 1 public class TestActivity extends FinalActivity {
 2     FinalHttp fh;
 3     String url = "http://xiaohua.hao.360.cn/m/itxt?page=1";
 4     @ViewInject(id=R.id.bn_click, click="testClick") Button bnClick;
 5     @ViewInject(id=R.id.tv_show) TextView tvShow;
 6     @Override
 7     protected void onCreate(Bundle savedInstanceState) {
 8         // TODO Auto-generated method stub
 9         super.onCreate(savedInstanceState);
10         setContentView(R.layout.test_main);
11         fh = new FinalHttp();
12     }
13     public void testClick(View v){
14         fh.get(url, new AjaxCallBack<String>(){
15             @Override
16             public void onStart() {
17                 // TODO Auto-generated method stub
18                 super.onStart();
19                 tvShow.setText("正在请求……");
20             }
21
22             @Override
23             public void onLoading(long count, long current) {
24                 // TODO Auto-generated method stub
25                 super.onLoading(count, current);
26                 //请求响应过程中会执行此方法,每隔1秒自动回调一次
27                 tvShow.setText(current + "/" + count);
28             }
29
30             @Override
31             public void onSuccess(String t) {
32                 // TODO Auto-generated method stub
33                 super.onSuccess(t);
34                 tvShow.setText(t);
35             }
36
37             @Override
38             public void onFailure(Throwable t, int errorNo, String strMsg) {
39                 // TODO Auto-generated method stub
40                 super.onFailure(t, errorNo, strMsg);
41                 tvShow.setText("网络异常");
42             }
43         });
44     }
45 }
post方法:
 1     AjaxParams params = new AjaxParams();
 2       params.put("username", "testname");
 3       params.put("password", "123456");
 4       params.put("profile_picture", new File("/mnt/sdcard/test.jpg")); // 上传文件
 5       params.put("profile_picture2", inputStream); // 上传数据流
 6       params.put("profile_picture3", new ByteArrayInputStream(bytes)); // 提交字节流
 7
 8       fh.post("http://www.test.com", params, new AjaxCallBack(){......});
① onStart()请求开始时回调此方法。
② onSuccess()请求成功时回调此方法,其中“t”为返回结果。
③ onFailure()请求失败时回调此方法。
④ onLoading()在请求响应过程中,每隔1秒回调一次此方法。
执行结果如下:

3、FinalBitmap的使用。同样,加载网络图片也是就一行代码 fb.display(imageView,url)。
1 public void loadingImg(View v){
2         FinalBitmap fb = FinalBitmap.create(this);
3         fb.display(ivImg, "http://pic4.nipic.com/20091120/805653_183746006558_2.jpg");
4 }
其中,loadingImg方法是用注解方式绑定在按钮上的事件,ivImg是ImageView控件。点击按钮后就会加载一张网络图片,结果如下:

哈哈,是不是很简单,同时也很给力啊!
本项目目前设计到Afinal的一些用法就这几个,如果想了解更多可以参考:http://www.oschina.net/p/afinal
在项目开中还涉及到了另一个很给力的工具--Jackson,暂时先不介绍了,等在项目中需要到的时候再做介绍。
有了这两样工具,我们的开发工作就大大简化了很多,而且性能绝不比自己纯手工去写网络请求之类的方法性能差。当然,在实际的开发中我们不能这样暴力式的直接使用get和post方法,最好是做一下封装,这样的话既节省了工作量,减少重复代码,又保证了请求方式的规范性,在后续博文中会展开项目的详细介绍。
PS:本来打算只介绍上面这么多呢,因为在将要介绍到的项目中目前只用到上面这几个功能,不过有园友建议再介绍一下FinalDb,OK,再续上一段。
4、FinalDb的使用。
其实用Afinal操作数据也是非常方便的,仍然很好的体现着Afinal的风格,一行代码实现保存数据/读取数据。
首先建立一个实体对象,用来充当数据表角色。
 1 public class Note {
 2     private int id;//id属性必须要有
 3     private String title;
 4     private String content;
 5
 6     /* getter and setter方法一定要有,应为FinalDb会通过setter方法赋值*/
 7     public int getId() {
 8         return id;
 9     }
10     public String getTitle() {
11         return title;
12     }
13     public String getContent() {
14         return content;
15     }
16     public void setId(int id) {
17         this.id = id;
18     }
19     public void setTitle(String title) {
20         this.title = title;
21     }
22     public void setContent(String content) {
23         this.content = content;
24     }
25 }
实体类建好了,再写一个测试Activity:
 1 public class DbTestActivity extends FinalActivity {
 2     FinalDb fd;
 3     Note note;
 4     @ViewInject(id=R.id.et_title) EditText etTitle;
 5     @ViewInject(id=R.id.et_content) EditText etContent;
 6     @ViewInject(id=R.id.txt_title) TextView txtTitle;
 7     @ViewInject(id=R.id.txt_content) TextView txtContent;
 8     @ViewInject(id=R.id.bn_save, click="saveData") Button bnSave;
 9     @ViewInject(id=R.id.bn_read, click="readData") Button bnRead;
10     @Override
11     protected void onCreate(Bundle savedInstanceState) {
12         // TODO Auto-generated method stub
13         super.onCreate(savedInstanceState);
14         setContentView(R.layout.activity_dbtest);
15         fd = FinalDb.create(this);
16     }
17
18     //利用Afinal注解直接在按钮上绑定事件。
19     public void saveData(View v){
20         dbSave();
21     }
22
23     public void readData(View v){
24         dbRead();
25     }
26
27     private void dbSave(){
28         note = new Note();
29         note.setTitle(etTitle.getText().toString());
30         note.setContent(etContent.getText().toString());
31         //利用FinalDb的save方法保存数据
32         fd.save(note);
33     }
34
35     private void dbRead(){
36         //利用FinalDb的findAll方法查询数据
37         List<Note> noteList = fd.findAll(Note.class);
38         txtTitle.setText("标题:" + noteList.get(0).getTitle());
39         txtContent.setText("内容:" + noteList.get(0).getContent());
40     }
41 }
布局文件也很简单,也一并贴出来吧。
 1 <LinearLayout xmlns:android="http://schemas.android.com/apk/res/android"
 2     xmlns:tools="http://schemas.android.com/tools"
 3     android:id="@+id/container"
 4     android:layout_width="match_parent"
 5     android:layout_height="match_parent"
 6     android:orientation="vertical">
 7
 8     <EditText
 9         android:id="@+id/et_title"
10         android:layout_width="match_parent"
11         android:layout_height="wrap_content"
12         android:hint="Input title"
13         android:ems="10" >
14         <requestFocus />
15     </EditText>
16
17     <EditText
18         android:id="@+id/et_content"
19         android:layout_width="match_parent"
20         android:layout_height="wrap_content"
21         android:hint="Input content"
22         android:ems="10" >
23     </EditText>
24
25     <Button
26         android:id="@+id/bn_save"
27         android:layout_width="fill_parent"
28         android:layout_height="wrap_content"
29         android:text="保存到数据库" />
30
31     <Button
32         android:id="@+id/bn_read"
33         android:layout_width="fill_parent"
34         android:layout_height="wrap_content"
35         android:text="读取数据" />
36
37     <TextView
38         android:id="@+id/txt_title"
39         android:layout_width="wrap_content"
40         android:layout_height="wrap_content"
41         android:text="标题:" />
42
43     <TextView
44         android:id="@+id/txt_content"
45         android:layout_width="wrap_content"
46         android:layout_height="wrap_content"
47         android:text="内容:" />
48
49 </LinearLayout>
执行结果如图,在编辑框输入内容后,单击保存到数据库按钮,程序会执行fd.save方法(如左图),然后我们单击读取数据按钮,就会从数据库中读取出来数据,并显示在下面(如右图)
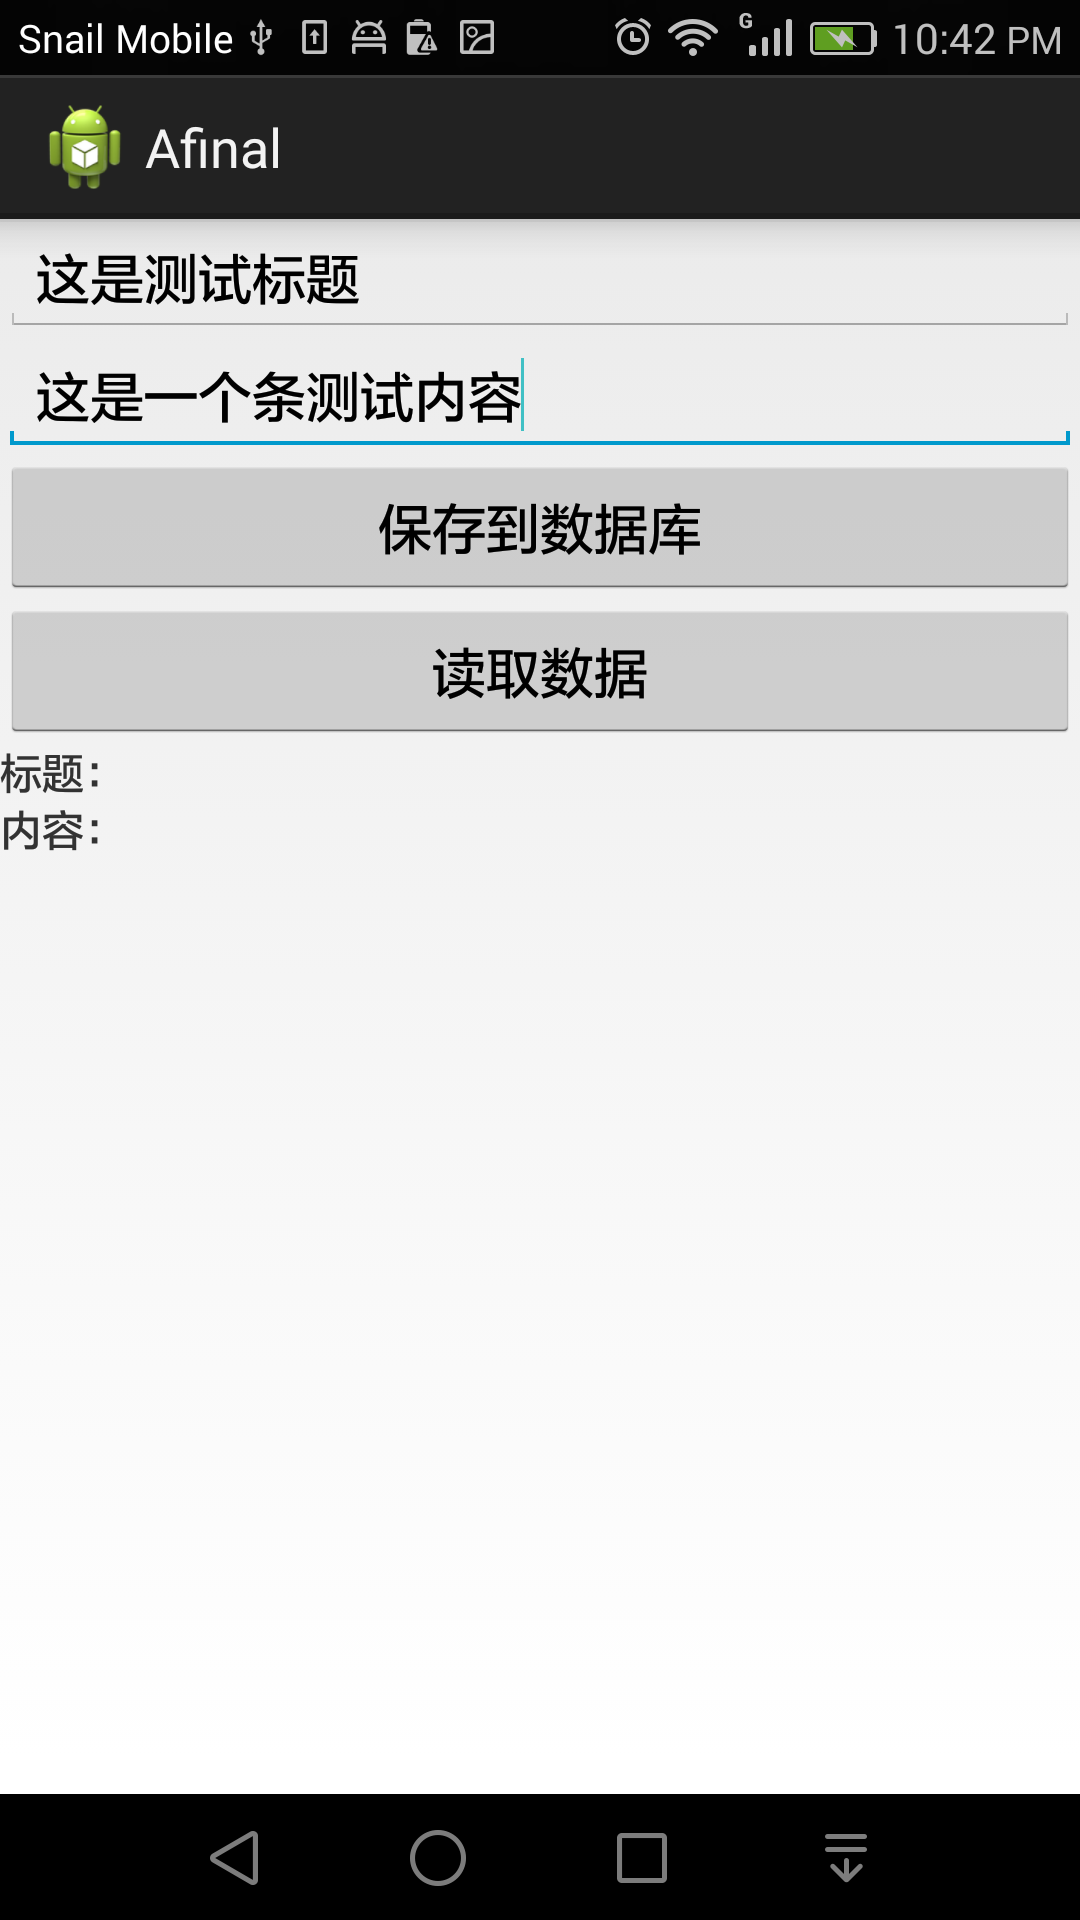

然后我们在验证一下,是否真的插入了数据库,关闭程序,重新打开后直接点击读取数据按钮,会看到仍然可以读取之前保存过的内容,由于在代码中,只取了数据表中的第一行内容,所以多次保存后仍然只显示第一次写入的数据。(由于手机目前没有root,所以无法直接通过eclipse的File Explorer查看数据库,敬请谅解!)

以上只是简单介绍了一下Afinal的几个用法,希望能起到抛砖引玉的作用,好了,步入正题,在下一遍博文中将要开始咱们的项目之旅......