一、es6
- 对象的扩展
a)属性名表达式
ES6 允许字面量定义对象时,用表达式作为对象的属性名,即把表达式放在方括号内。
var p = 'key1';
var obj = {
  [p]: 'value1'
};
var a = 2;
obj['key'+a] = 'value2';
console.log(obj); // { key1: "value1", key2: "value2" }
b)属性的简洁表示法
var x = 1;
var obj = {
  x,
  y() {
    console.log('对象方法的简写')
  }
};
console.log(obj); // { x: 1, y: function y() { console.log('对象方法的简写'); } }
上面代码表明,ES6 允许在对象之中,直接写变量。这时,属性名为变量名, 属性值为变量的值。除了属性简写,方法也可以简写。
- 字符串的扩展
a)模板字符串
模板字符串是增强版的字符串,用反引号(`)标识。它可以当作普通字符串使用,也可以用来定义多行字符串,或者在字符串中嵌入变量。
let s1 = `hello`;
let s2 = `In JavaScript this is
          not legal.`;
let name = "Bob", time = "today";
let s3 = `Hello ${name}, how are you ${time}?`;
console.log(s1);
console.log(s2);
console.log(s3);
运行结果:
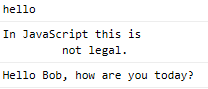
模板字符串中嵌入变量,需要将变量名写在${}之中。
大括号内部可以放入任意的 JavaScript 表达式,可以进行运算,以及引用对象属性。
let obj = {x: 1, y: 2};
console.log(`${obj.x + obj.y}`); // 3
模板字符串之中还能调用函数。
function fn() {
  return "Hello World";
}
console.log(`foo ${fn()} bar`); // foo Hello World bar
二、react
- 处理事件
通过 React 元素处理事件跟在 DOM 元素上处理事件非常相似。但是有一些语法上的区别:
React 事件使用驼峰命名,而不是全部小写;通过 JSX , 你传递一个函数作为事件处理程序,而不是一个字符串;在 React 中你不能通过返回 false来阻止默认行为。必须明确调用 preventDefault 。
当使用 React 时,你一般不需要调用 addEventListener 在 DOM 元素被创建后添加事件监听器。相反,只要当元素被初始渲染的时候提供一个监听器就可以了。
<div id="root"></div>
<a href="#" onclick="return false">Click me</a>
function ActionLink() {
    function handleClick(e) {
     // 这里,e 是一个合成的事件。 React 根据 W3C 规范 定义了这个合成事件,所以不需要担心跨浏览器的兼容性问题。
        e.preventDefault();
        console.log('The link was clicked.');
        // return false; // 此时不能阻止默认行为
    }
    return (
        <a href="#" onClick={handleClick}>click me</a>
    );
}
ReactDOM.render(
    <ActionLink />,
    document.getElementById('root')
);
当使用一个 ES6 类 定义一个组件时,通常的一个事件处理程序是类上的一个方法。
class Toggle extends React.Component { constructor() { super(); this.state = {isToggleOn: true}; this.handleClick = this.handleClick.bind(this);// 这个绑定使`this`在回调中起作用,不绑定handleClick方法里的this会是undefined} handleClick() { this.setState(prevState => ({ isToggleOn: !prevState.isToggleOn })); } render() { return (<button onClick={this.handleClick}>{this.state.isToggleOn ? 'ON' : 'OFF'}</button>); // 测试括号不能省略 } } ReactDOM.render( <Toggle />, document.getElementById('root') );
在JSX回调中你必须注意 this 的指向。 在 JavaScript 中,类方法默认没有 绑定 的。如果你忘记绑定 this.handleClick 并将其传递给onClick,那么在直接调用该函数时,this 会是 undefined 。(bind()方法会创建一个新函数,称为绑定函数,当调用这个绑定函数时,绑定函数会以创建它时传入 bind()方法的第一个参数作为 this)
将参数传递给事件处理程序
方式一:bind
class Toggle extends React.Component {
  constructor() {
    super();
    this.state = {isToggleOn: true};
  }
  handleClick(param, e) {
    this.setState(prevState => ({
      isToggleOn: !prevState.isToggleOn
    }));
    console.log(e);
    console.log(param);
  }
  render() {
    return (<button onClick={this.handleClick.bind(this, 1)}>{this.state.isToggleOn ? 'ON' : 'OFF'}</button>);
  }
}
ReactDOM.render(
  <Toggle />,
  document.getElementById('root')
);
方式二:箭头函数
render() {
  return (<button onClick={(e) => this.handleClick(1, e)}>{this.state.isToggleOn ? 'ON' : 'OFF'}</button>);
}
在循环内部,通常需要将一个额外的参数传递给事件处理程序。上面两个例子中,参数 e 作为 React 事件对象将会被作为第二个参数进行传递。通过箭头函数的方式,事件对象必须显式的进行传递,但是通过 bind 的方式,事件对象以及更多的参数将会被隐式的进行传递。
- 条件渲染
function UserGreeting(props) {
  return <h1>Welcome back!</h1>;
}
function GuestGreeting(props) {
  return <h1>Please sign up.</h1>;
}
function Greeting(props) {
  const isLoggedIn = props.isLoggedIn;
  if (isLoggedIn) {
    return <UserGreeting />;
  }
  return <GuestGreeting />;
}

ReactDOM.render(
  // 修改为 isLoggedIn={true} 试试:
  <Greeting isLoggedIn={false} />,
  document.getElementById('root')
);
- 列表渲染
通常情况下,我们会在一个组件中渲染列表。
function NumberList(props) {
  const numbers = props.numbers;
  const listItems = numbers.map(number => <li>{number}</li>);
  return (<ul>{listItems}</ul>);
}

const numbers = [1, 2, 3, 4, 5];
ReactDOM.render(
  <NumberList numbers={numbers} />,
  document.getElementById('root')
)

当运行上述代码的时候,将会收到一个警告(Warning: Each child in an array or iterator should have a unique "key" prop.)当创建元素列表时,“key” 是一个你需要包含的特殊字符串属性。
键(Keys) 帮助 React 标识哪个项被修改、添加或者移除了。数组中的每一个元素都应该有一个唯一不变的键来标识。挑选 key 最好的方式是使用一个在它的同辈元素中不重复的标识字符串。多数情况你可以使用数据中的 IDs 作为 keys。当要渲染的列表项中没有稳定的 IDs 时,你可以使用数据项的索引值作为 key 的最后选择。如果列表项可能被重新排序时,我们不建议使用索引作为 keys,因为这导致一定的性能问题,会很慢。
function ListItem(props) {
  return <li>{props.value}</li>;
}
function NumberList(props) {
  const numbers = props.numbers;
  const listItems = numbers.map(number => <ListItem key={number} value={number} />);
  return (<ul>{listItems}</ul>);
}
const numbers = [1,2,3,4,5];
ReactDOM.render(
  <NumberList numbers={numbers} />,
  document.getElementById('root')
);
JSX允许在大括号中嵌入任何表达式。
function NumberList(props) {
  const numbers = props.numbers;
  return (
    <ul>
      {numbers.map(number => <ListItem key={number} value={number} />)}
    </ul>
  );
}
就像在 JavaScript 中,是否有必要提取一个变量以提高程序的可读性,这取决于你。但是记住,如果 map() 体中有太多嵌套,可能是提取组件的好时机。
- 表单
a)在 HTML 中,表单元素如 <input>,<textarea> 和 <select> 通常保持自己的状态,并根据用户输入进行更新。而在 React 中,可变状态一般保存在组件的 state(状态) 属性中,并且只能通过 setState() 更新。我们可以通过使 React 的 state 成为 “单一数据源原则” 来结合这两个形式。然后渲染表单的 React 组件也可以控制在用户输入之后的行为。这种形式,其值由 React 控制的输入表单元素称为“受控组件”。
class NameForm extends React.Component {
  constructor(props) {
    super(props);
    this.state = {value: ''};
    this.handleChange = this.handleChange.bind(this);
    this.handleSubmit = this.handleSubmit.bind(this);
  }
  handleChange(event) {
    this.setState({value: event.target.value});
  }
  handleSubmit(event) {
    alert('A name was submitted: ' + this.state.value);
    event.preventDefault();
  }

  render() {
    return (
      <form onSubmit={this.handleSubmit}>
        <label>
          Name:
          <input type="text" value={this.state.value} onChange={this.handleChange} />
        </label>
        <input type="submit" value="Submit" />
      </form>
    );
  }
}
ReactDOM.render(
  <NameForm />,
  document.getElementById('root')
);
设置表单元素的value属性之后,其显示值将由this.state.value决定,以满足React状态的同一数据理念。每次键盘敲击之后会执行handleChange方法以更新React状态,显示值也将随着用户的输入改变。对于受控组件来说,每一次 state 变化都会伴有相关联的处理函数,这使得可以直接修改或验证用户的输入。比如,如果我们希望强制 name 的输入都是大写字母,可以这样来写 handleChange 方法:
handleChange(event) {
  this.setState({value: event.target.value.toUpperCase()});
}
b)在 React 中,一个 <input type =“file”/> 标签的 value 属性是只读的, 所以它是 React 中的一个非受控组件。它的值只能由用户设置,而不是以编程方式设置。
class FileInput extends React.Component {
  constructor(props) {
    super(props);
    this.handleSubmit = this.handleSubmit.bind(this);
  }
  handleSubmit(event) {
    event.preventDefault();
    alert(
      `Selected file - ${
        this.fileInput.files[0].name
      }`
    );
  }
  render() {
    return (
      <form onSubmit={this.handleSubmit}>
        <label>
          Upload file:
          <input type="file" ref={input => { this.fileInput = input; }} />
        </label>
        <br />
        <button type="submit">Submit</button>
      </form>
    );
  }
}

ReactDOM.render(
  <FileInput />,
  document.getElementById('root')
);
c)处理多个输入元素
当您需要处理多个受控的 input 元素时,您可以为每个元素添加一个 name 属性,并且让处理函数根据 event.target.name 的值来选择要做什么。
class Reservation extends React.Component {
  constructor(props) {
    super(props);
    this.state = {
      isGoing: true,
      numberOfGuests: 2
    };
    this.handleInputChange = this.handleInputChange.bind(this);
  }
  handleInputChange(event) {
    const target = event.target;
    const value = target.type === 'checkbox' ? target.checked : target.value;
    const name = target.name;
  // ES6 允许字面量定义对象时,用方法二(表达式)作为对象的属性名,即把表达式放在方括号内
    this.setState({
      [name]: value
    });
  }

  render() {
    return (
      <form>
        <label>
          Is going:<input name="isGoing" type="checkbox" checked={this.state.isGoing} onChange={this.handleInputChange} />
        </label>
        <br />
        <label>
          Number of guests:<input name="numberOfGuests" type="number" value={this.state.numberOfGuests} onChange={this.handleInputChange} />
        </label>
      </form>
    );
  }
}
ReactDOM.render(
  <Reservation />,
  document.getElementById('root')
);
d)受控组件和不受控组件
在大多数情况下,我们推荐使用受控组件来实现表单。在受控组件中,表单数据由 React 组件负责处理。另外一个选择是不受控组件,其表单数据由 DOM 元素本身处理。要编写一个未控制组件,你可以使用一个 ref 来从 DOM 获得 表单值,而不是为每个状态更新编写一个事件处理程序。
class NameForm extends React.Component {
  constructor(props) {
    super(props);
    this.handleSubmit = this.handleSubmit.bind(this);
  }
  handleSubmit(event) {
    alert('A name was submitted: ' + this.input.value);
    event.preventDefault();
  }

  render() {
    return (
      <form onSubmit={this.handleSubmit}>
        <label>
          Name:<input type="text" ref={(input) => this.input = input} />
        </label>
        <input type="submit" value="Submit" />
      </form>
    );
  }
}
ReactDOM.render(
  <NameForm />,
  document.getElementById('root')
);
- 状态提升
在 React 中,共享 state(状态) 是通过将其移动到需要它的组件的最接近的共同祖先组件来实现的,这被称为“状态提升。
在一个 React 应用中,对于任何可变的数据都应该循序“单一数据源”原则。通常情况下,state 首先被添加到需要它进行渲染的组件。然后,如果其它的组件也需要它,你可以提升状态到它们最近的祖先组件。你应该依赖 从上到下的数据流向 ,而不是试图在不同的组件中同步状态。
- 组合 VS 继承
React 拥有一个强大的组合模型,我们建议使用组合而不是继承以实现代码的重用。
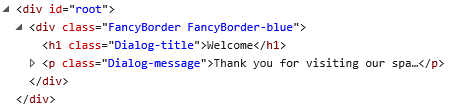
a)一些组件在设计前无法获知自己要使用什么子组件,尤其在 Sidebar 和 Dialog 等通用 “容器” 中比较常见。我们建议这种组件使用特别的 children prop 来直接传递 子元素到他们的输出中(允许其他组件通过嵌套 JSX 传递任意子组件)。
function FancyBorder(props) {
  return (
    <div className={'FancyBorder FancyBorder-' + props.color}>
      {props.children}
    </div>
  );
}
function WelcomeDialog() {
  return (
    <FancyBorder color="blue">
      <h1 className="Dialog-title">Welcome</h1>
      <p className="Dialog-message">Thank you for visiting our spacecraft!</p>
    </FancyBorder>
  );
}
ReactDOM.render(
  <WelcomeDialog />,
  document.getElementById('root')
);
浏览器渲染结果:
b)有时候,在一个组件中你可能需要多个 “占位符” 。在这种情况下,你可以使用自定义的 prop(属性),而不是使用 children
function Contacts() {
  return <div className="Contacts">Contacts</div>;
}
function Chat() {
  return <div className="Chat">Chat</div>;
}
function SplitPane(props) {
  return (
    <div className="SplitPane">
      <div className="SplitPane-left">{props.left}</div>
      <div className="SplitPane-right">{props.right}</div>
    </div>
  );
}

function App() {
  return ( <SplitPane left={ <Contacts /> } right={ <Chat /> } /> );
}
ReactDOM.render(
  <App />,
  document.getElementById('root')
);
浏览器渲染结果:
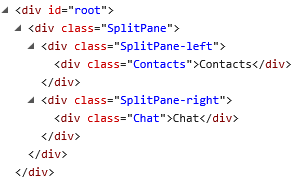
<Contacts /> 和 <Chat /> 等 React 元素本质上也是对象,所以可以将其像其他数据一样作为 props(属性) 传递使用。
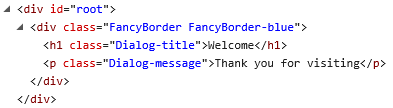
c)有时候,我们考虑组件作为其它组件的“特殊情况”。例如,我们可能说一个 WelcomeDialog 是 Dialog 的一个特殊用例。在React中,也可以使用组合来实现,一个偏“特殊”的组件渲染出一个偏“通用”的组件,通过 props(属性) 配置它。
function FancyBorder(props) {
  return (
    <div className={'FancyBorder FancyBorder-' + props.color}>
      {props.children}
    </div>
  );
}
function Dialog(props) {
  return (
    <FancyBorder color="blue">
      <h1 className="Dialog-title">
        {props.title}
      </h1>
      <p className="Dialog-message">
        {props.message}
      </p>
    </FancyBorder>
  );
}
function WelcomeDialog() {
  return <Dialog title="Welcome" message="Thank you for visiting" />;
}
ReactDOM.render(
  <WelcomeDialog />,
  document.getElementById('root')
);
浏览器渲染结果:
- React 的编程思想
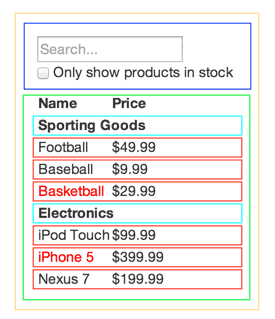
在线框图中,出现在其它组件内的组件,应该在层次结构中显示为子组件即可
步骤1:将 UI 拆解到组件层次结构中
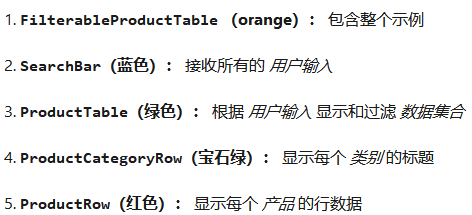
如何拆分组件 - 一个常用的技巧是单一职责原则,即一个组件理想情况下只处理一件事。如果一个组件持续膨胀,就应该将其拆分为多个更小的组件中。
步骤2: 用 React 构建一个静态版本
要构建你 app 的一个静态版本,用于渲染数据模型, 您将需要构建复用其他组件并使用 props传递数据的组件。props 是将数据从 父级组件 传递到 子级 的一种方式。在构建静态版本时 *不要使用 *state ** 。state 只用于交互,也就是说,数据可以随时被改变。由于这是一个静态版本 app,所以你并不需要使用 state 。
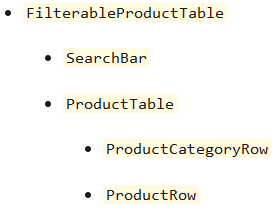
您可以 自上而下 或 自下而上 构建。也就是说,您可以从构建层次结构中顶端的组件开始(即从 FilterableProductTable 开始),也可以从构建层次结构中底层的组件开始(即 ProductRow )。在更简单的例子中,通常 自上而下 更容易,而在较大的项目中,自下而上,更有利于编写测试。
在这一步结束时,你已经有了一个可重用的组件库,用于渲染你的数据模型。组件将只有 render() 方法,因为这是你应用程序的静态版本。层次结构顶部的组件( FilterableProductTable )应该接收你的数据模型作为 prop 。如果您对基础数据模型进行更改,并再次调用 ReactDOM.render(),UI 将同步更新。
步骤3: 确定 UI state(状态) 的最小(但完整)表示
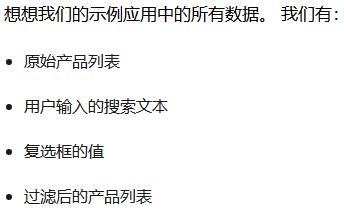
为了你的 UI 可以交互,你需要能够触发更改底层的数据模型。React 通过 state 使其变得容易。要正确的构建应用程序,你首先需要考虑你的应用程序需要的可变 state(状态) 的最小集合。这里的关键是:不要重复你自己 (DRY,don’t repeat yourself)。找出你的应用程序所需 state(状态) 的绝对最小表示,并且可以以此计算出你所需的所有其他数据内容。例如,如果你正在构建一个 TODO 列表,只保留一个 TODO 元素数组即可;不需要为元素数量保留一个单独的 state(状态) 变量。相反,当你要渲染 TODO 计数时,只需要获取 TODO 数组的长度即可。
原始的产品列表作为 props(属性) 传递,所以它不是 state(状态) 。搜索文本和复选框似乎是 state(状态) ,因为它们会根据用户的输入发生变化,并且不能从其他数据计算得出。 最后,过滤后的产品列表不是 state(状态) ,因为它可以通过结合 原始产品列表 与 搜索文本 和 复选框的值 计算得出。
 =>
=> 
步骤4:确定 state(状态) 的位置

已经决定 state(状态) 保存在 FilterableProductTable 中。首先,添加一个实例属性 this.state = {filterText: '', inStockOnly: false} 到 FilterableProductTable 的constructor 来反映你应用的初始 state(状态) 。然后,传递 filterText 和 inStockOnly 到 ProductTable 和 SearchBar 作为一个 prop(属性) 。最后,使用这些 props(属性) 来过滤 ProductTable 中的行,并设置 SearchBar 中的表单字段的值。
步骤5:添加反向数据流
目前,构建的应用已经具备了正确渲染 props(属性) 和 state(状态) 沿着层次结构向下传播的功能。现在是时候实现另一种数据流方式:层次结构中深层的 form(表单) 组件需要更新 FilterableProductTable 中的 state(状态) 。React 中明确的数据流向,使你容易理解程序如何运行。但是相比传统的数据双向绑定来说,的确需要多敲一些代码。如果你尝试在当前版本中的例子中输入或勾选复选框,你发现 React 会忽略了你的输入。这是有意为之的,因为我们已经设置了 input 的 value prop(属性) 总是等于从 FilterableProductTable 中传递的 state 。我们可以使用 input 的 onChange 事件来接收通知。而且通过 FilterableProductTable 传递的回调调用 setState(),然后应用被更新。
class ProductCategoryRow extends React.Component {
  render() {
    return (<tr><th colSpan="2">{this.props.category}</th></tr>);
  }
}
class ProductRow extends React.Component {
  render() {
    var name = this.props.product.stocked ?
      this.props.product.name :
      <span style={{color: 'red'}}>
        {this.props.product.name}
      </span>;
    return (
      <tr>
        <td>{name}</td>
        <td>{this.props.product.price}</td>
      </tr>
    );
  }
}

class ProductTable extends React.Component {
  render() {
    var rows = [];
    var lastCategory = null;
    this.props.products.forEach((product) => {
      if (product.name.indexOf(this.props.filterText) === -1 || (!product.stocked && this.props.inStockOnly)) {
        return;
      }
      if (product.category !== lastCategory) {
        rows.push(<ProductCategoryRow category={product.category} key={product.category} />);
      }
      rows.push(<ProductRow product={product} key={product.name} />);
      lastCategory = product.category;
    });
    return (
      <table>
        <thead>
          <tr>
            <th>Name</th>
            <th>Price</th>
          </tr>
        </thead>
        <tbody>{rows}</tbody>
      </table>
    );
  }
}

class SearchBar extends React.Component {
  constructor(props) {
    super(props);
    this.handleFilterTextInputChange = this.handleFilterTextInputChange.bind(this);
    this.handleInStockInputChange = this.handleInStockInputChange.bind(this);
  }
  handleFilterTextInputChange(e) {
    this.props.onFilterTextInput(e.target.value);
  }
  handleInStockInputChange(e) {
    this.props.onInStockInput(e.target.checked);
  }
  render() {
    return (
      <form>
        <input type="text" placeholder="Search..." value={this.props.filterText} onChange={this.handleFilterTextInputChange} />
        <p>
          <input type="checkbox" checked={this.props.inStockOnly} onChange={this.handleInStockInputChange} />
          Only show products in stock
        </p>
      </form>
    );
  }
}

class FilterableProductTable extends React.Component {
  constructor(props) {
    super(props);
    this.state = {
      filterText: '',
      inStockOnly: false
    };
    this.handleFilterTextInput = this.handleFilterTextInput.bind(this);
    this.handleInStockInput = this.handleInStockInput.bind(this);
  }
  handleFilterTextInput(filterText) {
    this.setState({
      filterText: filterText
    });
  }
  handleInStockInput(inStockOnly) {
    this.setState({
      inStockOnly: inStockOnly
    })
  }
  render() {
    return (
      <div>
        <SearchBar filterText={this.state.filterText} inStockOnly={this.state.inStockOnly} onFilterTextInput={this.handleFilterTextInput} onInStockInput={this.handleInStockInput} />
        <ProductTable products={this.props.products} filterText={this.state.filterText} inStockOnly={this.state.inStockOnly} />
      </div>
    );
  }
}

var PRODUCTS = [
  {category: 'Sporting Goods', price: '$49.99', stocked: true, name: 'Football'},
  {category: 'Sporting Goods', price: '$9.99', stocked: true, name: 'Baseball'},
  {category: 'Sporting Goods', price: '$29.99', stocked: false, name: 'Basketball'},
  {category: 'Electronics', price: '$99.99', stocked: true, name: 'iPod Touch'},
  {category: 'Electronics', price: '$399.99', stocked: false, name: 'iPhone 5'},
  {category: 'Electronics', price: '$199.99', stocked: true, name: 'Nexus 7'}
];
ReactDOM.render(
  <FilterableProductTable products={PRODUCTS} />,
  document.getElementById('container')
);