一、 使用脚手架 create-react-app
参考:https://github.com/facebook/create-react-app#creating-an-app
1、使用该脚手架,你不需要安装或配置webpack、babel这些工具,它们已经预先配置好并隐藏起来。
1)使用npm初始化一个react应用:npm init react-app my-app(创建项目并自动安装相关依赖)
和以下两条命令的效果类似:
npm install -g create-react-app-》create-react-app my-app
2)以开发模式运行该项目:
cd my-app(进入项目根目录,package.json所在目录)-》npm start
2、构建react
public/index.html是页面模板,src/index.js是js入口。为了更长远的重建,只有src目录下的文件会被webpack处理,你需要把js和css文件放在src目录下。
// Button.js
import React, { Component } from 'react';
class Button extends Component {
  render() {
    // ...
  }
}
export default Button;

// DangerButton.js
import React, { Component } from 'react';
import Button from './Button';
class DangerButton extends Component {
  render() {
    return <Button color="red" />;
  }
}
export default DangerButton;
官方建议当一个模块只暴露一个接口时使用默认的imports和exports,具名exports在暴露多个接口的模块中是有用的,一个模块最多有一个default export和任意个named exports。
二、React Router 4.x
参考:https://github.com/ReactTraining/react-router,
https://www.zcfy.cc/article/react-router-v4-the-complete-guide-mdash-sitepoint-4448.html,
http://reacttraining.cn/web/guides/quick-start
React Router 是一个基于 React 的路由库,它可以让你向应用中快速地添加视图和数据流,同时保持页面与 URL 间的同步。
React Router 4.x(以下简称 RR4)采用单代码仓库模型架构(monorepo),使用lerna(多包管理工具)管理。这意味者这个仓库里面有几个包,分别是:
- react-router React Router 核心
- react-router-dom 用于 DOM 绑定的 React Router
- react-router-native 用于 React Native 的 React Router
- react-router-redux React Router 和 Redux 的集成
- react-router-config 静态路由配置小助手
react-router-dom包含了react-router的功能,并且比react-router多出了 <Link> <BrowserRouter> 这样的 DOM 类组件。因此我们只需引用 react-router-dom 这个包就行了。如果搭配 redux ,你还需要使用 react-router-redux。
1)安装:cnpm install react-router-dom
2)导航组件
a)<BrowserRouter>&<HashRouter>
// <BrowserRouter>
'http://example.com/about'
// <HashRouter>
'http://example.com/#/about'
<BrowserRouter>在两者中更常用是因为它使用了HTML5的history API来记录你的路由历史,而<HashRouter>使用URL(window.location.hash)的hash部分来记录。如果你想兼容老式浏览器,你应该使用<HashRouter>。- 注意:Router组件只能有一个子元素。子元素可以是HTML (例如div), 也可以是一个react组件。
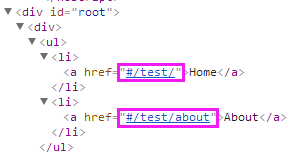
// src/index.js
import React from 'react';
import ReactDOM from 'react-dom';
import App from './App';

ReactDOM.render(<App />, document.getElementById('root'));

// src/App.js
import React from 'react'
import { BrowserRouter as Router, Route,  Link } from 'react-router-dom'

const BasicExample = () => (
  <Router basename="/test" forceRefresh>
    <div>
      <ul>
        <li><Link to="/">Home</Link></li> // http://localhost:3000/test/
        <li><Link to="/about">About</Link></li> // http://localhost:3000/test/about
      </ul>
      <hr/>
      <Route exact path="/" component={Home}/>
      <Route path="/about" component={About}/>
    </div>
  </Router>
)
const Home = () => (
  <div><h2>Home</h2></div>
)
const About = () => (
  <div><h2>About</h2></div>
)

export default BasicExample
渲染结果:

forceRefresh: bool(当设置为 true 时,在导航的过程中整个页面将会刷新。 只有当浏览器不支持 HTML5 的 history API 时,才设置为 true)
// HashRouter:子元素为html
<HashRouter basename="/test">
  <div>
    <ul>
      <li><Link to="/">Home</Link></li> // http://localhost:3000/#/test/
      <li><Link to="/about">About</Link></li> // http://localhost:3000/#/test/about
    </ul>

    <hr/>

    <Route exact path="/" component={Home}/>
    <Route path="/about" component={About}/>
  </div>
</HashRouter>

// HashRouter:子元素为组件
<HashRouter>
  <Route exact path="/" component={Home}/>
</HashRouter>
渲染结果:
b)<Link>
用来跳转页面,在浏览器中会被渲染为a标签
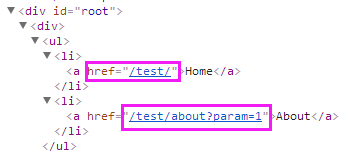
<BrowserRouter basename="/test">
  <div>
    <ul>
      <li><Link to="/" replace>Home</Link></li>
      <li><Link to={{ pathname: '/about', search: '?param=1'}} replace>About</Link></li>
    </ul>
    <Route exact path="/" component={Home}/>
    <Route path="/about" component={About}/>
  </div>
</BrowserRouter>
渲染结果:
to:需要跳转到的地址(string或object)
replace: bool(默认为 false)
当设置为 true 时,点击链接后将使用新地址替换掉访问历史记录里面的原地址。当设置为 false 时,点击链接后将在原有访问历史记录的基础上添加一个新的纪录。
c)<Route>
<Route>的基本功能是当location与route的路径匹配时渲染界面,它有三种渲染方式:component、render和children。大部分情况下使用到的是component方式。这三种渲染方式都会传递三个route属性:match、location和history。
<BrowserRouter>
  <div>
    <ul>
      <li><Link to="/">Home</Link></li>
      <li><Link to="/about">About</Link></li>
    </ul>
    <hr/>
    <Route exact path="/" component={Home}/>
    <Route path="/about" component={About}/>
  </div>
</BrowserRouter>
path:路由组件对应的url路径;component:路径匹配时会渲染的组件;exact(bool):当设为true时,只有当path与路径完全相同时才会匹配;render(func):路径匹配时方法会被调用来渲染界面。
path属性可以使用path-to-regexp(npm包:将一个类似于/user/:name的字符串转化为一个正则表达式),path-to-regexp暴露了一个compile方法可以将字符串转为一个有效的路径。
var toPath = pathToRegexp.compile('/user/:id')
toPath({ id: 123 }) //=> "/user/123"
toPath({ id: '/' }) //=> "/user/%2F"
当路由路径和当前路径成功匹配,会生成一个match对象。match对象包含下面这些属性:
-
match.url.返回URL匹配部分的字符串。对于创建嵌套的<Link>很有用。 -
match.path.返回用于匹配的路径字符串 - 就是<Route path="">。对于创建嵌套的<Route>很有用。 -
match.isExact.如果整个url准确匹配(没有任何多余字符)则返回true。 -
match.params.对于路径的动态部分,从URL解析出的键值对。
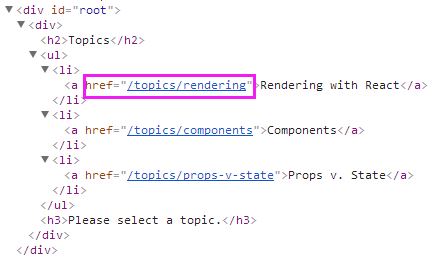
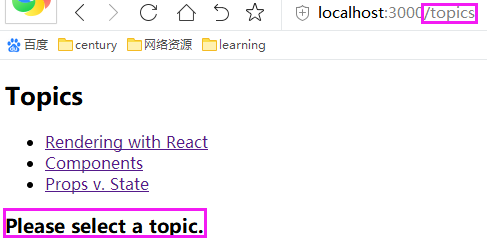
import React from 'react'
import { BrowserRouter as Router, Route, Link } from 'react-router-dom'

const BasicExample = () => (
  <Router>
    <Route path="/topics" component={Topics}/>
  </Router>
)

const Topics = ({ match }) => (
  <div>
    <h2>Topics</h2>
    <ul>
      <li>
        <Link to={`${match.url}/rendering`}>Rendering with React</Link>
      </li>
      <li>
        <Link to={`${match.url}/components`}>Components</Link>
      </li>
      <li>
        <Link to={`${match.url}/props-v-state`}>Props v. State</Link>
      </li>
    </ul>

    <Route path={`${match.url}/:topicId`} component={Topic}/>
    <Route exact path={match.url} render={() => (
      <h3>Please select a topic.</h3>
    )}/>
  </div>
)

const Topic = ({ match }) => (
  <div>
    <h3>{match.params.topicId}</h3>
  </div>
)
export default BasicExample
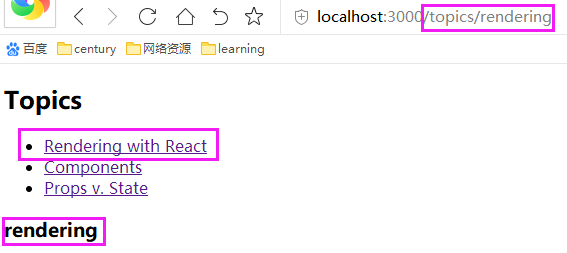
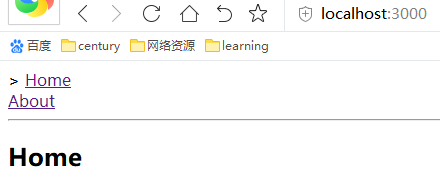
children(func):有时你需要渲染route组件,无论路由是否匹配(比如导航栏菜单),此时你可以使用<Route>组件的children属性。它和render属性很像,区别是children属性对应的方法,无论路由是否匹配都会被调用。
children属性和component、render属性一样,接收所有的route props(match、location、history)。但是当路由不匹配时,match为null(可以根据此动态调整匹配与不匹配路由组件的页面展示)。
import React from 'react'
import { BrowserRouter as Router, Route, Link } from 'react-router-dom'

const CustomLinkExample = () => (
  <Router>
    <div>
      <OldSchoolMenuLink activeOnlyWhenExact={true} to="/" label="Home"/>
      <OldSchoolMenuLink to="/about" label="About"/>
      <hr/>
      <Route exact path="/" component={Home}/>
      <Route path="/about" component={About}/>
    </div>
  </Router>
)

const OldSchoolMenuLink = ({ label, to, activeOnlyWhenExact }) => (
  <Route path={to} exact={activeOnlyWhenExact} children={({ match }) => (
    <div className={match ? 'active' : ''}>
      {match ? '> ' : ''}<Link to={to}>{label}</Link>
    </div>
  )}/>
)
const Home = () => (
  <div><h2>Home</h2></div>
)
const About = () => (
  <div><h2>About</h2></div>
)
export default CustomLinkExample
渲染结果:

d)<Redirect>
应用场景:访问一个页面a,若未登录则需要重定向到登录页面,若已登录就可以直接访问。
<Redirect>会重定向到新地址,默认将history堆栈的当前路径替换为新路径;to(string或object):重定向地址。
import React from 'react'
import { BrowserRouter, Route, Link, Redirect } from 'react-router-dom'
const AuthExample = () => (
  <BrowserRouter>
    <div>
      <ul>
        <li><Link to="/public">Public Page</Link></li>
        <li><Link to="/protected">Protected Page</Link></li>
      </ul>
      <Route path="/public" component={Public}/>
      <Route path="/protected" render={() => (<Redirect to="/public"/>)}/>
    // <Route path="/protected" render={() => (<Redirect to={{pathname:"/public"}}/>/>
    </div>
  </BrowserRouter>
)
const Public = () => <h3>Public</h3>
export default AuthExample
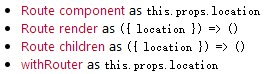
路由会在以下几个地方提供一个location对象(props.location)
import React from 'react'
import { BrowserRouter, Route, Link, Redirect } from 'react-router-dom'

const AuthExample = () => (
  <BrowserRouter>
    <div>
      <ul>
        <li><Link to="/protected">Protected Page</Link></li>
      </ul>
      <Route path="/login" component={Login}/>
      <PrivateRoute path="/protected" component={Protected}/>
    </div>
  </BrowserRouter>
)
const fakeAuth = {
  isAuthenticated: false,
  authenticate(cb) {
    this.isAuthenticated = true
    setTimeout(cb, 100) // fake async
  }
}
const PrivateRoute = ({ component: Component, ...rest }) => (
  <Route {...rest} render={props => (
    fakeAuth.isAuthenticated ? (
      <Component/>
    ) : (
      <Redirect to={{
        pathname: '/login',
        state: { from: props.location }
      }}/>
    )
  )}/>
)

class Login extends React.Component {
  constructor() {
    super()
    this.state = {
      redirectToReferrer: false
    }
    this.login = this.login.bind(this)
  }
  login() {
    fakeAuth.authenticate(() => {
      this.setState({ redirectToReferrer: true })
    })
  }
  render() {
    const { from } = this.props.location.state || { from: { pathname: '/' } }
    const { redirectToReferrer } = this.state
    if (redirectToReferrer) {
      return (
        <Redirect to={from}/>
      )
    }
    return (
      <div>
        <p>You must log in to view the page at {from.pathname}</p>
        <button onClick={this.login}>Log in</button>
      </div>
    )
  }
}
const Protected = () => <h3>Protected</h3>
export default AuthExample
<Redirect to={{pathname: '/login', state: {from: props.location}}}:你可以将当前路径的信息存在location.state里进行传递。
e)withRouter
当路由变化时,withRouter会重新渲染组件,它和 <Route>组件有相同的render props: { match, location, history }
import React from 'react'
import { BrowserRouter, Route, Link, Redirect, withRouter } from 'react-router-dom'

const AuthExample = () => (
  <BrowserRouter>
    <div>
      <AuthButton/>
      <ul>
        <li><Link to="/protected">Protected Page</Link></li>
      </ul>
      <Route path="/login" component={Login}/>
      <PrivateRoute path="/protected" component={Protected}/>
    </div>
  </BrowserRouter>
)

const fakeAuth = {
  isAuthenticated: false,
  authenticate(cb) {
    this.isAuthenticated = true
    setTimeout(cb, 100) // fake async
  },
  signout(cb) {
    this.isAuthenticated = false
    setTimeout(cb, 100)
  }
}
const AuthButton = withRouter(({ history }) => (
  fakeAuth.isAuthenticated ? (
    <p>
      Welcome! <button onClick={() => {
        fakeAuth.signout(() => history.push('/'))
      }}>Sign out</button>
    </p>
  ) : (
    <p>You are not logged in.</p>
  )
))