小程序的API接口文档写的很清晰,现在理一遍思路。
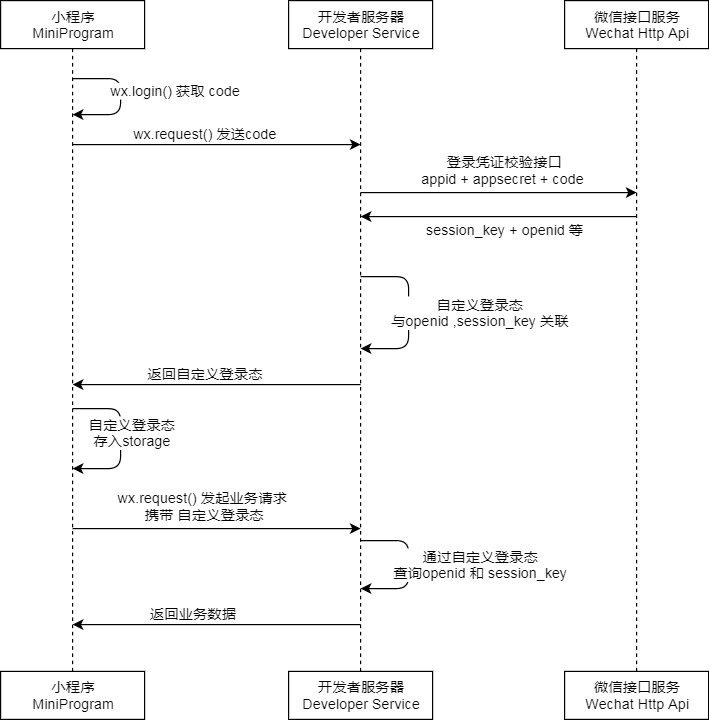
前端通过wx.login()获取code ,把code发给后台,后台返回openid,再获取用户的授权信息(这里先判断是否授权,授权过的就直接进入小程序,没授权过的,跳转到授权页进行)。
在app.js 页
  onLaunch: function () {
    var _this = this;
    // 登录
    wx.login({
      success: res => {
        // 发送 res.code 到后台换取 openId, sessionKey, unionId
        // 登陆成功
        if (res.code) {
          // 发起网络请求,获取微信信息
           console.log(res.code);

          wx.request({
            method: 'POST',
            url: getOpenIdUrl,
            data: {
              code: res.code
            },
            success: function(res) {
               console.log(res);
              var openid = res.data.data.openid;
              // 获取微信信息
              _this.userInfo(openid);
            }
          })
        }
      }
    })
userInfo:function(openid){
   wx.getSetting({  //判断是否授权
        if(!res.authSetting['scope.userInfo']){//如果没有授权
            wx.redirectTo({
              url:'/pages/login/login?openid='+openid,
          })
      }else{
        console.log('已经授权')
      }
})

}

//在login页xml设置button
<button class='loginbutton'open-type="getUserInfo" bindgetuserinfo="userInfoHandler">请授权</button>
//js页
userInfoHandler:function(res){
var userMes = res.detail;
_this.setData({
userMes:userMes
})
if (res.detail.errMsg=='getUserInfo:ok'){
var url = '/pages/list/list';
_this.postAddUser(_this.data.openid, _this.redirectTo, url);
}else{
console.log('授权失败')
}
},
redirectTo:function(url){
   wx.redirectionTo({
      url:url
  })
}
postAddUser:function(openid,callback,callbackArg){
     var _this=this;
wx.request({
method: 'POST',
url: login,
data: {
'rawData': _this.data.userMes.rawData,
'signature': _this.data.userMes.signature,
'encryptedData': _this.data.userMes.encryptedData,
'iv': _this.data.userMes.iv,
'openid': _this.data.openid
},
success: function (res) {
_this.saveCache('weInfo', res.data.data);
callback(callbackArg);
}
     }
//保存缓存
saveCache:function(key,value){
   wx.setStorage({
     key:key,
     data:vulue
 })
}