Android-Diaolog
对话框是提示用户做出选择或是输入额外信息的小窗口,通常不会占满整个屏幕,与用户进行交互
下面介绍一些Dialog对话框的创建方式:主要使用AlterDialog类进行创建,AlterDialog的构造方法被修饰文protected,因此无法在保外使用,所以要利用构建器
1.使用AlterDialog 构建器Builder 进行创建
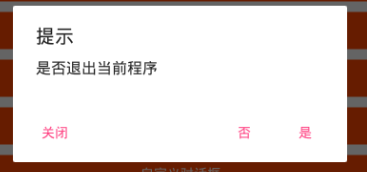
private void showNormalDialog1() {
        /*PositiveButton = -1; NegativeButton = -2; NeutralButton = -3;
          3种创建对话框按钮方法本身是一样的,
          只用来确定按钮在对话框中得位置,对应的位置分别是右、中、左.*/
        //AlterDialog的构造方法被修饰文protected,因此无法在保外使用,所以要利用构建器
        AlertDialog.Builder builder = new AlertDialog.Builder(this);
        //对话框的标题和内容
        builder.setTitle("提示").setMessage("是否退出当前程序")
                //设置按钮"是"
                .setPositiveButton("是", new DialogInterface.OnClickListener() {
                    @Override
                    public void onClick(DialogInterface dialogInterface, int i) {
                        MainActivity.this.finish();
                    }
                })
                //设置按钮"否"
                .setNegativeButton("否", new DialogInterface.OnClickListener() {
            @Override
            public void onClick(DialogInterface dialogInterface, int i) {
                dialogInterface.dismiss();
            }
        }).setNeutralButton("关闭",null);
        //show()方法默认创建对话框,然后展示对话框
        builder.show();
    }
效果图:
2.利用AlertDialog.Builder的creat方法创建AlertDialog对象
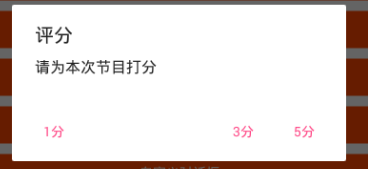
 private void showNormalDialog2() {
        //利用AlertDialog.Builder的creat方法创建AlertDialog对象
        final AlertDialog alertDialog = new AlertDialog.Builder(this).create();
        //设置标题和内容
        alertDialog.setTitle("评分");
        alertDialog.setMessage("请为本次节目打分");
        //设置按钮与监听事件
        alertDialog.setButton(-1, "5分", new DialogInterface.OnClickListener() {
            @Override
            public void onClick(DialogInterface dialogInterface, int i) {
                Toast.makeText(MainActivity.this,alertDialog.getButton(i).getText().toString(),Toast.LENGTH_SHORT).show();
            }
        });
        alertDialog.setButton(-2, "3分", new DialogInterface.OnClickListener() {
            @Override
            public void onClick(DialogInterface dialogInterface, int i) {
                Toast.makeText(MainActivity.this,alertDialog.getButton(i).getText().toString(),Toast.LENGTH_SHORT).show();
            }
        });
        alertDialog.setButton(-3, "1分", new DialogInterface.OnClickListener() {
            @Override
            public void onClick(DialogInterface dialogInterface, int i) {
                Toast.makeText(MainActivity.this,alertDialog.getButton(i).getText().toString(),Toast.LENGTH_SHORT).show();
            }
        });
        //千万不要忘记这一步哦
        alertDialog.show();
    }
效果图:
3.创建列表对话框
private void showListDialog() {
        //创建列表对话框选项
        final String[] str = {"支付宝","微信","QQ钱包","银行卡"};
        AlertDialog.Builder builder = new AlertDialog.Builder(this)
        .setTitle("请选择支付方式")
        //参数1:所要显示的列表项 参数2:点击事件
        .setItems(str, new DialogInterface.OnClickListener() {
            @Override
            //参数2:点击项的索引
            public void onClick(DialogInterface dialogInterface, int i) {
                Toast.makeText(MainActivity.this,str[i],Toast.LENGTH_LONG).show();
            }
        });
        builder.show();
    }
效果图:

4.创建单选对话框
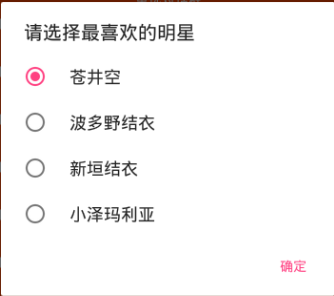
 private void showSingleDialog() {
        final String[] str ={"苍井空","波多野结衣","新垣结衣","小泽玛利亚"};
        AlertDialog.Builder builder = new AlertDialog.Builder(this)
                .setTitle("请选择最喜欢的明星")
                .setSingleChoiceItems(str, 0, new DialogInterface.OnClickListener() {
                    @Override
                    public void onClick(DialogInterface dialogInterface, int i) {
                        index = i;
                    }
                })
                .setPositiveButton("确定", new DialogInterface.OnClickListener() {
                    @Override
                    public void onClick(DialogInterface dialogInterface, int i) {
                        Toast.makeText(MainActivity.this, str[index],Toast.LENGTH_LONG).show();
                    }
                });
        builder.show();
    }
效果图
呃呃呃呃呃呃呃~~~~~~~~你懂的
5.创建多选对话框
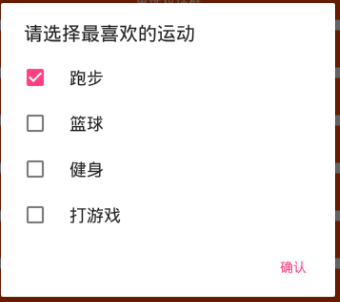
private void showMultiDialog() {
        final String[] str = {"跑步","篮球","健身","打游戏"};

         final boolean[] chected = {true,false,false,false};
        final AlertDialog.Builder builder = new AlertDialog.Builder(this)
                .setTitle("请选择最喜欢的运动")
                //参数1:选项 参数2:默认备选项(true 选中,false 未选中) 参数3:点击事件
                .setMultiChoiceItems(str, chected, new DialogInterface.OnMultiChoiceClickListener() {
                    @Override
                    //参数1:对话框本身对象 参数2:按钮索引 参数3:标识按钮是否处于被选中的状态
                    public void onClick(DialogInterface dialogInterface, int i, boolean b) {

                    }
                }).setPositiveButton("确认", new DialogInterface.OnClickListener() {
                    @Override
                    public void onClick(DialogInterface dialogInterface, int i) {
                        StringBuilder msg = new StringBuilder("您的爱好是:");
                        for(int j = 0;j < chected.length;j++){
                            if(chected[j]){
                                msg.append(str[j] + " " );
                            }
                        }
                        Toast.makeText(MainActivity.this,msg,Toast.LENGTH_LONG).show();
                    }

                });
        builder.show();
    }
效果图
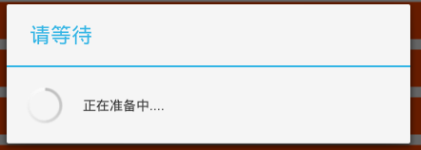
6.创建等待对话框
private void showWaitingDialog() {
        ProgressDialog dialog = new ProgressDialog(this);
        dialog.setTitle("请等待");
        dialog.setMessage("正在准备中....");
        //设置对话框显示 默认true
        // false点击不显示  任务执行完成后可使用dismiss方法设置对话框消失
        dialog.setCancelable(false);
        dialog.show();
    }
效果图:
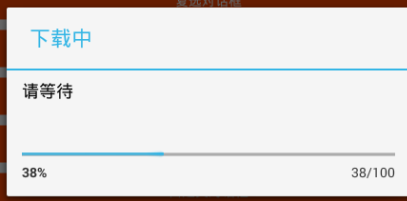
7.创建进度条对话框
private void showProgressDialog() {
        final ProgressDialog dialog = new ProgressDialog(this);
        dialog.setTitle("下载中");
        dialog.setMessage("请等待");
        //设置进度条模糊
        dialog.setIndeterminate(false);
        //设置进度条样式
        dialog.setProgressStyle(ProgressDialog.STYLE_HORIZONTAL);
        dialog.show();
        //设置任务线程进度
        new Thread(){
            @Override
            public void run() {
                for(int i = 1;i<100;i++){
                    dialog.setProgress(i);
                    try {
                        sleep(50);
                    } catch (InterruptedException e) {
                        e.printStackTrace();
                    }
                }
                //循环结束,关闭对话框
                dialog.dismiss();
            }

        }.start();
    }
效果图:
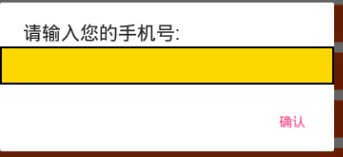
8.创建输入对话框
private void showInputDialog() {
        final EditText et = new EditText(this);
        Resources resources = getBaseContext().getResources();
        Drawable drawable = resources.getDrawable(R.drawable.et_shape);
        et.setBackground(drawable);//输入框样式
        et.setInputType(InputType.TYPE_CLASS_NUMBER);//限制输入内容为纯数字
        AlertDialog.Builder builder = new AlertDialog.Builder(this)
                .setTitle("请输入您的手机号:")
                .setView(et)
                .setPositiveButton("确认", new DialogInterface.OnClickListener() {
                    @Override
                    public void onClick(DialogInterface dialogInterface, int i) {
                        Toast.makeText(MainActivity.this,et.getText().toString(),Toast.LENGTH_LONG).show();
                    }
                });
        builder.show();
    }
效果图:
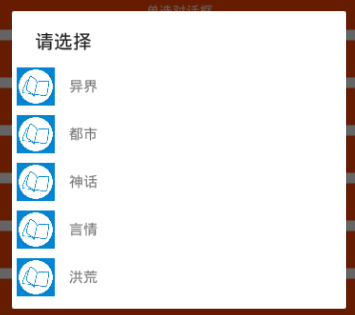
9.使用ArrayAdapter创建对话框
private void showArrayDialog() {
        final String[] sre = {"异界","都市","神话","言情","洪荒"};
        //数组适配器
        //参数1:环境 参数2:布局资源引用
//        ArrayAdapter arrayAdapter = new ArrayAdapter(this,android.R.layout.simple_dropdown_item_1line,sre);
        //参数3:int TextView 制定文本所需要放在布局文件中textview的对应id
        ArrayAdapter arrayAdapter = new ArrayAdapter(this,R.layout.array_layout,R.id.textview1,sre);
        AlertDialog.Builder builder = new AlertDialog.Builder(this)
                .setTitle("请选择")
                //参数1:适配器对象(对象显示样式规则制定)
                //参数2:监听器
                .setAdapter(arrayAdapter, new DialogInterface.OnClickListener() {
                    @Override
                    public void onClick(DialogInterface dialogInterface, int i) {
                        Toast.makeText(MainActivity.this,sre[i],Toast.LENGTH_LONG).show();
                        dialogInterface.dismiss();
                    }
                });
        builder.show();
    }
效果图:
10.自定义对话框
Main_activity类
 //自定义对话框
                //1.自定义一个类继承Dialog,并加载自定义布局
                // 2.设定自定义风格(不显示标题栏,不显示背景)  在资源文件夹 styles中修改
                // 3.(1)在自定义类的构造super添加style (2)直接重写含style参数的构造方法
                // 4.在自定义类中设定监听事件
                MyDialog myDialog = new MyDialog(this);
                myDialog.show();
            /*    Window dialogWindow = myDialog.getWindow();
                //获取当前对话框的宽 高
                WindowManager.LayoutParams layoutParams = dialogWindow.getAttributes();
                //对齐方式
                dialogWindow.setGravity(Gravity.CENTER);
                //宽 高
                layoutParams.width = 500;
                layoutParams.height = 300;
                //透明度
                layoutParams.alpha = 0.7f;
                dialogWindow.setAttributes(layoutParams);*/
MyDialog类 自定义dialog类
public class MyDialog extends Dialog {

    public MyDialog(Context context) {
        //参数2:对话框自定义风格
        super(context,R.style.mydialog);
        setContentView(R.layout.title);
        //自定义类中添加监听事件
        findViewById(R.id.bt11).setOnClickListener(new View.OnClickListener() {
            @Override
            public void onClick(View view) {
                System.exit(0);
            }
        });
        findViewById(R.id.bt12).setOnClickListener(new View.OnClickListener() {
            @Override
            public void onClick(View view) {
                dismiss();
            }
        });
    }
}
style样式修改
 <style name="mydialog" parent="android:style/Theme.Dialog">
            <item name="android:windowNoTitle">true</item>
            <item name="android:windowBackground">@android:color/transparent</item>
    </style>
windowNoTitle:修改标题为无标题
windowsBackground :修改背景为透明
效果图:
