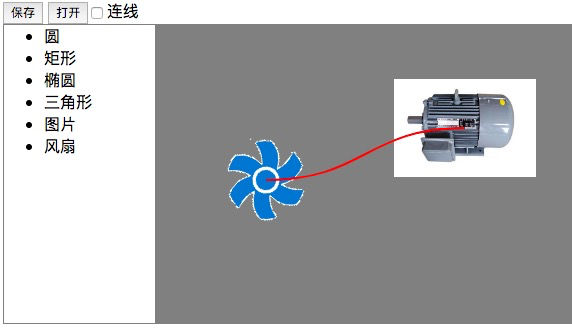
前面示例我建立了三种形状的组件,圆、矩形、椭圆,本节我将再扩展两种类型:图片和动画,并通过这个过程来论证前面OOP的编程是如何简化扩展工作的:
首先要在工具条里增加这两个组件,以便可以拖动:
                <li name="toolbox"  draggable="true">图片</li>
                <li name="toolbox"  draggable="true">风扇</li>
然后要增加两个Component的继承类:
  function MotorImage() {
        this.url="http://www.jc-ebike.com/uploadfile/20150723/20150723194720340.jpg";
    }
    MotorImage.prototype = $.extend({}, Component.prototype);
    MotorImage.prototype = $.extend(MotorImage.prototype, {
        render: function (options) {
            this.properties.width = 20;
            this.properties.typeName = "图片";
            this.properties.height = 60;
            this.properties = $.extend(this.properties, options);
            var motor = new paper.Raster({source:this.url,position:[options.x,options.y]});
            motor.scale(0.3);
            this.group.addChild(motor);
            return this;
        }
    });
    function Fan() {
        this.fan=null;
        this.url="http://www.ailawyers.cn/content/fan.png";
    }
    Fan.prototype = $.extend({}, Component.prototype);
    Fan.prototype = $.extend(Fan.prototype, {
        render: function (options) {
            this.properties.width = 60;
            this.properties.typeName = "风扇";
            this.properties.height = 60;
            this.properties = $.extend(this.properties, options);
            this.fan= new paper.Raster({source:this.url,position:[options.x,options.y]});
            this.fan.scale(0.1);
            this.group.addChild(this.fan);
            this.rotateMe();

            return this;
        },
        rotateMe:function(){
            debugger;
            this.fan.rotate(5);
            var me=this;
            setTimeout(function(){
                me.rotateMe()
            },16.5)
        }
    });
注意其实动画效果也是通过图片来变换坐标实现,如此处进行旋转,并通过定时器实现每16.5毫秒旋转5度。
最终效果如图:

源代码:sample.1.6.rar
(本文为原创,在引用代码和文字时请注明出处)
关键字:设计器源代码,Web设计器,工作流设计器,jQuery插件,组态设计器,SCADA系统设计器,流程图设计,表单设计建模,报表设计,可视化,设计时,运行时,轻量级开放平台。