参考:https://www.jianshu.com/p/e3b6f821acb8
请求的具体执行在RealCall.getResponseWithInterceptorChain()
private Response getResponseWithInterceptorChain() throws IOException {
    // Build a full stack of interceptors.
    List<Interceptor> interceptors = new ArrayList<>();
    interceptors.addAll(client.interceptors());//用户定义的一系列拦截器,例如日志拦截器等等
    interceptors.add(retryAndFollowUpInterceptor);//负责失败重试和重连拦截器
    interceptors.add(new BridgeInterceptor(client.cookieJar()));//把用户构造的请求转化为发送到服务器的请求,把服务器返回的结果转化为用户友好的结果
    interceptors.add(new CacheInterceptor(client.internalCache()));//负责缓存策略的拦截器
    interceptors.add(new ConnectInterceptor(client));//负责与服务器构建连接的拦截器
    if (!retryAndFollowUpInterceptor.isForWebSocket()) {
      interceptors.addAll(client.networkInterceptors());
    }
  //负责向服务器发送数据和从服务器获取数据的拦截器
    interceptors.add(new CallServerInterceptor(retryAndFollowUpInterceptor.isForWebSocket()));

    Interceptor.Chain chain = new RealInterceptorChain(
        interceptors, null, null, null, 0, originalRequest);
    return chain.proceed(originalRequest);
  }
一.拦截器模式的实现
责任链构造器
public RealInterceptorChain(List<Interceptor> interceptors, StreamAllocation streamAllocation,
      HttpStream httpStream, Connection connection, int index, Request request) {
    this.interceptors = interceptors;
    this.connection = connection;
    this.streamAllocation = streamAllocation;
    this.httpStream = httpStream;
    this.index = index;
    this.request = request;
  }
public Response proceed(Request request, StreamAllocation streamAllocation, HttpStream httpStream,
      Connection connection) throws IOException {
    //省略一部分
      // Call the next interceptor in the chain.

    RealInterceptorChain next = new RealInterceptorChain(interceptors, streamAllocation, httpStream, connection, index + 1, request);
    Interceptor interceptor = interceptors.get(index);
    Response response = interceptor.intercept(next);
}
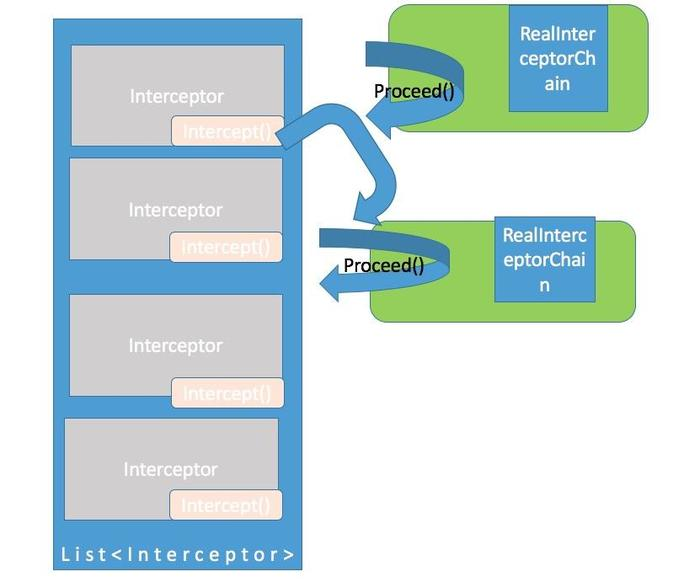
我们看到proceed()就是执行拦截器集合的第index个拦截器,同时intercept方法的参数又是拦截器链,但是该拦截器链不用this而重新构造一个新的在于构造器参数index设为了index+1
我们假设用户没有自定义拦截器,则第一个拦截器为RetryAndFollowUpInterceptor。
@Override public Response intercept(Chain chain) throws IOException {
  //省略一部分
Response response = null;
boolean releaseConnection = true;
try {
  response = ((RealInterceptorChain) chain).proceed(request, streamAllocation, null, null);
  releaseConnection = false;
} catch (RouteException e) {
  //省略
}
我们看到该拦截器的intercepte方法又是执行拦截器链的proceed方法,相当于就是执行第index个拦截器,相对本拦截器就是下一个拦截器,同时在proceed方法构造责任器链时index又+1了,为了下下个拦截器做准备。以此类推达到责任链模式。
图示:
PS
我们看着这拦截器模式有点像Android事件分发机制,例如点击时间在控件上的传递,但是有点不一样的是事件分发机制在事件分发的过程中,无论怎么分发,处理者只能为一个,但是拦截器在分发后处理返回回来,自生可以在结果的基础上在做一层处理。