".gitignore": 用git做版本控制时 用这个文件控制那些文件或文件夹 不被提交(不用git的话可删除 没影响)
"HELP.md": md是一种文档格式 这个就是你项目的帮助文档(可删除 没影响)
"mvnw": linux上处理mevan版本兼容问题的脚本(可删除 没影响)
"mvnw.cmd": windows 上处理mevan版本兼容问题的脚本(可删除 没影响)
"项目名称.iml": 有的文件每个导入IDEA的项目都会生成一个项目同名的.iml文件 用于保存你对这个项目的配置 (删了程序重新导入后还会生成 但由于配置丢失可能会造成程序异常)
"idea文件夹":不能删除,删除后也会重新生成
"src文件夹":如果作为父项目,其实用不到,可以删除
2.1、创建聚合项目
1、创建一个简单的maven项目,删除多余的文件,只留下"pom.xml",".idea文件夹","项目名称.iml文件"
2、修改pom.xml文件的中的打包方式,打包方式修改成pom
3、选中父项目,创建modules(子项目)
2.3、SpringApplication自定义
我们一般启动springboot项目都是通过SpringApplication的run方法:
/**
     * Static helper that can be used to run a {@link SpringApplication} from the
     * specified source using default settings.
     * @param source the source to load
     * @param args the application arguments (usually passed from a Java main method)
     * @return the running {@link ApplicationContext}
     */
    public static ConfigurableApplicationContext run(Object source, String... args) {
        return run(new Object[] { source }, args);
    }
这个run方法是SpringApplication中的静态方法,实际上SpringApplication中还有实例方法,一些特定设置可以通过实例方法来设置。
public static void main(String[] args) {
        SpringApplication springApplication=new SpringApplication(ParamInterceptor.class);
        springApplication.setBannerMode(Banner.Mode.OFF);
        springApplication.run(args);
    }
2.4、配置文件的使用
SpringBoot可以外部化配置,以便在不同的环境中使用相同的应用程序代码。您可以使用各种外部配置源,包括Java属性文件、YAML文件、环境变量和命令行参数。属性值可以通过使用 @Value 注解直接注入到你的 bean 中,通过 Spring 的 Environment 抽象访问,或者通过 @ConfigurationProperties 绑定到结构化对象。Spring Boot 使用了一个非常特殊的 PropertySource 顺序,该顺序旨在允许合理地覆盖值。 属性按以下顺序考虑(较低项目的值覆盖较早的项目):
1. Default properties (specified by setting SpringApplication.setDefaultProperties).
2. @PropertySource annotations on your @Configuration classes. Please note that such property
sources are not added to the Environment until the application context is being refreshed. This is
too late to configure certain properties such as logging.* and spring.main.* which are read
before refresh begins.
3. Config data (such as application.properties files)
4. A RandomValuePropertySource that has properties only in random.*.
5. OS environment variables.
6. Java System properties (System.getProperties()).
7. JNDI attributes from java:comp/env.
8. ServletContext init parameters.
9. ServletConfig init parameters.
10. Properties from SPRING_APPLICATION_JSON (inline JSON embedded in an environment variable or
system property).
11. Command line arguments.
12. properties attribute on your tests. Available on @SpringBootTest and the test annotations for
testing a particular slice of your application.
13. @TestPropertySource annotations on your tests.
14. Devtools global settings properties in the $HOME/.config/spring-boot directory when devtools is
active.
配置数据文件的考虑顺序如下:
1. Application properties packaged inside your jar (application.properties and YAML variants).
2. Profile-specific application properties packaged inside your jar (application-{profile}.properties and YAML variants).
3. Application properties outside of your packaged jar (application.properties and YAML variants).
4. Profile-specific application properties outside of your packaged jar (application-{profile}.properties and YAML variants)
约定大于配置。springboot中的默认配置文件有三种:
"application.properties"
"application.yml"
"application.yaml"且默认位置在resources目录下,且名称必须是application,如果配置文件名称不是application的话,需要采取读外部配置文件的方式(spring.config.name),且此方式指定的配置文件不会和别的配置文件互补。
查看代码
$ java -jar myproject.jar --spring.config.name="配置文件名称"
2.4.1、yml配置文件
yml配置文件采取的是树形结构,properties文件采取的是k/v格式。
-
yml 基本语法
-
k: v:表示一对键值对(冒号与V之间有空格)
-
以空格的缩进来控制层级关系,只要是左对齐的一列数据,都是同一个层级的
-
属性和值都是大小写敏感的
-
-
值的写法
-
字面量:普通的值(数字、字符串,布尔)
-
k: v:字面直接来写
字符串默认不用加上引号或者双引号;不会转义字符串里面的特殊字符;特殊字符会作为本身想表示的意思
name: "张三 \n lisi“ ;输出:张三 换行 lisi
-
对象、Map(属性和值)(键值对):
k: v:
对象还是k: v的方式:
friends:
  last_name: wang
  first_name: gang
还有一种行内写法:
friends: {last_name: wang,first_name: gang} -
数组(List、Set):
用”-“表示数组中的一个元素
pets:
  - cat
  - dog
  - pig
也有行内写法:
pets: [pig,cat,dog]
-
2.4.2、yml文件的注入
yaml配置文件:
person:
  lastName: 张三
  age: 19
  boss: false
  birth: 2010/05/02
  maps: {k1:va,k2:v2}
  lists:
    - lisi
    - wangwu
    - zhaoliu
  dog:
    name: 小爱
    age: 5
需要注入的JavaBean
/**
* @Description 将配置文件中的配置的每一个属性映射到这个组件中
* @ConfigurationProperties:告诉SpringBoot将本类中的所有属性和配置文件中相关的配置进行绑定
* prefix = "person":配置文件中那个下面的所有属性进行一一映射
*
* 只有这个组件是容器中的组件,才能容器提供的@ConfigurationProperties功能
*
**/
@Component
@ConfigurationProperties(prefix = "person")
public class Person {
private String lastName;
private Integer age;
private Boolean boss;
private Date birth;
private Map<String,Object> maps;
private List<Object> lists;
private Dog dog;
}导入配置文件处理器,以后编写配置就有提示了
<dependency>
  <groupId>org.springframework.boot</groupId>
  <artifactId>spring-boot-configuration-processor</artifactId>
  <optional>true</optional>
</dependency>
optional可以防止当前依赖传递到其他模块中 ,optional选项在统一控制版本的情况下会失效。
2.4.3、配置文件的加载顺序
2.4.3.1、相同位置的配置文件
在springboot的spring-boot-starter-parent.pom中定义了统一目录下不同的配置文件的加载的优先级
<resources>
      <resource>
        <directory>${basedir}/src/main/resources</directory>
        <filtering>true</filtering>
        <includes>
          <include>**/application*.yml</include>
          <include>**/application*.yaml</include>
          <include>**/application*.properties</include>
        </includes>
      </resource>
      <resource>
        <directory>${basedir}/src/main/resources</directory>
        <excludes>
          <exclude>**/application*.yml</exclude>
          <exclude>**/application*.yaml</exclude>
          <exclude>**/application*.properties</exclude>
        </excludes>
      </resource>
</resources>从上述的配置文件中可以看到,在相同位置时:.yml的优先级大于.yaml,.yaml的优先级大于.propertiess
2.4.3.2、不同位置的配置文件
在idea的项目中,springboot的配置文件位置可以放在如下列表中:
-
优先级由低到高
-
最高的配置文件为主
-
优先级低的配置文件为辅,补充主配置文件(spring.config.location指定的除外)
SpringApplication loads properties from application.properties files in the following locations and adds them to the Spring Environment:
1、"当前项目目录下的一个/config子目录"
2、"当前项目目录"
注意:如果是聚合项目或子项目,此处的当前项目都是指父项目
3、"项目的resources即一个classpath下的/config包"
4、"项目的resources即classpath根路径(root)"
5、"通过spring.config.location环境变量来指定配置文件的位置"
-
位置使用示例:

-
采用spring.config.location属性指定示例:
采用此方式指定配置文件,就只有指定的配置文件会生效,其他未指定的配置文件不会互补。
$ java -jar myproject.jar --spring.config.location=classpath:/default.properties-
如果有多个配置文件,用逗号隔开
$ java -jar myproject.jar
--spring.config.location=classpath:/default.properties,classpath:/override.properties
如果spring.config.location只指定了文件位置,并未指定文件名称,那么spring.config.location的值必须以“/”结尾
$ java -jar myproject.jar --spring.config.location=d:\config/2.4.3.3、配置信息指定顺序
SpringBoot 允许将配置外部化,以便您可以在不同环境中使用相同的应用程序代码。
外部化方式有:
1、".propertis文件"
2、".ymal文件"
3、".yml文件"
4、"环境变量"
5、"命令行参数"
6、"虚拟机参数"
springboot种的配置的值可以通过一下三种方式访问:
1、通过@Value注解
2、通过spring中的AbstractEnvironment对象
3、通过@ConfigurationProperties注解,把配置的属性的值注入到bean中
配置信息指定方式的优先级,从高到低
1、$HOME/.config/spring-boot当 devtools 处于活动状态时,文件夹中的Devtools 全局设置属性。
2、@TestPropertySource 测试中的注释。 单元测试中使用
3、properties属性在您的测试中。可用于测试应用程序的特定部分@SpringBootTest的测试注释。 单元测试中使用
4、命令行参数。
5、来自SPRING_APPLICATION_JSON(嵌入在环境变量或系统属性中的内联 JSON)的属性。
6、ServletConfig 初始化参数。
7、ServletContext 初始化参数。
8、JNDI 属性来自java:comp/env.
9、Java 系统属性 ( System.getProperties())。
10、操作系统环境变量。
11、一RandomValuePropertySource,只有在拥有性能random.*。
12、打包的 jar(application-{profile}.properties和 YAML 变体)之外的特定于配置文件的应用程序属性。
13、打包在 jar 中的特定于配置文件的应用程序属性(application-{profile}.properties和 YAML 变体)。
14、打包 jar 之外的应用程序属性(application.properties和 YAML 变体)。
15、打包在 jar 中的应用程序属性(application.properties和 YAML 变体)。
16、@PropertySource你的@Configuration类的注释。请注意,Environment在刷新应用程序上下文之前,不会将此类属性源添加到。现在配置某些属性(例如在刷新开始之前读取的logging.*和)为时已晚spring.main.*。
17、默认属性(由 setting 指定SpringApplication.setDefaultProperties)。
2.4.4、激活特定配置文件
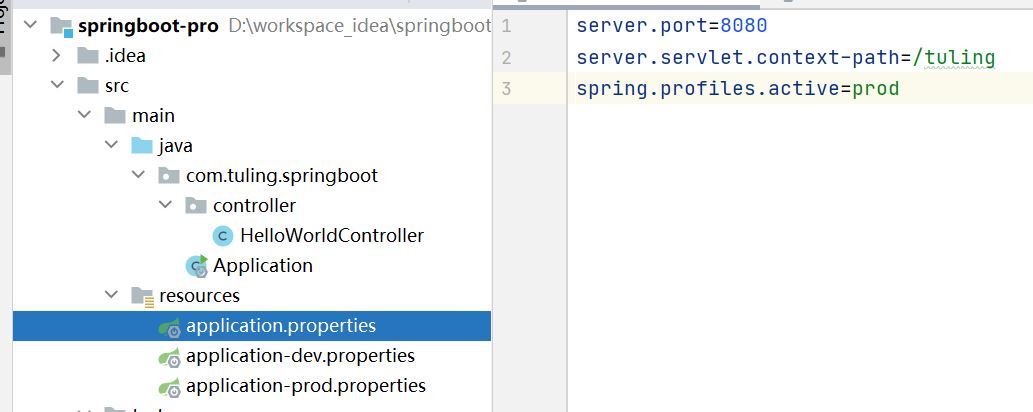
很多时候,我们项目在开发环境和生成环境的环境配置是不一样的,例如,数据库配置,在开发的时候,我们一般用测试数据库,而在生产环境的时候,我们是用正式的数据,这时候,我们可以利用profile在不同的环境下配置用不同的配置文件或者不同的配置。
spring boot允许你通过命名约定按照一定的格式"application-{profile}.properties"来定义多个配置文件,然后通过在"application.properyies"配置文件中通过配置"spring.profiles.active"来具体激活一个或者多个配置文件.
如果没有没有指定任何profile的配置文件的话,spring boot默认会启动application-default.properties。
注意:此种方式是对同一位置的配置文件,如果别的配置文件位置的优先级高,则以优先级高的配置文件为主。
2.5、属性值的注入
2.5.1、@Value
@Value注解通常被用来向bean的属性注入值
示例如下:
1、注入值
@Component
public class MovieRecommender {
  private final String catalog;
  public MovieRecommender(@Value("${catalog.name}") String catalog) {
  this.catalog = catalog;
  }
}
2、指定配置文件
@Configuration
@PropertySource("classpath:application.properties")
public class AppConfig { }
3、在类路径下定义一个配置文件
catalog.name=MovieCatalogSpring提供了一个默认的宽松的嵌入式值解析器。它将尝试解析属性值,如果无法解析,则属性名称(例如${catlom.name})将作为该值注入。默认的解析器,当@Value中要注入的属性不存在时,是不会报错,会把@Value中的值注入到Bean中。如果要对这种不存在的值进行严格的控制,可以声明一个PropertySourcesPlaceholderConfigurerbean,如下示例所示:
@Configuration
public class AppConfig {
  @Bean
  public static PropertySourcesPlaceholderConfigurer propertyPlaceholderConfigurer() {
     return new PropertySourcesPlaceholderConfigurer();
  }
}
配置好PropertySourcesPlaceholderConfigurer之后,如果再存在无@Value指定的配置的情况,spring直接启动失败。
注意:
1、如果采用javaConfig方式配置PropertySourcesPlaceholderConfigurer,那么这个@Bean方法必须是静态方法。
2、如果无法解析任何 ${} 占位符,则使用上述配置可确保 Spring 初始化失败。 也可以使用 setPlaceholderPrefix、setPlaceholderSuffix 或setValueSeparator 自定义占位符。
3、Spring Boot 默认配置一个 PropertySourcesPlaceholderConfigurer bean,它将从 application.properties 和 application.yml 文件中获取属性
Spring 提供的内置转换器支持简单类型的自动转换(例如到 Integer 或 int)。 多个逗号分隔的值也可以自动转换为 String 数组。
配置默认值
@Value支持配置默认值
@Component
public class MovieRecommender {

  private final String catalog;

  public MovieRecommender(@Value("${catalog.name:defaultCatalog}") String catalog) {
     this.catalog = catalog;
  }
}
自定义类型转换
Spring BeanPostProcessor 在幕后使用 ConversionService 来处理将 @Value 中的 String 值转换为目标类型的过程。 如果您想为您自己的自定义类型提供转换支持,您可以提供您自己的 ConversionService bean 实例,如下例所示:
@Configuration
public class AppConfig {
  @Bean
  public ConversionService conversionService() {
      DefaultFormattingConversionService conversionService = new DefaultFormattingConversionService();
      conversionService.addConverter(new MyCustomConverter());
      return conversionService;
  }
}
支持SpEL
当@Value 包含一个 SpEL 表达式时,该值将在运行时动态计算。
@Component
public class MovieRecommender {
  private final String catalog;
  public MovieRecommender(@Value("#{systemProperties['user.catalog'] + 'Catalog' }") String catalog) {
    this.catalog = catalog;
  }
}
SpEL 还支持使用更复杂的数据结构:
@Component
public class MovieRecommender {
  private final Map<String, Integer> countOfMoviesPerCatalog;
  public MovieRecommender(@Value("#{{'Thriller': 100, 'Comedy': 300}}") Map<String, Integer> countOfMoviesPerCatalog) {
  this.countOfMoviesPerCatalog = countOfMoviesPerCatalog;
  }
}
2.5.2、@PropertySource
@PropertySource 注解为将 PropertySource 添加到 Spring 的 Environment中 提供了一种方便的声明机制。
给定包含键值对 testbean.name=myTestBean 的 app.properties 文件,以下 @Configuration 类使用 @PropertySource 的方式是调用 testBean.getName() 返回 myTestBean:
@Configuration
@PropertySource("classpath:/com/myco/app.properties")
public class AppConfig {
  @Autowired
  Environment env;
  @Bean
  public TestBean testBean() {
  TestBean testBean = new TestBean();
  testBean.setName(env.getProperty("testbean.name"));
  return testBean;
  }
}
@PropertySource 资源位置中存在的任何 ${...} 占位符都根据已经注册在Environment进行解析,如以下示例所示:
@Configuration
@PropertySource("classpath:/com/${my.placeholder:default/path}/app.properties")
public class AppConfig {
@Autowired
Environment env;
@Bean
public TestBean testBean() {
TestBean testBean = new TestBean();
testBean.setName(env.getProperty("testbean.name"));
return testBean;
}
}
假设 my.placeholder 存在于已注册的属性源(例如,系统属性或环境变量)之一中,占位符将解析为相应的值。 如果不是,则default/path用作默认值。 如果未指定默认值且无法解析属性,则会引发 IllegalArgumentException。
注意:
根据 Java 8 约定,@PropertySource注解是可重复的。 但是,所有此类 @PropertySource 注解都需要在同一级别声明,或者直接在配置类上声明,或者作为自定义注解中的元注解。 不推荐混合直接注解和元注解,因为直接注解有效地覆盖了元注解。从历史上看,元素中占位符的值只能根据 JVM 系统属性或环境变量进行解析。 这已不再是这种情况。 因为 Environment 抽象集成在整个容器中,所以很容易通过它路由占位符的解析。这意味着您可以按照自己喜欢的任何方式配置解析过程。 您可以更改搜索系统属性和环境变量的优先级或完全删除它们。 您还可以根据需要将自己的属性源添加到组合中。
具体来说,无论客户属性在哪里定义,只要它在环境中可用,以下语句都有效:
<beans>
  <import resource="com/bank/service/${customer}-config.xml"/>
</beans>
2.5.3、@ConfigurationProperties
使用 @Value("${property}") 注释注入配置属性有时会很麻烦,尤其是当您使用多个属性或您的数据本质上是分层的时。 Spring Boot 提供了一种处理属性的替代方法,让强类型 bean 管理和验证应用程序的配置。
可以绑定一个声明标准 JavaBean 属性的 bean,如下所示例子:
import java.net.InetAddress;
import java.util.ArrayList;
import java.util.Collections;
import java.util.List;
import org.springframework.boot.context.properties.ConfigurationProperties;
@ConfigurationProperties("my.service")
public class MyProperties {
  private boolean enabled;
  private InetAddress remoteAddress;
  private final Security security = new Security();
  public boolean isEnabled() {
    return this.enabled;
  }
  public void setEnabled(boolean enabled) {
     this.enabled = enabled;
  }
  public InetAddress getRemoteAddress() {
    return this.remoteAddress;
  }
  public void setRemoteAddress(InetAddress remoteAddress) {
    this.remoteAddress = remoteAddress;
  }
  public Security getSecurity() {
     return this.security;
  }
  public static class Security {
      private String username;
      private String password;
      private List<String> roles = new ArrayList<>(Collections.singleton("USER"));
      public String getUsername() {
         return this.username;
      }
      public void setUsername(String username) {
         this.username = username;
      }
      public String getPassword() {
        return this.password;
      }
      public void setPassword(String password) {
        this.password = password;
      }
      public List<String> getRoles() {
         return this.roles;
      }
      public void setRoles(List<String> roles) {
         this.roles = roles;
      }
  }
}
前面的 POJO 定义了以下属性:
my.service.enabled
my.service.remote-address
my.service.security.username
my.service.security.password.
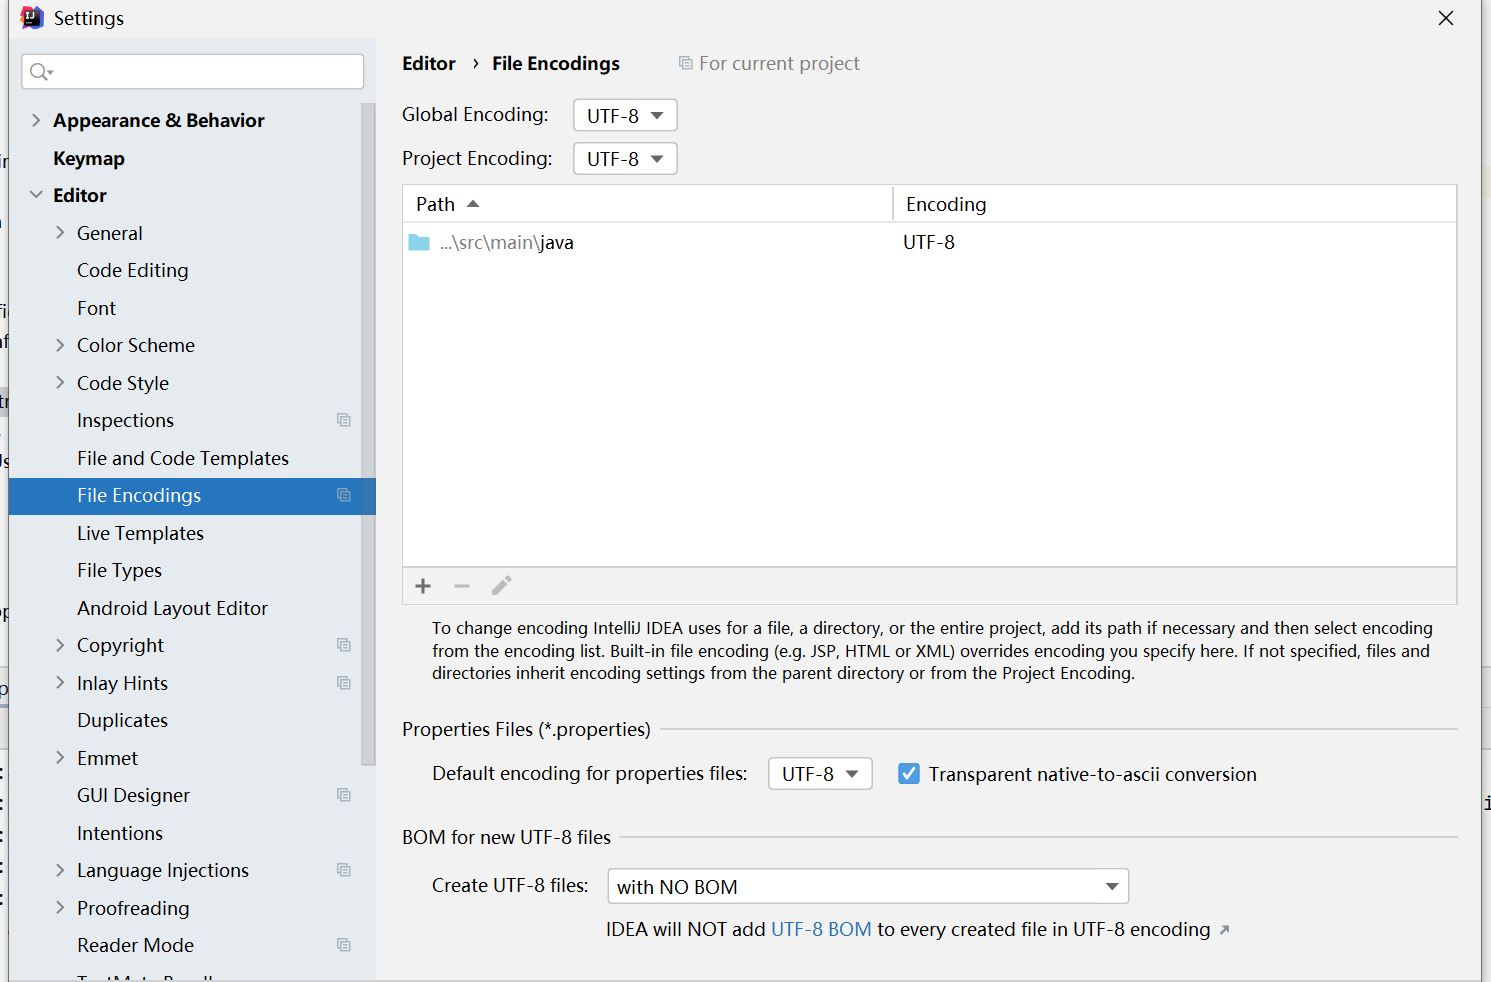
my.service.security.roles2.5.4、中文乱码的解决
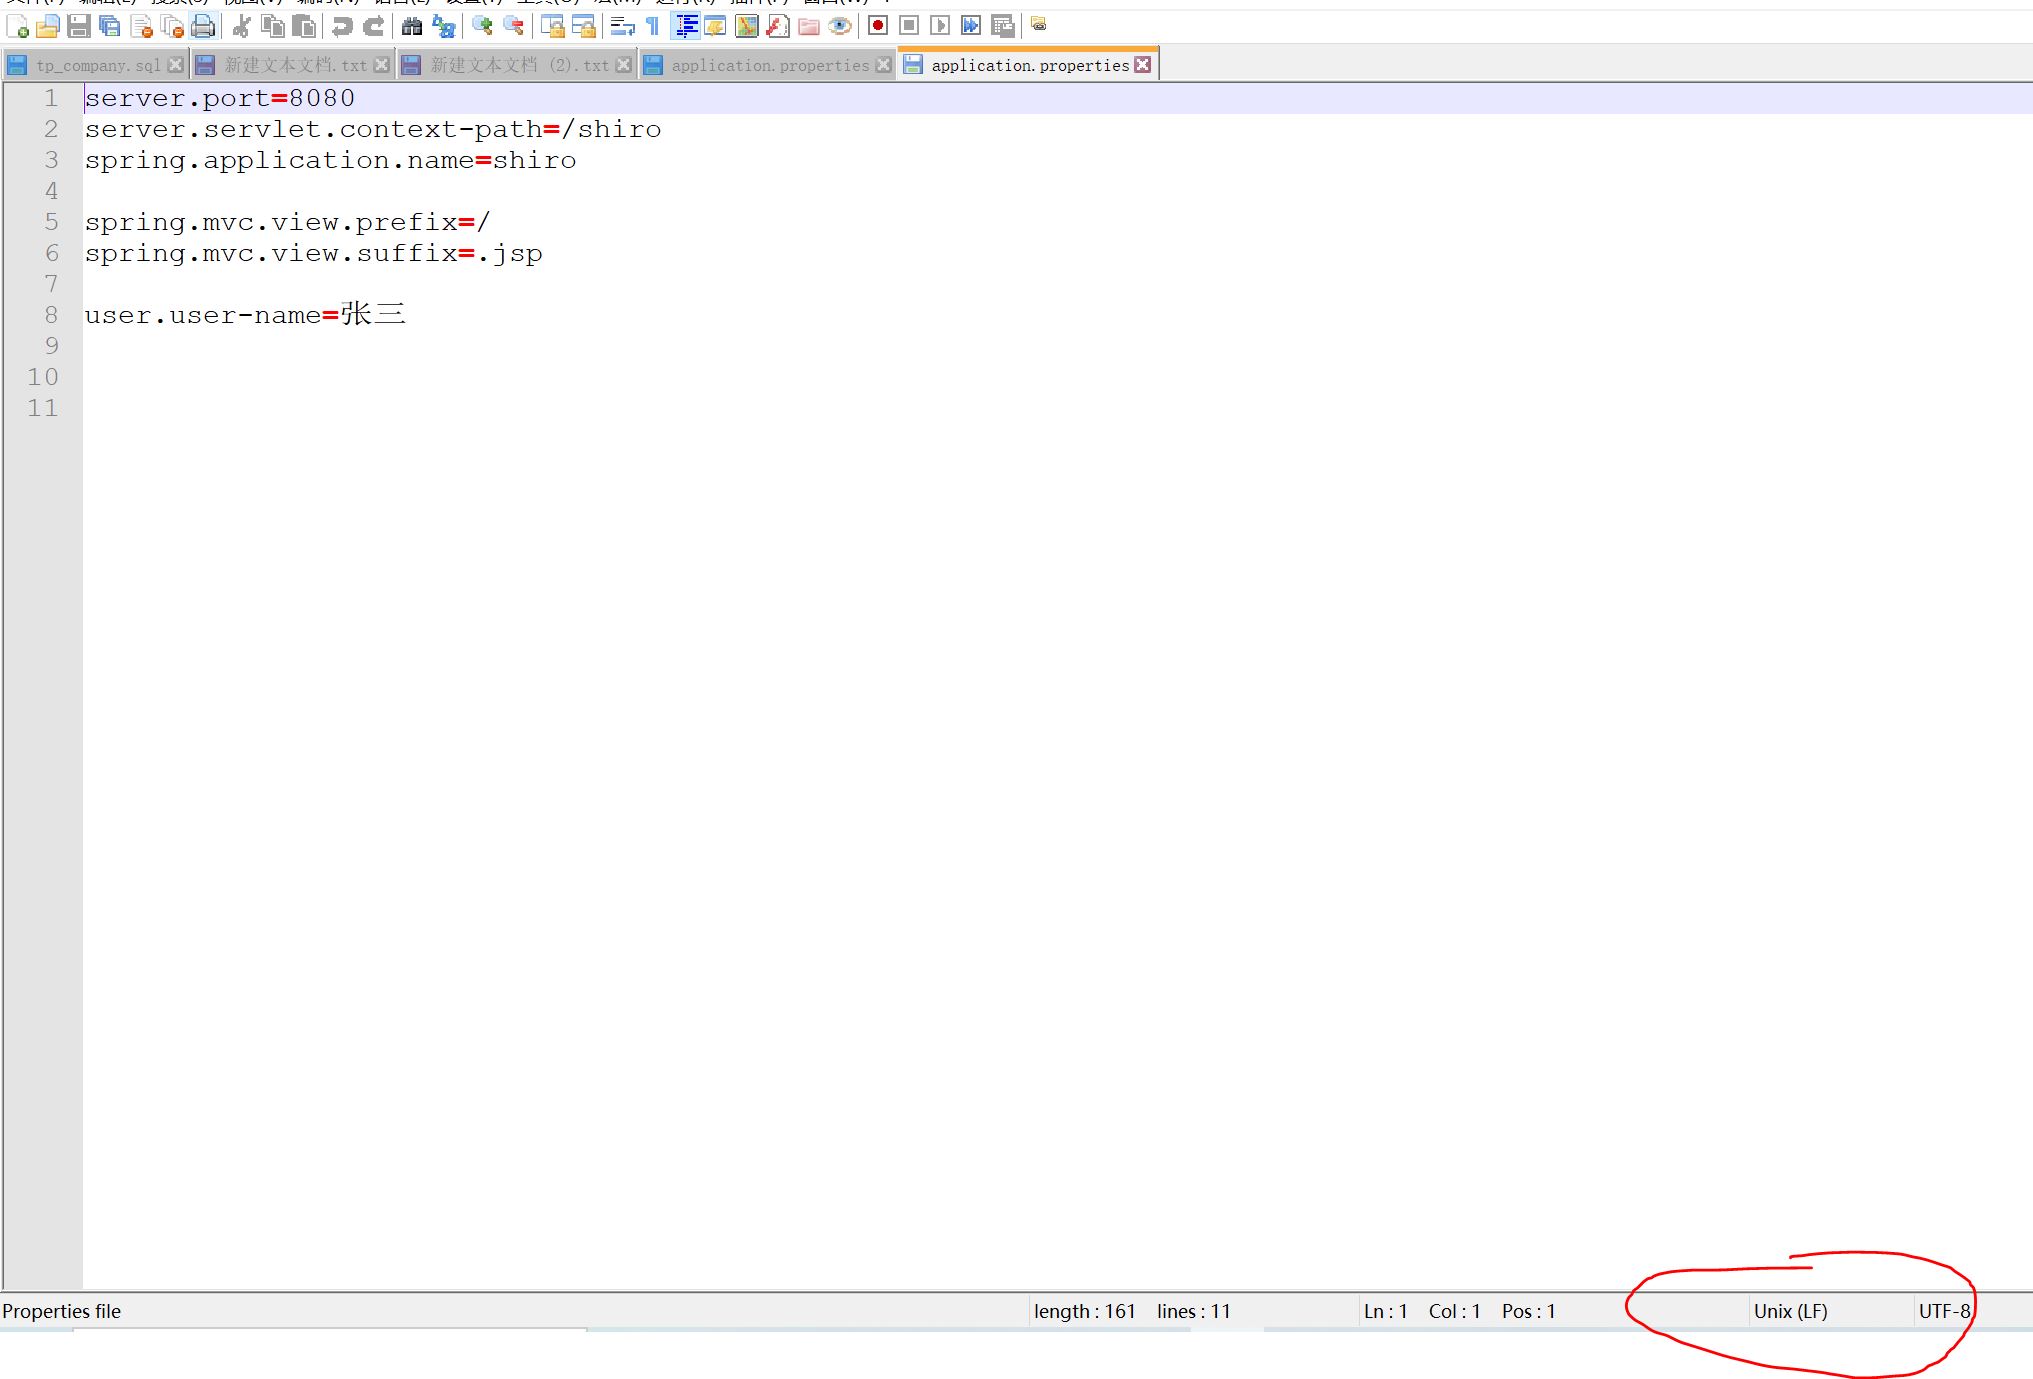
采用IDEA进行springboot开发时,在application.properties配置的中文乱码
配置文件如下:
server.port=8080
server.servlet.context-path=/shiro
spring.application.name=shiro
spring.mvc.view.prefix=/
spring.mvc.view.suffix=.jsp
user.user-name=张三对应绑定的配置类:
@Component
@ConfigurationProperties(prefix = "user")
@Data
public class User {
private String userName;
}
运行结果:
User(userName=å¼ ä¸•)
在全使用UTF-8的情况下还是解决不了乱码问题。
c.t.s.controller.UserController: User(userName=å¼ ä¸•)
c.t.s.controller.UserController : å¼ ä¸•
读取配置文件的代码:
log.info("{}",user);
InputStream inputStream = UserController.class.getClassLoader().getResourceAsStream("application.properties");
Properties properties=new Properties();
try {
properties.load(inputStream);
String property = properties.getProperty("user.user-name");
log.info("{}",property);
} catch (IOException e) {
e.printStackTrace();
}从上面的截图,我们也可以看到,配置文件是采用UTF-8,IDEA也是采用的UTF-8。那么现在可以猜测,springboot在读取文件时,默认不是采用的utf-8方式读取的。
InputStream inputStream = UserController.class.getClassLoader().getResourceAsStream("application.properties");
Properties utf8Properties=new Properties();
try {
utf8Properties.load(new InputStreamReader(inputStream, StandardCharsets.UTF_8));
String property = utf8Properties.getProperty("user.user-name");
log.info("{}",property);
} catch (IOException e) {
e.printStackTrace();
}
运行结果:
2021-09-12 16:34:14.776 INFO 12028 --- [nio-8080-exec-2] c.t.s.controller.UserController : 张三当读入的输入流采用UTF-8进行解释时,发现中文不再乱码。这就更证明了springboot默认情况下对输入流的解释,采取的不是utf8。
如何指定springboot对输入流的解释方式呢。
server.servlet.encoding.force=true
server.servlet.encoding.charset=UTF-8
server.servlet.encoding.enabled=true
server.tomcat.uri-encoding=UTF-8
此时运行的结果就正常了:
INFO 27248 --- [nio-8080-exec-1] c.t.s.controller.UserController: User(userName=张三)
INFO 27248 --- [nio-8080-exec-1] c.t.s.controller.UserController: 张三