运行环境:
ide: Spring Tool Suite 3 Version: 3.9.8.RELEASE
jdk: 1.8
系统: windows10
主要内容:
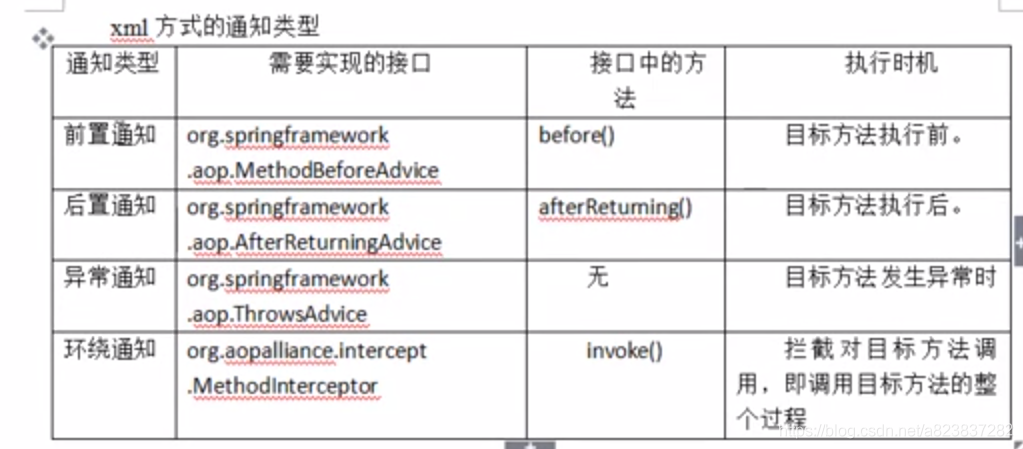
- 前置通知: 在方法执行之前通知。
- 后置通知: 在方法执行之后通知。
- 异常通知: 在方法出现异常时通知。
- 环绕通知: 全方位控制,可以在其中实现前三种通知。
它们需要继承的接口如下图:
a:需要导入的jar包:
aopaliance.jar
aspectjweaver.jar
spring-aop.jar 开发AOP特性时需要的JAR
spring-beans.jar 处理Bean的jar <bean>
spring-context.jar 处理spring上下文的jar <context>
spring-core.jar spring核心jar
spring-expression.jar spring表达式
commons-logging.jar
b.配置xml
<?xml version="1.0" encoding="UTF-8"?>
<beans xmlns="http://www.springframework.org/schema/beans "
xmlns:xsi="http://www.w3.org/2001/XMLSchema-instance "
xmlns:aop="http://www.springframework.org/schema/aop"
xmlns:tx="http://www.springframework.org/schema/tx "
xsi:schemaLocation="http://www.springframework.org/schema/beans
http://www.springframework.org/schema/beans/spring-beans.xsd
http://www.springframework.org/schema/tx
http://www.springframework.org/schema/tx/spring-tx.xsd
http://www.springframework.org/schema/aop
http://www.springframework.org/schema/aop/spring-aop.xsd">
c:编写
分为四个文件:
student.java: 其中的add()方法是切入点。
applicationContext.xml: 配置
test.java: 测试。
四个通知类型各新建一个对应的继承接口的类。(依照上图来继承)
前置通知:
student.java:
1 package springProject;
2
3 public class Student {
4     public void add() {
5         System.out.println("  add");
6     }
7 }
applicationContext.xml:
 1 <?xml version="1.0" encoding="UTF-8"?>
 2 <beans xmlns="http://www.springframework.org/schema/beans"
 3     xmlns:xsi="http://www.w3.org/2001/XMLSchema-instance"
 4     xmlns:p="http://www.springframework.org/schema/p"
 5     xmlns:aop="http://www.springframework.org/schema/aop"
 6     xmlns:context="http://www.springframework.org/schema/context"
 7     xsi:schemaLocation="http://www.springframework.org/schema/beans http://www.springframework.org/schema/beans/spring-beans.xsd
 8         http://www.springframework.org/schema/context http://www.springframework.org/schema/context/spring-context-4.3.xsd
 9         http://www.springframework.org/schema/aop http://www.springframework.org/schema/aop/spring-aop.xsd">
10
11     <bean id="student" class="springProject.Student">
12     </bean>
13
14     <bean id="logBefore" class="aop.before.loginBefore">
15     </bean>
16
17     <aop:config>
18         <!-- 配置切入点  (在哪里执行通知 ) -->
19         <!-- =========连接线的另一方========= -->
20         <aop:pointcut expression="execution(public * springProject.Student.add(..))"   id="poioncut"/>
21         <!-- advisor:相当于 链接切入点 和切面的线  -->
22         <!-- =========连接线========= -->
23         <aop:advisor advice-ref="logBefore" pointcut-ref="poioncut"/>
24     </aop:config>
25 </beans>
test.java:
 1 package springProject;
 2
 3 import org.springframework.context.ApplicationContext;
 4 import org.springframework.context.support.ClassPathXmlApplicationContext;
 5
 6 public class test {
 7     public static void main(String[] args) {
 8         ApplicationContext conext = new ClassPathXmlApplicationContext("applicationContext.xml");
 9         Student student=(Student)conext.getBean("student");
10         //System.out.println(student);
11         student.add();
12     }
13 }
loginBefore.java:
package aop.before;

import java.lang.reflect.Method;

import org.springframework.aop.MethodBeforeAdvice;

public class loginBefore implements MethodBeforeAdvice{
    @Override
    public void before(Method arg0, Object[] arg1, Object arg2) throws Throwable {
        System.out.println("前置通知");
    }
}
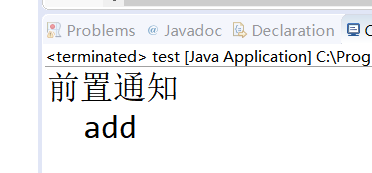
执行结果:

后置通知:
与前置通知几乎一样。
在xml中增加如下部分:
1 <bean id="loginAfter" class="aop.after.loginAfter"></bean>
3 <aop:config>
4     <aop:pointcut expression="execution(public * springProject.Student.add(..))" id="pointcut"/>
5     <aop:advisor advice-ref="loginAfter" pointcut-ref="pointcut"/>
6 </aop:config>
loginAfter.java
 1 package aop.after;
 2
 3 import java.lang.reflect.Method;
 5 import org.springframework.aop.AfterReturningAdvice;

 7 public class loginAfter implements AfterReturningAdvice{
 9     @Override
10     public void afterReturning(Object arg0, Method arg1, Object[] arg2, Object arg3) throws Throwable {
11         System.out.println("后置通知");
12     }
13 }
其他两个文件不用变。
执行结果:

异常通知:
xml中增加如下:
1 <bean id="loginThrow" class="aop.throwA.logThrow"></bean>
2 <aop:config>
3     <aop:pointcut expression="execution(public * springProject.Student.add(..))" id="pointcut"/>
4     <aop:advisor advice-ref="loginThrow" pointcut-ref="pointcut"/>
5 </aop:config>
student.java修改一下:
 1  package springProject;
 2 2
 3  public class Student {
 4     public void add() {
 5        String aString =null;//增加了一个异常
 6       aString.charAt(10);
 7
 8         System.out.println("  add");
 9     }
10  }
执行结果:

环绕通知:
loginInvoker.java:
 1 package aop.invoke;
 2
 3 import org.aopalliance.intercept.MethodInterceptor;
 4 import org.aopalliance.intercept.MethodInvocation;
 5
 6 public class loginInvoke  implements MethodInterceptor{
 7
 8     @Override
 9     public Object invoke(MethodInvocation invocation) throws Throwable {
10         Object result  = null ;
11         //方法体1...
12         try {
13             //方法体2...
14             System.out.println("用环绕通知实现的[前置通知]...");
15
16             // invocation.proceed() 之前的代码:前置通知
17              result  = invocation.proceed() ;//控制着目标方法的执行  ,add()
18             //result 就是目标方法addStudent()方法的返回值
19 //             invocation.proceed() 之后的代码:后置通知
20             System.out.println("用环绕通知实现的[后置通知]...:");
21             System.out.println("-----------------目标对象target"+invocation.getThis()+",调用的方法名:"+invocation.getMethod().getName()+",方法的参数个数:"+invocation.getArguments().length+",返回值:"+result);
22         }catch(Exception e) {
23             //方法体3...
24             //异常通知
25             System.out.println("用环绕通知实现的[异常通知]...");
26         }
27
28         return result;//目标方法的返回值(这里可以设置为任何你想设置的值。不推荐这样做。)
29     }
30 }
xml增加如下部分:
<bean id="loginInvoke" class="aop.invoke.loginInvoke"></bean>
<aop:config>
    <aop:pointcut expression="execution(public * springProject.Student.add(..))" id="pointcut"/>
    <aop:advisor advice-ref="loginInvoke" pointcut-ref="pointcut"/>
</aop:config>
