核心概念
redux专注于状态管理,把所有的状态都存在一个对象中。核心概念包括:store、state、action、reducer
【store】
store是保存数据的地方,redux提供createStore函数来生成 Store。函数参数是后面要介绍的reducer
import { createStore } from 'redux'
const store = createStore(reducer)
【state】
state是store的某个时刻的快照,可以通过store.getState()取得当前时刻的state
const state = store.getState()
【action】
action用来改变state。action是一个对象,其中的type属性是必须的,其他的属性一般用来设置改变state需要的数据
const action = {
  type: 'ADD_ONE',
  num: 1
}
store.dispatch()是发出action的唯一方法
const action = {
  type: 'ADD_ONE',
  num: 1
}
store.dispatch(action)
【reducer】
reducer 是一个函数,它接受action和当前state作为参数,返回一个新的state
import { createStore } from 'redux'
const store = createStore(reducer)
const reducer = (state = 10, action) => {
  switch (action.type) {
    case 'ADD_ONE':
      return state + action.num;
    default:
      return state;
  }
};
当store.dispatch发送过来一个新的action,store就会自动调用reducer,得到新的state
简单实例
多余的概念不再介绍,下面用上面介绍的这四个核心概念实现一个简单的实例,将create-react-app中index.js文件内容更改如下,即可运行
//第一步,创建action
const addOne = {
type: 'ADD',
num: 1
}
const addTwo = {
type: 'ADD',
num: 2
}
const square = {
type: 'SQUARE'
}
//第二步,创建reducer
let math = (state = 10, action) => {
switch (action.type) {
case ADD:
return state + action.num
case SQUARE:
return state * state
default:
return state
}
}
//第三步,创建store
import { createStore } from 'redux'
const store = createStore(math)
//第四步,测试,通过dispatch发出action,并通过getState()取得当前state值
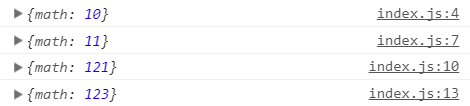
console.log(store.getState()) //默认值为10
store.dispatch(addOne) //发起'+1'的action
console.log(store.getState()) //当前值为10+1=11
store.dispatch(square) //发起'乘方'的action
console.log(store.getState()) //当前值为11*11=121
store.dispatch(addTwo) //发起'+2'的action
console.log(store.getState()) //当前值为121+2=123
结果如下

目录结构
下面对目录结构进行划分
1、一般地,将action.type设置为常量,这样在书写错误时,会得到报错提示
// constants/ActionTypes.js
export const ADD = 'ADD'
export const SQUARE = 'SQUARE'
2、可以将addOne对象和addTwo对象整合成add函数的形式
// action/math.js
import { ADD, SQUARE } from '../constants/ActionTypes'
export const add = num => ({ type: ADD, num })
export const square = { type: SQUARE }
3、根据action.type的分类来拆分reducer,最终通过combineReducers方法将拆分的reducer合并起来。上例中的action类型都是数字运算,无需拆分,只需进行如下变化
reducer/math.js
// reducer/math.js
import { ADD, SQUARE } from '../constants/ActionTypes'
const math = (state = 10, action) => {
  switch (action.type) {
    case ADD:
      return state + action.num
    case SQUARE:
      return state * state
    default:
      return state
  }
}
export default math
reducer/index.js
// reducer/index.js
import { combineReducers } from 'redux'
import math from './math'
const rootReducer = combineReducers({
  math
})
export default rootReducer
4、将store存储到store/index.js文件中
// store/index.js
import { createStore } from 'redux'
import rootReducer from '../reducer'
export default createStore(rootReducer)
5、最终,根路径下的index.js内容如下所示
import store from './store'
import {add, square} from './action/math'

console.log(store.getState()) //默认值为10

store.dispatch(add(1)) //发起'+1'的action
console.log(store.getState()) //当前值为10+1=11

store.dispatch(square) //发起'乘方'的action
console.log(store.getState()) //当前值为11*11=121

store.dispatch(add(2)) //发起'+2'的action
console.log(store.getState()) //当前值为121+2=123
最终目录路径如下所示

最终结果如下所示
UI层
前面的示例中,只是redux的状态改变,下面利用UI层来建立view和state的联系,将根目录下的index.js的内容更改如下
import store from './store'
import React from 'react'
import ReactDOM from 'react-dom'
import { add, square } from './action/math'

ReactDOM.render(
  <div store={store}>
    <p>{store.getState().math}</p>
    <input type="button" onClick={() => store.dispatch(add(1))} value="+1" />
    <input type="button" onClick={() => store.dispatch(add(2))} value="+2" />
    <input type="button" onClick={() => store.dispatch(square)} value="乘方" />
  </div>,
  document.getElementById('root')
)
虽然可以显示数字,但是点击按钮时,却不能重新渲染页面
【store.subscribe()】
接下来介绍store.subscribe()方法了,该方法用来设置监听函数,一旦state发生变化,就自动执行这个函数。该方法的返回值是一个函数,调用这个函数可以解除监听
下面将示例代码更改如下
import store from './store'
import React from 'react'
import ReactDOM from 'react-dom'
import { add, square } from './action/math'

const render = () => ReactDOM.render(
  <div store={store}>
    <p>{store.getState().math}</p>
    <input type="button" onClick={() => store.dispatch(add(1))} value="+1" />
    <input type="button" onClick={() => store.dispatch(add(2))} value="+2" />
    <input type="button" onClick={() => store.dispatch(square)} value="乘方" />
  </div>,
  document.getElementById('root')
)

render()
store.subscribe(render)
代码终于可以正常运行了
异步
redux默认只处理同步,对于API请求这样的异步任务则无能为力
接下来尝试使用axios的get方法来请求下面这个API
https://jsonplaceholder.typicode.com/posts/2
获取的数据如下
{
  "userId": 1,
  "id": 2,
  "title": "qui est esse",
  "body": "est rerum tempore vitae
sequi sint nihil reprehenderit dolor beatae ea dolores neque
fugiat blanditiis voluptate porro vel nihil molestiae ut reiciendis
qui aperiam non debitis possimus qui neque nisi nulla"
}
然后,将其id值设置为state.math的值
代码修改如下
// constants/ActionTypes.js
export const ADD = 'ADD'
export const SQUARE = 'SQUARE'
export const SET = 'SET'

// action/math.js
import { ADD, SQUARE, SET } from '../constants/ActionTypes'
export const add = num => ({ type: ADD, num })
export const square = { type: SQUARE }
export const setNum = num => ({type: SET,num})

// reduce/math.js
import { ADD, SQUARE,SET } from '../constants/ActionTypes'
const math = (state = 10, action) => {
  switch (action.type) {
    case ADD:
      return state + action.num
    case SQUARE:
      return state * state
    case SET:
      return action.num
    default:
      return state
  }
}
export default math

// index.js
import store from './store'
import React from 'react'
import ReactDOM from 'react-dom'
import { add, square, setNum } from './action/math'
import axios from 'axios'
let uri = 'https://jsonplaceholder.typicode.com/posts/2'
const render = () => ReactDOM.render(
  <div store={store}>
    <p>{store.getState().math}</p>
    <input type="button" onClick={() => {axios.get(uri).then(res => {store.dispatch(store.dispatch(setNum(res.data.id)))})}} value="设置Num" />
    <input type="button" onClick={() => store.dispatch(add(1))} value="+1" />
    <input type="button" onClick={() => store.dispatch(add(2))} value="+2" />
    <input type="button" onClick={() => store.dispatch(square)} value="乘方" />
  </div>,
  document.getElementById('root')
)
render()
store.subscribe(render)
但是,虽然API是异步操作,但store.dispatch并不是异步,而axios通过get方法请求回来数据后,store.dispatch在axios中的then方法中同步取得数据
【redux-thunk】
如果要使用真正的异步操作,即把axios方法封装到store.dispatch中,需要使用redux-thunk中间件
首先,使用npm进行安装
npm install --save redux-thunk
然后,使用applyMiddleware来使用thunk中间件
import { createStore, applyMiddleware } from 'redux'
import thunk from 'redux-thunk'
import rootReducer from '../reducer'
export default createStore(rootReducer,applyMiddleware(thunk))
接着来定义setNum这个action creator,然后在index.js文件的DOM加载完成后就发出setNum
[注意]如果action是一个对象,则它就是一个action,如果action是一个函数,则它是一个action creator,即action制造器
修改的代码如下
// action/math.js
import { ADD, SQUARE, SET } from '../constants/ActionTypes'
import axios from 'axios'
const uri = 'https://jsonplaceholder.typicode.com/posts/2'
export const add = num => ({ type: ADD, num })
export const square = { type: SQUARE }
export const setNum = () => (dispatch, getState) => {
  return axios.get(uri).then(res => {
    dispatch({
      type: SET,
      num: res.data.id
    })
  })
}

// index.js
import store from './store'
import React from 'react'
import ReactDOM from 'react-dom'
import { add, square, setNum } from './action/math'
const render = () => ReactDOM.render(
  <div store={store}>
    <p>{store.getState().math}</p>
    <input type="button" onClick={() => store.dispatch(setNum())} value="设置Num" />
    <input type="button" onClick={() => store.dispatch(add(1))} value="+1" />
    <input type="button" onClick={() => store.dispatch(add(2))} value="+2" />
    <input type="button" onClick={() => store.dispatch(square)} value="乘方" />
  </div>,
  document.getElementById('root')
)
render()
store.subscribe(render)
【提示信息】
如果做的更完备一点,应该把异步请求时的提示信息也加上。增加一个fetch的action,用于控制fetch过程的提示信息及显示隐藏情况
代码更改如下
action/fetch.js
// action/fetch.js
import { SET_FETCH_MESSAGE, HIDE_FETCH_MESSAGE } from '../constants/ActionTypes'
export const startFetch = { type: SET_FETCH_MESSAGE,message: '开始发送异步请求' }
export const successFetch = { type: SET_FETCH_MESSAGE, message: '成功接收数据' }
export const failFetch = { type: SET_FETCH_MESSAGE, message: '接收数据失败' }
export const hideFetchMessage = { type: HIDE_FETCH_MESSAGE }
action/math.js
// action/math.js
import { ADD, SQUARE, SET } from '../constants/ActionTypes'
import { startFetch, successFetch, failFetch, hideFetchMessage } from './fetch'
import axios from 'axios'
const uri = 'https://jsonplaceholder.typicode.com/posts/2'
export const add = num => ({ type: ADD, num })
export const square = { type: SQUARE }
export const setNum = () => (dispatch, getState) => {
  dispatch(startFetch)
  setTimeout(() => {
    dispatch(hideFetchMessage)
  }, 500)
  return axios
    .get(uri)
    .then(res => {
      setTimeout(() => {
        dispatch(successFetch)
        setTimeout(() => {
          dispatch(hideFetchMessage)
        }, 500)
        dispatch({ type: SET, num: res.data.id })
      }, 1000)
    })
    .catch(err => {
      dispatch(failFetch)
      setTimeout(() => {
        dispatch(hideFetchMessage)
      }, 500)
    })
}
constants/ActionTypes.js
// constants/ActionTypes.js
export const ADD = 'ADD'
export const SQUARE = 'SQUARE'
export const SET = 'SET'
export const SET_FETCH_MESSAGE = 'SET_FETCH_MESSAGE'
export const HIDE_FETCH_MESSAGE = 'HIDE_FETCH_MESSAGE'
reduce/fetch.js
// reduce/fetch.js
import { SET_FETCH_MESSAGE,HIDE_FETCH_MESSAGE } from '../constants/ActionTypes'
const initState = {
  message:'',
  isShow:false
}
const fetch = (state = initState, action) => {
  switch (action.type) {
    case SET_FETCH_MESSAGE:
      return {isShow: true, message: action.message}
    case HIDE_FETCH_MESSAGE:
      return { isShow: false, message: '' }
    default:
      return state
  }
}
export default fetch
index.js
// index.js
import store from './store'
import React from 'react'
import ReactDOM from 'react-dom'
import { add, square, setNum } from './action/math'
const render = () => ReactDOM.render(
  <div store={store}>
    <p>{store.getState().math}</p>
    <input type="button" onClick={() => store.dispatch(setNum())} value="设置Num" />
    <input type="button" onClick={() => store.dispatch(add(1))} value="+1" />
    <input type="button" onClick={() => store.dispatch(add(2))} value="+2" />
    <input type="button" onClick={() => store.dispatch(square)} value="乘方" />
    {store.getState().fetch.isShow && <p>{store.getState().fetch.message}</p>}
  </div>,
  document.getElementById('root')
)
render()
store.subscribe(render)
展示和容器
下面来介绍react-redux。前面的代码中,我们是通过store.subscribe()方法监控state状态的变化来更新UI层的。而使用react-redux,可以让组件动态订阅状态树。状态树一旦被修改,组件能自动刷新显示最新数据
react-redux将所有组件分成两大类:展示组件和容器组件。展示组件只负责UI呈现,所有数据由参数props提供;容器组件则负责管理数据和业务逻辑,带有内部状态,可使用redux的API。要使用react-redux,就要遵守它的组件拆分规范
【provider】
react-redux提供Provider组件,可以让容器组件默认可以拿到state,而不用当容器组件层级很深时,一级级将state传下去
将index.js文件更改如下
// index.js
import React from 'react'
import ReactDOM from 'react-dom'
import store from './store'
import MathContainer from './container/MathContainer'
import { Provider } from 'react-redux'
ReactDOM.render(
  <Provider store={store}>
    <MathContainer />
  </Provider>,
  document.getElementById('root')
)
按照组件拆分规范,将原来index.js中相关代码,分拆到container/MathContainer和component/Math这两个组件中
【connect】
react-redux提供connect方法,用于从展示组件生成容器组件。connect的意思就是将这两种组件连接起来
import { connect } from 'react-redux'
const MathContainer = connect()(Math);
Math是展示组件,MathContainer就是由React-redux通过connect方法自动生成的容器组件
为了定义业务逻辑,需要给出下面两方面的信息
1、输入逻辑:外部的数据(即state对象)如何转换为展示组件的参数
2、输出逻辑:用户发出的动作如何变为Action对象,从展示组件传出去
因此,connect方法的完整API如下
import {connect} from 'react-redux'
const MathContainer= connect(
    mapStateToProps,
    mapDispatchToProps
)(Math)
上面代码中,connect方法接受两个参数:mapStateToProps和mapDispatchToProps。它们定义了展示组件的业务逻辑。前者负责输入逻辑,即将state映射到UI组件的参数(props),后者负责输出逻辑,即将用户对展示组件的操作映射成Action
【mapStateToProps()】
mapStateToProps建立一个从外部的state对象到展示组件的props对象的映射关系。作为参数,mapStateToProps执行后应该返回一个对象,里面的每一个键值对就是一个映射。
const mapStateToProps = (state) => {
  return {
    num: getNum(state)
  }
}
mapStateToProps的第一个参数总是state对象,还可以使用第二个参数,代表容器组件的props对象。使用ownProps作为参数后,如果容器组件的参数发生变化,也会引发展示组件重新渲染
const mapStateToProps = (state,ownProps) => {
  return {
    num: getNum(state)
  }
}
mapStateToProps会订阅Store,每当state更新的时候,就会自动执行,重新计算展示组件的参数,从而触发展示组件的重新渲染。connect方法可以省略mapStateToProps参数,那样,展示组件就不会订阅Store,就是说Store的更新不会引起展示组件的更新
【mapDispatchToProps】
mapDispatchToProps是connect函数的第二个参数,用来建立展示组件的参数到store.dispatch方法的映射。也就是说,它定义了用户的哪些操作应该当作action,传给Store。它可以是一个函数,也可以是一个对象
如果mapDispatchToProps是一个函数,会得到dispatch和ownProps(容器组件的props对象)两个参数
const mapDispatchToProps = (dispatch,ownProps) => {
  return {
    onSetNumClick: () => dispatch(setNum())
  }
}
mapDispatchToProps作为函数,应该返回一个对象,该对象的每个键值对都是一个映射,定义了展示组件的参数怎样发出action
如果mapDispatchToProps是一个对象,它的每个键名也是对应展示组件的同名参数,键值应该是一个函数,会被当作action creator,返回的action会由redux自动发出
因此,上面的写法简写如下所示
const mapDispatchToProps = {
  onsetNumClick: () => setNum()
}
最终结构
由于store目录中,只能一个index.js文件,且不会有内容扩展,将其更改为根目录下的store.js文件
将其他的目录都变成复数形式,最终的目录结构如下所示
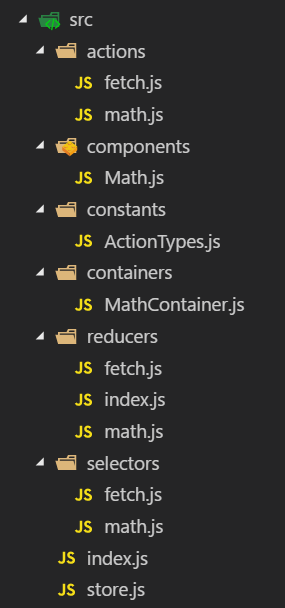
详细代码如下所示,且可访问github线上地址
【components】
// components/Math.js
import React from 'react'
const Math = ({
  num,
  isShow,
  fetchMessage,
  onSetNumClick,
  onAddOneClick,
  onAddTwoClick,
  onSqureClick
}) => (
  <section>
    <p>{num}</p>
    <input type="button" onClick={onSetNumClick} value="设置Num" />
    <input type="button" onClick={onAddOneClick} value="+1" />
    <input type="button" onClick={onAddTwoClick} value="+2" />
    <input type="button" onClick={onSqureClick} value="乘方" />
    {isShow && <p>{fetchMessage}</p>}
  </section>
)

export default Math
【containers】
// containers/MathContainer.js
import { connect } from 'react-redux'
import Math from '../components/Math'
import { getNum } from '../selectors/math'
import { getFetchMessage, getFetchIsShow } from '../selectors/fetch'
import { setNum, add, square } from '../actions/math'
const mapStateToProps = state => {
  return {
    num: getNum(state),
    fetchMessage: getFetchMessage(state),
    isShow: getFetchIsShow(state)
  }
}
const mapDispatchToProps = {
  onSetNumClick: () => setNum(),
  onAddOneClick: () => add(1),
  onAddTwoClick: () => add(2),
  onSqureClick: () => square
}
const MathContainer = connect(mapStateToProps, mapDispatchToProps)(Math)
export default MathContainer
【actions】
actions/fetch.js
// actions/fetch.js
import { SET_FETCH_MESSAGE, HIDE_FETCH_MESSAGE } from '../constants/ActionTypes'
export const startFetch = { type: SET_FETCH_MESSAGE,message: '开始发送异步请求' }
export const successFetch = { type: SET_FETCH_MESSAGE, message: '成功接收数据' }
export const failFetch = { type: SET_FETCH_MESSAGE, message: '接收数据失败' }
export const hideFetchMessage = { type: HIDE_FETCH_MESSAGE }
actions/math.js
// actions/math.js
import { ADD, SQUARE, SET } from '../constants/ActionTypes'
import { startFetch, successFetch, failFetch, hideFetchMessage } from './fetch'
import axios from 'axios'
const uri = 'https://jsonplaceholder.typicode.com/posts/2'
export const add = num => ({ type: ADD, num })
export const square = { type: SQUARE }
export const setNum = () => (dispatch, getState) => {
  dispatch(startFetch)
  setTimeout(() => {dispatch(hideFetchMessage)}, 300)
  return axios
    .get(uri)
    .then(res => {
      dispatch(successFetch)
      setTimeout(() => {dispatch(hideFetchMessage)}, 300)
      dispatch({ type: SET, num: res.data.id })
    })
    .catch(err => {
      dispatch(failFetch)
      setTimeout(() => {dispatch(hideFetchMessage)}, 300)
    })
}
【constants】
// constants/ActionTypes.js
export const ADD = 'ADD'
export const SQUARE = 'SQUARE'
export const SET = 'SET'
export const SET_FETCH_MESSAGE = 'SET_FETCH_MESSAGE'
export const HIDE_FETCH_MESSAGE = 'HIDE_FETCH_MESSAGE'
【reducers】
reducers/fetch.js
// reducers/fetch.js
import { SET_FETCH_MESSAGE,HIDE_FETCH_MESSAGE } from '../constants/ActionTypes'
const initState = {
  message:'',
  isShow:false
}
const fetch = (state = initState, action) => {
  switch (action.type) {
    case SET_FETCH_MESSAGE:
      return {isShow: true, message: action.message}
    case HIDE_FETCH_MESSAGE:
      return { isShow: false, message: '' }
    default:
      return state
  }
}
export default fetch
reducers/index.js
// reducers/index.js
import { combineReducers } from 'redux'
import math from './math'
import fetch from './fetch'
const rootReducer = combineReducers({
  math,
  fetch
})

export default rootReducer
reduces/math.js
// reduces/math.js
import { ADD, SQUARE,SET } from '../constants/ActionTypes'
const math = (state = 10, action) => {
  switch (action.type) {
    case ADD:
      return state + action.num
    case SQUARE:
      return state * state
    case SET:
      return action.num
    default:
      return state
  }
}
export default math
【selectors】
// selectors/fetch.js
export const getFetchMessage = state => state.fetch.message
export const getFetchIsShow = state => state.fetch.isShow
// selectors/math.js
export const getNum = state => state.math
【根目录】
index.js
// index.js
import React from 'react'
import ReactDOM from 'react-dom'
import store from './store'
import MathContainer from './containers/MathContainer'
import { Provider } from 'react-redux'
ReactDOM.render(
  <Provider store={store}>
    <MathContainer />
  </Provider>,
  document.getElementById('root')
)
store.js
// store.js
import { createStore, applyMiddleware } from 'redux'
import thunk from 'redux-thunk'
import rootReducer from './reducers'
export default createStore(rootReducer,applyMiddleware(thunk))
转自:http://www.cnblogs.com/xiaohuochai/p/8447826.html
.