http://extundelete.sourceforge.net/options.html
误删除/usr/share目录
因此考虑恢复目录
过程如下:
1.选用extundelete软件来进行恢复,源码编译安装
[root@84-monitor src]# bunzip2 extundelete-0.2.4.tar.bz2
[root@84-monitor src]# tar xf extundelete-0.2.4.tar
tar -xjf extundelete-0.2.0.tar.bz2
下面这是第一个警告,不予理睬。
[root@84-monitor extundelete-0.2.4]# less README
WARNING: terminal is not fully functional
必须先umount要恢复文件的分区或者把分区改为只读模式,命令:mount –o remout,ro 分区(例如:dev/hda1)或者
mount -n -r -o remount /db 最好尽快将所在分区修改为只读方式,防止数据被覆盖使用。
[root@84-monitor extundelete-0.2.4]# yum install gcc-c++
Traceback (most recent call last):
File "/usr/bin/yum", line 28, in <module>
import yummain
ImportError: No module named yummain
[root@84-monitor extundelete-0.2.4]# ./configure
Configuring extundelete 0.2.4
configure: error: in `/usr/local/src/extundelete-0.2.4':
configure: error: C++ compiler cannot create executables
See `config.log' for more details
[root@84-monitor src]# rpm -ivh libstdc++-devel-4.4.7-11.el6.x86_64.rpm libstdc++-4.4.7-11.el6.x86_64.rpm gcc-c++-4.4.7-11.el6.x86_64.rpm --replacefiles
[root@84-monitor extundelete-0.2.4]# ./configure
Configuring extundelete 0.2.4
configure: error: Can't find ext2fs library
[root@84-monitor packages]# ll
total 964
-rw-r--r--. 1 root root 566700 2014-10-18 04:00 e2fsprogs-1.41.12-21.el6.x86_64.rpm
-rw-r--r--. 1 root root 164100 2014-10-18 04:02 e2fsprogs-devel-1.41.12-21.el6.x86_64.rpm
-rw-r--r--. 1 root root 123728 2014-10-18 04:01 e2fsprogs-libs-1.41.12-21.el6.x86_64.rpm
-rw-r--r--. 1 root root 38088 2014-10-18 04:02 libcom_err-1.41.12-21.el6.x86_64.rpm
-rw-r--r--. 1 root root 33232 2014-10-18 04:01 libcom_err-devel-1.41.12-21.el6.x86_64.rpm
-rw-r--r--. 1 root root 42468 2014-10-18 04:01 libss-1.41.12-21.el6.x86_64.rpm
[root@84-monitor packages]# rpm -ivh * --replacefiles
Preparing... ########################################### [100%]
package libcom_err-1.41.12-21.el6.x86_64 is already installed
package e2fsprogs-libs-1.41.12-21.el6.x86_64 is already installed
package libcom_err-devel-1.41.12-21.el6.x86_64 is already installed
package libss-1.41.12-21.el6.x86_64 is already installed
package e2fsprogs-1.41.12-21.el6.x86_64 is already installed
[root@84-monitor packages]# rpm -ivh e2fsprogs-devel-1.41.12-21.el6.x86_64.rpm
Preparing... ########################################### [100%]
1:e2fsprogs-devel ########################################### [100%]
[root@84-monitor packages]# cd ../extundelete-0.2.4
[root@84-monitor extundelete-0.2.4]# ./configure
Configuring extundelete 0.2.4
Writing generated files to disk
[root@84-monitor extundelete-0.2.4]# make
make -s all-recursive
Making all in src
extundelete.cc:571: warning: unused parameter
You have new mail in /var/spool/mail/root
[root@84-monitor extundelete-0.2.4]# make install
Making install in src
/usr/bin/install -c extundelete '/usr/local/bin'
[root@84-monitor extundelete-0.2.4]# extundelete /dev/mapper/VolGroup-lv_root --inode 651608
[root@84-monitor extundelete-0.2.4]# extundelete /dev/mapper/VolGroup-lv_root --restore-directory /usr/share
NOTICE: Extended attributes are not restored.
WARNING: EXT3_FEATURE_INCOMPAT_RECOVER is set.
The partition should be unmounted to undelete any files without further data loss.
If the partition is not currently mounted, this message indicates
it was improperly unmounted, and you should run fsck before continuing.
If you decide to continue, extundelete may overwrite some of the deleted
files and make recovering those files impossible. You should unmount the
file system and check it with fsck before using extundelete.
Would you like to continue? (y/n)
y
Loading filesystem metadata ... 117 groups loaded.
Loading journal descriptors ... 30051 descriptors loaded.
Searching for recoverable inodes in directory /usr/share ...
1087 recoverable inodes found.
Looking through the directory structure for deleted files ...
Unable to restore inode 656184 (usr/share/policycoreutils-2.0.83): Space has been reallocated.
Unable to restore inode 656716 (usr/share/fuse-2.8.3): Space has been reallocated.
797 recoverable inodes still lost.
[root@84-monitor usr]# pwd
/usr
[root@84-monitor usr]# cp -r /usr/local/src/extundelete-0.2.4/RECOVERED_FILES/usr/share/ ./
拷贝其它系统中的/usr/share/yum-plugins和/usr/share/yum-cli到本系统下,yum就可以用了
[root@84-monitor share]# yum search wget
Traceback (most recent call last):
File "/usr/bin/yum", line 28, in <module>
import yummain
ImportError: No module named yummain
[root@84-monitor share]# cd yum-
yum-3.2.29/ yum-plugin-fastestmirror-1.1.30/
[root@84-monitor src]# cd /usr/share/yum-
yum-3.2.29/ yum-cli/ yum-plugin-fastestmirror-1.1.30/ yum-plugins/
有时候删除了大量的数据量,其中很多数据都是没用的,我们仅需要恢复其中的一部分数据,此时,如果采用恢复全部数据的办法,不但耗时,而且浪费资源,在这种情况下,就需要采用另外的一种恢复机制有选择地恢复,extundelete提供了“—after”“和”--before“参数,可以通过指定某个时间段,进而只恢复这个时间段内的数据。
[root@cloud1 mnt]# extundelete --after 1379146740 --restore-all /dev/sdc1
在数据被误删除后,第一时间要做的是卸载被删除数据所在的磁盘或磁盘分区,如果是系统根分区的数据遭到误删除,就需要将系统进入单用户,并且将根分区以只读模式挂载。这样做的原因很简单,因为将文件删除后,仅仅是将文件的inode结点中的扇区指针清零,实际文件还存储在磁盘上,如果磁盘以读写模式挂载,这些已删除的文件的数据块就可能被操作系统重新分配出去,在这些数据块被新的数据覆盖后,这些数据就真的丢失了,恢复工具也回力无天。所以,以只读模式挂载磁盘可以尽量降低数据块中数据被覆盖的风险,以提高恢复数据成功的比率。
2.卸载磁盘分区
在将数据误删除后,立刻需要做的就是卸载这块磁盘分区:
[root@cloud1 data]#cd /mnt
[root@cloud1 mnt]# umount /data
3.查询可恢复的数据信息
通过extundelete命令可以查询/dev/sdc1分区可恢复的数据信息:
[root@cloud1 /]# extundelete /dev/sdc1 --inode 2
在Linux下,基于开源的数据恢复工具有很多,常见的有debugfs、R-Linux、ext3grep、extundelete等,比较常用的有ext3grep和extundelete,这两个工具的恢复原理基本一样,只是extundelete功能更加强大,本文重点介绍extundelete的使用。
extundelete的恢复原理
在介绍使用extundelete进行恢复数据之前,简单介绍下关于inode的知识。在Linux下可以通过“ls –id”命令来查看某个文件或者目录的inode值,例如查看根目录的inode值,可以输入:
[root@cloud1 ~]# ls -id /
2 /
由此可知,根目录的inode值为2。
在利用extundelete恢复文件时并不依赖特定文件格式,首先extundelete会通过文件系统的inode信息(根目录的inode一般为2)来获得当前文件系统下所有文件的信息,包括存在的和已经删除的文件,这些信息包括文件名和inode。然后利用inode信息结合日志去查询该inode所在的block位置,包括直接块,间接块等信息。最后利用dd命令将这些信息备份出来,从而恢复数据文件。
根分区只读
两块硬盘做了raid0,结果在linux使用过程中(怀疑由于突然断电所致),根分区成了只读,任何写操作都不能执行,ls,df等读操作可以进行,系统也不能在命令行下关机,按电源键强关以后,不能启动。
http://www.ha97.com/5428.html
重启系统后使用root进入单用户模式,运行
fsck.ext3 -y /dev/vda3
说明:ext3的文件系统使用fsck.ext3,ext4文件系统使用fsck.etx4。/dev/vda3是系统/根分区。运行完毕后,reboot重启系统就恢复正常。20多台出问题的都是这样修复的,无失败案例。fsck.ext3开始进入扫描、修正文件系统,这个过程有时很快,有时比较长,中间有数次停顿的过程,只需等待即可,千万不要以为死机而重启服务器。修正完文件系统后,如果没有提示重启系统,也需要reboot来重启系统。
fsck不仅可以对文件系统进行扫描,还能修正文件系统的一些问题。注意的是fsck扫描文件系统时一定要在单用户模式、修复模式或把设备umount后进行。建议在单用户模式下运行。如果扫描正常运行中的系统,会造成系统文件损坏。
条件许可的话建议文件系统都用ext4,fsck修复文件系统的速度和ext3不是一个等级,T级以上的ext3分区,fsck修复的时间让人崩溃
[root@localhost ~]# mount -o remount, rw /
[root@localhost /]# hdparm /dev/mapper/VolGroup00-LogVol00
那就看下hdparm /dev/sda6 看readonly tag是0/1
手动设定 hdparm -r 0 /dev/sda6
=====================================
一次删除的案例
事由,不小心在这个目录下执行了rm -rf *,删错了目录
/u01/app/oracle/oradata/PDB/datafile/
=====================================
1先查inode号 ls -id /u01/app/oracle/oradata/PDB/datafile/
2安装软件
3关机
4root只读挂载
5运行命令,只能在控制台下操作,并且不能写文件,因为是只读
=====================================
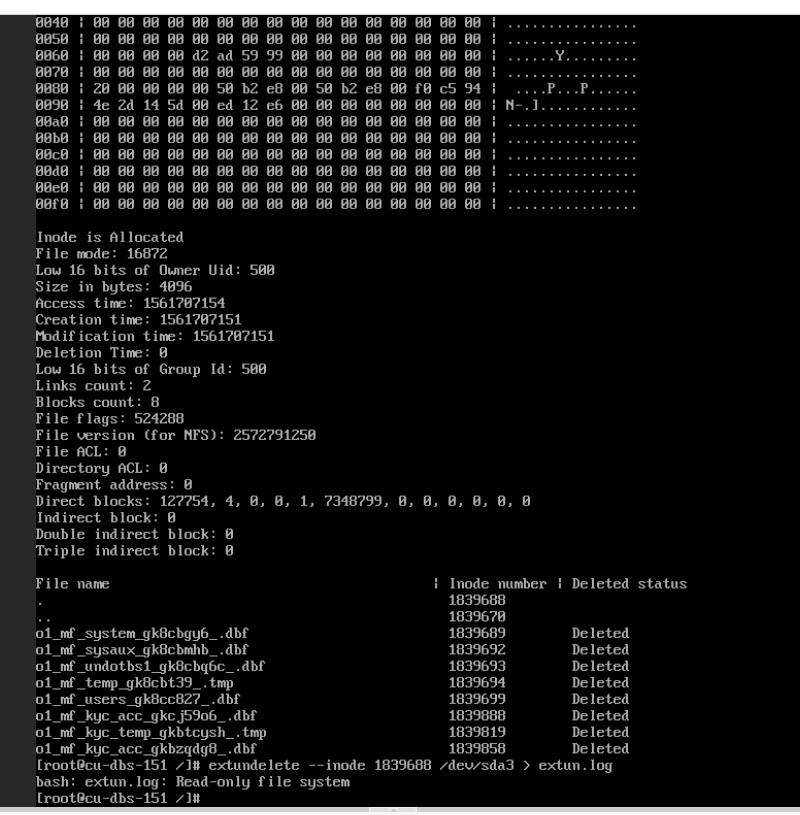
[oracle@cu-dbs-151 PDB]$ ls -id /u01/app/oracle/oradata/PDB/datafile/
1839688 datafile/
=====================================
tar -xjf extundelete-0.2.0.tar.bz2
cd extundelete-0.2.4
yum install e2fsprogs e2fsprogs-devel
./configure
make;make install
init 0
=====================================
然后进入单用户模式
将root分区只读挂载
mount -o remount,ro /
extundelete --inode 1839688 /dev/sda3
可以看到相关信息
=====================================
mount -o remount,rw /
extundelete --restore-directory /u01/app/oracle/oradata/PDB/datafile/ /dev/sda3
cp /RECOVERED_FILES/u01/app/oracle/oradata/PDB/datafile/* /u01/app/oracle/oradata/PDB/datafile/
在单用户下exit,就可以了
在执行目录下面找RECOVERED_FILES这个目录,将内容cp到目的地,就可以了。