关键词:android 电容屏 tp 工作队列 中断 坐点计算 电容屏主要参数
平台信息:
内核:linux2.6/linux3.0
系统:android/android4.0
平台:S5PV310(samsung exynos 4210)
作者:xubin341719(欢迎转载,请注明作者)
以goodix的gt8105为例
一、总体架构
硬件部分:先看一个总体的图吧,其实触摸屏原理也比较简单,触摸屏和主控芯片间的联系,如下主要有三部分:
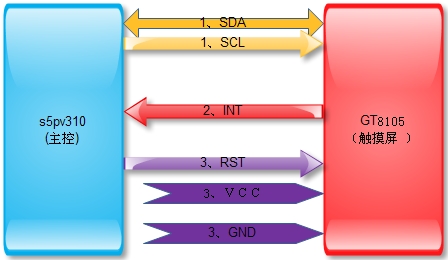
1、IIC部分,初始化gt8105的数据和传回主控制的坐标位置信息就是通过IIC这条线传输的;
2、INT,当gt8105初触摸时,会发出中断通知主控接收信息(坐标数据);
3、gt8105电源、复位这一部分,不同芯片有所不同,可以根据触摸屏芯片来配置。
软件部分:
二、电容触摸屏的主要参数(这部分面试的时候也许有人会问的)
记得刚出来找工作时有人问我一些问题,我答不上来,现在感觉很清晰(那时候刚毕业IIC我都说不全)
1、IIC
(1)、clk370KHz~400KHz;
(2)、触摸屏工作在从模式,这个比较简单;
2、电容检测频率,也就是每秒检测的次数:(大概)
(1)、单指≥100Hz;
(2)、五指≥80Hz;
(3)、十指≥60Hz。
3、手指按下,没抬起时触发多少中断?
中断个数也就是检测频率,按下没提起一直有中断。这样我们就可有判断单点、划线之类的操作;
4、校准功能、自动校准(有个别电容屏没有的,用软件校准)
(1)、初始化校准
不同的温度、湿度及物理空间结构均会影响到电容传感器在闲置状态的基准值。一般电容触摸屏会在初始化的
200ms内根据环境情况自动获得新的检测基准。完成触摸屏检测的初始化。
(2)、
自动温漂补偿
温度、湿度或灰尘等环境因素的缓慢变化,也会影响到电容传感器在闲置状态的基准值。实时检测各点数据的变化,对历史数据进行统计分析,由此来修正检测基准。从而降低环境变化对触摸屏检测的影响。
5、推荐工作条件(环境温度为
25°C,VDD=2.8V)
|
参数 |
最小值 |
典型值 |
最大值 |
单位 |
|
模拟AVDD(参考AGND) |
2.5 |
2.8 |
3.6 |
V |
|
数字DVDD(参考DGND) |
2.5 |
2.8 |
3.6 |
V |
|
电源纹波 |
|
50(注意电池、充电器的影响) |
|
mV |
|
工作温度 |
-20 |
+25 |
+85 |
度 |
|
工作湿度 |
- |
- |
95 |
% |
三、硬件接口电路:
如下图:
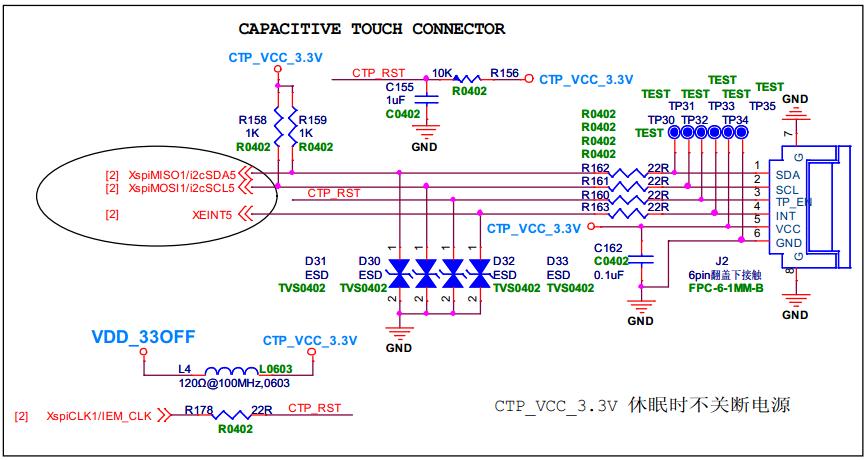
|
SDA |
IIC数据 要上拉电阻,为1K; |
|
SCL |
IIC 时钟(400KHz) |
|
TP_EN |
使能脚(gt8105为高电平) |
|
INT |
中断(一直点到触摸屏时中断是一直发出的) |
|
VCC |
3.3V 这个电压一直有 |
|
GND |
地 |
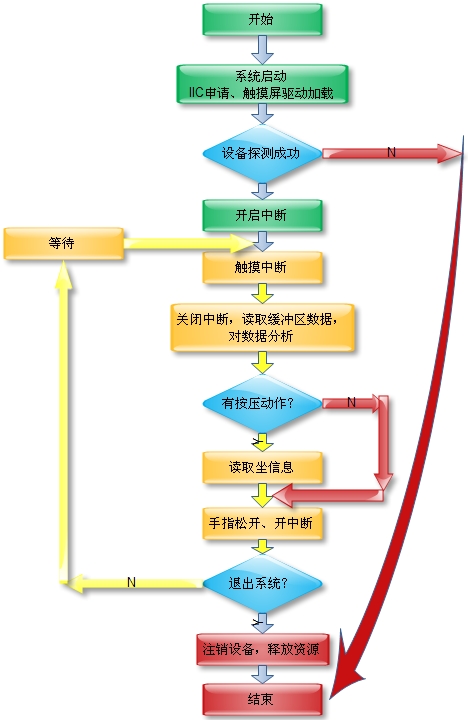
软件部分,整体流程如下:
三、IIC配置
设备到芯片的数据、初始化值都是从这条总线上传输的,首先我们要配置这个条总线,
/linux/arch/arm/mach-exynos/mach-smdkv310.c,这个因平台而已,地址右移也跟情况而定,如果本来就是7bit的地址就不用移位。
static struct i2c_board_info i2c_devs5[] __initdata = {
#if CONFIG_TOUCHSCREEN_GT8105
          {
                    I2C_BOARD_INFO("Goodix-TS", (0xaa>>1)),
                    .irq = IRQ_EINT(5),
          }
#endif
};
四、电源、复位(使能脚)
1、电源
3.3V的电源是一直有的,这个硬件上给就行了。
2、复位(时能脚),这个因触摸屏而已,gt8105工作时要高电平。
在:linux3.0/drivers/input/touchscreen/goodix_touch.h中
#define          RESETPIN_CFG          s3c_gpio_cfgpin(EXYNOS4_GPB(4), S3C_GPIO_OUTPUT)
#define          RESETPIN_SET0           gpio_direction_output(EXYNOS4_GPB(4),0)
#define          RESETPIN_SET1          gpio_direction_output(EXYNOS4_GPB(4),1)
static void goodix_reset(void)
{
          int err;
          err = gpio_request(EXYNOS4_GPB(4), "GPX1");
          if (err)
          printk(KERN_ERR "#### failed to request GPB_4 ####
");
          RESETPIN_CFG; //配置管脚功能
          RESETPIN_SET0;//管脚拉低
          mdelay(20); //延时
          RESETPIN_SET1;//管脚拉高
          mdelay(60);
          gpio_free(EXYNOS4_GPB(4));
}
五、中断配置
在:linux3.0/drivers/input/touchscreen/goodix_touch.h中
#define INT_PORT EXYNOS4_GPX0(5)
#ifdef INT_PORT
          #define TS_INT                     IRQ_EINT(5)//中断引脚,中断号
          #define INT_CFG           S3C_GPIO_SFN(0x0F)
#else

在:linux3.0/drivers/input/touchscreen/goodix_touch.h中 中断申请
#ifdef INT_PORT
          client->irq=TS_INT;
          if (client->irq)
          {
             ret = request_irq(client->irq, goodix_ts_irq_handler , IRQ_TYPE_EDGE_RISING|IRQ_TYPE_EDGE_FALLING,client->name, ts);
#endif
上面三部完成了触摸屏工作的最基本配置,保证IIC、上电、INT正常,触摸屏就可以工作。
六、驱动程序分析(完整代码见 goodix_touch.c/goodix_touch.h)
驱动有几个比较重要的部分:probe函数分析;中断申请、工作队列调度;中断下半部函数的执行,坐标值计算、上报。
1、probe函数分析
static int goodix_ts_probe(struct i2c_client *client, const struct i2c_device_id *id)
{
          struct goodix_ts_data *ts;
          …………
          // 1,分配触摸屏结构内核空间;
          ts = kzalloc(sizeof(*ts), GFP_KERNEL);
          …………
          // 2,初始化工作队列,这个比较重要,中断触发后,调用队列中的goodix_ts_work_func函数,计算上报坐标值;
          INIT_WORK(&ts->work, goodix_ts_work_func);
          …………
          // 3, 触摸芯片初始化;
          for(retry=0; retry<3; retry++)
          {
                    ret=goodix_init_panel(ts);
          …………
          }
          //4、触摸屏复位,拉高;
          goodix_reset();
#ifdef INT_PORT
          // 5,中断申请,TS_INT就是我们所设定的中断脚;
          client->irq=TS_INT;
                    ret = request_irq(client->irq, goodix_ts_irq_handler , IRQ_TYPE_EDGE_RISING|IRQ_TYPE_EDGE_FALLING,
                              client->name, ts);
          ………………
#endif

          // 6、分配input驱动内核空间;
          ts->input_dev = input_allocate_device();
  // 7,input初始化参数设定,我们在前面提到Linux与Android 多点触摸协议里有对这部分说明;
          ts->input_dev->evbit[0] = BIT_MASK(EV_SYN) | BIT_MASK(EV_KEY) | BIT_MASK(EV_ABS) ;
          ts->input_dev->keybit[BIT_WORD(BTN_TOUCH)] = BIT_MASK(BTN_TOUCH);
          ts->input_dev->absbit[0] = BIT(ABS_X) | BIT(ABS_Y) | BIT(ABS_PRESSURE);                                                             // absolute coor (x,y)
#ifdef HAVE_TOUCH_KEY
          for(retry = 0; retry < MAX_KEY_NUM; retry++)
          {
                    input_set_capability(ts->input_dev,EV_KEY,touch_key_array[retry]);
          }
#endif

          input_set_abs_params(ts->input_dev, ABS_X, 0, ts->abs_x_max, 0, 0);
          input_set_abs_params(ts->input_dev, ABS_Y, 0, ts->abs_y_max, 0, 0);
          input_set_abs_params(ts->input_dev, ABS_PRESSURE, 0, 255, 0, 0);
          //8、这部分针对触摸屏参数设定;
#ifdef GOODIX_MULTI_TOUCH
          input_set_abs_params(ts->input_dev, ABS_MT_WIDTH_MAJOR, 0, 255, 0, 0);
          input_set_abs_params(ts->input_dev, ABS_MT_TOUCH_MAJOR, 0, 255, 0, 0);
          input_set_abs_params(ts->input_dev, ABS_MT_POSITION_X, 0, ts->abs_x_max, 0, 0);
          input_set_abs_params(ts->input_dev, ABS_MT_POSITION_Y, 0, ts->abs_y_max, 0, 0);
          input_set_abs_params(ts->input_dev, ABS_MT_TRACKING_ID, 0, ts->max_touch_num, 0, 0);
#endif
          //9、触摸屏版本信息设定;
          sprintf(ts->phys, "input/ts");
          ts->input_dev->name = goodix_ts_name;
          ts->input_dev->phys = ts->phys;
          ts->input_dev->id.bustype = BUS_I2C;
          ts->input_dev->id.vendor = 0xDEAD;
          ts->input_dev->id.product = 0xBEEF;
          ts->input_dev->id.version = 10427;          //screen firmware version
          //10,对于input子系统来说,这个是重头戏了,只有注册了input子系统,其他的才有做用;
          ret = input_register_device(ts->input_dev);
          ………………
          // 11,对睡眠唤醒操作;
#ifdef CONFIG_HAS_EARLYSUSPEND
          ts->early_suspend.level = EARLY_SUSPEND_LEVEL_BLANK_SCREEN + 1;
          ts->early_suspend.suspend = goodix_ts_early_suspend;
          ts->early_suspend.resume = goodix_ts_late_resume;
          register_early_suspend(&ts->early_suspend);
#endif
………………
}
(1)、分配触摸屏结构内核空间;
struct goodix_ts_data {
          uint16_t addr;
          uint8_t bad_data;
          struct i2c_client *client;
          struct input_dev *input_dev;
          int use_reset;                    //use RESET flag
          int use_irq;                    //use EINT flag
          int read_mode;                    //read moudle mode,20110221 by andrew
          struct hrtimer timer;
          struct work_struct work;
          char phys[32];
          int retry;
          struct early_suspend early_suspend;
          int (*power)(struct goodix_ts_data * ts, int on);
          uint16_t abs_x_max;
          uint16_t abs_y_max;
          uint8_t max_touch_num;
          uint8_t int_trigger_type;
          uint8_t green_wake_mode;
};
(2)、初始化工作队列,这个比较重要,中断触发后,调用队列中的goodix_ts_work_func函数,计算上报坐标值;这个和中断申请一起分析;
(3)、触摸芯片初始化;
对触摸芯片寄存器的初始化,这里面对中断方式设定等,一般芯片厂的FAE在调试的时候会修改这里面的值,这个也是因芯片而异,有的在驱动里做,可以直接改;有的直接做成固件了,那部分要FAE帮忙了。
uint8_t cfg_info_group1[] =
          {
             0x65,0x00,0x25,0x80,0x19,0x00,0x00,0x2C,0x11,0x11,0x32,0x02,0x08,0x10,0x20,0x00,
             0x00,0x88,0x88,0x88,0x03,0x13,0x32,0x64,0x00,0x01,0x02,0x03,0x04,0x05,0x06,0x07,
             0x08,0x09,0x0A,0x0B,0x0C,0xFF,0x0D,0x0E,0x0F,0x10,0x11,0x12,0x13,0x14,0x15,0x16,
             0x17,0x18,0x19,0xFF,0xFF,0xFF,0x00,0x00,0x00,0x00,0x00,0x00,0x00,0x00,0x00,0x00,
             0x00,0x00,0x00,0x00,0x00,0x00,0x00,0x00,0x00,0x00,0x00,0x00,0x00,0x00,0x00,0x00,
             0x00,0x00,0x00,0x00
          };
(4)、触摸屏复位,拉高;
gt8015在工作时要拉高,所以我们做一个拉低—延时--拉高的操作;
(5)、中断申请,TS_INT就是我们所设定的中断脚,和(2)一起后面分析;
(6)、分配input驱动内核空间;
ts->input_dev= input_allocate_device();
(7)、input初始化参数设定,我们在前面提到Linux与Android 多点触摸协议里有对这部分说明;(8)、这部分针对触摸屏参数设定;
(9)、触摸屏版本信息设定;
cat /proc/bus/input/devices时可以看到下面信息(这个是pixcir的触摸屏)
I: Bus=0018 Vendor=0000 Product=0000 Version=0000
N: Name="pixcir-ts"
P: Phys=
S: Sysfs=/devices/platform/s3c2440-i2c.5/i2c-5/5-005c/input/input3
U: Uniq=
H: Handlers=kbd event3
B: PROP=0
B: EV=b
B: KEY=400 0 0 0 0 1000 40000800 0 0 0 0
B: ABS=2650000 1000000
(10)、对于input子系统来说,这个是重头戏了,驱动注册到input子系统;
input_register_device(ts->input_dev);
(11),触摸屏睡眠唤醒操作,这部分不做详细说明,感兴趣的可以看下……
2、中断申请、工作队列调度
(1)、中断申请
                 ret = request_irq(client->irq, goodix_ts_irq_handler , IRQ_TYPE_EDGE_RISING|IRQ_TYPE_EDGE_FALLING,
                              client->name, ts);
第一个参数: 中断号,client->irq,client->irq=TS_INT;
#define TS_INT                     IRQ_EINT(5)对应到我们要申请的中断;
第二个参数:中断执行函数,goodix_ts_irq_handler ;
第三个参数:中断触发方式:上升沿触发、下降沿触发、高电平触发、低电平触发
IRQ_TYPE_EDGE_RISING,
IRQ_TYPE_EDGE_FALLING,
IRQ_TYPE_LEVEL_LOW,
IRQ_TYPE_LEVEL_HIGH
第四个参数:
第五个参数:
(2)、中断处理函数 goodix_ts_irq_handler
static irqreturn_t goodix_ts_irq_handler(int irq, void *dev_id)
{
          struct goodix_ts_data *ts = dev_id;
          queue_work(goodix_wq, &ts->work);
          return IRQ_HANDLED;
}
看下queue_work()这个函数中的两个参数:
a、goodix_wq
goodix_wq=create_singlethread_workqueue("goodix_wq"); //createa work queue and worker thread
在函数 goodix_ts_init中,创建工作队列和工作线程,初始化时创建线程。
b、&ts->work
在函数goodix_ts_probe()中:
INIT_WORK(&ts->work,goodix_ts_work_func);
在工作队列&ts->work中增加 goodix_ts_work_func任务。
也就是当中断函数触发时,执行中断函数goodix_ts_irq_handler(),中断函数里面对队列调度,调用队列中的goodix_ts_work_func()函数。
3、中断下半部函数的执行goodix_ts_work_func()函数
这就是核心部分,坐标点的计算、上报、多点处理都在这个函数中执行。
static void goodix_ts_work_func(struct work_struct *work)
{
          int ret=-1;
          int tmp = 0;
          uint8_t point_data[(1-READ_COOR_ADDR)+1+2+5*MAX_FINGER_NUM+1]={ 0 }; //read address(1byte)+key index(1byte)+point mask(2bytes)+5bytes*MAX_FINGER_NUM+coor checksum(1byte)
          uint8_t check_sum = 0;
          uint16_t finger_current = 0;
          uint16_t finger_bit = 0;
          unsigned int count = 0, point_count = 0;
          unsigned int position = 0;
          uint8_t track_id[MAX_FINGER_NUM] = {0};
          unsigned int input_x = 0;
          unsigned int input_y = 0;
          unsigned int input_w = 0;
          unsigned char index = 0;
          unsigned char touch_num = 0;

          struct goodix_ts_data *ts = container_of(work, struct goodix_ts_data, work);


          if(g_enter_isp)return;

          COORDINATE_POLL:
          if((ts->int_trigger_type> 1)&& (gpio_get_value(INT_PORT) != (ts->int_trigger_type&0x01)))
          {
                    goto NO_ACTION;
          }

          if( tmp > 9) {

                    dev_info(&(ts->client->dev), "I2C transfer error,touchscreen stop working.
");
                    goto XFER_ERROR ;
          }

          if(ts->bad_data)
                    msleep(20);

          point_data[0] = READ_COOR_ADDR;                    //read coor address
          //1、读取触摸屏值,手指数、坐标值等;
          ret=i2c_read_bytes(ts->client, point_data, ((1-READ_COOR_ADDR)+1+2+5*ts->max_touch_num+1));
          …………
          //2、判断是否有手指按下;
          finger_current = (point_data[3 - READ_COOR_ADDR]<<8) + point_data[2 – READ_COOR_ADDR];

          if(finger_current)//3、如果有手指按下
          {
                    point_count = 0, finger_bit = finger_current;
                    //3,循环判断有多少手指按下;
                    for(count = 0; (finger_bit != 0) && (count < ts->max_touch_num); count++)//cal how many point touch currntly
                    {
                              if(finger_bit & 0x01)
                              {
                                        track_id[point_count] = count;
                                        point_count++;
                              }
                              finger_bit >>= 1;
                    }
                    //4、把按下手指数赋给touch_num;
                    touch_num = point_count;
                    //5、计算坐标值;
                    check_sum = point_data[2 - READ_COOR_ADDR] + point_data[3 - READ_COOR_ADDR];                               //cal coor checksum
                    count = 4 - READ_COOR_ADDR;
                    for(point_count *= 5; point_count > 0; point_count--)
                              check_sum += point_data[count++];
                    check_sum += point_data[count];
                    if(check_sum != 0)                              //checksum verify error
                    {
                              printk("coor checksum error!
");
                              if(ts->int_trigger_type> 1)
                                        goto COORDINATE_POLL;
                              else
                                        goto XFER_ERROR;
                    }
          }
          //6、读取值坐标值上报;
          if(touch_num)
          {
                    //7、touch_num为按下手指个数,依次循环读取;
                    for(index=0; index<touch_num; index++)
                    {
                              position = 4 - READ_COOR_ADDR + 5*index;
                              //8、读出X的值;
                              input_x = (unsigned int) (point_data[position]<<8) + (unsigned int)( point_data[position+1]);
                              //9、读出Y的值;
                              input_y = (unsigned int)(point_data[position+2]<<8) + (unsigned int) (point_data[position+3]);
                              input_w =(unsigned int) (point_data[position+4]);
                              //10、如果读出值超出范围,退出;
                              if((input_x > ts->abs_x_max)||(input_y > ts->abs_y_max))
                              continue;
                              //11、下面的函数依次上报坐标, input_mt_sync单点同步
                              input_report_abs(ts->input_dev, ABS_MT_POSITION_X, input_x);
                              input_report_abs(ts->input_dev, ABS_MT_POSITION_Y, input_y);
                              input_report_abs(ts->input_dev, ABS_MT_TOUCH_MAJOR, input_w);
                              input_report_abs(ts->input_dev, ABS_MT_WIDTH_MAJOR, input_w);
                              input_report_abs(ts->input_dev, ABS_MT_TRACKING_ID, track_id[index]);
                              input_mt_sync(ts->input_dev);
                    }
          }
          //12、没有触摸时,初始值为0;
          else
          {
                    input_report_abs(ts->input_dev, ABS_MT_TOUCH_MAJOR, 0);
                    input_report_abs(ts->input_dev, ABS_MT_WIDTH_MAJOR, 0);
                    input_mt_sync(ts->input_dev);
          }
          //13、同步多点值;
          input_sync(ts->input_dev);

          if(ts->int_trigger_type> 1)
          {
                    msleep(POLL_TIME);
                    goto COORDINATE_POLL;
          }
          goto END_WORK_FUNC;

          NO_ACTION:
          END_WORK_FUNC:
          XFER_ERROR:

          return;
}
总的来数,当我们手指按下是,不管是单个手指,还是多个手指,坐标值和一些信息存储到触摸芯片的相应寄存器中,然后再通过IIC读出,送到主控中就可以了,其他事情就是android去处理了。
如下图所示,规格书中坐标及重量:XY坐标缓存寄存器的高低位:

中断触发--中断函数--工作队列调度--功能函数执行