1、确保环境配置配置正确(Myeclipse(eclipse)+Tomcat)
2、新建web project
3、将Spring MVC所需的jar包粘贴到WebRoot/WEB-INF/lib下
4、在WebRoot/WEB-INF下新建web.xml,里面添加代码
<?xml version="1.0" encoding="UTF-8"?>
<web-app id="WebApp_ID" version="2.4"
   xmlns="http://java.sun.com/xml/ns/j2ee"
   xmlns:xsi="http://www.w3.org/2001/XMLSchema-instance"
   xsi:schemaLocation="http://java.sun.com/xml/ns/j2ee
   http://java.sun.com/xml/ns/j2ee/web-app_2_4.xsd">

    <display-name>Spring MVC Application</display-name>

    <!-- 配置DispatcherServlet -->
    <servlet>
        <servlet-name>HelloWeb</servlet-name>
        <servlet-class>org.springframework.web.servlet.DispatcherServlet</servlet-class>
        <load-on-startup>1</load-on-startup>
    </servlet>

    <!-- 映射 -->
    <servlet-mapping>
        <servlet-name>HelloWeb</servlet-name>
        <url-pattern>/</url-pattern>
    </servlet-mapping>

</web-app>
其中<servlet>标签中是配置DispatcherServlet的。
<servlet-mapping>表示在servlet和URL之间进行映射。
其中<servlet-name>给出servlet名字,这个名字必须和<servlet>中声明的名字一致。
<url-pattern>指定对应于Servlet的URL路 径,该路径是相对于Web应用程序上下文根的路径(具体请看这)。
<load-on-startup>标签表示容器是否在启动的时候就加载这个servlet。
当数字大于等于0时表示,容器在启动时加载servlet,小于0时表示不加载。正数的数值越小,启动的优先级越高。
5、在WebRoot/WEB-INF下新建HelloWeb-servlet.xml,该文件用于创建定义的bean,它会覆盖在全局范围中使用相同名称定义的任何bean的定义。
<beans xmlns="http://www.springframework.org/schema/beans"
   xmlns:context="http://www.springframework.org/schema/context"
   xmlns:xsi="http://www.w3.org/2001/XMLSchema-instance"
   xsi:schemaLocation="
   http://www.springframework.org/schema/beans
   http://www.springframework.org/schema/beans/spring-beans-3.0.xsd
   http://www.springframework.org/schema/context
   http://www.springframework.org/schema/context/spring-context-3.0.xsd">

   <context:component-scan base-package="com.test" />

   <!-- 配置ViewResolver,定义解析视图的规则-->
   <bean class="org.springframework.web.servlet.view.InternalResourceViewResolver">
      <property name="prefix" value="/WEB-INF/jsp/" />
      <property name="suffix" value=".jsp" />
   </bean>

</beans>
ViewResolver的配置说明逻辑视图将交给/WEB-INF/jsp/目录下带有.jsp后缀的文件解析。
6、在src包下新建一个包com.test包,里面新建Java文件HelloController.java。
package com.test;
import org.springframework.stereotype.Controller;
import org.springframework.ui.ModelMap;
import org.springframework.web.bind.annotation.RequestMapping;
import org.springframework.web.bind.annotation.RequestMethod;

@Controller
@RequestMapping("/hello")
public class HelloController{
    @RequestMapping(method=RequestMethod.GET)
    public String printHello(ModelMap model){
        model.addAttribute("message","hello spring mvc");
        return "hello";
    }
}
7、在WebRoot/WEB-INF下新建jsp包,下面创建一个jsp文件,hello.jsp
<%@ page contentType="text/html; charset=UTF-8" %>
<html>
<head>
<title>hello</title>
</head>
<body>
    <h2>hello, ${message}</h2>
</body>

</html>
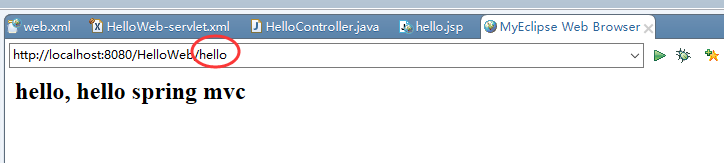
8、使用Tomcat服务器部署,运行。
文档结构如下:

运行结果