安装
创建项目;并且安装上 react-native-router-flux 包
  react-native init ReactNativeRouterFluxDemo
  cd ReactNativeRouterFluxDemo
npm install --save react-native-router-flux然后建立个存放js的目录,我们这里就叫app,作为 ios 和Android的公用目录
mkdir app
先来创建个简单的页面
  // app/index.js

  import React, { Component } from 'react';
  import {
  StyleSheet,
  Text,
  View
  } from 'react-native';

  const App = () => {
  return (
    <View style={styles.container}>
      <Text style={styles.welcome}>
        Welcome to the Demo!
      </Text>
    </View>
  );
  }

  const styles = StyleSheet.create({
  container: {
    flex: 1,
    justifyContent: 'center',
    alignItems: 'center',
    backgroundColor: '#F5FCFF',
  },
  welcome: {
    fontSize: 20,
    textAlign: 'center',
    margin: 10,
  },
  });

  export default App;
在 index.android.js 或者 index.ios.js 写入如下内容:
  // index.ios.js
  // index.android.js

  import { AppRegistry } from 'react-native';
  import App from './app';

  AppRegistry.registerComponent('ReactNativeRouterFluxDemo', () => App);
好了。先跑起来看眼。

first
页面之间的跳转
刚刚我们只是建立了一个简单的页面。我们现在需要做的是,新建两个页面,实现互相之间的跳转。
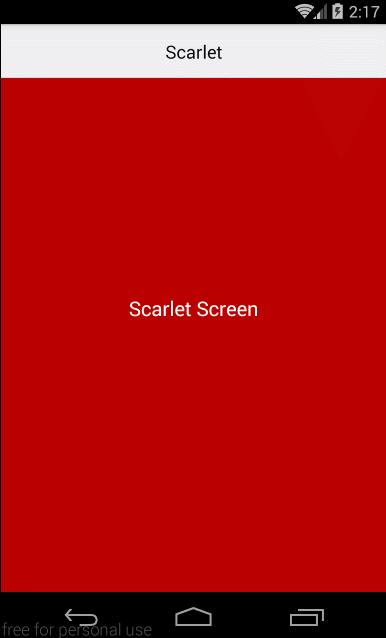
分别就建立 ScarletScreen.js 和 GrayScreen.js,下面代码就只是给出红色的了。灰色就改改 text,component name,backgroundColor 就行。
// app/ScarletScreen.js

import React, { Component } from 'react';
import {
  StyleSheet,
  Text,
  View
} from 'react-native';

const ScarletScreen = () => {
  return (
    <View style={styles.container}>
      <Text style={styles.welcome}>
        Scarlet Screen
      </Text>
    </View>
  );
}

const styles = StyleSheet.create({
  container: {
    flex: 1,
    justifyContent: 'center',
    alignItems: 'center',
    backgroundColor: '#bb0000',
  },
  welcome: {
    fontSize: 20,
    textAlign: 'center',
    margin: 10,
    color: '#ffffff',
  },
});

export default ScarletScreen;
好了,我们建立好两个页面了。然后要实现页面的跳转,引入我们文章重点吧。react-native-router-flux.直接看我们修改的app/index.js
// app/index.js

import React, { Component } from 'react';
import { Router, Scene } from 'react-native-router-flux';//引入包

import ScarletScreen from './ScarletScreen'; //引入文件
import GrayScreen from './GrayScreen';//引入文件

const App = () => {
return (
  <Router>
    <Scene key="root">
      <Scene key="scarlet"
        component={ScarletScreen}
        title="Scarlet"
        initial
      />
      <Scene
        key="gray"
        component={GrayScreen}
        title="Gray"
      />
    </Scene>
  </Router>
);
}

export default App;
这里我们做的就是 把 react-native-router-flux 包引入,在引入两个定义好的页面。
然后下面就是 <Router>标签了。这里约定了所有的页面都要在root下。
root 下的标签就是我们实际要显示的内容了。
这里注意,key得是唯一的。相当于给这个页面一个名称。当我们需要跳转到某个页面的时候就可以直接调用Actions.key();下面我们来修改一下 app/ScarletScreen.js
// app/ScarletScreen.js

import React, { Component } from 'react';
import {
  StyleSheet,
  Text,
  View
} from 'react-native';
import { Actions } from 'react-native-router-flux'; // New code

const ScarletScreen = () => {
  return (
    <View style={styles.container}>
      <Text
        style={styles.welcome}
        onPress={() => Actions.gray()} // New Code
      >
        Scarlet Screen
      </Text>
    </View>
  );
}

const styles = StyleSheet.create({
  container: {
    flex: 1,
    justifyContent: 'center',
    alignItems: 'center',
    backgroundColor: '#bb0000',
  },
  welcome: {
    fontSize: 20,
    textAlign: 'center',
    margin: 10,
    color: '#ffffff',
  },
});

export default ScarletScreen;
上面代码注明了新加的内容。现在跑起来看看吧。
两个页面跳转
好了。到这里我们两个页面的跳转就完成了,这里可以参看下这篇官方文章MINI_TUTORIAL
原文链接:https://www.jianshu.com/p/65ec0a44286c