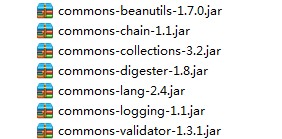
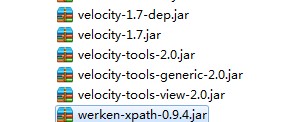
1.首先添加jar包,记得包含以下的主要两个类别


2.新建一个servlet类(继承自VelocityViewServlet)
package com.servlet;

import java.util.Properties;
import java.util.Vector;

import javax.servlet.ServletException;
import javax.servlet.http.HttpServletRequest;
import javax.servlet.http.HttpServletResponse;

import org.apache.velocity.Template;
import org.apache.velocity.app.Velocity;
import org.apache.velocity.app.VelocityEngine;
import org.apache.velocity.context.Context;
import org.apache.velocity.tools.view.VelocityViewServlet;

public class VeloServlet extends VelocityViewServlet {
    private static final long serialVersionUID = 1L;
    private VelocityEngine velo;

    public void init() throws ServletException {
        velo = new VelocityEngine();// velocity引擎对象
        Properties prop = new Properties();// 设置vm模板的装载路径
        String path = this.getServletContext().getRealPath("/");
        prop.setProperty(Velocity.FILE_RESOURCE_LOADER_PATH, path
                + "templates/");
        try {
            velo.init(prop);// 初始化设置,下面用到getTemplate("*.vm")输出时;一定要调用velo对象去做,即velo.getTemplate("*.vm")
        } catch (Exception e1) {
            e1.printStackTrace();
        }
    }

    protected Template handleRequest(HttpServletRequest request,
            HttpServletResponse response, Context ctx) {
        String p1 = "Charles";
        String p2 = "Michael";
        Vector personList = new Vector();
        personList.addElement(p1);
        personList.addElement(p2);
        ctx.put("theList", personList);
        ctx.put("myname", "cuiyf");// 将模板数据 list放置到上下文环境context中
        Template template = velo.getTemplate("index.vm");
        return template;
    }
}
3.在web.xml下面配置如下:
<?xml version="1.0" encoding="UTF-8"?>
<web-app xmlns:xsi="http://www.w3.org/2001/XMLSchema-instance" xmlns="http://java.sun.com/xml/ns/javaee" xmlns:web="http://java.sun.com/xml/ns/javaee/web-app_2_5.xsd" xsi:schemaLocation="http://java.sun.com/xml/ns/javaee http://java.sun.com/xml/ns/javaee/web-app_3_0.xsd" id="WebApp_ID" version="3.0">
  <display-name>TestVelocity</display-name>
   <servlet>
          <servlet-name>velocity</servlet-name>
          <servlet-class>org.apache.velocity.tools.view.VelocityViewServlet</servlet-class>
  </servlet>
  <servlet-mapping>
          <servlet-name>velocity</servlet-name>
          <url-pattern>*.vm</url-pattern>
  </servlet-mapping>

  <servlet>
          <servlet-name>hello</servlet-name>
          <servlet-class>com.servlet.VeloServlet</servlet-class>
  </servlet>
  <servlet-mapping>
          <servlet-name>hello</servlet-name>
          <url-pattern>/hello</url-pattern>
  </servlet-mapping>
  <welcome-file-list>
    <welcome-file>/hello</welcome-file>
  </welcome-file-list>
</web-app>
4.在WebContent下创建文件夹templates,在里面创建.vm文件 index.vm(跟html比较像)
<!DOCTYPE html PUBLIC "-//W3C//DTD HTML 4.01 Transitional//EN" "http://www.w3.org/TR/html4/loose.dtd">
<html>
    <head><title>Sample velocity page</title></head>
    <body bgcolor="#ffffff">
            <center>
                    <h2>Hello My First Velocity</h2>
                    <table width="100" cellpadding="5" cellspacing="1" bordercolor="#333333">
                            <tr><td bgcolor="#eeeeee" align="center">name list</td></tr>
                            $myname
                            #foreach ($name in $theList)
                            <tr><td bgcolor="#6666FF" align="center">$name</td></tr>
                            #end
                    </table>
            </center>
    </body>
</html>
项目完毕,把项目部署到tomcat ,访问即可 http://localhost:8082/TestVelocity/hello
注意以下问题: 设置.vm文件的路径 ,可以在java代码里面设置,也可以在配置文件设置 , 不然会找不到