高级算子
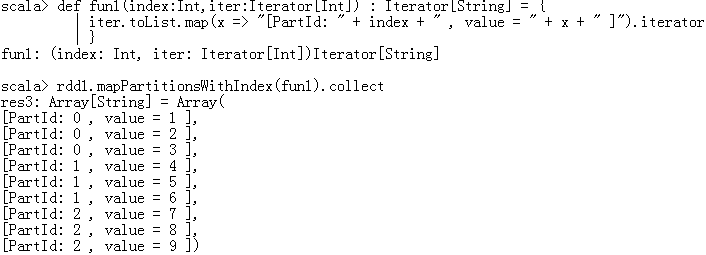
- mapPartitionWithIndex:对RDD中每个分区(有下标)进行操作,通过自己定义的一个函数来处理
- def mapPartitionsWithIndex[U](f: (Int, Iterator[T]) ⇒ Iterator[U])
- f 是函数参数,接收两个参数
- Int:分区号
- Iterator[T]:分区中的元素
- Iterator[U]:处理完的结果
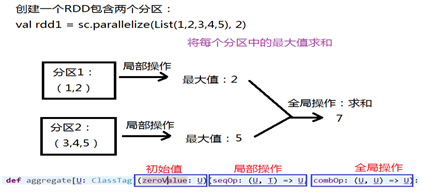
- aggregate:聚合操作(类似分组)
- 先对局部进行聚合操作,再对全局进行聚合操作
- rdd1.aggregate(0)(max(_,_),_+_) 结果 7
- rdd1.aggregate(10)(max(_,_),_+_) 结果 30
- aggregateByKey:类似aggregate,操作<Key Value>
- coalesce:重分区,默认不会进行shuffle
- repartition:重分区,对数据进行shuffle
编程案例
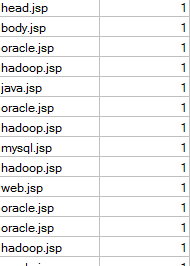
- 分析Tomcat的访问日志,找到访问最高的两个网页
- 对网页访问量求和
- 排序(降序)


 1 package day0608
 2
 3 import org.apache.spark.{SparkConf, SparkContext}
 4
 5 object MyTomcatLogCount {
 6   def main(args: Array[String]): Unit = {
 7     val conf = new SparkConf().setAppName("MyTomcatLogCount").setMaster("local")
 8     val sc = new SparkContext(conf)
 9
10     /*
11      * 日志:192.168.88.1 - - [30/Jul/2017:12:53:43 +0800] "GET /MyDemoWeb/head.jsp HTTP/1.1" 200 713
12      * 返回:(hadoop.jsp,1),相当于WordCount中的<k2 v2>
13      */
14     val rdd1 = sc.textFile("G:\K\TZ-Bigdata\讲义\1101-Spark案例分析\代码\localhost_access_log.2017-07-30.txt").map(line => {
15       //解析字符串,找到jsp的名字
16       //得到双引号位置
17       val index1 = line.indexOf(""")
18       val index2 = line.lastIndexOf(""")
19       val line1 = line.substring(index1+1,index2) // 得到 GET /MyDemoWeb/head.jsp HTTP/1.1
20
21       //得到两个空格位置
22       val index3 = line1.indexOf(" ")
23       val index4 = line1.lastIndexOf(" ")
24       val line2 = line1.substring(index3+1,index4) // 得到 /MyDemoWeb/head.jsp
25
26       //得到jsp的名字
27       val jspName = line2.substring(line2.lastIndexOf("/") + 1)
28
29       //返回
30       (jspName,1)
31     })
32     //按照jsp的名字进行聚合操作,类似WordCount
33     val rdd2 = rdd1.reduceByKey(_+_) // 得到所有jsp访问总量,如(hadoop.jsp,9) (oracle.jsp,9)
34
35     //排序,按value降序顺序
36     val rdd3 = rdd2.sortBy(_._2,false)
37
38     //取出访问量最高的两个网页
39     println(rdd3.take(2).toBuffer)
40     sc.stop()
41   }
42 }
ArrayBuffer((oracle.jsp,9), (hadoop.jsp,9))
- 创建自定义分区
 1 package day0608
 2
 3 import org.apache.spark.{Partitioner, SparkConf, SparkContext}
 4 import scala.collection.mutable.HashMap
 5
 6 object MyTomcatLogPartitioner {
 7   def main(args: Array[String]): Unit = {
 8     val conf = new SparkConf().setAppName("MyTomcatLogPartitioner").setMaster("local")
 9     val sc = new SparkContext(conf)
10
11     /*
12      * 日志:192.168.88.1 - - [30/Jul/2017:12:53:43 +0800] "GET /MyDemoWeb/head.jsp HTTP/1.1" 200 713
13      * 返回:(hadoop.jsp,对应的日志),相当于WordCount中的<k2 v2>
14      */
15
16     val rdd1 = sc.textFile("G:\K\TZ-Bigdata\讲义\1101-Spark案例分析\代码\localhost_access_log.2017-07-30.txt")
17       .map(line => {
18       //解析字符串,找到jsp的名字
19       //得到双引号位置
20       val index1 = line.indexOf(""")
21       val index2 = line.lastIndexOf(""")
22       val line1 = line.substring(index1+1,index2) // 得到 GET /MyDemoWeb/head.jsp HTTP/1.1
23
24       //得到两个空格位置
25       val index3 = line1.indexOf(" ")
26       val index4 = line1.lastIndexOf(" ")
27       val line2 = line1.substring(index3+1,index4) // 得到 /MyDemoWeb/head.jsp
28
29       //得到jsp的名字
30       val jspName = line2.substring(line2.lastIndexOf("/") + 1)
31
32       //返回(jsp的名字,访问日志)
33       (jspName,line)
34     })
35
36     //得到不重复的jsp名字,创建分区规则
37     val rdd2 = rdd1.map(_._1).distinct().collect()
38
39     //创建分区规则
40     val myPartitioner = new MyWebPartitioner(rdd2)
41
42     //对rdd1进行分区
43     val rdd3 = rdd1.partitionBy(myPartitioner)
44
45     //输出
46     rdd3.saveAsTextFile("G:\K\TZ-Bigdata\讲义\1101-Spark案例分析\output")
47
48     sc.stop()
49   }
50 }
51
52 //根据jsp名字,创建分区规则
53 class MyWebPartitioner(jspList:Array[String]) extends Partitioner{
54   //定义集合保存分区条件
55   //String:jsp的名字 Int:对应的分区号
56   val partitionMap = new HashMap[String,Int]()
57
58   var partID = 0
59   for(jsp <- jspList){
60     partitionMap.put(jsp,partID)
61     partID += 1
62   }
63   //实现抽象方法
64   //返回有多少分区
65   override def numPartitions:Int = partitionMap.size
66
67   //根据jsp的名字key,查找对应的分区号
68   override def getPartition(key: Any):Int = {
69     partitionMap.getOrElse(key.toString,0)
70   }
71 }


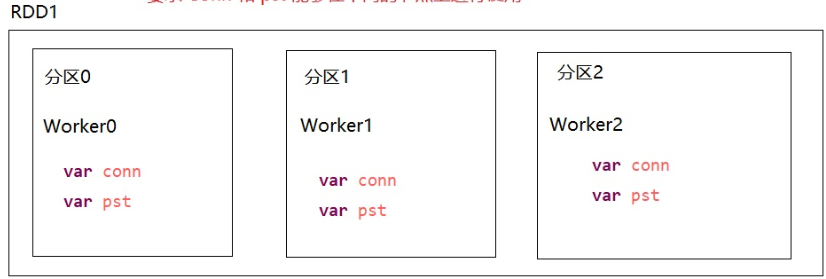
- 操作数据库(把结果存入MySQL)
- 对分区进行操作
- conn和pst在不同的分区(节点)上进行使用
 1 package day0611
 2
 3 import org.apache.spark.SparkConf
 4 import org.apache.spark.SparkContext
 5 import java.sql.DriverManager
 6
 7 object MyTomcatLogCountToMysql {
 8
 9   def main(args: Array[String]): Unit = {
10
11     val conf = new SparkConf().setMaster("local").setAppName("MyTomcatLogCountToMysql")
12     val sc = new SparkContext(conf)
13
14     val rdd1 = sc.textFile("G:\K\TZ-Bigdata\讲义\1101-Spark案例分析\代码\localhost_access_log.2017-07-30.txt")
15       .map(
16         line => {
17           //解析字符串 找到jsp名字
18           //得到两个双引号之间的东西  GET /MyDemoWeb/hadoop.jsp HTTP/1.1
19           val index1 = line.indexOf(""")
20           val index2 = line.lastIndexOf(""")
21           val line1 = line.substring(index1 + 1, index2)
22           //得到两个空格之间的东西 /MyDemoWeb/hadoop.jsp
23           val index3 = line1.indexOf(" ")
24           val index4 = line1.lastIndexOf(" ")
25           val line2 = line1.substring(index3 + 1, index4)
26           //得到jsp名字
27           val jspName = line2.substring(line2.lastIndexOf("/") + 1)
28
29           (jspName, 1)
30         })
31
32     //        var conn = DriverManager.getConnection("jdbc:mysql://localhost:3306/company?serverTimezone=UTC&characterEncoding=utf-8", "root", "123456")
33     //        var pst = conn.prepareStatement("insert into mydata values(?,?)")
34     //
35     //        rdd1.foreach(f => {
36     //        pst.setString(1, f._1)
37     //        pst.setInt(2,f._2)
38     //        pst.executeUpdate()
39     //     })
40
41     //  上述代码直接运行时报错:Task not serializable
42     //  因为 conn 和 pst 没有序列化 即 不能再不同节点上进行传输
43     //
44
45     //    rdd1.foreach(f => {
46     //      var conn = DriverManager.getConnection("jdbc:mysql://localhost:3306/company?serverTimezone=UTC&characterEncoding=utf-8", "root", "Chen1227+")
47     //      var pst = conn.prepareStatement("insert into mydata values(?,?)")
48     //      pst.setString(1, f._1)
49     //      pst.setInt(2, f._2)
50     //      pst.executeUpdate()
51     //    })
52
53
54     //     上述代码可直接运行 相当于在本地新建连接
55     //     每条数据都创建Connection和PreparedStatement
56     //     缺点:频繁操作数据库 对数据库压力很大
57
58
59     //第二种修改方式,针对分区进行操作,每个分区创建一个conn 和 pst
60     //参数要求 (f: Iterator[(String, Int)] => Unit): Unit
61     //相当于 对 rdd1 中每个分区都调用 saveToMysql 函数
62     rdd1.foreachPartition(saveToMysql)
63     sc.stop()
64   }
65     //
66     //  }
67
68     //  //定义一个函数 针对分区进行操作
69       def saveToMysql(it: Iterator[(String, Int)]) {
70         //it保存的是一个分区的数据
71         var conn = DriverManager.getConnection("jdbc:mysql://localhost:3306/company?serverTimezone=UTC&characterEncoding=utf-8", "root", "Chen1227+")
72         var pst = conn.prepareStatement("insert into mydata values(?,?)")
73
74         it.foreach(f => {
75           pst.setString(1, f._1)
76           pst.setInt(2, f._2)
77           pst.executeUpdate()
78         })
79       }
80
81 }
参考
RDD算子文档
http://homepage.cs.latrobe.edu.au/zhe/ZhenHeSparkRDDAPIExamples.html