cobbler |
1、首先准备好一台虚拟机
2、给虚拟机添加一块网卡,并设置成仅主机模式

部署 |
1.查看版本信息
cat /etc/redhat-release

2.配置网络yum源
将原来的网络yum源移动到一个文件夹中,重新配置网络yum源

下面是ali.repo 中的内容
[epel]
name=epel
enabled=1
gpgcheck=0
baseurl=https://mirrors.aliyun.com/epel/7/x86_64/

[centos]
name=centos base
enabled=1
gpgcheck=0
baseurl=http://mirrors.163.com/centos/7/os/x86_64/
下载:yum install cobbler dhcp tftp-server xinetd syslinux httpd pykickstart -y
3.配置dhcp:
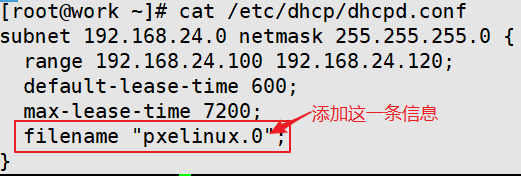
注意:其中的192.168.24.0是仅主机模式下的ip
重启dhcpd:systemctl restart dhcpd
设置开机自启:systemctl enable dhcpd
4.修改tftp:vim /etc/xinetd.d/tftp
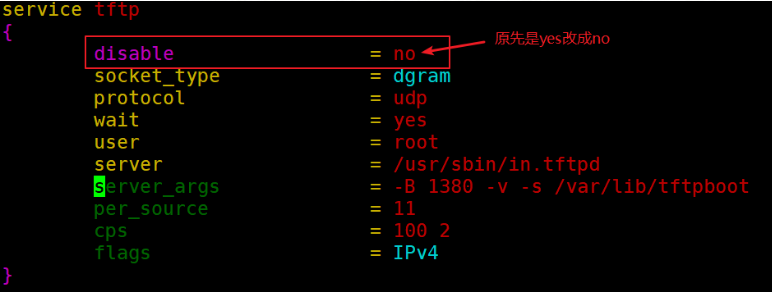
重启xinetd服务:systemctl restart xinetd
设置开机启动:systemctl enable xinetd.service
5.配置cobbler:
1、先启动httpd:systemctl restart httpd
2、cobbler check
[root@work cobbler]# cobbler check
The following are potential configuration items that you may want to fix:

1 : The 'server' field in /etc/cobbler/settings must be set to something other than localhost, or kickstarting featurt work.  This should be a resolvable hostname or IP for
the boot server as reachable by all machines that will use it
2 : For PXE to be functional, the 'next_server' field in /etc/cobbler/settings must be set to something other than 12nd should match the IP of the boot server on the PXE
network.
3 : Some network boot-loaders are missing from /var/lib/cobbler/loaders, you may run 'cobbler get-loaders' to downloa, if you only want to handle x86/x86_64 netbooting,
you may ensure that you have installed a *recent* version of the ackage installed and can ignore this message entirely.  Files in this directory, should you want to support
all archishould include pxelinux.0, menu.c32, elilo.efi, and yaboot. The 'cobbler get-loaders' command is the easiest way to rse requirements.
4 : enable and start rsyncd.service with systemctl
5 : debmirror package is not installed, it will be required to manage debian deployments and repositories
6 : The default password used by the sample templates for newly installed machines (default_password_crypted in /etc/ttings) is still set to 'cobbler' and should be changed,
try: "openssl passwd -1 -salt 'random-phrase-here' 'your-pas'" to generate new one
7 : fencing tools were not found, and are required to use the (optional) power management features. install cman or fs to use them

Restart cobblerd and then run 'cobbler sync' to apply changes.
问题一:cobbler文件默认是127.0.0.1本地回环地址,需要更改为提供cobbler服务的ip地址 192.168.24.137
sed i 's/server: 127.0.0.1/server: 192.168.24.137/g' /etc/cobbler/settings
问题二:netx_server也是默认本地127.0.0.1回环地址,需要修改为提供cobbler服务的ip地址 192.168.24.137
sed i 's/next_server: 127.0.0.1/next_server: 192.168.24.137/g' /etc/cobbler/settings
问题三:忽略
问题四:启动rsync即可
  systemctl restart rsyncd
  systemctl enable rsyncd
问题五:忽略
问题六:更改密码,并把新生成的加密数据填写进
/etc/cobbler/settings openssl passwd -1 -salt "123" "123"
将得到的加密密码复制:vim /etc/cobbler/settings

问题7:忽略
解决完问题之后我们需要重启cobbler服务:
service cobblerd restart
进行同步 cobbler sync
检查是否更改完成,下图表示完成

6、挂载光盘并进行导入
-
- mount /dev/cdrom /mnt 数据导入 (可能这需要一会时间,可以另开一个窗口,执行下面的操作)
- cobbler import --path=/mnt --name=centos7.3
7、准备ks文件
1、cp anaconda-ks.cfg /var/lib/cobbler/kickstarts/ks.cfg
2、vim /var/lib/cobbler/kickstarts/ks.cfg

注意:其中ip是仅主机模式的ip地址,后面的路径是 在/var/www/cobbler/ks_mirror/centos7.3/
8、自定义profile

cobbler profile add --distro="centos7.3-x86_64" -name="centos7.3_chen" --kickstart=/var/lib/cobbler/kickstarts/ks.cfg
cobbler sync

这就安装成功啦 (注意:在这里我把centos7.3-x86_64删除了)
你可以用cobbler profile remove -name="centos7.3-x86_64"
为了保证实验的成功率,你可以在重启一下服务
- systemctl restart cobblerd
- systemctl restart httpd
- systemctl restart dhcpd
- systemctl restart xinetd
测试 |
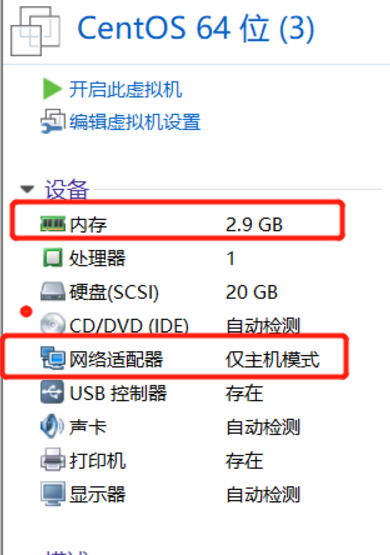
打开一个未装系统的虚拟机,将网卡设置成仅主机模式,同时内存最好调整为3G
选择下面的镜像就ok啦

