上篇见:Spring Cloud Alibaba 简介(上) - Chen洋 - 博客园 (cnblogs.com)
中篇见:Spring Cloud Alibaba 简介(中) - Chen洋 - 博客园 (cnblogs.com)
8.Spring Cloud Alibaba 熔断器仪表盘监控
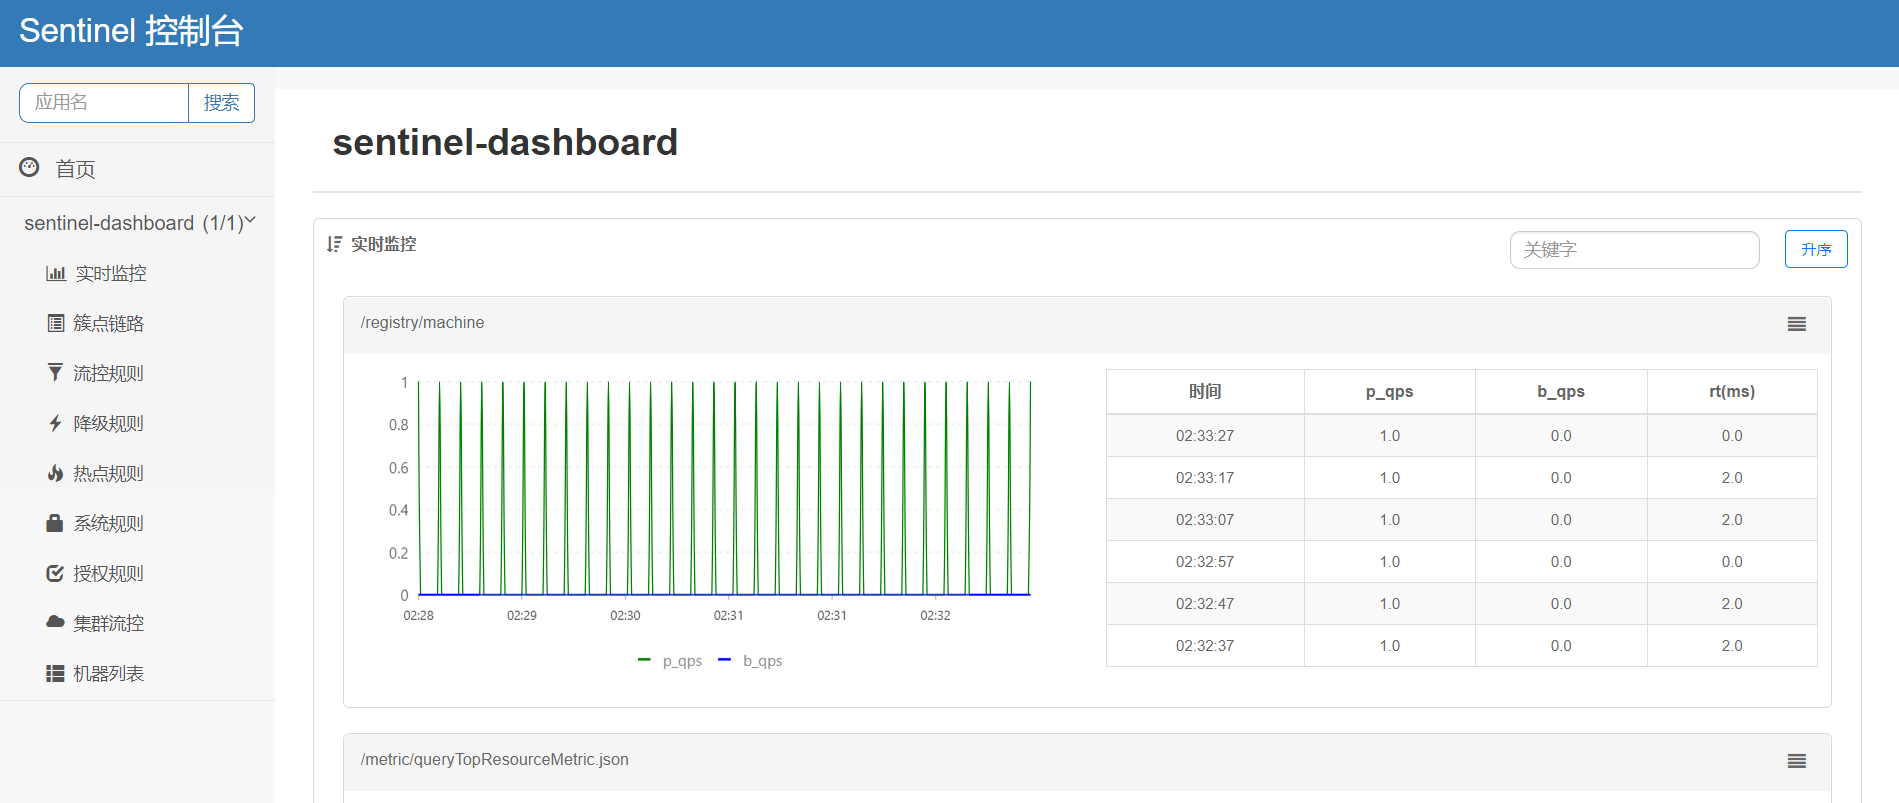
Sentinel 控制台
Sentinel 控制台提供一个轻量级的控制台,它提供机器发现、单机资源实时监控、集群资源汇总,以及规则管理的功能。您只需要对应用进行简单的配置,就可以使用这些功能。
注意: 集群资源汇总仅支持 500 台以下的应用集群,有大概 1 - 2 秒的延时。如果想支持更多的集群,那就部署两个Sentinel喽
下载并打包
# 下载源码
git clone https://github.com/alibaba/Sentinel.git

# 编译打包
mvn clean package
注:下载依赖时间较长,请耐心等待...
启动控制台
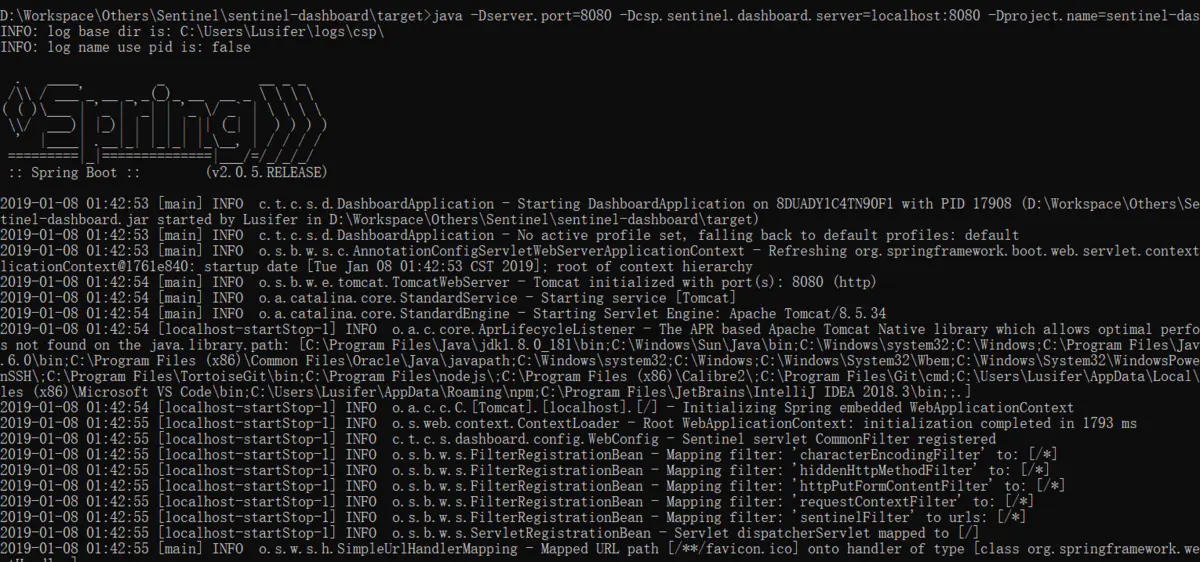
Sentinel 控制台是一个标准的 SpringBoot 应用,以 SpringBoot 的方式运行 jar 包即可。
cd sentinel-dashboard	arget
java -Dserver.port=8080 -Dcsp.sentinel.dashboard.server=localhost:8080 -Dproject.name=sentinel-dashboard -jar sentinel-dashboard.jar
如果8080端口冲突请修改-Dserver.port=自定义端口号
访问服务
打开浏览器访问:http://localhost:8080/#/dashboard/home

配置控制台信息
application.yml 配置文件中增加如下配置:
spring:
  cloud:
    sentinel:
      transport:
        port: 8719
        dashboard: localhost:8080
这里的 spring.cloud.sentinel.transport.port 端口配置会在应用对应的机器上启动一个 Http Server,该 Server 会与 Sentinel 控制台做交互。比如 Sentinel 控制台添加了 1 个限流规则,会把规则数据 push 给这个 Http Server 接收,Http Server 再将规则注册到 Sentinel 中。
测试 Sentinel
使用之前的 Feign 客户端,application.yml 完整配置如下:
spring:
  application:
    name: nacos-consumer-feign
  cloud:
    nacos:
      discovery:
        server-addr: 127.0.0.1:8848
    sentinel:
      transport:
        port: 8720
        dashboard: localhost:8080

server:
  port: 9092

feign:
  sentinel:
    enabled: true

management:
  endpoints:
    web:
      exposure:
        include: "*"
注:由于 8719 端口已被 sentinel-dashboard 占用,故这里修改端口号为 8720;不修改也能注册,会自动帮你在端口号上 + 1;
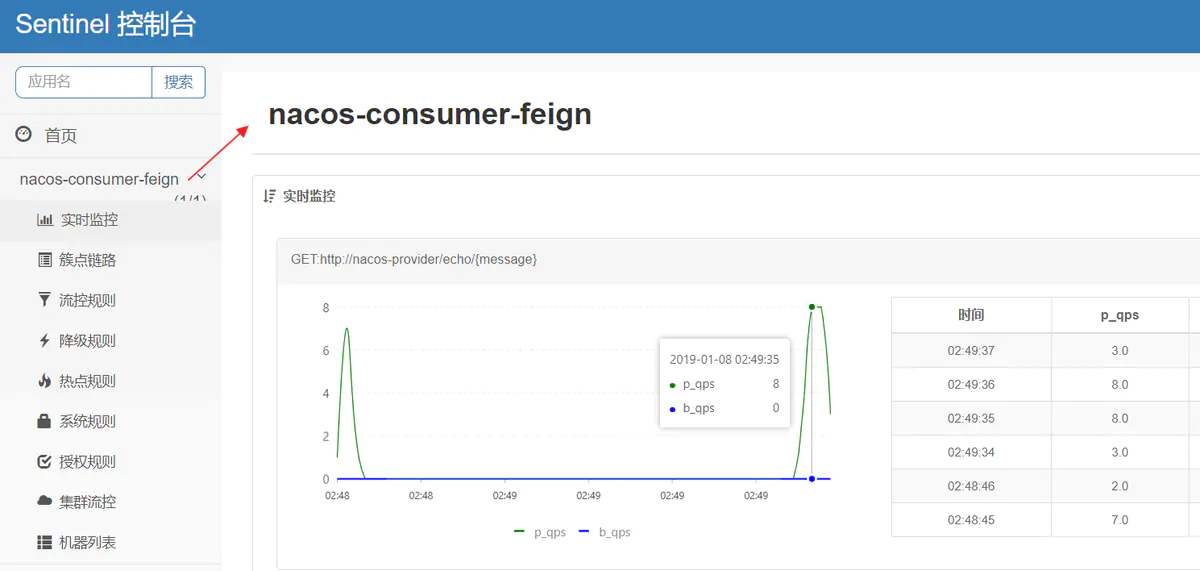
打开浏览器访问:http://localhost:8080/#/dashboard/home
此时会多一个名为 nacos-consumer-feign 的服务
9.Spring Cloud Alibaba 路由网关(Gateway)
路由网关统一访问接口
什么是 Spring Cloud Gateway
Spring Cloud Gateway 是 Spring 官方基于 Spring 5.0,Spring Boot 2.0 和 Project Reactor 等技术开发的网关,Spring Cloud Gateway 旨在为微服务架构提供一种简单而有效的统一的 API 路由管理方式。Spring Cloud Gateway 作为 Spring Cloud 生态系中的网关,目标是替代 Netflix ZUUL,其不仅提供统一的路由方式,并且基于 Filter 链的方式提供了网关基本的功能,例如:安全,监控/埋点,和限流等。

Spring Cloud Gateway 功能特征
- 基于 Spring Framework 5,Project Reactor 和 Spring Boot 2.0
- 动态路由
- Predicates 和 Filters 作用于特定路由
- 集成 Hystrix 断路器
- 集成 Spring Cloud DiscoveryClient
- 易于编写的 Predicates 和 Filters
- 限流
- 路径重写
Spring Cloud Gateway 工程流程
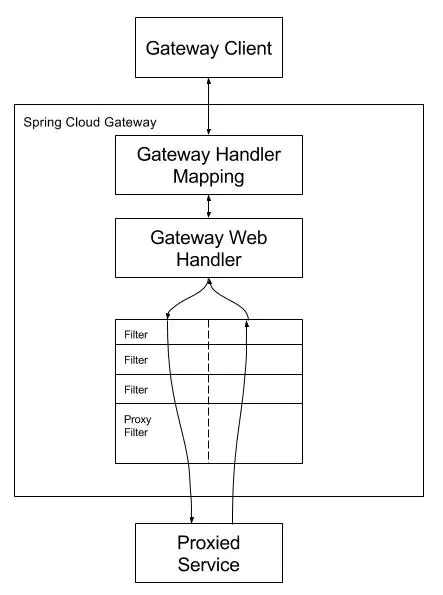
客户端向 Spring Cloud Gateway 发出请求。然后在 Gateway Handler Mapping 中找到与请求相匹配的路由,将其发送到 Gateway Web Handler。Handler 再通过指定的过滤器链来将请求发送到我们实际的服务执行业务逻辑,然后返回。
过滤器之间用虚线分开是因为过滤器可能会在发送代理请求之前(pre)或之后(post)执行业务逻辑。
POM
<?xml version="1.0" encoding="UTF-8"?>
<project xmlns="http://maven.apache.org/POM/4.0.0" xmlns:xsi="http://www.w3.org/2001/XMLSchema-instance"
         xsi:schemaLocation="http://maven.apache.org/POM/4.0.0 http://maven.apache.org/xsd/maven-4.0.0.xsd">
    <modelVersion>4.0.0</modelVersion>
    <parent>
        <groupId>com.wsl</groupId>
        <artifactId>hello-spring-cloud-alibaba-dependencies</artifactId>
        <version>1.0.0-SNAPSHOT</version>
        <relativePath>../hello-spring-cloud-alibaba-dependencies/pom.xml</relativePath>
    </parent>

    <artifactId>hello-spring-cloud-gateway</artifactId>
    <packaging>jar</packaging>

    <name>hello-spring-cloud-gateway</name>

    <dependencies>
        <!-- Spring Boot Begin -->
        <dependency>
            <groupId>org.springframework.boot</groupId>
            <artifactId>spring-boot-starter-actuator</artifactId>
        </dependency>
        <dependency>
            <groupId>org.springframework.boot</groupId>
            <artifactId>spring-boot-starter-test</artifactId>
            <scope>test</scope>
        </dependency>
        <!-- Spring Boot End -->

        <!-- Spring Cloud Begin -->
        <dependency>
            <groupId>com.alibaba.cloud</groupId>
            <artifactId>spring-cloud-starter-alibaba-nacos-discovery</artifactId>
        </dependency>
        <dependency>
            <groupId>com.alibaba.cloud</groupId>
            <artifactId>spring-cloud-starter-alibaba-sentinel</artifactId>
        </dependency>
        <dependency>
            <groupId>org.springframework.cloud</groupId>
            <artifactId>spring-cloud-starter-openfeign</artifactId>
        </dependency>
        <dependency>
            <groupId>org.springframework.cloud</groupId>
            <artifactId>spring-cloud-starter-gateway</artifactId>
        </dependency>
        <dependency>
            <groupId>com.alibaba.cloud</groupId>
            <artifactId>spring-cloud-starter-alibaba-nacos-config</artifactId>
        </dependency>
        <!-- Spring Cloud End -->

        <!-- Commons Begin -->
        <dependency>
            <groupId>javax.servlet</groupId>
            <artifactId>javax.servlet-api</artifactId>
        </dependency>
        <!-- Commons Begin -->
    </dependencies>

    <build>
        <plugins>
            <plugin>
                <groupId>org.springframework.boot</groupId>
                <artifactId>spring-boot-maven-plugin</artifactId>
                <configuration>
                    <mainClass>com.wsl.hello.gateway.GatewayApplication</mainClass>
                </configuration>
            </plugin>
        </plugins>
    </build>

</project>
主要增加了 org.springframework.cloud:spring-cloud-starter-gateway 依赖
Application
package com.wsl.hello.gateway;

import org.springframework.boot.SpringApplication;
import org.springframework.boot.autoconfigure.SpringBootApplication;
import org.springframework.cloud.client.discovery.EnableDiscoveryClient;
import org.springframework.cloud.openfeign.EnableFeignClients;

@SpringBootApplication
@EnableDiscoveryClient
@EnableFeignClients
public class GatewayApplication {
    public static void main(String[] args) {
        SpringApplication.run(GatewayApplication.class, args);
    }
}
application.yml
spring:
  application:
    # 应用名称
    name: spring-gateway
  cloud:
    # 使用 Naoos 作为服务注册发现
    nacos:
      discovery:
        server-addr: 127.0.0.1:8848
    # 使用 Sentinel 作为熔断器
    sentinel:
      transport:
        port: 8721
        dashboard: localhost:8080
    # 路由网关配置
    gateway:
      # 设置与服务注册发现组件结合,这样可以采用服务名的路由策略
      discovery:
        locator:
          enabled: true
      # 配置路由规则
      routes:
        # 采用自定义路由 ID(有固定用法,不同的 id 有不同的功能,详见:https://cloud.spring.io/spring-cloud-gateway/2.0.x/single/spring-cloud-gateway.html#gateway-route-filters)
        - id: NACOS-CONSUMER
          # 采用 LoadBalanceClient 方式请求,以 lb:// 开头,后面的是注册在 Nacos 上的服务名
          uri: lb://nacos-consumer
          # Predicate 翻译过来是“谓词”的意思,必须,主要作用是匹配用户的请求,有很多种用法
          predicates:
            # Method 方法谓词,这里是匹配 GET 和 POST 请求
            - Method=GET,POST
        - id: NACOS-CONSUMER-FEIGN
          uri: lb://nacos-consumer-feign
          predicates:
            - Method=GET,POST

server:
  port: 9000

# 目前无效
feign:
  sentinel:
    enabled: true

# 目前无效
management:
  endpoints:
    web:
      exposure:
        include: "*"

# 配置日志级别,方别调试
logging:
  level:
    org.springframework.cloud.gateway: debug
注意:请仔细阅读注释
测试访问
依次运行 Nacos 服务:NacosProviderApplication、NacosConsumerApplication、NacosConsumerFeignApplication、GatewayApplication
打开浏览器访问:http://localhost:9000/nacos-consumer/test/app/name 浏览器显示
Hello Nacos Discovery nacos-consumer i am from port 8082
打开浏览器访问:http://localhost:9000/nacos-consumer-feign/test/hi 浏览器显示
Hello Nacos Discovery Hi Feign i am from port 8082
注意:请求方式是 http://路由网关IP:路由网关Port/服务名/
至此说明 Spring Cloud Gateway 的路由功能配置成功
10.Spring Cloud Alibaba 网关全局过滤
概述
全局过滤器作用于所有的路由,不需要单独配置,我们可以用它来实现很多统一化处理的业务需求,比如权限认证,IP 访问限制等等。
注意:截止2019年06月,Spring Cloud Gateway 正式版为 2.0.2 其文档并不完善,并且有些地方还要重新设计,这里仅提供一个基本的案例
详见:Spring Cloud Gateway Documentation
声明周期

Spring Cloud Gateway 基于 Project Reactor 和 WebFlux,采用响应式编程风格,打开它的 Filter 的接口 GlobalFilter 你会发现它只有一个方法 filter。
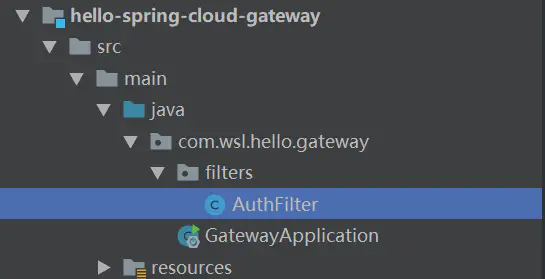
创建全局过滤器
实现 GlobalFilter, Ordered 接口并在类上增加 @Component 注解就可以使用过滤功能了,非常简单方便
package com.wsl.hello.gateway.filters;

import com.fasterxml.jackson.core.JsonProcessingException;
import com.fasterxml.jackson.databind.ObjectMapper;
import com.google.common.collect.Maps;
import org.springframework.cloud.gateway.filter.GatewayFilterChain;
import org.springframework.cloud.gateway.filter.GlobalFilter;
import org.springframework.core.Ordered;
import org.springframework.core.io.buffer.DataBuffer;
import org.springframework.http.HttpStatus;
import org.springframework.http.server.reactive.ServerHttpResponse;
import org.springframework.stereotype.Component;
import org.springframework.web.server.ServerWebExchange;
import reactor.core.publisher.Mono;

import java.util.Map;

/**
 * 鉴权过滤器
 */
@Component
public class AuthFilter implements GlobalFilter, Ordered {
    @Override
    public Mono<Void> filter(ServerWebExchange exchange, GatewayFilterChain chain) {
        String token = exchange.getRequest().getQueryParams().getFirst("token");

        if (token == null || token.isEmpty()) {
            ServerHttpResponse response = exchange.getResponse();

            // 封装错误信息
            Map<String, Object> responseData = Maps.newHashMap();
            responseData.put("code", 401);
            responseData.put("message", "非法请求");
            responseData.put("cause", "Token is empty");

            try {
                // 将信息转换为 JSON
                ObjectMapper objectMapper = new ObjectMapper();
                byte[] data = objectMapper.writeValueAsBytes(responseData);

                // 输出错误信息到页面
                DataBuffer buffer = response.bufferFactory().wrap(data);
                response.setStatusCode(HttpStatus.UNAUTHORIZED);
                response.getHeaders().add("Content-Type", "application/json;charset=UTF-8");
                return response.writeWith(Mono.just(buffer));
            } catch (JsonProcessingException e) {
                e.printStackTrace();
            }
        }
        return chain.filter(exchange);
    }

    /**
     * 设置过滤器的执行顺序
     *
     * @return
     */
    @Override
    public int getOrder() {
        return Ordered.LOWEST_PRECEDENCE;
    }
}
测试过滤器
浏览器访问:http://localhost:9000/nacos-consumer/test/app/name 网页显示
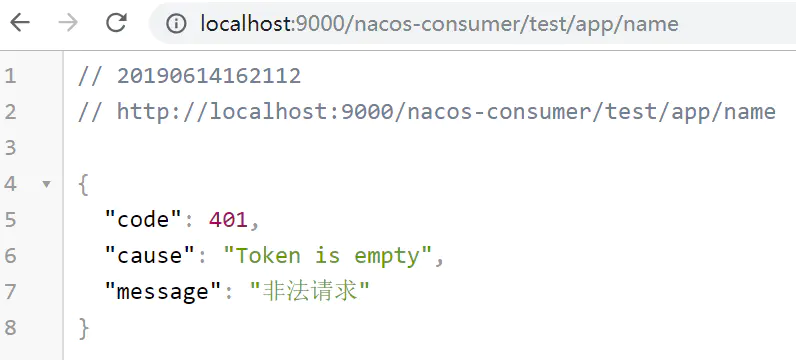
浏览器访问:http://localhost:9000/nacos-consumer/test/app/name?token=123456 网页显示
Hello Nacos Discovery nacos-consumer i am from port 8082

附:Spring Cloud Gateway Benchmark
Spring 官方人员提供的网关基准测试报告 GitHub
| Proxy | Avg Latency | Avg Req/Sec/Thread |
|---|---|---|
| gateway | 6.61ms | 3.24k |
| linkered | 7.62ms | 2.82k |
| zuul | 12.56ms | 2.09k |
| none | 2.09ms | 11.77k |
说明
- 这里的 Zuul 为 1.x 版本,是一个基于阻塞 IO 的 API Gateway
- Zuul 已经发布了 Zuul 2.x,基于 Netty,非阻塞的,支持长连接,但 Spring Cloud 暂时还没有整合计划
- Linkerd 基于 Scala 实现的、目前市面上仅有的生产级别的 Service Mesh(其他诸如 Istio、Conduit 暂时还不能用于生产)。
11.Spring Cloud Alibaba 服务配置
Nacos Config 服务端初始化
分布式配置中心
在分布式系统中,由于服务数量巨多,为了方便服务配置文件统一管理,实时更新,所以需要分布式配置中心组件。
Nacos Config
Nacos 提供用于存储配置和其他元数据的 key/value 存储,为分布式系统中的外部化配置提供服务器端和客户端支持。使用 Spring Cloud Alibaba Nacos Config,您可以在 Nacos Server 集中管理你 Spring Cloud 应用的外部属性配置。
Spring Cloud Alibaba Nacos Config 是 Spring Cloud Config Server 和 Client 的替代方案,客户端和服务器上的概念与 Spring Environment 和 PropertySource 有着一致的抽象,在特殊的 bootstrap 阶段,配置被加载到 Spring 环境中。当应用程序通过部署管道从开发到测试再到生产时,您可以管理这些环境之间的配置,并确保应用程序具有迁移时需要运行的所有内容。
创建配置文件
需要在 Nacos Server 中创建配置文件,我们依然采用 YAML 的方式部署配置文件,操作流程如下:
- 浏览器打开
http://localhost:8848/nacos,访问 Nacos Serve
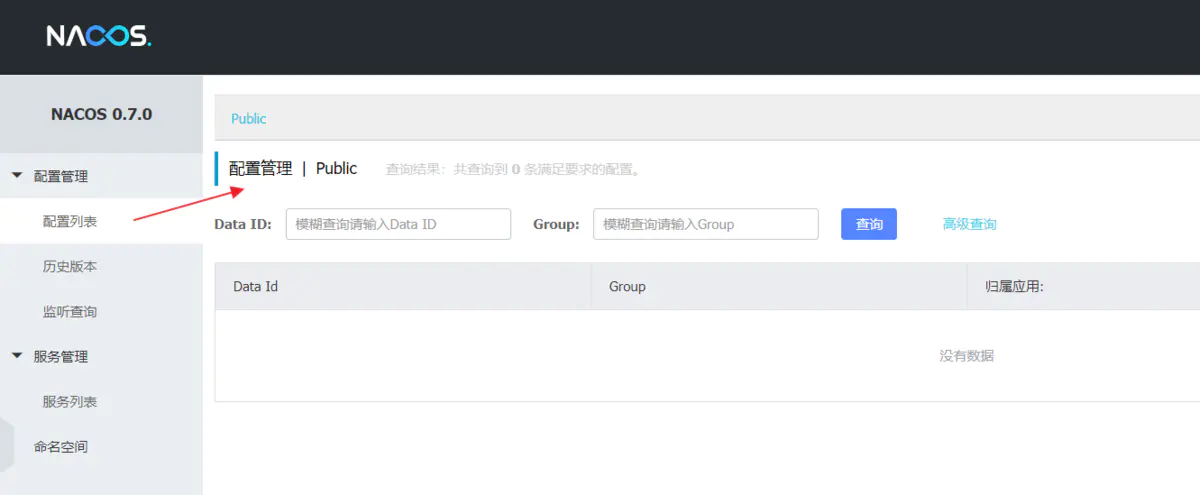
- 新建配置文件,此处我们以之前创建的 服务提供者 项目为例


注意:Data ID 的默认扩展名为 .properties ,希望使用 YAML 配置,此处必须指明是 .yaml
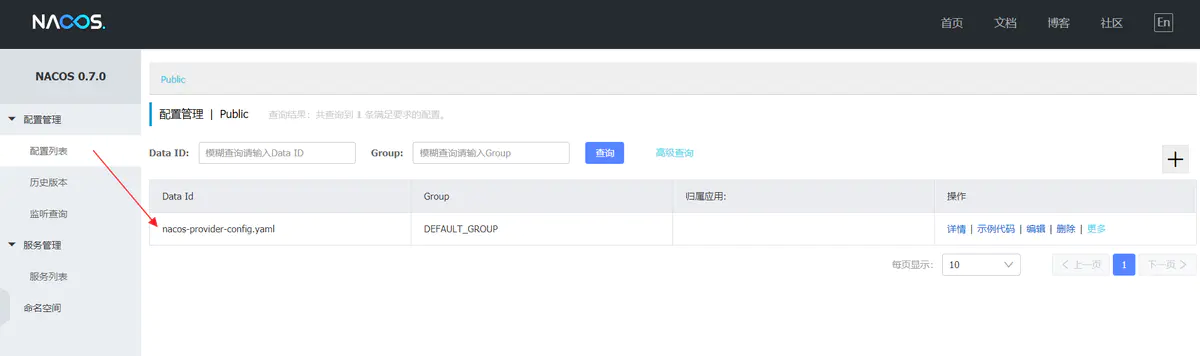
- 发布成功后在 “配置列表” 一栏即可看到刚才创建的配置项
Nacos Config 客户端的使用
POM
此处我们以之前创建的 服务提供者 项目为例
在 pom.xml 中增加 org.springframework.cloud:spring-cloud-starter-alibaba-nacos-config 依赖
<dependency>
    <groupId>org.springframework.cloud</groupId>
    <artifactId>spring-cloud-starter-alibaba-nacos-config</artifactId>
</dependency>
完整的 pom.xml 如下:
<?xml version="1.0" encoding="UTF-8"?>
<project xmlns="http://maven.apache.org/POM/4.0.0" xmlns:xsi="http://www.w3.org/2001/XMLSchema-instance"
         xsi:schemaLocation="http://maven.apache.org/POM/4.0.0 http://maven.apache.org/xsd/maven-4.0.0.xsd">
    <modelVersion>4.0.0</modelVersion>

    <parent>
        <groupId>com.wsl</groupId>
        <artifactId>hello-spring-cloud-alibaba-dependencies</artifactId>
        <version>1.0.0-SNAPSHOT</version>
        <relativePath>../hello-spring-cloud-alibaba-dependencies/pom.xml</relativePath>
    </parent>

    <artifactId>hello-spring-cloud-alibaba-nacos-provider</artifactId>
    <packaging>jar</packaging>

    <name>hello-spring-cloud-alibaba-nacos-provider</name>

    <dependencies>
        <!-- Spring Boot Begin -->
        <dependency>
            <groupId>org.springframework.boot</groupId>
            <artifactId>spring-boot-starter-web</artifactId>
        </dependency>
        <dependency>
            <groupId>org.springframework.boot</groupId>
            <artifactId>spring-boot-starter-actuator</artifactId>
        </dependency>
        <dependency>
            <groupId>org.springframework.boot</groupId>
            <artifactId>spring-boot-starter-test</artifactId>
            <scope>test</scope>
        </dependency>
        <!-- Spring Boot End -->

        <!-- Spring Cloud Begin -->
        <dependency>
            <groupId>org.springframework.cloud</groupId>
            <artifactId>spring-cloud-starter-alibaba-nacos-discovery</artifactId>
        </dependency>
        <dependency>
            <groupId>org.springframework.cloud</groupId>
            <artifactId>spring-cloud-starter-alibaba-nacos-config</artifactId>
        </dependency>
        <!-- Spring Cloud End -->
    </dependencies>

    <build>
        <plugins>
            <plugin>
                <groupId>org.springframework.boot</groupId>
                <artifactId>spring-boot-maven-plugin</artifactId>
                <configuration>
                    <mainClass>com.wsl.hello.provider.NacosProviderApplication</mainClass>
                </configuration>
            </plugin>
        </plugins>
    </build>
</project>
bootstrap.properties
创建名为 bootstrap.properties 的配置文件并删除之前创建的 application.yml 配置文件,由于已经在服务端配置,此处不再赘述
# 这里的应用名对应 Nacos Config 中的 Data ID,实际应用名称以配置中心的配置为准
spring.application.name=nacos-provider-config
# 指定查找名为 nacos-provider-config.yaml 的配置文件
spring.cloud.nacos.config.file-extension=yaml
# Nacos Server 的地址
spring.cloud.nacos.config.server-addr=127.0.0.1:8848
注意:在之前的 Spring Cloud Netflix 课程中有提到过 Spring Boot 配置文件的加载顺序,依次为 bootstrap.properties -> bootstrap.yml -> application.properties -> application.yml ,其中 bootstrap.properties 配置为最高优先级
启动应用程序
启动应用后我们可以通过日志看到,已经成功加载到了配置文件

配置的动态更新
Nacos Config 也支持配置的动态更新,操作流程如下:
- 修改服务端配置,增加一个
user.name的属性
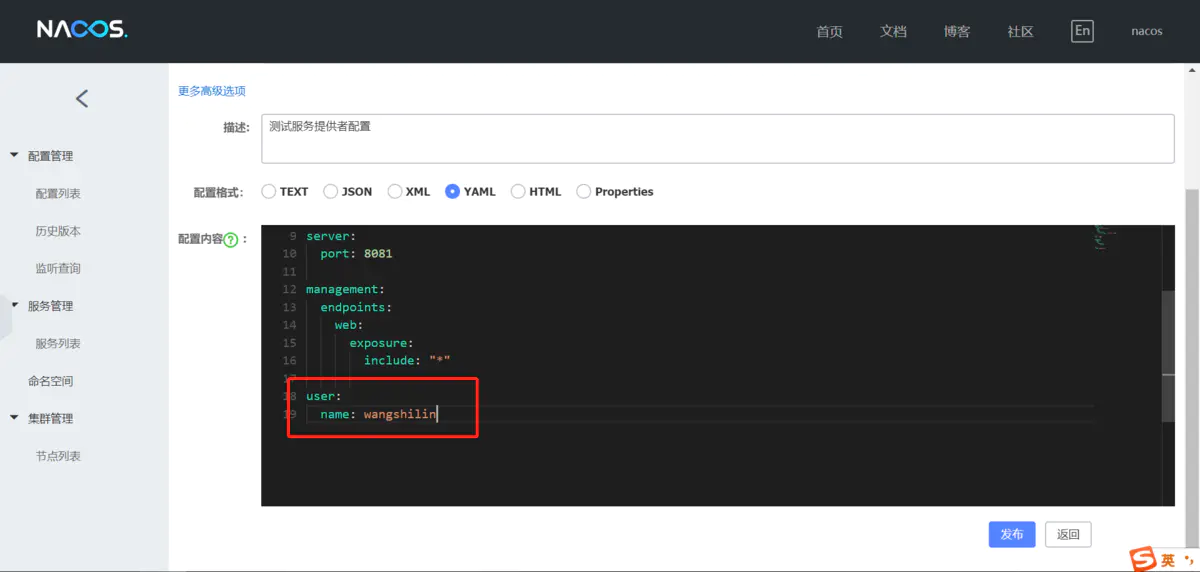
- 修改 Controller ,增加一个请求方法,测试配置更新效果
// 注入配置文件上下文
@Autowired
private ConfigurableApplicationContext applicationContext;

// 从上下文中读取配置
@GetMapping(value = "/hi")
public String sayHi() {
    return "Hello " + applicationContext.getEnvironment().getProperty("user.name");
}
- 通过浏览器访问该接口,浏览器显示
Hello wangshilin
修改服务端配置

此时观察控制台日志,你会发现我们已经成功刷新了配置

- 刷新浏览器,浏览器显示
Hello wangshilin1
注意:你可以使用 spring.cloud.nacos.config.refresh.enabled=false 来关闭动态刷新
Nacos Config 多环境的配置
Spring Boot Profile
我们在做项目开发的时候,生产环境和测试环境的一些配置可能会不一样,有时候一些功能也可能会不一样,所以我们可能会在上线的时候手工修改这些配置信息。但是 Spring 中为我们提供了 Profile 这个功能。我们只需要在启动的时候添加一个虚拟机参数,激活自己环境所要用的 Profile 就可以了。
操作起来很简单,只需要为不同的环境编写专门的配置文件,如:application-dev.yml、application-prod.yml, 启动项目时只需要增加一个命令参数 --spring.profiles.active=环境配置 即可,启动命令如下:
java -jar hello-spring-cloud-alibaba-nacos-provider-1.0.0-SNAPSHOT.jar --spring.profiles.active=prod
Nacos Config Profile
spring-cloud-starter-alibaba-nacos-config 在加载配置的时候,不仅仅加载了以 dataid 为 ${spring.application.name}.${file-extension:properties} 为前缀的基础配置,还加载了 dataid 为 ${spring.application.name}-${profile}.${file-extension:properties} 的基础配置。在日常开发中如果遇到多套环境下的不同配置,可以通过 Spring 提供的 ${spring.profiles.active} 这个配置项来配置。
此处我们以之前创建的 服务提供者 项目为例
在 Nacos Server 中增加配置
增加一个名为 nacos-provider-config-prod.yaml 的配置

注意:此时,我将配置文件中的端口由 8081 -> 8082
在项目中增加配置
增加一个名为 bootstrap-prod.properties 的配置文件,内容如下:
spring.profiles.active=prod
spring.application.name=nacos-provider-config
spring.cloud.nacos.config.file-extension=yaml
spring.cloud.nacos.config.server-addr=127.0.0.1:8848
主要增加了 spring.profiles.active=prod 配置,用于指定访问 Nacos Server 中的 nacos-provider-config-prod.yaml 配置
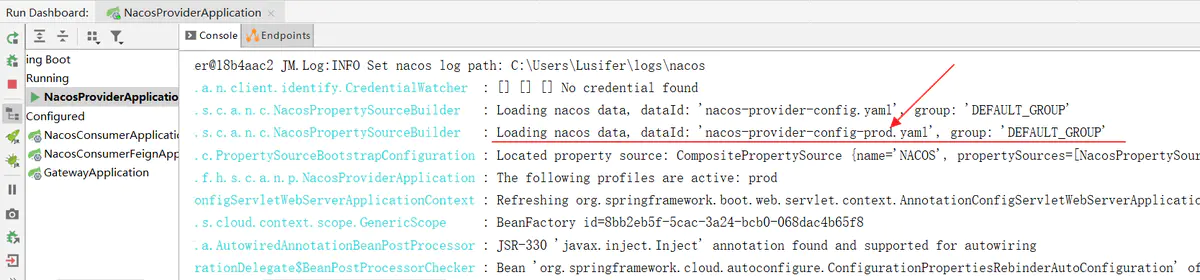
启动应用程序
此时我们有两个配置文件,分别为 bootstrap.properties 和 bootstrap-prod.properties ,我们需要指定启动时加载哪一个配置文件,操作流程如下:
Run->Edit Configurations..
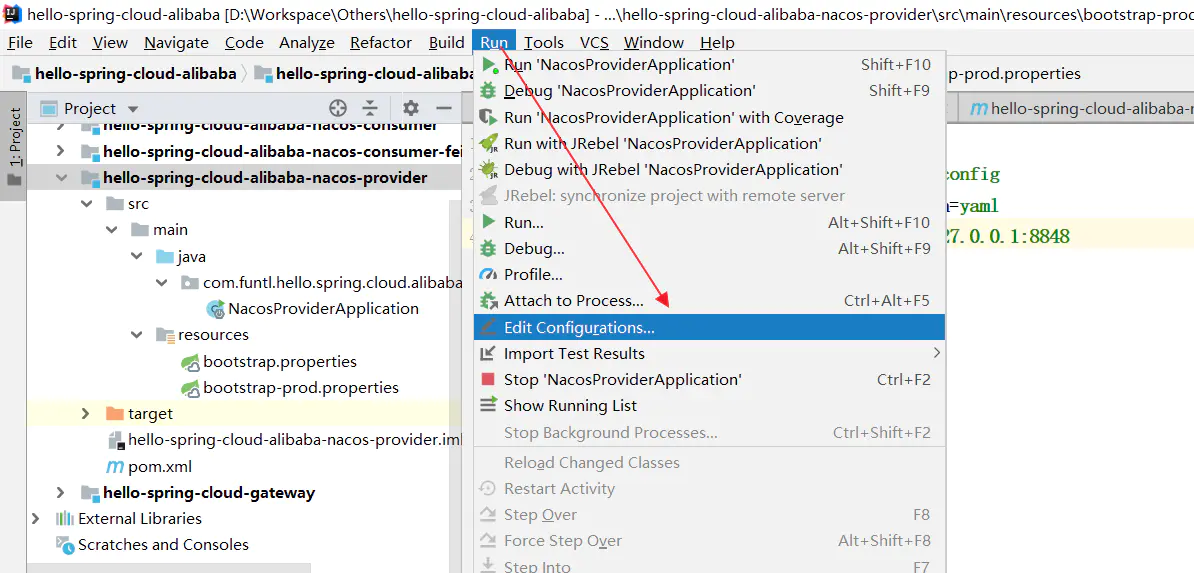
设置需要激活的配置

观察日志,判断是否成功加载配置