ListView
1.概念
(1)列表视图
(2)用来显示多个可滑动项列表的ViewGroup
(3)需要适配器Adapter将集合中数据和每一个Item所对应的布局动态适配到ListView中进行显示
2.适配器 Adaper
(1)API
(2)分类
3.监听器
 1 <?xml version="1.0" encoding="utf-8"?>
 2 <LinearLayout xmlns:android="http://schemas.android.com/apk/res/android"
 3     xmlns:tools="http://schemas.android.com/tools"
 4     android:layout_width="match_parent"
 5     android:layout_height="match_parent"
 6     android:paddingBottom="@dimen/activity_vertical_margin"
 7     android:paddingLeft="@dimen/activity_horizontal_margin"
 8     android:paddingRight="@dimen/activity_horizontal_margin"
 9     android:paddingTop="@dimen/activity_vertical_margin"
10     tools:context="com.hanqi.testapp2.TestActivity7">
11     <ListView
12         android:layout_width="match_parent"
13         android:layout_height="match_parent"
14         android:id="@+id/lv_1">
15
16     </ListView>
17
18 </LinearLayout>
1 <?xml version="1.0" encoding="utf-8"?>
2 <TextView xmlns:android="http://schemas.android.com/apk/res/android"
3         android:layout_width="match_parent"
4         android:layout_height="wrap_content"
5     android:textSize="20sp"
6     android:paddingTop="10dp"
7     android:paddingBottom="10dp"/>
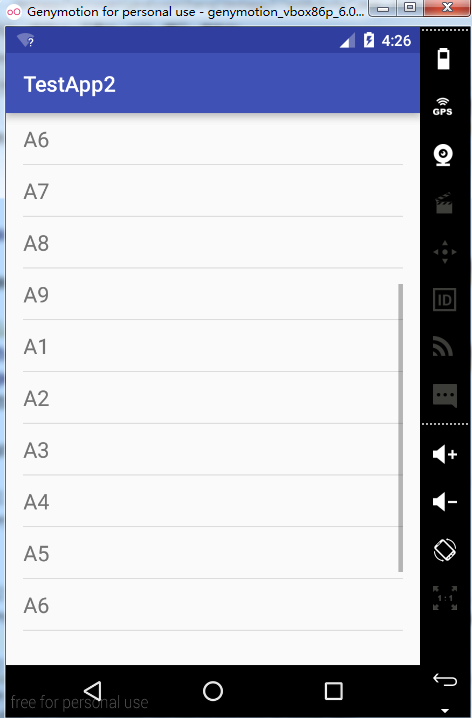
 1 package com.hanqi.testapp2;
 2
 3 import android.os.Bundle;
 4 import android.support.v7.app.AppCompatActivity;
 5 import android.widget.ArrayAdapter;
 6 import android.widget.ListView;
 7
 8 public class TestActivity7 extends AppCompatActivity {
 9
10     ListView lv_1;
11
12     @Override
13     protected void onCreate(Bundle savedInstanceState) {
14         super.onCreate(savedInstanceState);
15         setContentView(R.layout.activity_test7);
16
17         ListView lv_1=(ListView)findViewById(R.id.lv_1);
18
19         //1.数据集合  layout
20         String[]strings={"A1","A2","A3","A4","A5","A6","A7","A8","A9",
21                 "A1","A2","A3","A4","A5","A6","A7","A8","A9"};
22
23         //2.创建Adpter
24         ArrayAdapter<String> arrayAdapter=new ArrayAdapter<String>(this,R.layout.array_adapter,strings);
25
26         //3.绑定到LisView
27         lv_1.setAdapter(arrayAdapter);
28     }
29 }

 1 <?xml version="1.0" encoding="utf-8"?>
 2 <LinearLayout xmlns:android="http://schemas.android.com/apk/res/android"
 3     xmlns:tools="http://schemas.android.com/tools"
 4     android:layout_width="match_parent"
 5     android:layout_height="match_parent"
 6     android:paddingBottom="@dimen/activity_vertical_margin"
 7     android:paddingLeft="@dimen/activity_horizontal_margin"
 8     android:paddingRight="@dimen/activity_horizontal_margin"
 9     android:paddingTop="@dimen/activity_vertical_margin"
10     tools:context="com.hanqi.testapp2.TestActivity8">
11
12     <ListView
13         android:layout_width="match_parent"
14         android:layout_height="match_parent"
15         android:id="@+id/lv_2"></ListView>
16
17 </LinearLayout>
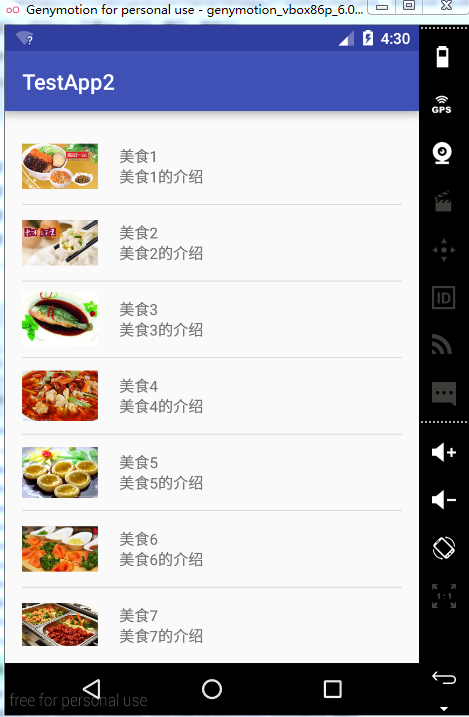
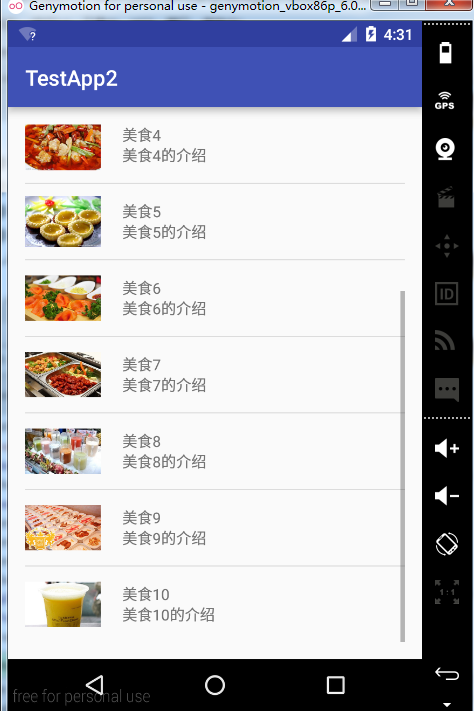
 1 <?xml version="1.0" encoding="utf-8"?>
 2 <LinearLayout xmlns:android="http://schemas.android.com/apk/res/android"
 3     android:orientation="horizontal"
 4     android:layout_width="match_parent"
 5     android:layout_height="match_parent">
 6
 7     <ImageView
 8         android:layout_width="70dp"
 9         android:layout_height="70dp"
10         android:src="@drawable/f1"
11         android:id="@+id/iv_2"/>
12     <LinearLayout
13         android:layout_width="0dp"
14         android:layout_height="match_parent"
15         android:layout_weight="1"
16         android:orientation="vertical"
17         android:layout_marginLeft="20dp"
18         android:gravity="center_vertical">
19
20         <TextView
21             android:layout_width="match_parent"
22             android:layout_height="wrap_content"
23             android:text="名字=aaa"
24             android:id="@+id/tv_7"/>
25         <TextView
26             android:layout_width="match_parent"
27             android:layout_height="wrap_content"
28             android:text="内容=aaa"
29             android:id="@+id/tv_8"/>
30
31     </LinearLayout>
32
33 </LinearLayout>
 1 package com.hanqi.testapp2;
 2
 3 import android.os.Bundle;
 4 import android.support.v7.app.AppCompatActivity;
 5 import android.widget.ListView;
 6 import android.widget.SimpleAdapter;
 7
 8 import java.util.ArrayList;
 9 import java.util.HashMap;
10 import java.util.List;
11 import java.util.Map;
12
13 public class TestActivity8 extends AppCompatActivity {
14
15     ListView lv_2;
16
17     @Override
18     protected void onCreate(Bundle savedInstanceState) {
19         super.onCreate(savedInstanceState);
20         setContentView(R.layout.activity_test8);
21
22         lv_2=(ListView)findViewById(R.id.lv_2);
23
24         //1.数据集合 layout
25
26         List<Map<String,Object>> lm=new ArrayList<Map<String, Object>>();
27
28         Map<String,Object> map = new HashMap<String,Object>();
29         map.put("img",R.drawable.f1);
30         map.put("name","美食1");
31         map.put("content", "美食1的介绍");
32         lm.add(map);
33
34         map = new HashMap<String,Object>();
35         map.put("img",R.drawable.f2);
36         map.put("name","美食2");
37         map.put("content", "美食2的介绍");
38         lm.add(map);
39
40         map = new HashMap<String,Object>();
41         map.put("img",R.drawable.f3);
42         map.put("name","美食3");
43         map.put("content", "美食3的介绍");
44         lm.add(map);
45
46         map = new HashMap<String,Object>();
47         map.put("img",R.drawable.f4);
48         map.put("name","美食4");
49         map.put("content", "美食4的介绍");
50         lm.add(map);
51
52         map = new HashMap<String,Object>();
53         map.put("img",R.drawable.f5);
54         map.put("name","美食5");
55         map.put("content", "美食5的介绍");
56         lm.add(map);
57
58         map = new HashMap<String,Object>();
59         map.put("img",R.drawable.f6);
60         map.put("name","美食6");
61         map.put("content", "美食6的介绍");
62         lm.add(map);
63
64         map = new HashMap<String,Object>();
65         map.put("img",R.drawable.f7);
66         map.put("name","美食7");
67         map.put("content", "美食7的介绍");
68         lm.add(map);
69
70         map = new HashMap<String,Object>();
71         map.put("img",R.drawable.f8);
72         map.put("name","美食8");
73         map.put("content", "美食8的介绍");
74         lm.add(map);
75
76         map = new HashMap<String,Object>();
77         map.put("img",R.drawable.f9);
78         map.put("name","美食9");
79         map.put("content", "美食9的介绍");
80         lm.add(map);
81
82         map = new HashMap<String,Object>();
83         map.put("img",R.drawable.f10);
84         map.put("name","美食10");
85         map.put("content", "美食10的介绍");
86         lm.add(map);
87
88         //数组 key的数组
89         String[]strings={"img","name","content"};
90         int[]ids={R.id.iv_2,R.id.tv_7,R.id.tv_8};
91
92         //2.创建Simpleadapter
93         SimpleAdapter simpleAdapter=new SimpleAdapter(this,lm,R.layout.simple_adapter,strings,ids);
94
95         lv_2.setAdapter(simpleAdapter);
96     }
97 }