一、在安装的时候配置网卡名称的参数
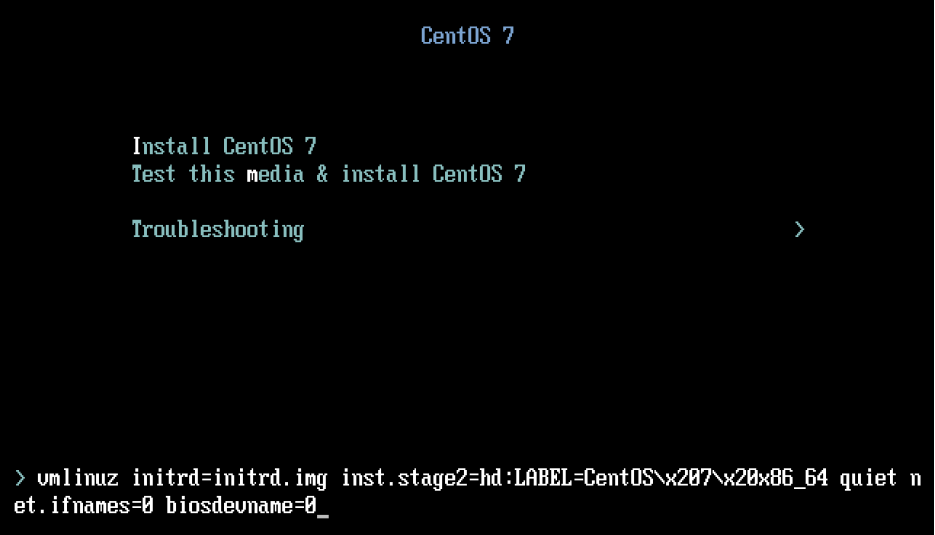
1. 选择“Install Centos 7”
2. 按Tab,打开kernel启动选项后,增加 net.ifnames=0 biosdevname=0
二、最小化安装完成之后必备安装软件
# 添加epel源,安装基础软件,设置主机名
rpm -ivh http://mirrors.aliyun.com/epel/epel-release-latest-7.noarch.rpm
yum install -y net-tools vim lrzsz tree screen lsof tcp wget tcpdump nc mtr nmap openssl-devel ntpdate
hostnamectl set-hostname linux-node1.example.com

# 关闭firewalld和NetworkManager
systemctl stop firewalld
systemctl stop NetworkManager
systemctl disable firewalld
systemctl disable NetworkManager

# 关闭selinux
setenforce 0
sed -i '/SELINUX/s/enforcing/disabled/' /etc/selinux/config

# 设置打开文件描述符的数量
echo "* hard nofile 65536" >> /etc/security/limits.conf
echo "* soft nofile 65536" >> /etc/security/limits.conf

# 设置记录历史命令的格式
echo 'export HISTTIMEFORMAT=" %F %T `whoami` "' >> /etc/profile
source /etc/profile

# 使用tables键的时候补全systemctl命令
yum install -y bash-completion

# 安装killall命令
yum install -y psmisc

# 时间同步,如果没有内网时间同步可以使用公网的
crontab -e
*/5 * * * * /usr/sbin/ntpdate time1.aliyun.com
三、内核参数优化
cat /etc/sysctl.conf

# 系统优化参数
# 关闭ipv6
net.ipv6.conf.all.disable_ipv6 = 1
net.ipv6.conf.default.disable_ipv6 = 1

# 避免放大攻击
net.ipv4.icmp_echo_ignore_broadcasts = 1

# 开启恶意icmp错误消息保护
net.ipv4.icmp_ignore_bogus_error_responses = 1

# 关闭路由转发
net.ipv4.ip_forward = 0
net.ipv4.conf.all.send_redirects = 0
net.ipv4.conf.default.send_redirects = 0

# 开启反向路径过滤
net.ipv4.conf.all.rp_filter = 1
net.ipv4.conf.default.rp_filter = 1

# 处理无源路由的包
net.ipv4.conf.all.accept_source_route = 0
net.ipv4.conf.default.accept_source_route = 0

#关闭sysrq功能
kernel.sysrq = 0

# core文件名中添加pid作为扩展名
kernel.core_uses_pid = 1

# 开启SYN洪水攻击保护
net.ipv4.tcp_syncookies = 1

# 修改消息队列长度
kernel.msgmnb = 65536
kernel.msgmax = 65536

# 设置最大内存共享段大小bytes
kernel.shmmax = 68719476736
kernel.shmall = 4294967296

# timewait的数量,默认180000
net.ipv4.tcp_max_tw_buckets = 6000
net.ipv4.tcp_sack = 1
net.ipv4.tcp_window_scaling = 1
net.ipv4.tcp_rmem = 4096        87380   4194304
net.ipv4.tcp_wmem = 4096        16384   4194304
net.core.wmem_default = 8388608
net.core.rmem_default = 8388608
net.core.rmem_max = 16777216
net.core.wmem_max = 16777216

# 每个网络接口接收数据包的速率比内核处理这些包的速率快时,允许送到队列的数据包的最大数目
net.core.netdev_max_backlog = 262144

# 限制仅仅是为了防止简单的DoS 攻击
net.ipv4.tcp_max_orphans = 3276800

# 未收到客户端确认信息的连接请求的最大值
net.ipv4.tcp_max_syn_backlog = 262144

# 启用timewait 快速回收,需要先打开时间戳。注:(NAT的网络和负载均衡器上不能打开)
net.ipv4.tcp_timestamps = 1
net.ipv4.tcp_tw_recycle = 1

#开启重用。允许将TIME-WAIT sockets 重新用于新的TCP连接
net.ipv4.tcp_tw_reuse = 1
net.ipv4.tcp_mem = 94500000 915000000 927000000
net.ipv4.tcp_fin_timeout = 1

# 当keepalive 起用的时候,TCP 发送keepalive 消息的频度。缺省是2小时
net.ipv4.tcp_keepalive_time = 30

#允许系统打开的端口范围,不建议从1024开始,因为某些端口会存在10000以内。一般情况下已够用。
net.ipv4.ip_local_port_range = 10000    65000

# 修改防火墙表大小,默认65536
net.netfilter.nf_conntrack_max=655350
net.netfilter.nf_conntrack_tcp_timeout_established=1200

# 确保无人能修改路由表
net.ipv4.conf.all.accept_redirects = 0
net.ipv4.conf.default.accept_redirects = 0
net.ipv4.conf.all.secure_redirects = 0
net.ipv4.conf.default.secure_redirects = 0