1、路由基础
(1)安装 vue-router:
cnpm install vue-router --save
(2)如果在一个模块化工程中使用它,必须要通过 Vue.use() 初始化路由插件:
import Vue from 'vue'
import VueRouter from 'vue-router'
Vue.use(VueRouter)
(3)创建路由格式:
const router = new VueRouter({
    routes:[
      {
        path: "/learn",            // 访问路由的路径
        name: "Learn",             // 路由名称
        component: Learn          // 对应组件
      }
    ]
  })
(4)给出路由显示位置:
<div id="app">
  <!-- 路由出口 -->
  <!-- 路由匹配到的组件将渲染在这里 -->
  <router-view></router-view>
</div>
(5)使用示例:
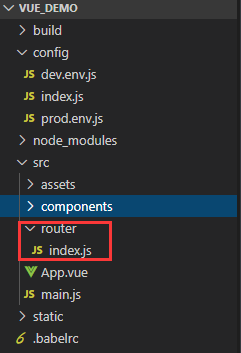
首先在 src 目录下创建一个 router 文件夹,同时在该文件夹下创建一个 index.js 文件,目录结构如下:
index.js 文件内容:
import Vue from 'vue'
import VueRouter from 'vue-router'
import Learn from '@/components/Learn'
import HelloWord from '@/components/HelloWorld'

// 初始化 VueRouter 插件
Vue.use(VueRouter)

// 创建路由
export default new VueRouter({
    routes: [
        {
            path: '/learn',
            name: 'Learn',
            component: Learn
        },
        {
            path: '/hello',
            name: 'Hello',
            component: HelloWord
        }
    ]
})
然后创建 Learn.vue,HelloWorld.vue 两个文件,目录结构如下:

HelloWorld.vue 文件内容:
<template>
  <div class="container">
    <p>This is HelloWorld</p>
  </div>
</template>

<script>
export default {
  name: 'HelloWorld',
  data () {
    return {

    }
  }
}
</script>
Learn.vue 文件内容:
<template>
  <div class="container">
    <p>This is learn</p>
  </div>
</template>

<script>
export default {
  name: "Learn",
  data() {
    return {

    };
  }
};
</script>
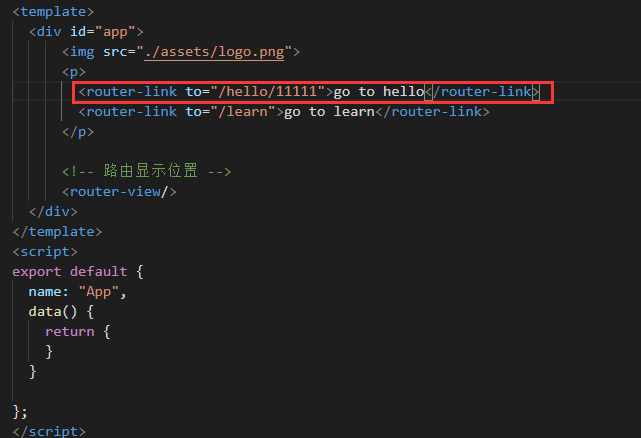
App.vue 文件内容:
<template>
  <div id="app">
      <img src="./assets/logo.png">
      <p>
        <!-- 使用声明式导航 router-link 组件来导航. -->
        <!-- 通过传入 `to` 属性指定链接. -->
        <!-- <router-link> 默认会被渲染成一个 `<a>` 标签 -->
        <router-link to="/hello">go to hello</router-link>
        <router-link to="/learn">go to learn</router-link>
      </p>

      <!-- 路由显示位置 -->
      <router-view/>
  </div>
</template>
<script>
export default {
  name: "App",
  data() {
    return {

    }
  }

};
</script>
main.js 文件内容:
import Vue from 'vue'
import App from './App'
// 引入路由对象
import router from './router'

Vue.config.productionTip = false

/* eslint-disable no-new */
new Vue({
  el: '#app',
  render: h => h(App),
  router    // 注入路由对象
})
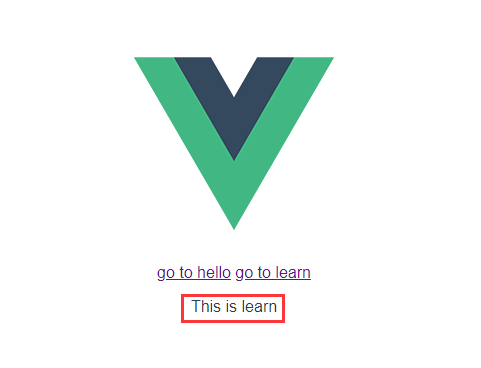
如上,当点击不同链接时,红色框会显示指定路径所对应的组件内容。
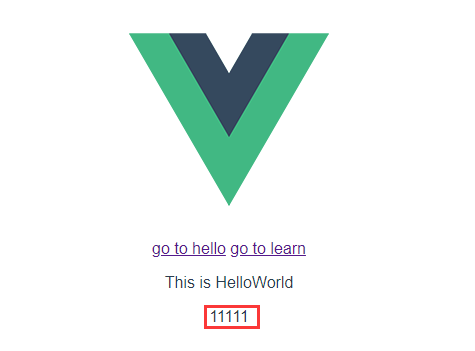
2、传递参数
声明式导航(<router-link>)传参
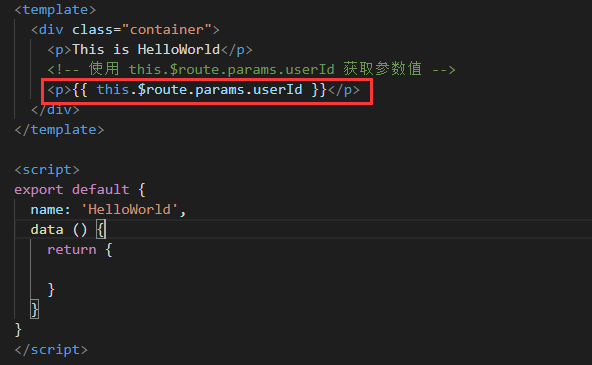
HelloWorld.vue :
App.vue:
页面效果:
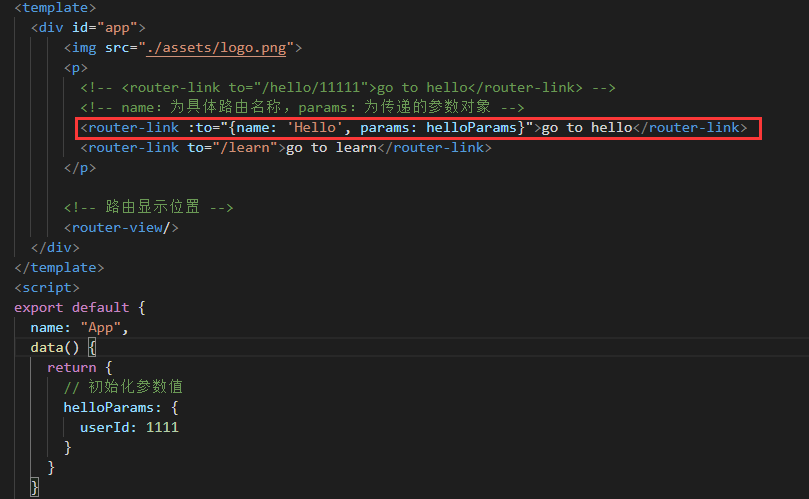
(2)声明式导航(使用命名路由,对象参数):
App.vue :
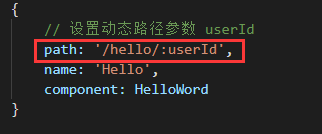
(3)声明式导航(使用命名路由,查询参数):
查询参数就是在路由地址后面带上参数,与传统的 url 参数一致,会变成 /hello?userId=1111
App.vue :
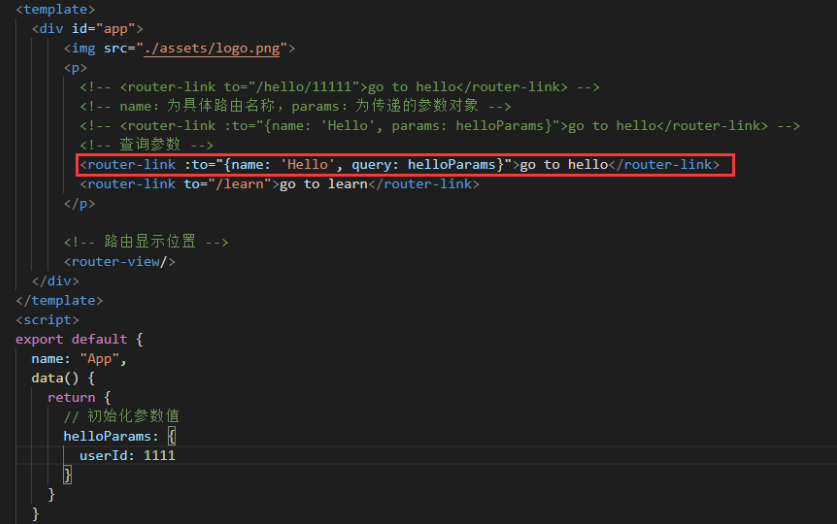
HelloWorld.vue:
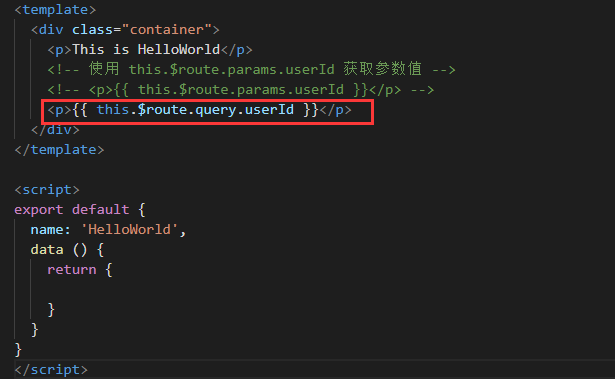
页面效果:

(4)编程式导航(与声明式导航一样,只是写法不同,实际开发中以这种方式为主):
// 字符串
this.$router.push('/hello')

// 对象
this.$router.push({ path: '/hello' })

// 对象 + 路径字符串参数
const userId = '1111'
this.$router.push({ path: '/hello/${userId}' }) // -> /hello/1111

// 命名的路由
this.$router.push({ name: 'Hello', params: { userId: '1111' }})

// 带查询参数,变成 /hello?userId=1111
this.$router.push({ path: '/hello', query: { userId: '1111' }})
3、嵌套路由
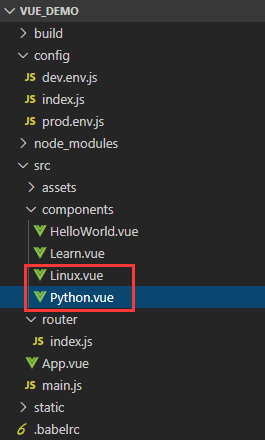
(1)在 components 目录下,创建 Python.vue、Linux.vue 两个文件:
Python.vue:
<template>
    <div class="python">
        <p>学习Python</p>
    </div>
</template>
<script>
export default {
    name: 'Python',
    data() {
        return {

        }
    }
}
</script>
Linux.vue:
<template>
    <div class="linux">
        <p>学习Linux</p>
    </div>
</template>
<script>
export default {
    name: 'Linux',
    data() {
        return {

        }
    }
}
</script>
router/index.js:
import Vue from 'vue'
import VueRouter from 'vue-router'
import Learn from '@/components/Learn'
import HelloWorld from '@/components/HelloWorld'
/* 导入子组件 */
import Python from '@/components/Python'
import Linux from '@/components/Linux'

// 初始化 VueRouter 插件
Vue.use(VueRouter)

// 创建路由
export default new VueRouter({
    routes: [
        {
            path: '/learn',
            name: 'Learn',
            component: Learn,
            // 使用 children 定义子组件
            children: [
                {
                    // 以"/"开头的嵌套路径会被当作根路径,所以子路由上不用加"/;
                    // 在生成路由时,主路由上的path会被自动添加到子路由之前,
                    // 所以子路由上的path不用在重新声明主路由上的path了。

                    // Python 会被渲染在 Learn 的 <router-view> 中
                    path: 'python',
                    name: 'Python',
                    component: Python
                },
                {
                    // Linux 会被渲染在 Learn 的 <router-view> 中
                    path: 'linux',
                    name: 'Linux',
                    component: Linux
                }

            ]
        },
        {
            path: '/hello',
            name: 'Hello',
            component: HelloWorld
        }

    ]
})
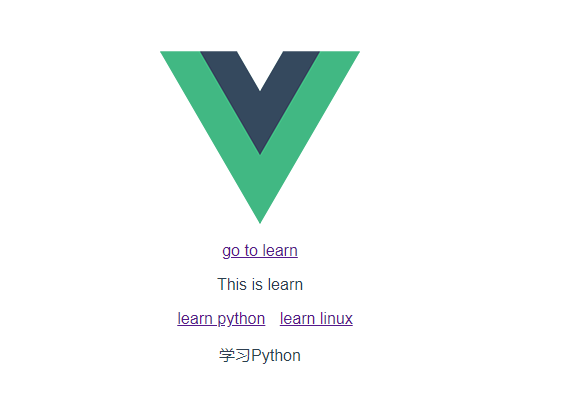
Learn.vue:
<template>
  <div class="container">
    <p>This is learn</p>

    <router-link to="/learn/python">learn python</router-link>
    <router-link to="/learn/linux">learn linux</router-link>

    <!-- Learn 的子组件会被渲染在 <router-view> 中 -->
    <router-view/>
  </div>
</template>

<script>
export default {
  name: "Learn",
  data() {
    return {

    };
  }
};
</script>
App.vue:
<template>
  <div id="app">
    <img src="./assets/logo.png" />
    <div>
      <router-link to="/learn">go to learn</router-link>
    </div>
    <router-view />
  </div>
</template>
<script>
export default {
  name: "App",
  data() {
    return {

    };
  }
};
</script>
页面效果:
4、路由杂项
(1)404 Not Found路由:
router/index.js :
// 访问根路径时,匹配到 Learn 组件
{
  path: '/',
  component: Learn
},

// * 号为通用匹配,即匹配所有路径,通常用于客户端 404 错误
{
  path: '*',
  component: NotFound
}
// 给出一个路由 { path: '/user-*' }
this.$router.push('/user-admin')
this.$route.params.pathMatch // 'admin'
// 给出一个路由 { path: '*' }
this.$router.push('/non-existing')
this.$route.params.pathMatch // '/non-existing'
(2)history 模式:
const router = new VueRouter({
  mode: 'history',
  routes: [...]
})
当你使用 history 模式时,URL 就像正常的 url,例如 http://yoursite.com/user/id,也好看!
所以呢,你要在服务端增加一个覆盖所有情况的候选资源:如果 URL 匹配不到任何静态资源,则应该返回同一个 index.html 页面,这个页面就是你 app 依赖的页面。
比如 Nginx 配置:
location / {
  try_files $uri $uri/ /index.html;
}
参考:
《Vue.js 实战》