SpringMVC获取服务器时间
题目:
前端页面显示后台服务器时间
1、新建项目工程
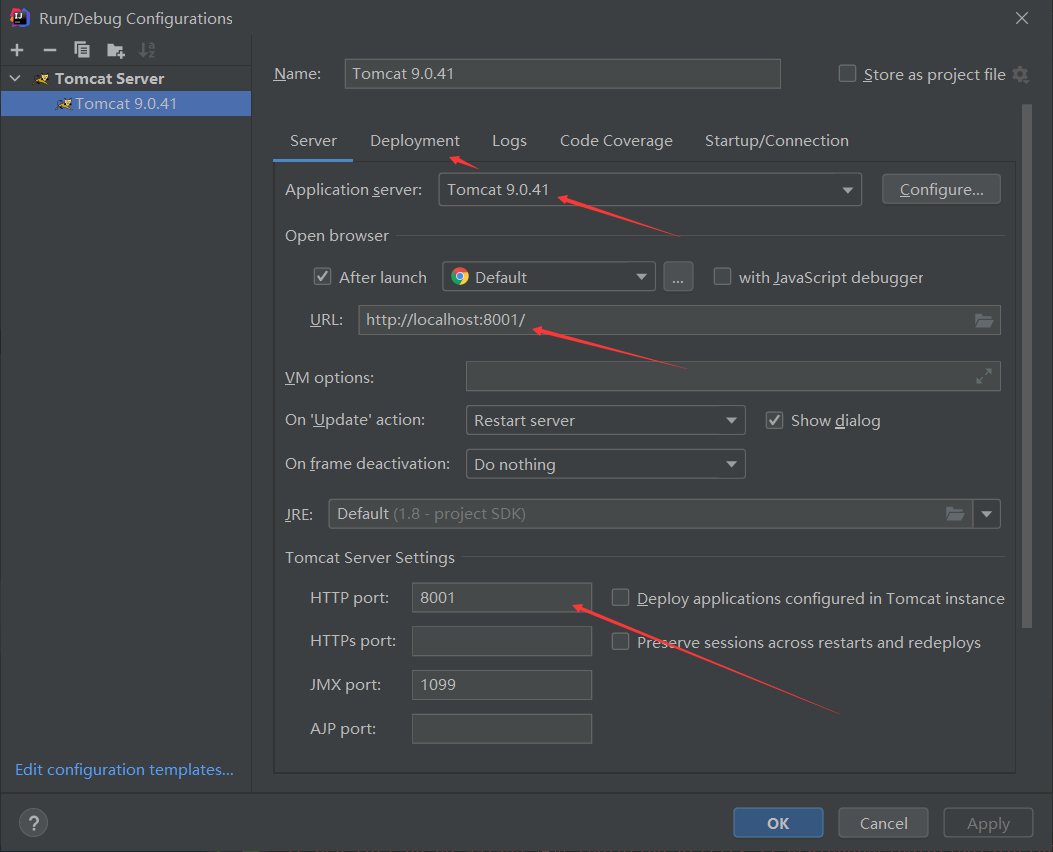
2、配置Tomcat

3、配置pom.xml文件
<?xml version="1.0" encoding="UTF-8"?>
<project xmlns="http://maven.apache.org/POM/4.0.0"
         xmlns:xsi="http://www.w3.org/2001/XMLSchema-instance"
         xsi:schemaLocation="http://maven.apache.org/POM/4.0.0 https://maven.apache.org/xsd/maven-4.0.0.xsd">
    <modelVersion>4.0.0</modelVersion>

    <groupId>com.xiang</groupId>
    <artifactId>mvcText</artifactId>
    <version>1.0-SNAPSHOT</version>
    <name>dateDemo</name>
    <packaging>war</packaging>
    <!-- 依赖软件包版本 -->
    <properties>
        <commons-lang.version>2.6</commons-lang.version>
        <spring.version>5.3.9</spring.version>
        <slf4j.version>2.0.0-alpha5</slf4j.version>
        <maven.compiler.target>1.8</maven.compiler.target>
        <maven.compiler.source>1.8</maven.compiler.source>
        <junit.version>5.7.1</junit.version>
    </properties>
    <!-- 配置依赖管理包 -->
    <dependencyManagement>
        <dependencies>
            <dependency>
                <groupId>org.springframework</groupId>
                <artifactId>spring-framework-bom</artifactId>
                <version>${spring.version}</version>
                <type>pom</type>
                <scope>import</scope>
            </dependency>
        </dependencies>
    </dependencyManagement>

    <!--  依赖配置节点-->
    <dependencies>
        <!--springMVC依赖包-->
        <!-- https://mvnrepository.com/artifact/org.springframework/spring-webmvc -->
        <dependency>
            <groupId>org.springframework</groupId>
            <artifactId>spring-webmvc</artifactId>
            <version>5.3.9</version>
        </dependency>

        <!-- 通用依赖包  -->
        <dependency>
            <groupId>commons-lang</groupId>
            <artifactId>commons-lang</artifactId>
            <version>${commons-lang.version}</version>
        </dependency>

        <!--jstl-->
        <dependency>
            <groupId>javax.servlet</groupId>
            <artifactId>jstl</artifactId>
            <version>1.2</version>
        </dependency>

    </dependencies>

    <build>
        <plugins>
            <plugin>
                <groupId>org.apache.maven.plugins</groupId>
                <artifactId>maven-war-plugin</artifactId>
                <version>3.3.1</version>
            </plugin>
        </plugins>
    </build>
</project>
4、配置mvc-dispatcher-servlet.xml文件
<?xml version="1.0" encoding="UTF-8"?>
<beans xmlns="http://www.springframework.org/schema/beans"
       xmlns:xsi="http://www.w3.org/2001/XMLSchema-instance"
       xmlns:context="http://www.springframework.org/schema/context"
       xmlns:mvc="http://www.springframework.org/schema/mvc"
       xsi:schemaLocation="
        http://www.springframework.org/schema/beans
        http://www.springframework.org/schema/beans/spring-beans.xsd
        http://www.springframework.org/schema/context
        http://www.springframework.org/schema/context/spring-context.xsd
        http://www.springframework.org/schema/mvc
        http://www.springframework.org/schema/mvc/spring-mvc.xsd">

    <!-- 扫描控制器 -->
    <context:component-scan base-package="com.xiang">
        <context:include-filter type="annotation"
                                expression="org.springframework.stereotype.Controller"/>
    </context:component-scan>
    <!-- 扩充了注解驱动,可以将请求参数绑定到控制器参数 -->
    <mvc:annotation-driven/>

    <!-- 静态资源处理, css, js, imgs -->
    <!--    <mvc:resources mapping="/resource/css/**" location="/resource/css/" />-->
    <!--    <mvc:resources mapping="/resource/js/**" location="/resource/js/" />-->
    <!--    <mvc:resources mapping="/resource/image/**" location="/resource/image/" />-->

    <!-- 配置试图解析器 -->
    <bean
            class="org.springframework.web.servlet.view.InternalResourceViewResolver">
        <property name="viewClass"
                  value="org.springframework.web.servlet.view.JstlView"></property>
        <!-- 配置jsp文件前缀及后缀 -->
        <property name="prefix" value="/"></property>
        <property name="suffix" value=".jsp"></property>
    </bean>

    <!--    自动注册最合适的处理器映射器、处理器适配器-->
    <mvc:annotation-driven/>
</beans>
5、配置springApplication.xml文件
<?xml version="1.0" encoding="UTF-8"?>
<beans xmlns="http://www.springframework.org/schema/beans"
       xmlns:xsi="http://www.w3.org/2001/XMLSchema-instance"
       xsi:schemaLocation="http://www.springframework.org/schema/beans
		http://www.springframework.org/schema/beans/spring-beans-4.0.xsd
		">
</beans>
6、编写controller.HomeController类
package com.xiang.controller;

import org.springframework.stereotype.Controller;
import org.springframework.web.bind.annotation.RequestMapping;
import org.springframework.web.servlet.ModelAndView;

import java.text.SimpleDateFormat;
import java.time.LocalDateTime;
import java.time.format.DateTimeFormatter;
import java.util.Calendar;
import java.util.Date;

/**
 * Created by IntelliJ IDEA.
 * User: xiang
 * Date: 2021/9/11 17:30
 */

@Controller

public class HomeController {
    private  Date date = new Date();

    @RequestMapping("/date")
    public ModelAndView test01() {
        date = new Date(); //服务器时间
        SimpleDateFormat dateFormat = new SimpleDateFormat("yyyy-MM-dd HH:ss:mm");
        String format = dateFormat.format(date);

        SimpleDateFormat df = new SimpleDateFormat("yyyy-MM-dd HH:mm:ss");//设置日期格式
        String s = df.format(date);

        new SimpleDateFormat("yyyy-MM-dd 'at' HH:mm:ss z");
        date = new Date(System.currentTimeMillis());

        LocalDateTime.now(); // get the current date and time
        DateTimeFormatter timeFormatter = DateTimeFormatter.ofPattern("dd-MM-yyyy HH:mm:ss");

        Calendar calendar = Calendar.getInstance(); // get current instance of the calendar
        SimpleDateFormat formatter = new SimpleDateFormat("dd-MM-yyyy HH:mm:ss");
        formatter.format(calendar.getTime());


//        返回服务器时间到前端
//        封装了数据和页面信息 ModelAndView
        ModelAndView modelAndView = new ModelAndView();
        modelAndView.addObject("format", format);
        modelAndView.addObject("date", date);
        modelAndView.addObject("df", df);
        modelAndView.addObject("timeFormatter", timeFormatter);
        modelAndView.addObject("formatter", formatter);
        modelAndView.addObject("s", s);

//        视图解析
        modelAndView.setViewName("date/date");
        return modelAndView;
    }
}
7、编写date.date.jsp文件
<%--
  Created by IntelliJ IDEA.
  User: Xiang
  Date: 2021/9/11
  Time: 17:38
  To change this template use File | Settings | File Templates.
--%>
<%@ page contentType="text/html;charset=UTF-8" language="java" %>
<html>
<head>
    <title>date</title>
</head>
<body>
<h3>
    跳转成功,当前服务器时间: ${format}
</h3>
<h3>
    跳转成功,当前服务器时间: ${date}
</h3>
<h3>
    跳转成功,当前服务器时间: ${df}
</h3>
<h3>
    跳转成功,当前服务器时间: ${timeFormatter}
</h3>
<h3>
    跳转成功,当前服务器时间: ${formatter}
</h3>
<h3 style="color: red">
    跳转成功,当前服务器时间: ${s}
</h3>

</body>
</html>
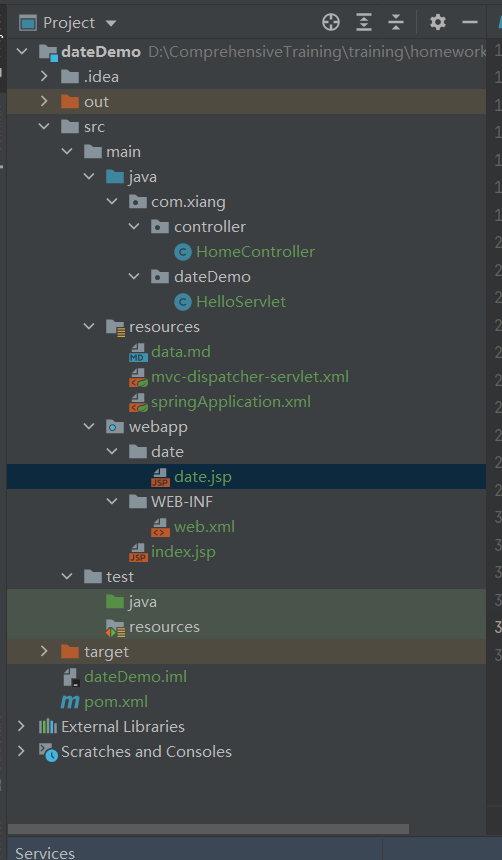
8、项目工程结构目录

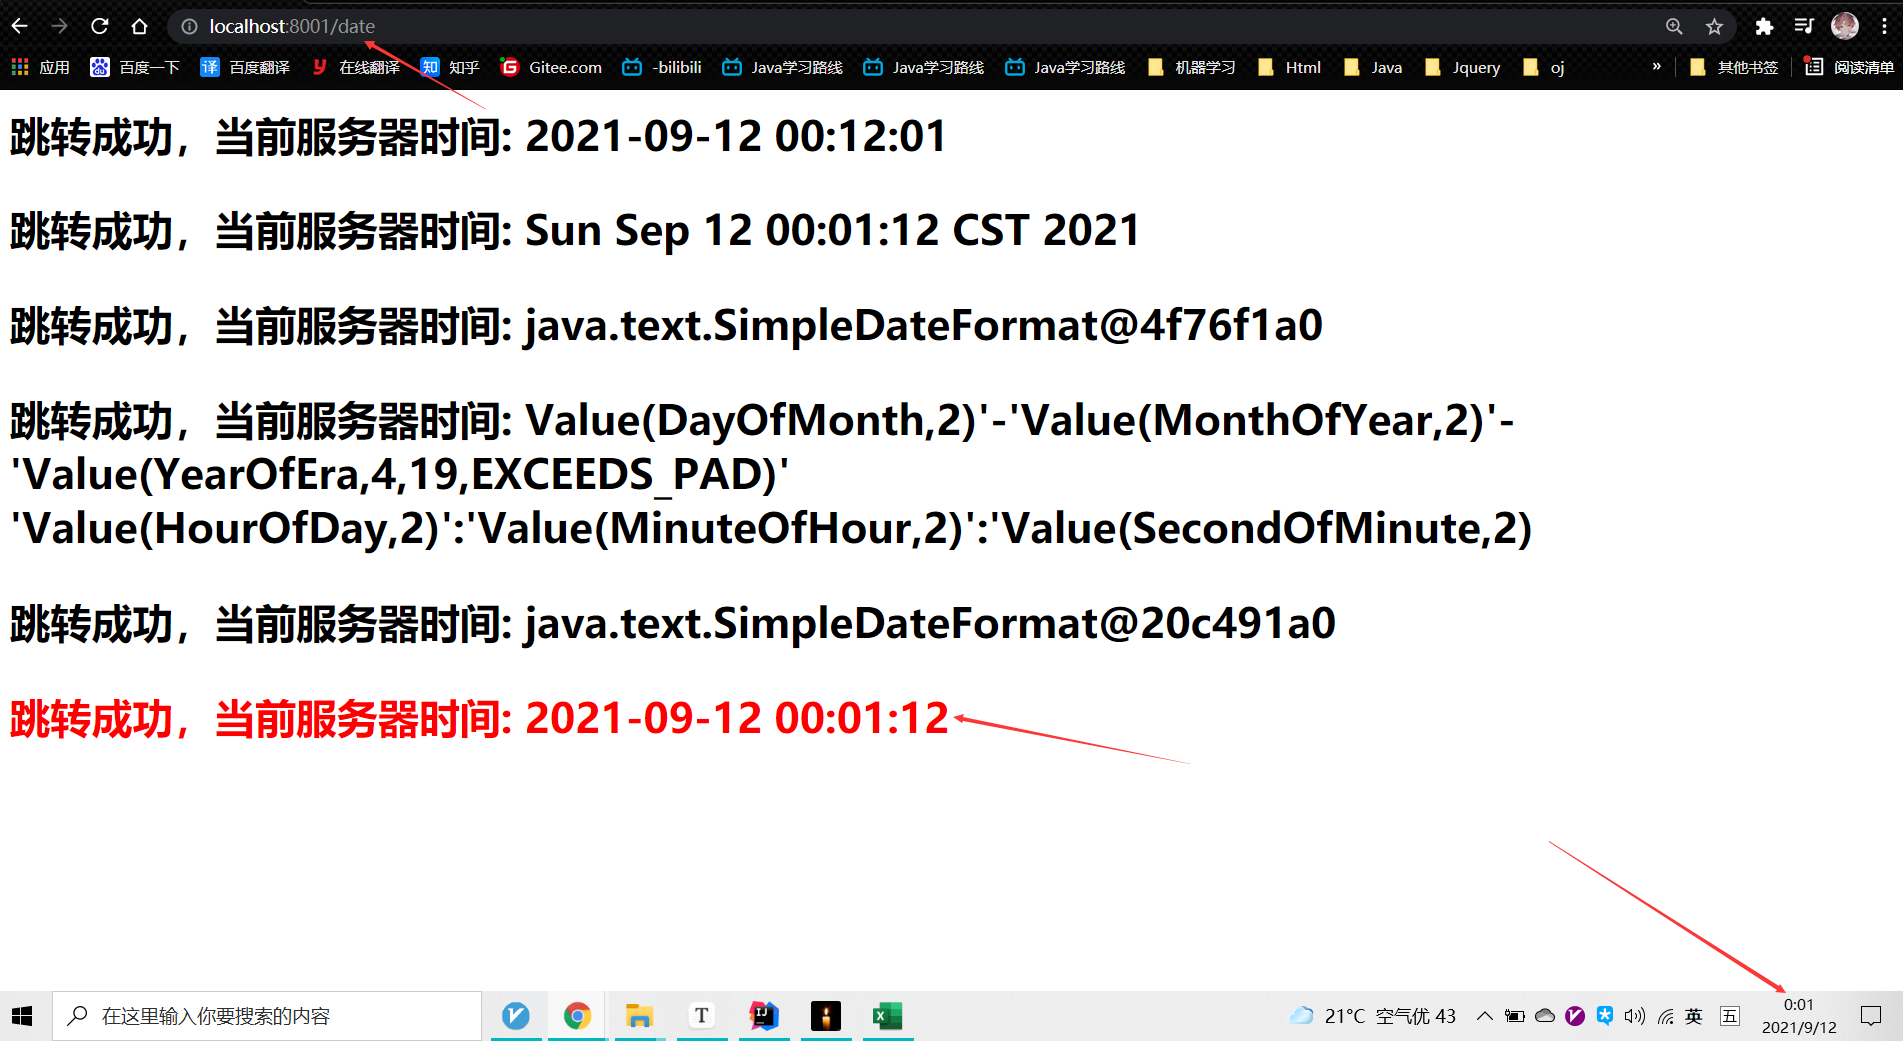
9、项目工程运行结果
