MHA
MHA介绍
MHA(Master High Availability)目前在MySQL高可用方面是一个相对成熟的解决方案,是一套优秀的作为MySQL高可用性环境下故障切换和主从提升的高可用软件。在MySQL故障切换过程中,MHA能做到0~30秒之内自动完成数据库的故障切换操作,并且在进行故障切换过程中,MHA能最大程度上保证数据库的一致性,以达到真正意义上的高可用。
MHA组成
MHA由两部分组成:MHA Manager(管理节点)和MHA Node(数据节点)。MHA Manager可以独立部署在一台独立的机器上管理多个Master-Slave集群,也可以部署在一台Slave上,管理一台Slave。当Master出现故障时,它可以自动将最新数据的Slave提升为新的Master,然后将所有其他的Slave重新指向新的Master。整个故障转移过程对应程序是完全透明的。
MHA工作流程
(1)从宕机崩溃的master保存二进制日志事件(binlog events);
(2)识别含有最新更新的slave;
(3)应用差异的中继日志(relay log)到其他的slave;
(4)应用从master保存的二进制日志事件(binlog events);
(5)提升一个slave为新的master;
(6)使其他的slave连接新的master进行复制;
如果主数据库宕机,复制主数据库的二进制日志出来,然后去找出三个从库的中继日志relay log最全最新的一个从库,将最全的relay log日志在所有从库中同步(第一次数据同步);然后将之前找到的最全的从库提升为主数据库,将复制出来的bin-log日志放到新提升的主数据库里,再将其他所有从库重新指向新提升的主库,继续主从复制。
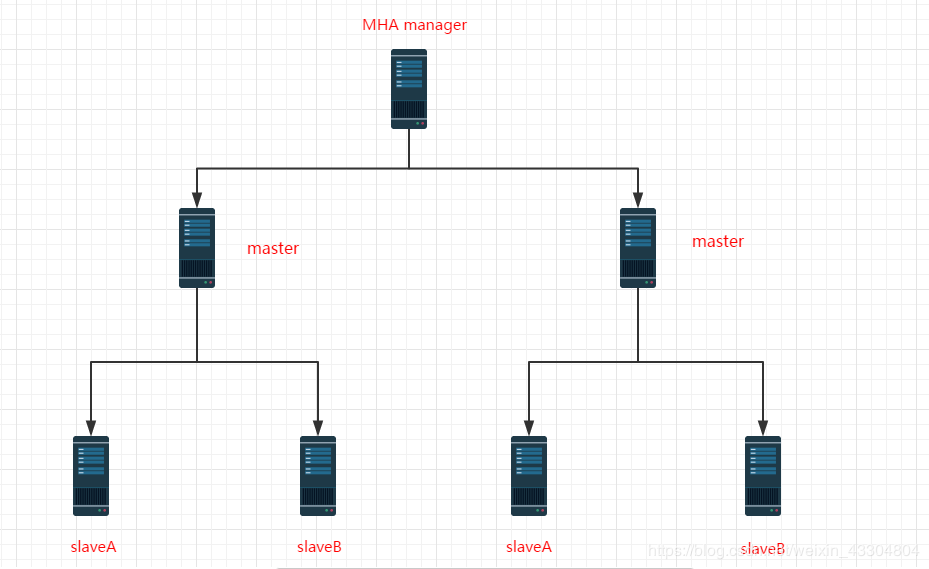
MHA架构图
MHA工具介绍
MHA软件由两部分组成,Manager工具包和Node工具包
#Manager工具包主要包括以下几个工具:
masterha_check_ssh #检查MHA的SSH配置状况
masterha_check_repl #检查MySQL复制状况
masterha_check_status #检测当前MHA运行状态
masterha_master_monitor #检测master是否宕机
masterha_manger #启动MHA
masterha_master_switch #控制故障转移(自动或者手动)
masterha_conf_host #添加或删除配置的server信息
masterha_secondary_check #试图建立TCP连接从远程服务器
masterha_stop #停止MHA
#Node工具包主要包括以下几个工具:
save_binary_logs #保存和复制master的二进制日志
apply_diff_relay_logs #识别差异的中继日志事件
filter_mysqlbinlog #去除不必要的ROLLBACK事件
purge_relay_logs #清除中继日志
MySQL环境准备
实验环境:
mysql-master eth0:192.168.239.128
mysql-slaveA eth0:192.168.239.129
mysql-slaveB eth0:192.168.239.130
需要的软件包
1) mha管理节点安装包:
mha4mysql-manager-0.56-0.el6.noarch.rpm
mha4mysql-manager-0.56.tar.gz
2) mha node节点安装包:
mha4mysql-node-0.56-0.el6.noarch.rpm
mha4mysql-node-0.56.tar.gz
3) mysql中间件:
Atlas-2.2.1.el6.x86_64.rpm
4) mysql源码安装包
mysql-5.6.17-linux-glibc2.5-x86_64.tar
安装MySQL
主机名映射
[root@localhost ~]# ls
anaconda-ks.cfg mha4mysql-manager-0.56.tar.gz
Atlas-2.2.1.el6.x86_64.rpm mha4mysql-node-0.56-0.el6.noarch.rpm
install.log mha4mysql-node-0.56.tar.gz
install.log.syslog mysql-5.6.17-linux-glibc2.5-x86_64.tar.gz
mha4mysql-manager-0.56-0.el6.noarch.rpm yum.sh
[root@localhost ~]# ll mysql-5.6.17-linux-glibc2.5-x86_64.tar.gz
-rw-r--r--. 1 root root 305102088 Sep 4 2017 mysql-5.6.17-linux-glibc2.5-x86_64.tar.gz
[root@localhost ~]# echo "192.168.239.128 MySQL-Master" >> /etc/hosts
[root@localhost ~]# echo "192.168.239.129 MySQL-SlaveA" >> /etc/hosts
[root@localhost ~]# echo "192.168.239.130 MySQL-SlaveB" >> /etc/hosts
[root@localhost ~]# scp /etc/hosts root@192.168.239.129:/etc/
The authenticity of host '192.168.239.129 (192.168.239.129)' can't be established.
RSA key fingerprint is 2d:76:57:08:d0:37:08:9e:bd:f2:2c:c6:30:28:d7:be.
Are you sure you want to continue connecting (yes/no)? yes
Warning: Permanently added '192.168.239.129' (RSA) to the list of known hosts.
root@192.168.239.129's password:
hosts 100% 245 0.2KB/s 00:00
[root@localhost ~]# scp /etc/hosts root@192.168.239.130:/etc/
The authenticity of host '192.168.239.130 (192.168.239.130)' can't be established.
RSA key fingerprint is 2d:76:57:08:d0:37:08:9e:bd:f2:2c:c6:30:28:d7:be.
Are you sure you want to continue connecting (yes/no)? yes
Warning: Permanently added '192.168.239.130' (RSA) to the list of known hosts.
root@192.168.239.130's password:
hosts 100% 245 0.2KB/s 00:00
安装MySQL(3台都装)
[root@localhost ~]# mount /dev/sr0 /media/cdrom/
mount: block device /dev/sr0 is write-protected, mounting read-only
[root@localhost ~]# yum -y install ncurses-devel libaio
Loaded plugins: fastestmirror
Loading mirror speeds from cached hostfile
[root@localhost ~]# tar xf mysql-5.6.17-linux-glibc2.5-x86_64.tar.gz -C /usr/local/
[root@localhost ~]# ln -s /usr/local/mysql-5.6.17-linux-glibc2.5-x86_64 /usr/local/mysql
[root@localhost ~]# useradd mysql -s /sbin/nologin -M
[root@localhost ~]# /usr/local/mysql/scripts/mysql_install_db --user=mysql --basedir=/usr/local/mysql --datadir=/usr/local/mysql/data/
[root@localhost ~]# /bin/cp /usr/local/mysql/support-files/my-default.cnf /etc/my.cnf
[root@localhost ~]# /bin/cp /usr/local/mysql/support-files/mysql.server /etc/init.d/mysqld
[root@localhost ~]# ln -s /usr/local/mysql/bin/* /usr/local/bin/
[root@localhost ~]# which mysqladmin
/usr/local/bin/mysqladmin
[root@localhost ~]# mysqladmin -uroot password '123456'
#加入开机自启动并启动mysql
[root@localhost ~]# chkconfig mysqld on
[root@localhost ~]# chkconfig mysqld --list
mysqld 0:off 1:off 2:on 3:on 4:on 5:on 6:off
[root@localhost ~]# /etc/init.d/mysqld start
Starting MySQL.. SUCCESS!
配置基于GTID的主从复制
先决条件
(1)主库和从库都要开启binlog
(2)主库和从库server-id不同
(3)要有主从复制用户
主库操作(MySQL-Master)
修改配置文件
[root@localhost mysql]# vim /etc/my.cnf
[client]
socket = /usr/local/mysql/data/mysql.sock
[mysqld]
lower_case_table_names = 1
default-storage-engine = InnoDB
port = 3306
datadir = /usr/local/mysql/data
character-set-server = utf8
socket = /usr/local/mysql/data/mysql.sock
log_bin = mysql-bin #开启binlog日志
server_id = 1 #设置server_id
innodb_buffer_pool_size = 200M
slave-parallel-workers = 8
thread_cache_size = 600
back_log = 600
slave_net_timeout = 60
max_binlog_size = 512M
key_buffer_size = 8M
query_cache_size = 64M
join_buffer_size = 2M
sort_buffer_size = 2M
query_cache_type = 1
thread_stack = 192K
#重启动MySQL服务
[root@localhost mysql]# /etc/init.d/mysqld restart
Shutting down MySQL.. SUCCESS!
Starting MySQL. SUCCESS!
#将主库的配置文件复制到从库
[root@localhost mysql]# scp /etc/my.cnf root@192.168.239.129:/etc/
root@192.168.239.129's password:
my.cnf 100% 595 0.6KB/s 00:00
[root@localhost mysql]# scp /etc/my.cnf root@192.168.239.130:/etc/
root@192.168.239.130's password:
my.cnf 100% 595 0.6KB/s 00:00
创建主从复制用户
[root@localhost mysql]# mysql -uroot -p123456
mysql> grant replication slave on *.* to rep@'192.168.239.%' identified by '123456';
Query OK, 0 rows affected (0.04 sec)
mysql> select user,host from mysql.user;
+------+-----------------------+
| user | host |
+------+-----------------------+
| root | 127.0.0.1 |
| rep | 192.168.239.% |
| root | ::1 |
| | localhost |
| root | localhost |
| | localhost.localdomain |
| root | localhost.localdomain |
+------+-----------------------+
7 rows in set (0.08 sec)
mysql> show grants for rep@'192.168.239.%';
+----------------------------------------------------------------------------------------------------------------------------+
| Grants for rep@192.168.239.% |
+----------------------------------------------------------------------------------------------------------------------------+
| GRANT REPLICATION SLAVE ON *.* TO 'rep'@'192.168.239.%' IDENTIFIED BY PASSWORD '*6BB4837EB74329105EE4568DDA7DC67ED2CA2AD9' |
+----------------------------------------------------------------------------------------------------------------------------+
1 row in set (0.00 sec)
mysql> exit
Bye
从库操作(mysql-slaveA和mysql-slaveB)
修改配置文件
#修改mysql-slaveA配置文件(和mysql-master配置文件一致)
#只需要修改server-id = 5选项
[root@localhost ~]# vim /etc/my.cnf
[client]
socket = /usr/local/mysql/data/mysql.sock
[mysqld]
lower_case_table_names = 1
default-storage-engine = InnoDB
port = 3306
datadir = /usr/local/mysql/data
character-set-server = utf8
socket = /usr/local/mysql/data/mysql.sock
log_bin = mysql-bin #从库的binlog也要打开
server_id = 5 #仅需修改此项
innodb_buffer_pool_size = 200M
slave-parallel-workers = 8
thread_cache_size = 600
back_log = 600
slave_net_timeout = 60
max_binlog_size = 512M
key_buffer_size = 8M
query_cache_size = 64M
join_buffer_size = 2M
sort_buffer_size = 2M
query_cache_type = 1
thread_stack = 192K
[root@localhost ~]# /etc/init.d/mysqld restart
Shutting down MySQL... SUCCESS!
Starting MySQL................... SUCCESS!
#修改mysql-slaveB配置文件(和mysql-master配置文件一致)
#只需要修改server-id = 10选项
[root@localhost ~]# vim /etc/my.cnf
[client]
socket = /usr/local/mysql/data/mysql.sock
[mysqld]
lower_case_table_names = 1
default-storage-engine = InnoDB
port = 3306
datadir = /usr/local/mysql/data
character-set-server = utf8
socket = /usr/local/mysql/data/mysql.sock
log_bin = mysql-bin #从库的binlog也要打开
server_id = 10 #仅需修改此项
innodb_buffer_pool_size = 200M
slave-parallel-workers = 8
thread_cache_size = 600
back_log = 600
slave_net_timeout = 60
max_binlog_size = 512M
key_buffer_size = 8M
query_cache_size = 64M
join_buffer_size = 2M
sort_buffer_size = 2M
query_cache_type = 1
thread_stack = 192K
[root@localhost ~]# /etc/init.d/mysqld restart
Shutting down MySQL... SUCCESS!
Starting MySQL................... SUCCESS!
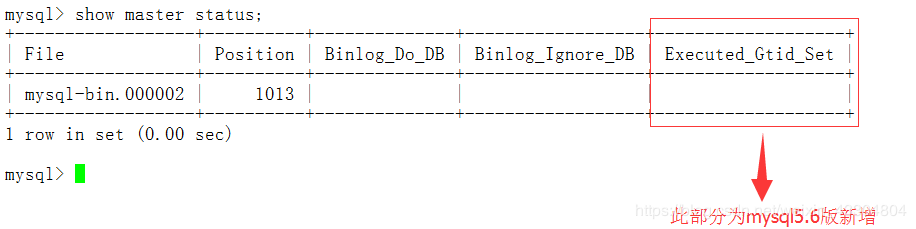
在MySQL5.6版本里多了一个Gtid的功能,可以自动记录主从复制位置点的信息,并在日志中输出出来。
开启GTID
#没开启之前先看一下GTID状态
mysql> show global variables like '%gtid%';
+--------------------------+-------+
| Variable_name | Value |
+--------------------------+-------+
| enforce_gtid_consistency | OFF |
| gtid_executed | |
| gtid_mode | OFF |
| gtid_owned | |
| gtid_purged | |
+--------------------------+-------+
5 rows in set (0.01 sec)
编辑mysql配置文件(主库从库都需要修改)
[root@localhost ~]# vim /etc/my.cnf
#在[mysqld]模块下面加入这三行
gtid_mode = ON
log_slave_updates #作用:双主模式必须加入的参数
enforce_gtid_consistency
[root@localhost mysql]# /etc/init.d/mysqld restart
Shutting down MySQL.. SUCCESS!
Starting MySQL... SUCCESS!
再次在MySQL-Master中查看GTID状态
[root@localhost mysql]# mysql -uroot -p123456
mysql> show global variables like '%gtid%';
+--------------------------+-------+
| Variable_name | Value |
+--------------------------+-------+
| enforce_gtid_consistency | ON |
| gtid_executed | |
| gtid_mode | ON |
| gtid_owned | |
| gtid_purged | |
+--------------------------+-------+
5 rows in set (0.00 sec)
配置主从复制(mysql-slaveA,mysql-slaveB)
[root@localhost ~]# mysql -uroot -p123456
mysql> change master to master_host='192.168.239.128',master_user='rep',master_password='123456',master_auto_position=1; #主库IP,主库复制用户,主库复制用密码,GTID位置点(自动追踪需要同步的position)
Query OK, 0 rows affected, 2 warnings (0.22 sec)
开启从库的主从复制功能(mysql-slaveA,mysql-slaveB)
mysql> start slave;
Query OK, 0 rows affected, 1 warning (0.47 sec)
mysql> show slave statusG
*************************** 1. row ***************************
Slave_IO_State: Waiting for master to send event
Master_Host: 192.168.239.128
Master_User: rep
Master_Port: 3306
Connect_Retry: 60
Master_Log_File: mysql-bin.000003
Read_Master_Log_Pos: 151
Relay_Log_File: localhost-relay-bin.000002
Relay_Log_Pos: 361
Relay_Master_Log_File: mysql-bin.000003
Slave_IO_Running: Yes
Slave_SQL_Running: Yes
Replicate_Do_DB:
Replicate_Ignore_DB:
Replicate_Do_Table:
Replicate_Ignore_Table:
Replicate_Wild_Do_Table:
Replicate_Wild_Ignore_Table:
Last_Errno: 0
Last_Error:
Skip_Counter: 0
Exec_Master_Log_Pos: 151
Relay_Log_Space: 569
Until_Condition: None
Until_Log_File:
Until_Log_Pos: 0
Master_SSL_Allowed: No
Master_SSL_CA_File:
Master_SSL_CA_Path:
Master_SSL_Cert:
Master_SSL_Cipher:
Master_SSL_Key:
Seconds_Behind_Master: 0
Master_SSL_Verify_Server_Cert: No
Last_IO_Errno: 0
Last_IO_Error:
Last_SQL_Errno: 0
Last_SQL_Error:
Replicate_Ignore_Server_Ids:
Master_Server_Id: 1
Master_UUID: 9a7e8455-f90b-11e8-b581-000c29e4bd28
Master_Info_File: /usr/local/mysql/data/master.info
SQL_Delay: 0
SQL_Remaining_Delay: NULL
Slave_SQL_Running_State: Slave has read all relay log; waiting for the slave I/O thread to update it
Master_Retry_Count: 86400
Master_Bind:
Last_IO_Error_Timestamp:
Last_SQL_Error_Timestamp:
Master_SSL_Crl:
Master_SSL_Crlpath:
Retrieved_Gtid_Set:
Executed_Gtid_Set:
Auto_Position: 1
1 row in set (0.05 sec)
GTID
GTID介绍
GTID(Global Transaction)全局事务标识符:是一个唯一的标识符,它创建并与源服务器(主)上提交的每个事务相关联。此标识符不仅对其发起的服务器是唯一的,而且在给定复制设置中的所有服务器上都是唯一的。所有交易和所有GTID之间都有1对1的映射。
GTID实际上是由UUID+TID组成的。其中UUID是一个MySQL实例的唯一标识。TID代表了该实例上已经提交的事务数量,并且随着事务提交单调递增。
这是一个GTID的具体形式:3E11FA47-71CA-11E1-9E33-C80AA9429562:23
GTID的新特性
(1)支持多线程复制:事实上是针对每个database开启相应的独立线程,即每个库有一个单独的(sql thread)
(2)支持启用GTID,在配置主从复制,传统的方式里,你需要找到binlog和POS点,然后change master to 指向。在mysql5.6里,无须再知道binlog和POS点,只需要知道master的IP/端口/账号密码即可,因为同步复制是自动的,MySQL通过内部机制GTID自动找点同步。
(3)基于Row复制只保存改变的列,大大节省磁盘空间,网络,内存等
(4)支持把Master和Slave的相关信息记录在Table中;原来是记录在文件里,现在则记录在表里,增强可用性
(5)支持延迟复制
开启方法
#mysql配置文件:
[mysqld]
gtid_mode=ON
enforce_gtid_consistency
#查看
show global variables like ‘%gtid%’;
配置从库,禁止自己删除MySQL中继日志
方法一:临时禁止
#登陆从库
[root@localhost ~]# mysql -uroot -p123456
#临时禁用自动删除relay log功能
mysql> set global relay_log_purge = 0;
Query OK, 0 rows affected (0.00 sec)
#设置只读
mysql> set global read_only=1;
Query OK, 0 rows affected (0.00 sec)
方法二:永久禁止
编辑从库配置文件/etc/my.cnf
[root@localhost ~]# vim /etc/my.cnf
#在[mysqld]模块下加入一行,永久禁止自动删除relay log功能
relay_log_purge = 0
[root@localhost ~]# /etc/init.d/mysqld restart
Shutting down MySQL.. SUCCESS!
Starting MySQL.. SUCCESS!
部署MHA
环境准备(所有节点mysql-master,mysql-slaveA,mysql-slaveB)
#光盘安装依赖包
[root@localhost ~]# yum -y install perl-DBD-MySQL
#安装mha4mysql-node-0.56-0.el6.noarch.rpm
[root@localhost ~]# rpm -ivh mha4mysql-node-0.56-0.el6.noarch.rpm
Preparing... ########################################### [100%]
1:mha4mysql-node ########################################### [100%]
库上创建mha管理账号
[root@localhost ~]# mysql -uroot -p123456
mysql> grant all privileges on *.* to mha@'192.168.239.%' identified by '123456';
Query OK, 0 rows affected (0.10 sec)
mysql> select user,host from mysql.user where user='mha';
+------+---------------+
| user | host |
+------+---------------+
| mha | 192.168.239.% |
+------+---------------+
1 row in set (0.13 sec)
#主库上创建从库会自动复制
1
从库上创建主从复制用户(MySQL-slaveA和MySQL-slaveB)
[root@localhost ~]# mysql -uroot -p123456
mysql> grant replication slave on *.* to rep@'192.168.239.%' identified by '123456';
Query OK, 0 rows affected (0.01 sec)
mysql> show grants for rep@'192.168.239.%';
+----------------------------------------------------------------------------------------------------------------------------+
| Grants for rep@192.168.239.% |
+----------------------------------------------------------------------------------------------------------------------------+
| GRANT REPLICATION SLAVE ON *.* TO 'rep'@'192.168.239.%' IDENTIFIED BY PASSWORD '*6BB4837EB74329105EE4568DDA7DC67ED2CA2AD9' |
+----------------------------------------------------------------------------------------------------------------------------+
1 row in set (0.00 sec)
mysql> exit
Bye
部署管理节点(mha-manager)
在mysql-slaveB上部署管理节点
#使用阿里云源+epel源
[root@localhost ~]# wget -O /etc/yum.repos.d/CentOS-Base.repo http://mirrors.aliyun.com/repo/Centos-6.repo
[root@localhost ~]# wget -O /etc/yum.repos.d/epel-6.repo http://mirrors.aliyun.com/repo/epel-6.repo
#安装manager依赖包(需要公网源)
[root@localhost ~]# yum -y install perl-Config-Tiny epel-release perl-Log-Dispatch perl-Parallel-ForkManager perl-Time-HiRes
#安装manager包
[root@localhost ~]# rpm -ivh mha4mysql-manager-0.56-0.el6.noarch.rpm
Preparing... ########################################### [100%]
1:mha4mysql-manager ########################################### [100%]
编辑配置文件
#创建配置文件目录
[root@localhost ~]# mkdir -p /etc/mha
#创建日志目录
[root@localhost ~]# mkdir -p /var/log/mha/mha1 #如果有多组主从复制架构可以延mha2、mha3...
#创建配置文件(默认没有)
[root@localhost ~]# cd /etc/mha/
[root@localhost mha]# ls
[root@localhost mha]# vim /etc/mha/mha1.cnf
[server default]
manager_log=/var/log/mha/mha1/manager #manager管理日志存放路径
manager_workdir=/var/log/mha/mha1 #manager管理日志的目录路径
master_binlog_dir=/usr/local/mysql/data #binlog日志的存放路径
user=mha #管理账户
password=123456 #管理账户密码
ping_interval=2 #存活检查的间隔时间
repl_user=rep #主从复制的授权账户
repl_password=123456 #主从复制的授权账户密码
ssh_user=root #用于ssh连接的账户
[server1]
hostname=192.168.239.128
port=3306
[server2]
#candidate_master=1 #此条暂时注释掉,设置为候选master,如果设置该参数以后,发生主从切换以后会将此从库提升为主库,即使这个主库不是集群中事件最新的slave
#check_repl_delay=0 #此条暂时注释掉,默认情况下如果一个slave落后master 100M的relay logs 的话,MHA将不会选择该slave作为一个新的master,因为对于这个slave的恢复需要花费很长时间,通过设置check_repl_delay=0,MHA触发切换在选择一个新的master的时候将会忽略复制延时,这个参数对于设置了candidate_master=1的主机非常有用,因为这个候选主在切换的过程中一定是新的master
hostname=192.168.239.129
port=3306
[server3]
hostname=192.168.239.130
port=3306
配置ssh信任(所有节点mysql-master,mysql-slaveA,mysql-slaveB)
#创建密钥对
[root@localhost mha]# ssh-keygen -t dsa -P "" -f ~/.ssh/id_dsa
Generating public/private dsa key pair.
Created directory '/root/.ssh'.
Your identification has been saved in /root/.ssh/id_dsa.
Your public key has been saved in /root/.ssh/id_dsa.pub.
The key fingerprint is:
6d:1c:e1:9f:35:ff:6e:5d:69:ca:08:69:79:9f:f9:80 root@localhost.localdomain
The key's randomart image is:
+--[ DSA 1024]----+
| . |
| . . |
| o o |
| o o o o |
| S * o o|
| * .. oo|
| . oE+.= +|
| . *..o|
| .o.|
+-----------------+
#发送mysql-master公钥,包括自己
[root@localhost ~]# ssh-copy-id -i /root/.ssh/id_dsa.pub root@192.168.239.128
[root@localhost ~]# ssh-copy-id -i /root/.ssh/id_dsa.pub root@192.168.239.129
[root@localhost ~]# ssh-copy-id -i /root/.ssh/id_dsa.pub root@192.168.239.130
#发送mysql-slaveA公钥,包括自己
[root@localhost ~]# ssh-copy-id -i /root/.ssh/id_dsa.pub root@192.168.239.128
[root@localhost ~]# ssh-copy-id -i /root/.ssh/id_dsa.pub root@192.168.239.129
[root@localhost ~]# ssh-copy-id -i /root/.ssh/id_dsa.pub root@192.168.239.130
#发送mysql-slaveB公钥,包括自己
[root@localhost ~]# ssh-copy-id -i /root/.ssh/id_dsa.pub root@192.168.239.128
[root@localhost ~]# ssh-copy-id -i /root/.ssh/id_dsa.pub root@192.168.239.129
[root@localhost ~]# ssh-copy-id -i /root/.ssh/id_dsa.pub root@192.168.239.130
启动测试
(1)ssh检查检测(在mha-master这台服务器上进行检查)
[root@localhost mha]# which masterha_check_ssh
/usr/bin/masterha_check_ssh
[root@localhost mha]# masterha_check_ssh --conf=/etc/mha/mha1.cnf #ssh检查命令
Thu Dec 6 17:26:01 2018 - [warning] Global configuration file /etc/masterha_default.cnf not found. Skipping.
Thu Dec 6 17:26:01 2018 - [info] Reading application default configuration from /etc/mha/mha1.cnf..
Thu Dec 6 17:26:01 2018 - [info] Reading server configuration from /etc/mha/mha1.cnf..
Thu Dec 6 17:26:01 2018 - [info] Starting SSH connection tests..
...
Thu Dec 6 17:26:02 2018 - [debug] Connecting via SSH from root@192.168.239.130(192.168.239.130:22) to root@192.168.239.128(192.168.239.128:22)..
Thu Dec 6 17:26:03 2018 - [debug] ok.
Thu Dec 6 17:26:03 2018 - [debug] Connecting via SSH from root@192.168.239.130(192.168.239.130:22) to root@192.168.239.129(192.168.239.129:22)..
Thu Dec 6 17:26:04 2018 - [debug] ok.
Thu Dec 6 17:26:04 2018 - [info] All SSH connection tests passed successfully. #出现这个就表示成功
(2) 主从复制检测
[root@localhost mha]# masterha_check_repl --conf=/etc/mha/mha1.cnf
Thu Dec 6 17:36:23 2018 - [warning] Global configuration file /etc/masterha_default.cnf not found. Skipping.
...
Thu Dec 6 17:36:24 2018 - [info] Checking replication health on 192.168.239.129..
Thu Dec 6 17:36:24 2018 - [info] ok.
Thu Dec 6 17:36:24 2018 - [info] Checking replication health on 192.168.239.130..
Thu Dec 6 17:36:24 2018 - [info] ok.
Thu Dec 6 17:36:24 2018 - [warning] master_ip_failover_script is not defined.
Thu Dec 6 17:36:24 2018 - [warning] shutdown_script is not defined.
Thu Dec 6 17:36:24 2018 - [info] Got exit code 0 (Not master dead).
MySQL Replication Health is OK.
启动MHA
#启动
[root@localhost mha]# nohup masterha_manager --conf=/etc/mha/mha1.cnf --remove_dead_master_conf --ignore_last_failover < /dev/null > /var/log/mha/mha1/manager.log 2>&1 &
[1] 4090
[root@localhost mha]# ps -ef | grep perl | grep -v grep
root 4090 1631 0 17:57 pts/1 00:00:00 perl /usr/bin/masterha_manager --conf=/etc/mha/mha1.cnf --remove_dead_master_conf --ignore_last_failover
#说明:
nohup:启动命令
--conf:指定配置文件位置
--remove_dead_master_conf:如果有master down了,就去掉配置文件里该master的部分。
进行mha自动切换master的测试
初始状态:

(1)登陆mysql-slaveA(192.168.239.129)查看信息状态
[root@localhost ~]# mysql -uroot -p123456
mysql> show slave statusG
*************************** 1. row ***************************
Slave_IO_State: Waiting for master to send event
Master_Host: 192.168.239.128 #这是主库IP地址
Master_User: rep
Master_Port: 3306
Connect_Retry: 60
Master_Log_File: mysql-bin.000003
Read_Master_Log_Pos: 405
Relay_Log_File: localhost-relay-bin.000004
Relay_Log_Pos: 615
Relay_Master_Log_File: mysql-bin.000003
Slave_IO_Running: Yes
Slave_SQL_Running: Yes
Replicate_Do_DB:
Replicate_Ignore_DB:
(2)停掉mysql-master(192.168.239.128)上的MySQL服务
[root@localhost ~]# /etc/init.d/mysqld stop
Shutting down MySQL...... SUCCESS!
(3)查看mysql-slaveB上的MySQL从库同步状态
[root@localhost mha]# mysql -uroot -p123456 -e 'show slave statusG'
Warning: Using a password on the command line interface can be insecure.
*************************** 1. row ***************************
Slave_IO_State: Waiting for master to send event
Master_Host: 192.168.239.129 #现在的主库IP地址
Master_User: rep
Master_Port: 3306
Connect_Retry: 60
Master_Log_File: mysql-bin.000003 #binlog日志
Read_Master_Log_Pos: 662 #binlog日志位置
Relay_Log_File: localhost-relay-bin.000002
Relay_Log_Pos: 665
Relay_Master_Log_File: mysql-bin.000003
Slave_IO_Running: Yes
Slave_SQL_Running: Yes
Replicate_Do_DB:
Replicate_Ignore_DB:
(4)查看mysql-slaveA上的MySQL,主库同步状态。
[root@localhost ~]# mysql -uroot -p123456 -e 'show master status'
Warning: Using a password on the command line interface can be insecure.
+------------------+----------+--------------+------------------+--------------------------------------------------------------------------------+
| File | Position | Binlog_Do_DB | Binlog_Ignore_DB | Executed_Gtid_Set |
+------------------+----------+--------------+------------------+--------------------------------------------------------------------------------+
| mysql-bin.000003 | 662 | | | 9a7e8455-f90b-11e8-b581-000c29e4bd28:1,
9c940ddb-f90b-11e8-b581-000c29ca6c91:1 |
+------------------+----------+--------------+------------------+--------------------------------------------------------------------------------+
(5)查看mysql-slaveB上的mha进程状态
[root@localhost mha]# ps -ef | grep perl | grep -v grep #查询发现mha进程已经没了
[root@localhost mha]#
6)查看mha配置文件信息
[root@localhost mha]# cat /etc/mha/mha1.cnf
[server default]
manager_log=/var/log/mha/mha1/manager
manager_workdir=/var/log/mha/mha1
master_binlog_dir=/usr/local/mysql/data
password=123456
ping_interval=2
repl_password=123456
repl_user=rep
ssh_user=root
user=mha
[server2]
hostname=192.168.239.129
port=3306
[server3]
hostname=192.168.239.130
port=3306
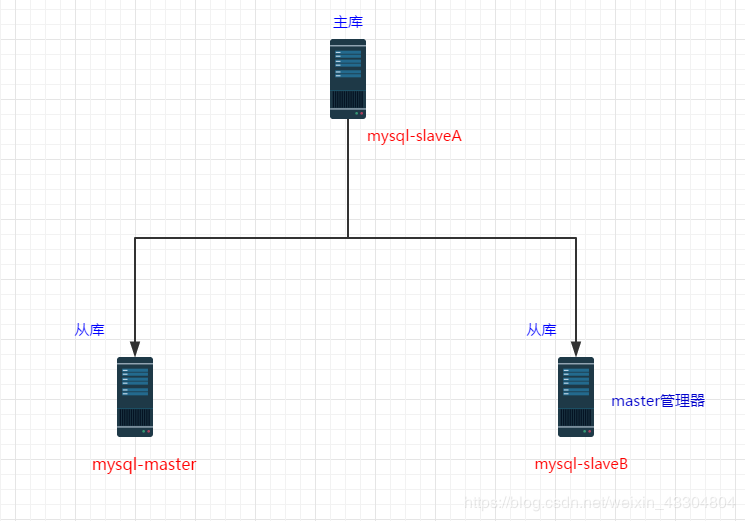
#此时[server1]模块的信息已经消失了,当作为主库的mysql-master上的MySQL宕机以后,mha通过检测发现mysql-master宕机,那么会将binlog日志最全的从库立刻提升为主库,而其他的从库会指向新的主库进行再次同步。
进行mha的故障还原测试
mha的进程只能完成1次切换,不能持续切换(完成一次后,后台进程就当掉了,需要重新手动启动)
由于mysql-master的MySQL服务宕机,因此mha将mysql-slaveA提升为了主库。因此,我们需要将宕机的mysql-master的MySQL服务启动,然后作为主库mysql-slaveA的从库。
初始状态:

(1)将故障宕机的mysql-master的MySQL服务启动并授权进行从同步
[root@localhost mha]# cat /var/log/mha/mha1/manager
#找到这句话,复制到文本中
CHANGE MASTER TO MASTER_HOST='192.168.239.129', MASTER_PORT=3306, MASTER_AUTO_POSITION=1, MASTER_USER='rep', MASTER_PASSWORD='xxx';
[root@localhost ~]# mysql -uroot -p123456
mysql> CHANGE MASTER TO MASTER_HOST='192.168.239.129', MASTER_PORT=3306, MASTER_AUTO_POSITION=1, MASTER_USER='rep', MASTER_PASSWORD='123456'; #复制/var/log/mha/mha1/manager日志中的这句话,只需修改密码
Query OK, 0 rows affected, 2 warnings (0.18 sec)
mysql> start slave;
Query OK, 0 rows affected, 1 warning (0.43 sec)
mysql> show slave statusG #查看从同步状态
*************************** 1. row ***************************
Slave_IO_State: Waiting for master to send event
Master_Host: 192.168.239.129
Master_User: rep
Master_Port: 3306
Connect_Retry: 60
Master_Log_File: mysql-bin.000003
Read_Master_Log_Pos: 662
Relay_Log_File: localhost-relay-bin.000002
Relay_Log_Pos: 665
Relay_Master_Log_File: mysql-bin.000003
Slave_IO_Running: Yes
Slave_SQL_Running: Yes
Replicate_Do_DB:
Replicate_Ignore_DB:
(2)将mha配置文件里缺失的部分补全(mysql-slaveB服务器)
[root@localhost mha]# vim /etc/mha/mha1.cnf
[server default]
manager_log=/var/log/mha/mha1/manager
manager_workdir=/var/log/mha/mha1
master_binlog_dir=/usr/local/mysql/data
password=123456
ping_interval=2
repl_password=123456
repl_user=rep
[server default]
manager_log=/var/log/mha/mha1/manager
manager_workdir=/var/log/mha/mha1
master_binlog_dir=/usr/local/mysql/data
password=123456
ping_interval=2
repl_password=123456
repl_user=rep
ssh_user=root
user=mha
[server1] #添加此模块
hostname=192.168.239.128
port=3306
[server2]
hostname=192.168.239.129
port=3306
[server3]
hostname=192.168.239.130
port=3306
[root@localhost mha]# pkill perl
[root@localhost mha]# ps -ef | grep mha
root 8641 1631 1 21:02 pts/1 00:00:00 grep mha
[1]+ Exit 1 nohup masterha_manager --conf=/etc/mha/mha1.cnf --remove_dead_master_conf --ignore_last_failover < /dev/null > /var/log/mha/mha1/manager.log 2>&1
[root@localhost mha]# ps -ef | grep mha
root 8643 1631 0 21:02 pts/1 00:00:00 grep mha
(3)启动mha进程
[root@localhost mha]# nohup masterha_manager --conf=/etc/mha/mha1.cnf --remove_dead_master_conf --ignore_last_failover < /dev/null > /var/log/mha/mha1/manager.log 2>&1 &
[1] 5215
[root@localhost mha]# ps -ef | grep perl | grep -v grep
root 5215 1631 3 19:14 pts/1 00:00:00 perl /usr/bin/masterha_manager --conf=/etc/mha/mha1.cnf --remove_dead_master_conf --ignore_last_failover
1
2
3
4
5
(4)停掉mysql-slaveA上的MySQL服务
[root@localhost ~]# /etc/init.d/mysqld stop
Shutting down MySQL....... SUCCESS!
1
2
3
(5)查看mysql-slaveB上的主从同步状态:
[root@localhost mha]# mysql -uroot -p123456 -e 'show slave statusG'
Warning: Using a password on the command line interface can be insecure.
*************************** 1. row ***************************
Slave_IO_State: Waiting for master to send event
Master_Host: 192.168.239.128 #此时主库为mysql-master
Master_User: rep
Master_Port: 3306
Connect_Retry: 60
Master_Log_File: mysql-bin.000004
Read_Master_Log_Pos: 448
Relay_Log_File: localhost-relay-bin.000002
Relay_Log_Pos: 408
Relay_Master_Log_File: mysql-bin.000004
Slave_IO_Running: Yes
Slave_SQL_Running: Yes
Replicate_Do_DB:
Replicate_Ignore_DB:
(6)启动mysql-slaveA上的MySQL服务
[root@localhost ~]# /etc/init.d/mysqld start
Starting MySQL.................. SUCCESS!
[root@localhost ~]# mysql -uroot -p123456
mysql> CHANGE MASTER TO MASTER_HOST='192.168.239.128', MASTER_PORT=3306, MASTER_AUTO_POSITION=1, MASTER_USER='rep', MASTER_PASSWORD='123456'; #这条信息到mysql-slaveB中的/var/log/mha/mha1/manager中查找
Query OK, 0 rows affected, 2 warnings (0.07 sec)
mysql> start slave;
Query OK, 0 rows affected, 1 warning (0.15 sec)
mysql> show slave statusG
*************************** 1. row ***************************
Slave_IO_State: Waiting for master to send event
Master_Host: 192.168.239.128 #主库为mysql-master
Master_User: rep
Master_Port: 3306
Connect_Retry: 60
Master_Log_File: mysql-bin.000004
Read_Master_Log_Pos: 448
Relay_Log_File: localhost-relay-bin.000002
Relay_Log_Pos: 408
Relay_Master_Log_File: mysql-bin.000004
Slave_IO_Running: Yes
Slave_SQL_Running: Yes
Replicate_Do_DB:
(7)再次补全mha配置文件后,启动mha进程
[root@localhost mha]# vim /etc/mha/mha1.cnf
[server default]
manager_log=/var/log/mha/mha1/manager
manager_workdir=/var/log/mha/mha1
master_binlog_dir=/usr/local/mysql/data
password=123456
ping_interval=2
repl_password=123456
repl_user=rep
ssh_user=root
[server default]
manager_log=/var/log/mha/mha1/manager
manager_workdir=/var/log/mha/mha1
master_binlog_dir=/usr/local/mysql/data
password=123456
ping_interval=2
repl_password=123456
repl_user=rep
ssh_user=root
user=mha
[server1]
hostname=192.168.239.128
port=3306
[server2] #添加此模块
hostname=192.168.239.129
port=3306
[server3]
hostname=192.168.239.130
port=3306
[root@localhost mha]# nohup masterha_manager --conf=/etc/mha/mha1.cnf --remove_dead_master_conf --ignore_last_failover < /dev/null > /var/log/mha/mha1/manager.log 2>&1 &
[1] 8730
[root@localhost mha]# ps -ef | grep perl | grep -v grep
root 8730 1631 1 21:19 pts/1 00:00:00 perl /usr/bin/masterha_manager --conf=/etc/mha/mha1.cnf --remove_dead_master_conf --ignore_last_failover
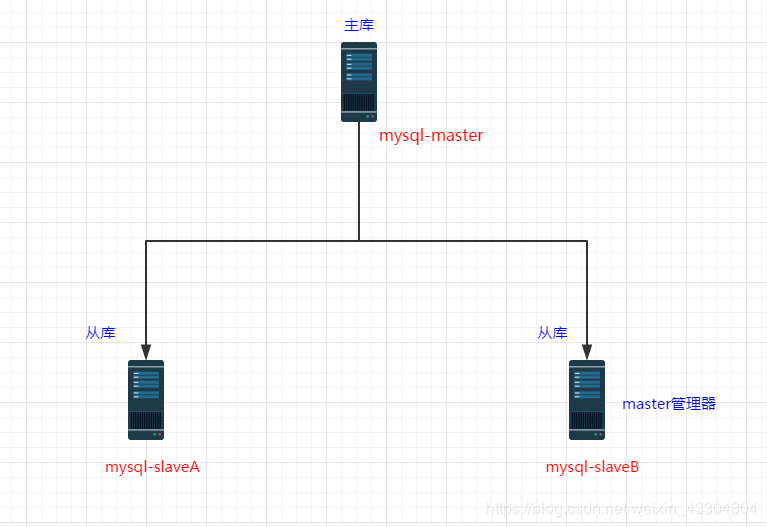
此时的初始状态还原为下图:
源码安装mha的方法
node节点的源码安装方法:
[root@localhost ~]# yum -y install perl-DBD-MySQL perl-Config-Tiny perl-Params-Validate perl-CPAN perl-devel perl-ExtUtils-CBuilder perl-ExtUtils-MakeMaker
[root@localhost ~]# tar xf mha4mysql-node-0.56.tar.gz -C /usr/src/
[root@localhost ~]# cd /usr/src/mha4mysql-node-0.56/
[root@localhost mha4mysql-node-0.56]# perl Makefile.PL
[root@localhost mha4mysql-node-0.56]# make && make install
manager节点的源码安装方法:
[root@localhost ~]# yum -y install perl-DBD-MySQL perl-Config-Tiny perl-Params-Validate perl-CPAN perl-devel perl-ExtUtils-CBuilder perl-ExtUtils-MakeMaker
[root@localhost ~]# tar xf mha4mysql-manager-0.56.tar.gz -C /usr/src/
[root@localhost ~]# cd /usr/src/mha4mysql-manager-0.56/
[root@localhost mha4mysql-manager-0.56]# perl Makefile.PL
[root@localhost mha4mysql-manager-0.56]# make && make install
配置VIP漂移
IP漂移的两种方式
(1)通过keepalived的方式,管理虚拟IP的漂移
(2)通过MHA自带脚本方式,管理虚拟IP的漂移
MHA脚本管理方式
(1)获取管理脚本master_ip_failover
[root@localhost ~]# ls
anaconda-ks.cfg mha4mysql-manager-0.56-0.el6.noarch.rpm
Atlas-2.2.1.el6.x86_64.rpm mha4mysql-manager-0.56.tar.gz
install.log mha4mysql-node-0.56-0.el6.noarch.rpm
install.log.syslog mha4mysql-node-0.56.tar.gz
master_ip_failover mysql-5.6.17-linux-glibc2.5-x86_64.tar.gz
mha4mysql-manager-0.56 yum.sh
[root@localhost scripts]# cp master_ip_failover /usr/local/bin/ #复制到/usr/local/bin目录下
[root@localhost ~]# cd /usr/local/bin/
[root@localhost bin]# chmod +x master_ip_failover
[root@localhost bin]# which master_ip_failover
/usr/local/bin/master_ip_failover
(2)修改mha配置文件
[root@localhost ~]# vim /etc/mha/mha1.cnf
[server default]
[server default]
manager_log=/var/log/mha/mha1/manager
manager_workdir=/var/log/mha/mha1
master_binlog_dir=/usr/local/mysql/data
master_ip_failover_script=/usr/local/bin/master_ip_failover #添加脚本位置
password=123456
ping_interval=2
repl_password=123456
repl_user=rep
ssh_user=root
user=mha
#candidate_master=1 #留着备用的注释项
#check_repl_delay=0 #留着备用的注释项
[server1]
hostname=192.168.239.128
port=3306
[server2]
hostname=192.168.239.129
port=3306
[server3]
hostname=192.168.239.130
port=3306
(3)修改VIP漂移脚本(master_ip_failover脚本)
[root@localhost ~]# vim /usr/local/bin/master_ip_failover
#!/usr/bin/env perl
use strict;
use warnings FATAL => 'all';
use Getopt::Long;
my (
$command, $ssh_user, $orig_master_host,
$orig_master_ip, $orig_master_port, $new_master_host,
$new_master_ip, $new_master_port
);
my $vip = '192.168.239.60/24'; #定义VIP
my $key = '0'; #定义网卡后缀数值,如果eth0就是0,eth1就是1
my $ssh_start_vip = "/sbin/ifconfig eth0:$key $vip"; #绑定VIP的命令
my $ssh_stop_vip = "/sbin/ifconfig eth0:$key down"; #关闭VIP的命令
GetOptions(
'command=s' => $command,
'ssh_user=s' => $ssh_user,
'orig_master_host=s' => $orig_master_host,
'orig_master_ip=s' => $orig_master_ip,
'orig_master_port=i' => $orig_master_port,
'new_master_host=s' => $new_master_host,
'new_master_ip=s' => $new_master_ip,
'new_master_port=i' => $new_master_port,
);
exit &main();
sub main {
if ( $command eq "stop" || $command eq "stopssh" ) {
my $exit_code = 1;
eval {
print "Disabling the VIP on old master:$orig_master_host
";
&stop_vip();
$exit_code = 0;
};
if ($@) {
warn "Got Error: $@
";
exit $exit_code;
}
exit $exit_code;
}
elsif ( $command eq "start" ) {
my $exit_code = 10;
eval {
print "Enabling the VIP - $vip on the new master - $new_master_host
";
&start_vip();
$exit_code = 0;
};
if ($@) {
warn $@;
exit $exit_code;
}
exit $exit_code;
}
elsif ( $command eq "status" ) {
print "Checking the Status of the script..OK
";
`ssh $ssh_user@$orig_master_host " $ssh_start_vip "`;
exit 0;
}
else {
&usage();
exit 1;
}
}
sub start_vip() {
`ssh $ssh_user@$new_master_host " $ssh_start_vip "`;
}
sub stop_vip() {
`ssh $ssh_user@$orig_master_host " $ssh_stop_vip "`;
}
sub usage {
print
"Usage: master_ip_failover --command=start|stop|stopssh|status --orig_master_host=host --orig_master_ip=ip --orig_master_port=port --new_master_host=host --new_master_ip=ip --new_master_port=port
";
}
(4)重启动mha管理端
[root@localhost ~]# pkill perl
[root@localhost ~]# nohup masterha_manager --conf=/etc/mha/mha1.cnf --remove_dead_master_conf --ignore_last_failover < /dev/null > /var/log/mha/mha1/manager.log 2>&1 &
[1] 10984
#提示:
如果启动mha进程失败,需要进行mha的连接检测
masterha_check_ssh --conf=/etc/mha/mha1.cnf ssh连接检测
masterha_check_repl --conf=/etc/mha/mha1.cnf 主从复制检测
VIP漂移脚本验证测试
架构初始状态:
(1)查看mysql-master网络状态
[root@localhost ~]# ifconfig
eth0 Link encap:Ethernet HWaddr 00:0C:29:E4:BD:28
inet addr:192.168.239.128 Bcast:192.168.239.255 Mask:255.255.255.0
inet6 addr: fe80::20c:29ff:fee4:bd28/64 Scope:Link
UP BROADCAST RUNNING MULTICAST MTU:1500 Metric:1
RX packets:249193 errors:0 dropped:0 overruns:0 frame:0
TX packets:74203 errors:0 dropped:0 overruns:0 carrier:0
collisions:0 txqueuelen:1000
RX bytes:334114738 (318.6 MiB) TX bytes:6310911 (6.0 MiB)
eth0:0 Link encap:Ethernet HWaddr 00:0C:29:E4:BD:28 #出现VIP
inet addr:192.168.239.60 Bcast:192.168.239.255 Mask:255.255.255.0
UP BROADCAST RUNNING MULTICAST MTU:1500 Metric:1
lo Link encap:Local Loopback
inet addr:127.0.0.1 Mask:255.0.0.0
inet6 addr: ::1/128 Scope:Host
UP LOOPBACK RUNNING MTU:16436 Metric:1
RX packets:50 errors:0 dropped:0 overruns:0 frame:0
TX packets:50 errors:0 dropped:0 overruns:0 carrier:0
collisions:0 txqueuelen:0
RX bytes:8386 (8.1 KiB) TX bytes:8386 (8.1 KiB)
(2)停掉mysql-master的MySQL数据库服务
[root@localhost ~]# /etc/init.d/mysqld stop
Shutting down MySQL..... SUCCESS!
[root@localhost ~]# ifconfig #VIP消失了
eth0 Link encap:Ethernet HWaddr 00:0C:29:59:7C:EF
inet addr:192.168.239.128 Bcast:192.168.239.255 Mask:255.255.255.0
inet6 addr: fe80::20c:29ff:fe59:7cef/64 Scope:Link
UP BROADCAST RUNNING MULTICAST MTU:1500 Metric:1
RX packets:316130 errors:0 dropped:0 overruns:0 frame:0
TX packets:58058 errors:0 dropped:0 overruns:0 carrier:0
collisions:0 txqueuelen:1000
RX bytes:363635227 (346.7 MiB) TX bytes:6462008 (6.1 MiB)
lo Link encap:Local Loopback
inet addr:127.0.0.1 Mask:255.0.0.0
inet6 addr: ::1/128 Scope:Host
UP LOOPBACK RUNNING MTU:16436 Metric:1
RX packets:69 errors:0 dropped:0 overruns:0 frame:0
TX packets:69 errors:0 dropped:0 overruns:0 carrier:0
collisions:0 txqueuelen:0
RX bytes:9752 (9.5 KiB) TX bytes:9752 (9.5 KiB)
(3)查看mysql-slaveA
[root@localhost ~]# ifconfig #VIP出现了
eth0 Link encap:Ethernet HWaddr 00:0C:29:4C:D5:92
inet addr:192.168.239.129 Bcast:192.168.239.255 Mask:255.255.255.0
inet6 addr: fe80::20c:29ff:fe4c:d592/64 Scope:Link
UP BROADCAST RUNNING MULTICAST MTU:1500 Metric:1
RX packets:287225 errors:0 dropped:0 overruns:0 frame:0
TX packets:47133 errors:0 dropped:0 overruns:0 carrier:0
collisions:0 txqueuelen:1000
RX bytes:361247254 (344.5 MiB) TX bytes:5159560 (4.9 MiB)
eth0:0 Link encap:Ethernet HWaddr 00:0C:29:4C:D5:92
inet addr:192.168.239.60 Bcast:192.168.239.255 Mask:255.255.255.0
UP BROADCAST RUNNING MULTICAST MTU:1500 Metric:1
lo Link encap:Local Loopback
inet addr:127.0.0.1 Mask:255.0.0.0
inet6 addr: ::1/128 Scope:Host
UP LOOPBACK RUNNING MTU:16436 Metric:1
RX packets:45 errors:0 dropped:0 overruns:0 frame:0
TX packets:45 errors:0 dropped:0 overruns:0 carrier:0
collisions:0 txqueuelen:0
RX bytes:7718 (7.5 KiB) TX bytes:7718 (7.5 KiB)
(4)查看mysql-slaveB的主从同步情况
[root@localhost ~]# mysql -uroot -p123456 -e 'show slave statusG'
Warning: Using a password on the command line interface can be insecure.
*************************** 1. row ***************************
Slave_IO_State: Waiting for master to send event
Master_Host: 192.168.239.129 #mysql-slaveB的主库已经切换为mysql-slaveA
Master_User: rep
Master_Port: 3306
Connect_Retry: 60
Master_Log_File: mysql-bin.000008
Read_Master_Log_Pos: 271
Relay_Log_File: mysql-db03-relay-bin.000002
Relay_Log_Pos: 361
Relay_Master_Log_File: mysql-bin.000008
Slave_IO_Running: Yes
Slave_SQL_Running: Yes
(5)mysql-master故障恢复
[root@localhost ~]# /etc/init.d/mysqld start
Starting MySQL. SUCCESS!
[root@localhost ~]# mysql -uroot -p123456
mysql> CHANGE MASTER TO MASTER_HOST='192.168.239.129', MASTER_PORT=3306, MASTER_AUTO_POSITION=1, MASTER_USER='rep', MASTER_PASSWORD='123456';
Query OK, 0 rows affected, 2 warnings (0.02 sec)
mysql> start slave;
Query OK, 0 rows affected, 1 warning (0.01 sec)
mysql> show slave statusG
*************************** 1. row ***************************
Slave_IO_State: Waiting for master to send event
Master_Host: 192.168.239.129
Master_User: rep
Master_Port: 3306
Connect_Retry: 60
Master_Log_File: mysql-bin.000008
Read_Master_Log_Pos: 271
Relay_Log_File: mysql-db01-relay-bin.000002
Relay_Log_Pos: 361
Relay_Master_Log_File: mysql-bin.000008
Slave_IO_Running: Yes
Slave_SQL_Running: Yes
(6)补上缺失的mha配置文件
[root@localhost mha]# vim /etc/mha/mha1.cnf
[server default]
manager_log=/var/log/mha/mha1/manager
manager_workdir=/var/log/mha/mha1
master_binlog_dir=/usr/local/mysql/data
password=123456
ping_interval=2
repl_password=123456
repl_user=rep
ssh_user=root
[server default]
manager_log=/var/log/mha/mha1/manager
manager_workdir=/var/log/mha/mha1
master_binlog_dir=/usr/local/mysql/data
master_ip_failover_script=/usr/local/bin/master_ip_failover
password=123456
ping_interval=2
repl_password=123456
repl_user=rep
ssh_user=root
user=mha
[server1] #添加此模块
hostname=192.168.239.128
port=3306
[server2]
hostname=192.168.239.129
port=3306
[server3]
hostname=192.168.239.130
port=3306
(7)启动mha管理进程
[root@localhost ~]# ps -ef | grep mha | grep -v grep
[root@localhost ~]# nohup masterha_manager --conf=/etc/mha/mha1.cnf --remove_dead_master_conf --ignore_last_failover < /dev/null > /var/log/mha/mha1/manager.log 2>&1 &
[1] 14921
[root@localhost ~]# ps -ef | grep mha | grep -v grep
root 14921 13211 3 20:11 pts/3 00:00:00 perl /usr/bin/masterha_manager --conf=/etc/mha/mha1.cnf --remove_dead_master_conf --ignore_last_failover
此时的架构状态

配置binlog-server备份服务器
主库宕机,也许会造成主库binlog复制不及时而导致数据丢失的情况出现,因此配置binlog-server进行时时同步备份,是必要的一种安全手段。
修改mha配置文件
[root@localhost mha]# vim /etc/mha/mha1.cnf
[server default]
manager_log=/var/log/mha/mha1/manager
manager_workdir=/var/log/mha/mha1
master_binlog_dir=/usr/local/mysql/data
password=123456
ping_interval=2
repl_password=123456
repl_user=rep
ssh_user=root
[server default]
manager_log=/var/log/mha/mha1/manager
manager_workdir=/var/log/mha/mha1
master_binlog_dir=/usr/local/mysql/data #全局的binlog存放位置
master_ip_failover_script=/usr/local/bin/master_ip_failover
password=123456
ping_interval=2
repl_password=123456
repl_user=rep
ssh_user=root
user=mha
[server1] #添加此模块
hostname=192.168.239.128
port=3306
[server2]
hostname=192.168.239.129
port=3306
[server3]
hostname=192.168.239.130
port=3306
[binlog1] #添加binlog模块
no_master=1 #不允许切换为主
hostname=192.168.239.130 #存放IP
master_binlog_dir=/data/mysql/binlog/ #binlog存放位置优先级比全局的高
拉取主库(mysql-slaveB)上的binlog日志到mysql-slaveB的存放目录里
[root@localhost ~]# mkdir -p /data/mysql/binlog #创建存放目录
[root@localhost ~]# cd /data/mysql/binlog/ #进入存放目录
[root@localhost binlog]# ll
total 0
[root@localhost binlog]# which mysqlbinlog
/usr/local/bin/mysqlbinlog
[root@localhost binlog]# mysqlbinlog -R --host=192.168.239.60 --user=mha --password=123456 --raw --stop-never mysql-bin.000001 & #拉取VIP的binlog
[2] 15694
[root@localhost binlog]# ps -ef | grep mysqlbinlog | grep -v grep
root 16061 12786 0 20:53 pts/2 00:00:00 mysqlbinlog -R --host=192.168.239.60 --user=mha --password=x xxxx --raw --stop-never mysql-bin.000001
启动mha管理进程
[root@localhost binlog]# pkill perl
[root@localhost binlog]# nohup masterha_manager --conf=/etc/mha/mha1.cnf --remove_dead_master_conf --ignore_last_failover < /dev/null > /var/log/mha/mha1/manager.log 2>&1 &
[root@localhost binlog]# ps -ef | grep perl | grep -v grep
root 15697 13211 0 20:42 pts/3 00:00:00 perl /usr/bin/masterha_manager --conf=/etc/mha/mha1.cnf --remove_dead_master_conf --ignore_last_failover
mysql中间件Atlas
Atlas简介
Atlas是由Qihoo-360公司web平台部基础架构团队开发维护的一个基于MySQL协议的数据中间层项目。它在MySQL官方推出的MySQL-Proxy-0.8.2版本的基础上,修改了大量bug,添加了很多功能特性。它在MySQL官方推出的MySQL-Proxy0.8.2版本的基础上,修改了大量bug,添加了很多功能特性。
Atlas主要功能
读写分离
从库负载均衡
IP过滤
自动分表
DBA可平滑上下线DB
自动摘除宕机的DB
Atlas相对于官方MySQL-Proxy的优势
将主流程中所有Lua代码用C重写,Lua仅用于管理接口
重写网络模型,线程模型
实现了真正意义上的连接池
优化了锁机制,性能提高数十倍
安装Atlas
在mysql-slaveB上操作
[root@localhost ~]# rpm -ivh Atlas-2.2.1.el6.x86_64.rpm
Preparing... ########################################### [100%]
package Atlas-2.2.1-1.x86_64 is already installed
配置Atlas
配置文件里需要做如下修改:
在mysql-slaveB上操作
#需要修改的内容一览:
[root@localhost ~]# cat -n /usr/local/mysql-proxy/conf/test.cnf.bak | egrep -w "12|15|18|30|36|48"
12 proxy-backend-addresses = 127.0.0.1:3306
15 #proxy-read-only-backend-addresses = 127.0.0.1:3305@1
18 pwds = user1:+jKsgB3YAG8=, user2:GS+tr4TPgqc=
30 log-level = message
36 #sql-log = OFF
45 proxy-address = 0.0.0.0:1234
48 admin-address = 0.0.0.0:2345
#将上边内容修改为如下配置:
[root@localhost ~]# cat -n /usr/local/mysql-proxy/conf/test.cnf | egrep -w "12|15|18|30|36|48"
12 proxy-backend-addresses = 192.168.239.60:3307 #这里添加VIP地址
15 proxy-read-only-backend-addresses = 192.168.239.128:3307@1,192.168.239.130:3307@1 #从库地址
18 pwds = root:++gAN07C/Q0=,mha:++gAN07C/Q0= #MySQL授权用户账号密码(密码要加密)
30 log-level = error #日志级别
36 sql-log = ON #打开日志
45 proxy-address = 192.168.239.130:3306 #Atlas的工作监听端口(提供代理服务)
48 admin-address = 192.168.239.130:1234 #Atlas的管理监听端口
> 提示:
> 主从复制的主从数据库的默认3306端口需要修改成3307
> 第18行为登陆MySQL的授权账号信息,其中密码需要加密(通过/usr/local/mysql-proxy/bin/encrypt加密工具来加密)
修改每个数据库的服务端口为3307
在mysql-slaveB上操作
#先杀掉mha管理进程
[root@localhost conf]# ps -ef | grep mha | grep -v grep
root 15697 1 0 Sep05 ? 00:00:09 perl /usr/bin/masterha_manager --conf=/etc/mha/mha1.cnf --remove_dead_master_conf --ignore_last_failover
[root@localhost conf]# kill -9 15697
[root@localhost conf]# ps -ef | grep mha | grep -v grep
#修改mysql-master,mysql-slaveA,mysql-slaveB上的MySQL服务端口为3307
[root@localhost conf]# sed -n '13p' /etc/my.cnf
port = 3307
[root@localhost conf]# /etc/init.d/mysqld restart
将从库mysql-master和mysql-slaveB指向主库mysql-slaveA进行同步
#mysql-master和mysql-slaveB的操作步骤相同
mysql> stop slave; #停止从同步
Query OK, 0 rows affected (0.00 sec)
mysql> CHANGE MASTER TO MASTER_HOST='192.168.239.129', MASTER_PORT=3307, MASTER_AUTO_POSITION=1, MASTER_USER='rep', MASTER_PASSWORD='123123'; #授权同步信息
Query OK, 0 rows affected, 2 warnings (0.01 sec)
mysql> start slave; #开始同步
ERROR 1064 (42000): You have an error in your SQL syntax; check the manual that corresponds to your MySQL server version for the right syntax to use near 'slavee' at line 1
mysql> start slave;
Query OK, 0 rows affected, 1 warning (0.02 sec)
mysql> show slave statusG
*************************** 1. row ***************************
Slave_IO_State: Waiting for master to send event
Master_Host: 192.168.239.129
Master_User: rep
Master_Port: 3307
Connect_Retry: 60
Master_Log_File: mysql-bin.000010
Read_Master_Log_Pos: 271
Relay_Log_File: mysql-db01-relay-bin.000002
Relay_Log_Pos: 361
Relay_Master_Log_File: mysql-bin.000010
Slave_IO_Running: Yes #同步成功
Slave_SQL_Running: Yes #同步成功
Replicate_Do_DB:
修改mha配置文件
[root@localhost mha]# vim /etc/mha/mha1.cnf
[server default]
manager_log=/var/log/mha/mha1/manager
manager_workdir=/var/log/mha/mha1
master_binlog_dir=/usr/local/mysql/data
password=123456
ping_interval=2
repl_password=123456
repl_user=rep
ssh_user=root
[server default]
manager_log=/var/log/mha/mha1/manager
manager_workdir=/var/log/mha/mha1
master_binlog_dir=/usr/local/mysql/data #全局的binlog存放位置
master_ip_failover_script=/usr/local/bin/master_ip_failover
password=123456
ping_interval=2
repl_password=123456
repl_user=rep
ssh_user=root
user=mha
[server1]
hostname=192.168.239.128
port=3307 #修改端口号
[server2]
hostname=192.168.239.129
port=3307
[server3]
hostname=192.168.239.130
port=3307
[binlog1] #添加binlog模块
no_master=1 #不允许切换为主
hostname=192.168.239.130 #存放IP
master_binlog_dir=/data/mysql/binlog/ #binlog存放位置优先级比全局的高
启动mysqlbinlog日志备份的进程
[root@localhost binlog]# ps -ef | grep mysqlbinlog | grep -v grep
[root@localhost binlog]# mysqlbinlog -R --host=192.168.239.129 --port=3307 --user=mha --password=123456 --raw --stop-never mysql-bin.000001 &
[1] 24880
[root@localhost binlog]# ps -ef | grep mysqlbinlog | grep -v grep
root 24880 22198 0 01:38 pts/1 00:00:00 mysqlbinlog -R --host=192.168.239.129 --port=3307 --user=mha --password=x xxxx --raw --stop-never mysql-bin.000001
启动mha管理进程
[root@localhost conf]# ps -ef | grep perl | grep -v grep
[root@localhost conf]# nohup masterha_manager --conf=/etc/mha/mha1.cnf --remove_dead_master_conf --ignore_last_failover < /dev/null > /var/log/mha/mha1/manager.log 2>&1 &
[1] 24895
[root@localhost conf]# ps -ef | grep perl | grep -v grep
root 24895 17795 3 01:41 pts/0 00:00:00 perl /usr/bin/masterha_manager --conf=/etc/mha/mha1.cnf --remove_dead_master_conf --ignore_last_failover
启动Atlas服务
[root@localhost conf]# /usr/local/mysql-proxy/bin/mysql-proxyd test start
OK: MySQL-Proxy of test is started
[root@localhost conf]# ps -ef | grep mysql-proxy | grep -v grep
root 25005 1 0 01:43 ? 00:00:00 /usr/local/mysql-proxy/bin/mysql-proxy --defaults-file=/usr/local/mysql-proxy/conf/test.cnf
root 25006 25005 0 01:43 ? 00:00:00 /usr/local/mysql-proxy/bin/mysql-proxy --defaults-file=/usr/local/mysql-proxy/conf/test.cnf
[root@localhost conf]#
#说明:
#为何启动服务需要加test,因为在Atlas配置文件里定义了一个实例名字为test
#Atlas实际是启动了某个实例(当然也可以多实例)
[root@localhost conf]# netstat -antup | grep mysql-proxy
tcp 0 0 0.0.0.0:1234 0.0.0.0:* LISTEN 25006/mysql-proxy
tcp 0 0 0.0.0.0:3306 0.0.0.0:* LISTEN 25006/mysql-proxy
#说明:
#监听3306的为Atlas对外提供代理的端口;监听1234是Atlas的管理监听端口
登陆Atlas管理端口
[root@localhost conf]# mysql -uuser -ppwd -P1234 -h 192.168.239.130 #登陆Atlas管理端
Warning: Using a password on the command line interface can be insecure.
Welcome to the MySQL monitor. Commands end with ; or g.
Your MySQL connection id is 1
Server version: 5.0.99-agent-admin
Copyright (c) 2000, 2014, Oracle and/or its affiliates. All rights reserved.
Oracle is a registered trademark of Oracle Corporation and/or its
affiliates. Other names may be trademarks of their respective
owners.
Type 'help;' or 'h' for help. Type 'c' to clear the current input statement.
mysql> show databases; #看所有库,报错,并不让看
ERROR 1105 (07000): use 'SELECT * FROM help' to see the supported commands
mysql> select * from help; #按提示输入命令
+----------------------------+---------------------------------------------------------+
| command | description |
+----------------------------+---------------------------------------------------------+
| SELECT * FROM help | shows this help |
| SELECT * FROM backends | lists the backends and their state |
| SET OFFLINE $backend_id | offline backend server, $backend_id is backend_ndxs id |
| SET ONLINE $backend_id | online backend server, ... |
| ADD MASTER $backend | example: "add master 127.0.0.1:3306", ... |
| ADD SLAVE $backend | example: "add slave 127.0.0.1:3306", ... |
| REMOVE BACKEND $backend_id | example: "remove backend 1", ... |
| SELECT * FROM clients | lists the clients |
| ADD CLIENT $client | example: "add client 192.168.1.2", ... |
| REMOVE CLIENT $client | example: "remove client 192.168.1.2", ... |
| SELECT * FROM pwds | lists the pwds |
| ADD PWD $pwd | example: "add pwd user:raw_password", ... |
| ADD ENPWD $pwd | example: "add enpwd user:encrypted_password", ... |
| REMOVE PWD $pwd | example: "remove pwd user", ... |
| SAVE CONFIG | save the backends to config file |
| SELECT VERSION | display the version of Atlas |
+----------------------------+---------------------------------------------------------+
16 rows in set (0.00 sec)
mysql> select * from backends; #输入上边列表里的命令,出现下表
+-------------+-------------------+-------+------+
| backend_ndx | address | state | type |
+-------------+-------------------+-------+------+
| 1 | 192.168.239.60:3307 | up | rw |
| 2 | 192.168.239.128:3307 | up | ro |
| 3 | 192.168.239.130:3307 | up | ro |
+-------------+-------------------+-------+------+
3 rows in set (0.00 sec)
进行读写分离及读负载均衡测试
在mysql-master和mysql-slaveB上的本地MySQL(3307端口)创建一个库
#在mysql-slaveB上的本地3307端口的数据库里创建一个库
[root@localhost binlog]# mysql -uroot -p123456 -P3307 #登陆本地MySQL
Warning: Using a password on the command line interface can be insecure.
Welcome to the MySQL monitor. Commands end with ; or g.
Your MySQL connection id is 30
Server version: 5.6.17-log MySQL Community Server (GPL)
Copyright (c) 2000, 2014, Oracle and/or its affiliates. All rights reserved.
Oracle is a registered trademark of Oracle Corporation and/or its
affiliates. Other names may be trademarks of their respective
owners.
Type 'help;' or 'h' for help. Type 'c' to clear the current input statement.
mysql> show databases;
+--------------------+
| Database |
+--------------------+
| information_schema |
| benet |
| mysql |
| performance_schema |
| test |
| yunjisuan |
+--------------------+
6 rows in set (0.00 sec)
mysql> create database slaveB; #创建一个库slaveB
Query OK, 1 row affected (0.00 sec)
mysql> show databases;
+--------------------+
| Database |
+--------------------+
| information_schema |
| benet |
| slaveB |
| mysql |
| performance_schema |
| test |
| yunjisuan |
+--------------------+
7 rows in set (0.00 sec)
#在mysql-master上的本地3307端口的数据库里创建一个库
[root@mysql-db01 ~]# mysql -uroot -p123456 -P3307
Warning: Using a password on the command line interface can be insecure.
Welcome to the MySQL monitor. Commands end with ; or g.
Your MySQL connection id is 37
Server version: 5.6.17-log MySQL Community Server (GPL)
Copyright (c) 2000, 2014, Oracle and/or its affiliates. All rights reserved.
Oracle is a registered trademark of Oracle Corporation and/or its
affiliates. Other names may be trademarks of their respective
owners.
Type 'help;' or 'h' for help. Type 'c' to clear the current input statement.
mysql> show databases;
+--------------------+
| Database |
+--------------------+
| information_schema |
| benet |
| mysql |
| performance_schema |
| test |
| yunjisuan |
+--------------------+
6 rows in set (0.00 sec)
mysql> create database master;
Query OK, 1 row affected (0.00 sec)
mysql> show databases;
+--------------------+
| Database |
+--------------------+
| information_schema |
| benet |
| master |
| mysql |
| performance_schema |
| test |
| yunjisuan |
+--------------------+
7 rows in set (0.00 sec)
登陆mysql-slaveA(主库)进行查看
[root@localhost ~]# mysql -uroot -p123456 -P3307
Warning: Using a password on the command line interface can be insecure.
Welcome to the MySQL monitor. Commands end with ; or g.
Your MySQL connection id is 11
Server version: 5.6.17-log MySQL Community Server (GPL)
Copyright (c) 2000, 2014, Oracle and/or its affiliates. All rights reserved.
Oracle is a registered trademark of Oracle Corporation and/or its
affiliates. Other names may be trademarks of their respective
owners.
Type 'help;' or 'h' for help. Type 'c' to clear the current input statement.
mysql> show databases;
+--------------------+
| Database |
+--------------------+
| information_schema |
| benet |
| mysql | #主库192.168.239.129里并没有之前创建的master或slaveB
| performance_schema |
| test |
| yunjisuan |
+--------------------+
6 rows in set (0.00 sec)
在mysql-slaveB的本地登陆Atlas代理的3306端口
[root@localhost ~]# mysql -uroot -p123456 -h 192.168.239.130
4. 在mysql-db03的Atlas代理的MySQL服务端口里进行写入操作,测试读写分离
[root@localhost ~]# mysql -uroot -p123456 -h 192.168.239.130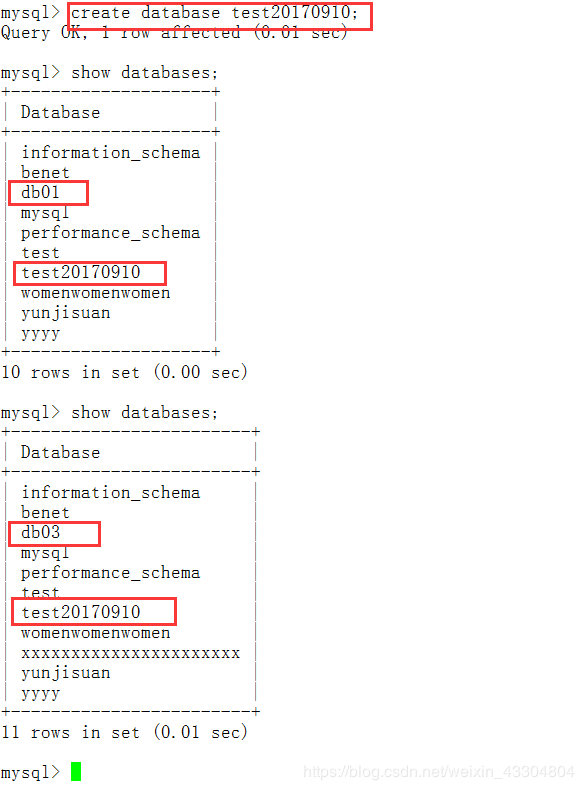
由此可见,mysql-db01和mysql-db3的库里都出现了test20170910的库。只有一个可能,数据是被写入了主库192.168.0.52里,然后同步到的从库。因此,读写分离测试完毕。