1 谈谈网络爬虫
1.1 什么是网络爬虫
在大数据时代,信息的采集是一项重要的工作,而互联网中的数据是海量的,如果单纯靠人力进行信息采集,不仅低效繁琐,搜集的成本也会提高。如何自动高效地获取互联网中我们感兴趣的信息并为我们所用是一个重要的问题,而爬虫技术就是为了解决这些问题而生的。
网络爬虫(Web crawler)也叫做网络机器人,可以代替人们自动地在互联网中进行数据信息的采集与整理。它是一种按照一定的规则,自动地抓取万维网信息的程序或者脚本,可以自动采集所有其能够访问到的页面内容,以获取或更新这些网站的内容和检索方式。
从功能上来讲,爬虫一般分为数据采集,处理,储存三个部分。爬虫从一个或若干初始网页的URL开始,获得初始网页上的URL,在抓取网页的过程中,不断从当前页面上抽取新的URL放入队列,直到满足系统的一定停止条件。
1.2 网络爬虫可以做什么
我们初步认识了网络爬虫,网络爬虫具体可以做什么呢?
a.可以实现搜索引擎
b.大数据时代,可以让我们获取更多的数据源。
c.快速填充测试和运营数据
d.为人工智能提供训练数据集
1.3 网络爬虫常用的技术(Java)
1.3.1 底层实现 HttpClient + Jsoup
HttpClient 是 Apache Jakarta Common 下的子项目,用来提供高效的、最新的、功能丰富的支持 HTTP 协议的客户端编程工具包,并且它支持 HTTP 协议最新的版本和建议。 HttpClient 已经应用在很多的项目中,比如 Apache Jakarta 上很著名的另外两个开源项目 Cactus 和 HTMLUnit 都使用了 HttpClient。更多信息请关注http://hc.apache.org/
jsoup 是一款Java 的HTML解析器,可直接解析某个URL地址、HTML文本内容。它提供了一套非常省力的API,可通过DOM,CSS以及类似于jQuery的操作方法来取出和操作数据。
1.3.2 开源框架 Webmagic
webmagic是一个开源的Java爬虫框架,目标是简化爬虫的开发流程,让开发者专注于逻辑功能的开发。webmagic的核心非常简单,但是覆盖爬虫的整个流程,也是很好的学习爬虫开发的材料。

webmagic的主要特色:
a.完全模块化的设计,强大的可扩展性。
b.核心简单但是涵盖爬虫的全部流程,灵活而强大,也是学习爬虫入门的好材料。
c.提供丰富的抽取页面API。
d.无配置,但是可通过POJO+注解形式实现一个爬虫。
e. 支持多线程。
f. 支持分布式。
g.支持爬取js动态渲染的页面。
h.无框架依赖,可以灵活的嵌入到项目中去。
2 爬虫框架Webmagic
2.1 架构解析
WebMagic项目代码分为核心和扩展两部分。核心部分(webmagic-core)是一个精简
的、模块化的爬虫实现,而扩展部分则包括一些便利的、实用性的功能。扩展部分(webmagic-extension)提供一些便捷的功能,例如注解模式编写爬虫等。同时内置了一些常用的组件,便于爬虫开发。
WebMagic的设计目标是尽量的模块化,并体现爬虫的功能特点。这部分提供非常简单、灵活的API,在基本不改变开发模式的情况下,编写一个爬虫。
WebMagic的结构分为Downloader、PageProcessor、Scheduler、Pipeline四大组件,并由Spider将它们彼此组织起来。这四大组件对应爬虫生命周期中的下载、处理、管
理和持久化等功能。而Spider则将这几个组件组织起来,让它们可以互相交互,流程化的执行,可以认为Spider是一个大的容器,它也是WebMagic逻辑的核心。
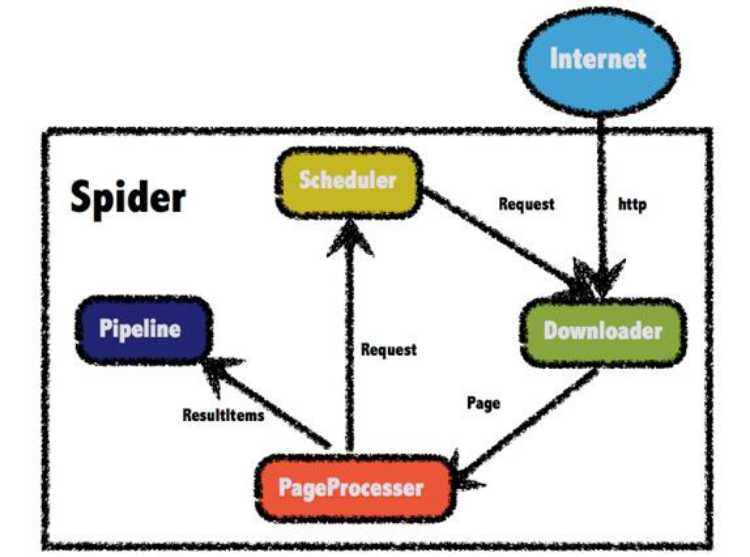
四大组件
a.Downloader
Downloader负责从互联网上下载页面,以便后续处理。WebMagic默认使用了ApacheHttpClient作为下载工具。
b.PageProcessor
PageProcessor负责解析页面,抽取有用信息,以及发现新的链接。WebMagic使用Jsoup作为HTML解析工具,并基于其开发了解析XPath的工具Xsoup。
在这四个组件中,PageProcessor对于每个站点每个页面都不一样,是需要使用者定制的部分。
c.Scheduler
Scheduler负责管理待抓取的URL,以及一些去重的工作。WebMagic默认提供了JDK的内存队列来管理URL,并用集合来进行去重。也支持使用Redis进行分布式管理。
d.Pipeline
Pipeline负责抽取结果的处理,包括计算、持久化到文件、数据库等。WebMagic默认提供了“输出到控制台”和“保存到文件”两种结果处理方案。
2.2 PageProcessor
需求:编写爬虫程序,爬取csdn中博客--工人智能的内容
2.2.1 爬取页面全部内容
(1)创建工程,引入依赖
<dependency>

<groupId>us.codecraft</groupId>

<artifactId>webmagic‐core</artifactId>

<version>0.7.3</version>

</dependency>

<dependency>

<groupId>us.codecraft</groupId>

<artifactId>webmagic‐extension</artifactId>

<version>0.7.3</version>

</dependency>
(2)编写类实现网页内容的爬取
import us.codecraft.webmagic.Page;

import us.codecraft.webmagic.Site;

import us.codecraft.webmagic.Spider;

import us.codecraft.webmagic.processor.PageProcessor; /**
*爬取类

*/

public class MyProcessor implements PageProcessor {


public void process(Page page) {

System.out.println(page.getHtml().toString());

}


public Site getSite() {

return Site.me().setSleepTime(100).setRetryTimes(3);

}


public static void main(String[] args) {

Spider.create( new MyProcessor() ).addUrl("https://blog.csdn.net").run();

}

}
Spider是爬虫启动的入口。在启动爬虫之前,我们需要使用一个PageProcessor创建一个Spider对象,然后使用run()进行启动。
方法** 说明** 示例**
create(PageProcessor) 创建Spider Spider.create(new GithubRepoProcessor())
同时Spider的其他组件(Downloader、Scheduler、Pipeline)都可以通过set方法来进行设置。
Page代表了从Downloader下载到的一个页面——可能是HTML,也可能是JSON或者其他文本格式的内容。Page是WebMagic抽取过程的核心对象,它提供一些方法可供抽取、结果保存等。
Site用于定义站点本身的一些配置信息,例如编码、HTTP头、超时时间、重试策略等、代理等,都可以通过设置Site对象来进行配置。
方法** 说明** 示例**
setCharset(String) 设置编码 site.setCharset("utf-8")
2.2.2 爬取指定内容(XPath)
如果我们想爬取网页中部分的内容,需要指定xpath。
XPath,即为XML路径语言(XMLPathLanguage),它是一种用来确定XML文档中某部分位置的语言。XPath 使用路径表达式来选取 XML 文档中的节点或者节点集。这些路径表达式和我们在常规的电脑文件系统中看到的表达式非常相似。
我们通过指定xpath来抓取网页的部分内容
System.out.println(page.getHtml().xpath("//* [@id="nav"]/div/div/ul/li[5]/a").toString());
以上代码的含义:id为nav的节点下的div节点下的div节点下的ul下的第5个li节点下的a节点
看一下输出结果
<a href="/nav/ai">人工智能</a>
2.2.3 添加目标地址
我们可以通过添加目标地址,从种子页面爬取到更多的页面
public void process(Page page) {
page.addTargetRequests( page.getHtml().links().all() );//将当前页面
里的所有链接都添加到目标页面中
public void process(Page page) {
        page.addTargetRequests( page.getHtml().links().all() );//将当前页面
里的所有链接都添加到目标页面中
        System.out.println(page.getHtml().xpath("//*
[@id="nav"]/div/div/ul/li[5]/a").toString());
    }
运行后发现好多地址都出现在控制台
2.2.4 目标地址正则匹配
需求:只提取csdn的文章详细页内容,并提取标题
import us.codecraft.webmagic.Page;

import us.codecraft.webmagic.Site;

import us.codecraft.webmagic.Spider;

import us.codecraft.webmagic.processor.PageProcessor; /**
*爬取类

*/

public class MyProcessor implements PageProcessor {


public void process(Page page) {

//page.addTargetRequests( page.getHtml().links().all() );//将当前页

面里的所有链接都添加到目标页面中

//

page.addTargetRequests(

page.getHtml().links().regex("https://blog.csdn.net/[a‐z 0‐9

‐]+/article/details/[0‐9]{8}").all() );

System.out.println(page.getHtml().xpath("//* [@id="mainBox"]/main/div[1]/div[1]/h1/text()").toString());

}


public Site getSite() {

return Site.me().setSleepTime(100).setRetryTimes(3);

}


public static void main(String[] args) {

Spider.create( new MyProcessor()

).addUrl("https://blog.csdn.net/nav/ai").run();

}

}
2.3 Pipeline
2.3.1 ConsolePipeline 控制台输出
/**
 * 爬取类
 */
public class MyProcessor implements PageProcessor {
    public void process(Page page) {
        //page.addTargetRequests( page.getHtml().links().all() );//将当前页
面里的所有链接都添加到目标页面中
        //
        page.addTargetRequests(
page.getHtml().links().regex("https://blog.csdn.net/[a‐z 0‐9
‐]+/article/details/[0‐9]{8}").all() );
        //System.out.println(page.getHtml().xpath("//*
[@id="mainBox"]/main/div[1]/div[1]/h1/text()").toString());
        page.putField("title",page.getHtml().xpath("//*
[@id="mainBox"]/main/div[1]/div[1]/h1/text()").toString());
    }
    public Site getSite() {
        return Site.me().setSleepTime(100).setRetryTimes(3);
    }
    public static void main(String[] args) {
        Spider.create( new MyProcessor() )
                .addUrl("https://blog.csdn.net")
                .addPipeline(new ConsolePipeline())
                .run();
    }
}
2.3.2 FilePipeline 文件保存
public static void main(String[] args) {
        Spider.create( new MyProcessor() )
                .addUrl("https://blog.csdn.net")
                .addPipeline(new ConsolePipeline())
                .addPipeline(new FilePipeline("e:/data"))//以文件方式保存
                .run();
    }
2.3.3 JsonFilePipeline
以json方式保存
public static void main(String[] args) {
        Spider.create( new MyProcessor() )
                .addUrl("https://blog.csdn.net")
                .addPipeline(new ConsolePipeline())
                .addPipeline(new FilePipeline("e:/data"))
                .addPipeline(new JsonFilePipeline("e:/json"))// 以json方式保
存
                .run();
    }
2.3.4 定制Pipeline
如果以上Pipeline都不能满足你的需要,你可以定制Pipeline
(1)创建类MyPipeline实现接口Pipeline
import us.codecraft.webmagic.ResultItems;
import us.codecraft.webmagic.Task;
import us.codecraft.webmagic.pipeline.Pipeline;
public class MyPipeline implements Pipeline {
    public void process(ResultItems resultItems, Task task) {
        String title=resultItems.get("title");
        System.out.println("我的定制的 title:"+title);
    }
(2)修改main方法
public static void main(String[] args) {
        Spider.create( new MyProcessor() )
                .addUrl("https://blog.csdn.net")
                .addPipeline(new ConsolePipeline())
                .addPipeline(new FilePipeline("e:/data"))
                .addPipeline(new JsonFilePipeline("e:/json"))
                .addPipeline(new MyPipeline())//定制化输出
                .run();
    }
2.4 Scheduler
我们刚才完成的功能,每次运行可能会爬取重复的页面,这样做是没有任何意义的。Scheduler(URL管理) 最基本的功能是实现对已经爬取的URL进行标示。可以实现URL的增量去重。
目前scheduler主要有三种实现方式:
1)内存队列 QueueScheduler
2)文件队列 FileCacheQueueScheduler
3) Redis队列 RedisScheduler
2.4.1 内存队列
使用setScheduler来设置Scheduler
public static void main(String[] args) {
        Spider.create( new MyProcessor() )
                .addUrl("https://blog.csdn.net")
                .setScheduler(new QueueScheduler())
                .run();
    }
2.4.2 文件队列
使用文件保存抓取URL,可以在关闭程序并下次启动时,从之前抓取到的URL继续抓取
(1)创建文件夹E:scheduler
(2)修改代码
public static void main(String[] args) {
        Spider.create( new MyProcessor() )
                .addUrl("https://blog.csdn.net")
                //.setScheduler(new QueueScheduler())//设置内存队列
                .setScheduler(new
FileCacheQueueScheduler("E:\scheduler"))//设置文件队列
                .run();
    }
运行后文件夹E:scheduler会产生两个文件blog.csdn.net.urls.txt和 blog.csdn.net.cursor.txt
2.4.3 Redis队列
使用Redis保存抓取队列,可进行多台机器同时合作抓取
(1)运行redis服务端
(2)修改代码
public static void main(String[] args) {
        Spider.create( new MyProcessor() )
                .addUrl("https://blog.csdn.net")
                //.setScheduler(new QueueScheduler())//设置内存队列
                //.setScheduler(new
FileCacheQueueScheduler("E:\scheduler"))//设置文件队列
                .setScheduler(new RedisScheduler("127.0.0.1"))//设置Redis队
列
                .run();
    }
3 csdn文章爬取
3.1 需求分析
每日某时间段整从CSDN博客中爬取文档,存入文章数据库中。
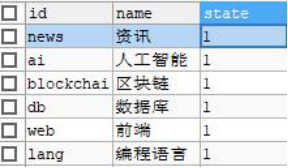
3.2 频道设置
资讯 https://blog.csdn.net/nav/news
人工智能 https://blog.csdn.net/nav/ai
区块链 https://blog.csdn.net/nav/blockchain
数据库 https://blog.csdn.net/nav/db
前端 https://blog.csdn.net/nav/web
编程语言 https://blog.csdn.net/nav/lang
向数据库tensquare_article的tb_channel表中添加记录
3.3 代码编写
3.3.1 模块搭建
(1)创建模块tensquare_article_crawler ,引入依赖
<dependency>
            <groupId>us.codecraft</groupId>
            <artifactId>webmagic‐core</artifactId>
            <version>0.7.3</version>
            <exclusions>
                <exclusion>
                    <groupId>org.slf4j</groupId>
                    <artifactId>slf4j‐log4j12</artifactId>
                </exclusion>
            </exclusions>
        </dependency>
        <dependency>
            <groupId>us.codecraft</groupId>
            <artifactId>webmagic‐extension</artifactId>
            <version>0.7.3</version>
        </dependency>
        <dependency>
            <groupId>org.springframework.boot</groupId>
            <artifactId>spring‐boot‐starter‐data‐jpa</artifactId>
        </dependency>
        <dependency>
            <groupId>mysql</groupId>
            <artifactId>mysql‐connector‐java</artifactId>
        </dependency>
        <dependency>
            <groupId>com.tensquare</groupId>
            <artifactId>tensquare_common</artifactId>
            <version>1.0‐SNAPSHOT</version>
        </dependency>
(2)创建配置文件application.yml
server:
  port: 9014
spring:
  application:
    name: tensquare‐crawler #指定服务名
  datasource:
    driverClassName: com.mysql.jdbc.Driver
    url: jdbc:mysql://127.0.0.1:3306/tensquare_article?
characterEncoding=UTF8
    username: root
    password: 123456
  jpa:
    database: MySQL
    show‐sql: true
redis:
  host: 127.0.0.1
(3)创建启动类
@SpringBootApplication
@EnableScheduling
public class CrawlerApplication {
   @Value("${redis.host}")
private String redis_host;

public static void main(String[] args) {
SpringApplication.run(CrawlerApplication.class, args);
}
@Bean
public IdWorker idWorkker(){
return new IdWorker(1, 1);
}

   @Bean
public RedisScheduler redisScheduler(){
return new RedisScheduler(redis_host);
}
}
(4)实体类及数据访问接口
3.3.2 爬取类
创建文章爬取类ArticleProcessor
package com.tensquare.crawler.processor;
import us.codecraft.webmagic.Page;
import us.codecraft.webmagic.Site;
import us.codecraft.webmagic.processor.PageProcessor;
/**
 * 文章爬取类
 */
@Component
public class ArticleProcessor implements PageProcessor {

    @Override
    public void process(Page page) {

page.addTargetRequests(page.getHtml().links().regex("https://blog.csdn.net/
[a‐z 0‐9 ‐]+/article/details/[0‐9]{8}").all());
        String title= page.getHtml().xpath("//*
[@id="mainBox"]/main/div[1]/div[1]/h1/text()").get();
        String content= page.getHtml().xpath("//*
[@id="article_content"]/div/div[1]").get();
        //获取页面需要的内容
        System.out.println("标题:"+title );
        System.out.println("内容:"+content );
        if(title!=null && content!=null){  //如果有标题和内容
            page.putField("title",title);
            page.putField("content",content);
        }else{
            page.setSkip(true);//跳过
        }
    }
    @Override
    public Site getSite() {
        return Site.me().setRetryTimes(3000).setSleepTime(100);
    }
}
3.3.3 入库类
创建文章入库类ArticleDbPipeline ,负责将爬取的数据存入数据库
package com.tensquare.crawler.pipeline;
import com.tensquare.crawler.dao.ArticleDao;
import com.tensquare.crawler.pojo.Article;
import org.springframework.beans.factory.annotation.Autowired;
import org.springframework.stereotype.Repository;
import us.codecraft.webmagic.ResultItems;
import us.codecraft.webmagic.Task;
import us.codecraft.webmagic.pipeline.Pipeline;
import util.IdWorker;
import java.util.Map;
/**
 * 入库类
 */
@Component
public class ArticleDbPipeline implements Pipeline {
    @Autowired
    private ArticleDao articleDao;
    @Autowired
    private IdWorker idWorker;
    public void setChannelId(String channelId) {
        this.channelId = channelId;
    }
    private String channelId;//频道ID
    @Override
    public void process(ResultItems resultItems, Task task) {
        String title = resultItems.get("title");
        String content= resultItems.get("content");
        Article article=new Article();
        article.setId(idWorker.nextId()+"");
        article.setChannelid(channelId);
        article.setTitle(title);
        article.setContent(content);
        articleDao.save(article);
    }
}
ReusltItems 相当于一个Map,它保存PageProcessor处理的结果,供Pipeline使用。它的API与Map很类似,值得注意的是它有一个字段 skip ,若设置为true,则不应被Pipeline处理。
3.3.4 任务类
创建任务类
package com.tensquare.crawler.task;
import com.tensquare.crawler.pipeline.ArticleDbPipeline;
import com.tensquare.crawler.pipeline.ArticleTxtPipeline;
import com.tensquare.crawler.processor.ArticleProcessor;
import org.springframework.beans.factory.annotation.Autowired;
import org.springframework.scheduling.annotation.Scheduled;
import org.springframework.stereotype.Component;
import us.codecraft.webmagic.Spider;
import us.codecraft.webmagic.scheduler.RedisScheduler;
/**
 * 文章任务类
 */
@Component
public class ArticleTask {
    @Autowired
    private ArticleDbPipeline articleDbPipeline;
    @Autowired
    private ArticleTxtPipeline articleTxtPipeline;
    @Autowired
    private RedisScheduler redisScheduler;
    @Autowired
    private ArticleProcessor articleProcessor;
    /**
     * 爬取ai数据
     */
    @Scheduled(cron="0 54 21 * * ?")
    public void aiTask(){
        System.out.println("爬取AI文章");
        Spider spider = Spider.create(articleProcessor);
        spider.addUrl("https://blog.csdn.net/nav/ai");
        articleTxtPipeline.setChannelId("ai");
        articleDbPipeline.setChannelId("ai");
        spider.addPipeline(articleDbPipeline);
        spider.addPipeline(articleTxtPipeline);
        spider.setScheduler(redisScheduler);
        spider.start();
 }
    /**
     * 爬取db数据
     */
    @Scheduled(cron="20 17 11 * * ?")
    public void dbTask(){
        System.out.println("爬取DB文章");
        Spider spider = Spider.create(articleProcessor);
        spider.addUrl("https://blog.csdn.net/nav/db");
        articleTxtPipeline.setChannelId("db");
        spider.addPipeline(articleTxtPipeline);
        spider.setScheduler(redisScheduler);
        spider.start();
    }
    /**
     * 爬取web数据
     */
    @Scheduled(cron="20 27 11 * * ?")
    public void webTask(){
        System.out.println("爬取WEB文章");
        Spider spider = Spider.create(articleProcessor);
        spider.addUrl("https://blog.csdn.net/nav/web");
        articleTxtPipeline.setChannelId("web");
        spider.addPipeline(articleTxtPipeline);
        spider.setScheduler(redisScheduler);
        spider.start();
    }
}
4 CSDN用户数据爬取
4.1 需求分析
从csdn中爬取用户昵称和头像,存到用户表,头像图片存储到本地
4.2 代码编写
4.2.1 模块搭建
(1)创建工程tensquare_user_crawler。pom.xml引入依赖
<dependency>
            <groupId>us.codecraft</groupId>
            <artifactId>webmagic‐core</artifactId>
            <version>0.7.3</version>
            <exclusions>
                <exclusion>
                    <groupId>org.slf4j</groupId>
                    <artifactId>slf4j‐log4j12</artifactId>
                </exclusion>
            </exclusions>
        </dependency>
        <dependency>
            <groupId>us.codecraft</groupId>
            <artifactId>webmagic‐extension</artifactId>
            <version>0.7.3</version>
        </dependency>
        <dependency>
            <groupId>org.springframework.boot</groupId>
            <artifactId>spring‐boot‐starter‐data‐jpa</artifactId>
        </dependency>
        <dependency>
            <groupId>mysql</groupId>
            <artifactId>mysql‐connector‐java</artifactId>
        </dependency>
        <dependency>
            <groupId>com.tensquare</groupId>
            <artifactId>tensquare_common</artifactId>
            <version>1.0‐SNAPSHOT</version>
        </dependency>
(2)创建配置文件application.yml
server:
  port: 9015
spring:
  application:
    name: tensquare‐user‐crawler #指定服务名
  datasource:
    driverClassName: com.mysql.jdbc.Driver
    url: jdbc:mysql://127.0.0.1:3306/tensquare_user?characterEncoding=UTF8
    username: root
    password: 123456
  jpa:
    database: MySQL
    show‐sql: true
redis:
  host: 127.0.0.1
(3)创建启动类
@SpringBootApplication
@EnableScheduling
public class UserCrawlerApplication {
   @Value("${redis.host}")
private String redis_host;

public static void main(String[] args) {
SpringApplication.run(CrawlerApplication.class, args);
}
@Bean
public IdWorker idWorkker(){
return new IdWorker(1, 1);
}

   @Bean
public RedisScheduler redisScheduler(){
return new RedisScheduler(redis_host);
}
}
(4)实体类及数据访问接口
4.2.2 爬取类
package com.tensquare.usercrawler.processor;
import org.springframework.stereotype.Component;
import us.codecraft.webmagic.Page;
import us.codecraft.webmagic.Site;
import us.codecraft.webmagic.processor.PageProcessor;
/**
 * 文章爬取类
 */
@Component
public class UserProcessor implements PageProcessor {
    @Override
    public void process(Page page) {

page.addTargetRequests(page.getHtml().links().regex("https://blog.csdn.net/
[a‐z 0‐9 ‐]+/article/details/[0‐9]{8}").all());
        String nickname= page.getHtml().xpath("//*
[@id="uid"]/text()").get();
        String image= page.getHtml().xpath("//*
[@id="asideProfile"]/div[1]/div[1]/a").css("img","src").toString();
        if(nickname!=null && image!=null){  //如果有昵称和头像
            page.putField("nickname",nickname);
            page.putField("image",image);
        }else{
            page.setSkip(true);//跳过
        }
    }
    @Override
    public Site getSite() {
        return Site.me().setRetryTimes(3000).setSleepTime(100);
    }
}
4.2.3 下载工具类
将工具类拷贝至tensquare_common工程的util包下
package util;
import java.io.*;
import java.net.URL;
import java.net.URLConnection;
/**
 * 下载工具类
 */
public class DownloadUtil {
    public static void download(String urlStr,String filename,String
savePath) throws IOException {
        URL url = new URL(urlStr);
        //打开url连接
        URLConnection connection = url.openConnection();
        //请求超时时间
        connection.setConnectTimeout(5000);
        //输入流
        InputStream in = connection.getInputStream();
        //缓冲数据
        byte [] bytes = new byte[1024];
        //数据长度
        int len;
        //文件
        File file = new File(savePath);
        if(!file.exists())
            file.mkdirs();
        OutputStream out  = new
FileOutputStream(file.getPath()+"\"+filename);
        //先读到bytes中
        while ((len=in.read(bytes))!=‐1){
            //再从bytes中写入文件
            out.write(bytes,0,len);
        }
        //关闭IO
        out.close();
        in.close();
    }
}
4.2.4 入库类
package com.tensquare.usercrawler.pipeline;
import com.tensquare.usercrawler.dao.UserDao;
import com.tensquare.usercrawler.pojo.User;
import org.springframework.beans.factory.annotation.Autowired;
import org.springframework.stereotype.Component;
import us.codecraft.webmagic.ResultItems;
import us.codecraft.webmagic.Task;
import us.codecraft.webmagic.pipeline.Pipeline;
import util.DownloadUtil;
import util.IdWorker;
import java.io.IOException;
@Component
public class UserPipeline implements Pipeline {
    @Autowired
    private IdWorker idWorker;
    @Autowired
    private UserDao userDao;
    @Override
    public void process(ResultItems resultItems, Task task) {
        User user=new User();
        user.setId(idWorker.nextId()+"");
        user.setNickname(resultItems.get("nickname"));
        String image = resultItems.get("image");//图片地址
        String fileName = image.substring(image.lastIndexOf("/")+1);
        user.setAvatar(fileName);
        userDao.save(user);
        //下载图片
        try {
            DownloadUtil.download(image,fileName,"e:/userimg");
        } catch (IOException e) {
            e.printStackTrace();
        }
    }
}
4.2.5 任务类
package com.tensquare.usercrawler.task;
import com.tensquare.usercrawler.pipeline.UserPipeline;
import com.tensquare.usercrawler.processor.UserProcessor;
import org.springframework.beans.factory.annotation.Autowired;
import org.springframework.scheduling.annotation.Scheduled;
import org.springframework.stereotype.Component;
import us.codecraft.webmagic.Spider;
import us.codecraft.webmagic.scheduler.RedisScheduler;
/**
 * 用户爬取任务类
 */
@Component
public class UserTask {
    @Autowired
    private RedisScheduler redisScheduler;
    @Autowired
    private UserPipeline userPipeline;
    @Autowired
    private UserProcessor userProcessor;
    /**
     * 爬取用户数据
     */
    @Scheduled(cron="0 56 22 * * ?")
    public void userTask(){
        System.out.println("爬取用户");
        Spider spider = Spider.create(userProcessor);
        spider.addUrl("https://blog.csdn.net");
        spider.addPipeline(userPipeline);
        spider.setScheduler(redisScheduler);
        spider.start();
    }
}