在Suteki.Shop,实现了自己的数据校验机制,可以说其设计思路还是很有借鉴价值的。而使用
这种机制也很容易在Model中对相应的实体对象(属性)添加校验操作方法。下面就来介绍一下其实
现方式。
首先,看一下这样类图:
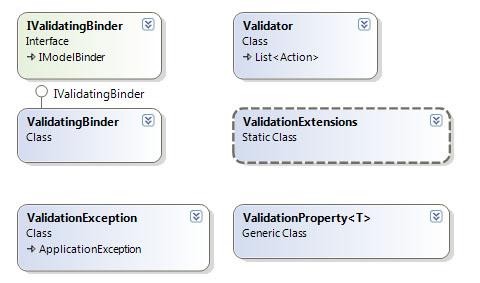
在Suteki.Shop定义一个“IValidatingBinder”接口,其派生自IModelBinder:
{
void UpdateFrom(object target, NameValueCollection values);
void UpdateFrom(object target, NameValueCollection values, string objectPrefix);
void UpdateFrom(object target, NameValueCollection values, ModelStateDictionary modelStateDictionary);
void UpdateFrom(object target, NameValueCollection values, ModelStateDictionary modelStateDictionary, string objectPrefix);
}
其接口中定义了一个重载方法UpdateFrom,其要实现的功能与MVC中UpdateFrom一样,就是自动读取
我们在form中定义的有些元素及其中所包含的内容。
实现IValidatingBinder接口的类叫做:ValidatingBinder,下面是其核心代码说明。
首先是BindModel(ControllerContext controllerContext, ModelBindingContext bindingContext)
该方法是在IModelBinder接口中定义的,是其核心功能,用于将客户端数据转成我们希望Model类型。
/// IModelBinder.BindModel
/// </summary>
/// <param name="controllerContext"></param>
/// <param name="bindingContext"></param>
/// <returns></returns>
public object BindModel(ControllerContext controllerContext, ModelBindingContext bindingContext)
{
if (bindingContext == null)
{
throw new ArgumentNullException("bindingContext");
}
if (IsBasicType(bindingContext.ModelType))
{
return new DefaultModelBinder().BindModel(controllerContext, bindingContext);
}
var instance = Activator.CreateInstance(bindingContext.ModelType);
var request = controllerContext.HttpContext.Request;
var form = request.RequestType == "POST" ? request.Form : request.QueryString;
UpdateFrom(instance, form);
return instance;
}
上面代码第二个if 用于判断bindingContext的Model类型是否是系统类型,比如decimal,string等。
如果是则使用MVC自带的DefaultModelBinder来进行处理。否则就使用该类自己的UpdateFrom方法,从而
实现对当前form中的数据与Model中相应类型的信息绑定,并返相应的 Model 实例(instance)。下面
是其核心代码:
{
foreach (var property in bindingContext.Target.GetType().GetProperties())
{
try
{
foreach (var binder in propertyBinders)
{
binder.Bind(property, bindingContext);
}
}
catch (Exception exception)
{
if (exception.InnerException is FormatException ||
exception.InnerException is IndexOutOfRangeException)
{
string key = BuildKeyForModelState(property, bindingContext.ObjectPrefix);
bindingContext.AddModelError(key, bindingContext.AttemptedValue, "Invalid value for {0}".With(property.Name));
bindingContext.ModelStateDictionary.SetModelValue(key, new ValueProviderResult(bindingContext.AttemptedValue, bindingContext.AttemptedValue, CultureInfo.CurrentCulture));
}
else if (exception is ValidationException)
{
string key = BuildKeyForModelState(property, bindingContext.ObjectPrefix);
bindingContext.AddModelError(key, bindingContext.AttemptedValue, exception.Message);
bindingContext.ModelStateDictionary.SetModelValue(key, new ValueProviderResult(bindingContext.AttemptedValue, bindingContext.AttemptedValue, CultureInfo.CurrentCulture));
}
else if (exception.InnerException is ValidationException)
{
string key = BuildKeyForModelState(property, bindingContext.ObjectPrefix);
bindingContext.AddModelError(key, bindingContext.AttemptedValue, exception.InnerException.Message);
bindingContext.ModelStateDictionary.SetModelValue(key, new ValueProviderResult(bindingContext.AttemptedValue, bindingContext.AttemptedValue, CultureInfo.CurrentCulture));
}
else
{
throw;
}
}
}
if (!bindingContext.ModelStateDictionary.IsValid)
{
throw new ValidationException("Bind Failed. See ModelStateDictionary for errors");
}
}
上面代码中的TRY部分就是其数据绑定的代码,而其Catch部分实现了在数据绑定过程中出现的
错误异常(主要是数据验证等,会在后面提到)收集到ModelState(ModelStateDictionary)中
以便于后续处理。而这里Suteki.Shop还定义了自己的验证异常类“ValidationException”(位于:
Suteki.Common\Validation\ValidationException.cs,因为代码很简单,就不多做解释了。
有了ValidatingBinder之后,下面就来看一下Suteki.Shop是如何使用它的。这里以一个业务
流程---“编辑用户”来进行说明。
下面就是UserController(Suteki.Shop\Controllers\UserController.cs) 中的Edit操作:
public ActionResult Edit([DataBind] User user, string password)
{
if(! string.IsNullOrEmpty(password))
{
user.Password = userService.HashPassword(password);
}
 ..
.. }
在该Action中,我们看到其定义并使用了DataBind这个ModelBinder进行绑定处理,所以我们要
先看一下DataBinder(注:它是Suteki.Shop中关于数据绑定的“ModelBinder的基类)中倒底做了
些什么,下面是其实现代码:
{
public virtual object BindModel(ControllerContext controllerContext, ModelBindingContext bindingContext)
{
object entity;
if(declaringAttribute == null || declaringAttribute.Fetch)
{
entity = FetchEntity(bindingContext, controllerContext);
}
else
{
entity = Activator.CreateInstance(bindingContext.ModelType);
}
try
{
validatingBinder.UpdateFrom(entity, controllerContext.HttpContext.Request.Form, bindingContext.ModelState, bindingContext.ModelName);
}
catch(ValidationException ex)
{}
return entity;
}
}
其BindModel方法中“获取当前要编辑的用户数据操作”就是通过下面这一行完成的:
而try中的代码validatingBinder.UpdateFrom()就是对上面所说的“ValidatingBinder”中的
“UpdateFrom”调用。通过UpdateFrom之后就会将绑定时出现的错误异常进行收集。
有了这种绑定,可以说设置上完成了,而如何将验证规则绑定到相应的Model对象上呢?
为了实现这个功能,Suteki.Shop提供了一个叫做ValidationProperty的泛型类,它提供了对于
数字,是否为空, IsDecimal,最大值,最小值,IsEmail等验证功能。并以扩展方法的行式提供出
来,相应代码如下:
使用它就可以很方便的对Model中的相关属性添加验证规则了。以User为例,其验证规则添加
内容如下(Suteki.Shop\Models\User.cs):
{
Validator validator = new Validator
{
() => Email.Label("Email").IsRequired().IsEmail(),
() => Password.Label("Password").IsRequired(),
};
validator.Validate();
}
在规则添加完成后,就把对获取到的信息进行验证了,下面是验证的实现方法:
{
public void Validate()
{
var errors = new List<ValidationException>();
foreach (Action validation in this)
{
try
{
validation();
}
catch (ValidationException validationException)
{
errors.Add(validationException);
}
}
if (errors.Count > 0)
{
//backwards compatibility
string error = string.Join("", errors.Select(x => x.Message + "<br />").ToArray());
throw new ValidationException(error, errors);
}
}
}
代码比较简单,大家看一下就可以了。
到这里,主要的代码就介绍完了,下面再后到UserController中看看Action是如何调用验证方法
并发验证错误信息复制到ModelState中的,接着看一下编辑用户信息这个Action:
public ActionResult Edit([DataBind] User user, string password)
{
if(! string.IsNullOrEmpty(password))
{
user.Password = userService.HashPassword(password);
}
try
{
user.Validate();
}
catch (ValidationException validationException)
{
validationException.CopyToModelState(ModelState, "user");
return View("Edit", EditViewData.WithUser(user));
}
return View("Edit", EditViewData.WithUser(user).WithMessage("Changes have been saved"));
}
大家看到了吧,Try中的user.Validate()就是启动验证的功能,而在Catch中使用CopyToModelState
方法将错误信息Copy到当前Controller中的ModelState中,如下:
{
foreach(var error in errors)
{
string key = string.IsNullOrEmpty(prefix) ? error.propertyKey : prefix + "." + error.propertyKey;
dictionary.AddModelError(key, error.Message);
}
}
这样在前台View中,通过Html.ValidationSummary()方法来显示验证结果,现在我们看一下最终的
运行效果:
以“输入错误的Email地址”为例:

好了,今天的内容就先到这里了。
原文链接:http://www.cnblogs.com/daizhj/archive/2009/05/18/1452735.html
作者: daizhj,代震军,LaoD
Tags: mvc,Suteki.Shop
网址: http://daizhj.cnblogs.com/