zoukankan      html  css  js  c++  java
  • Spring集成Axis2

    服务端

    服务端采用Spring4 MVC技术,maven工程

    添加依赖

     <properties>
            <axis2.version>1.6.2</axis2.version>
        </properties>
        <dependencies>
            <!-- spring 核心 -->
            <dependency>
                <groupId>org.springframework</groupId>
                <artifactId>spring-context</artifactId>
                <version>4.2.4.RELEASE</version>
            </dependency>
            <!-- spring web集成 -->
            <dependency>
                <groupId>org.springframework</groupId>
                <artifactId>spring-web</artifactId>
                <version>4.2.4.RELEASE</version>
            </dependency>
            <!-- spring 整合junit  -->
            <dependency>
                <groupId>org.springframework</groupId>
                <artifactId>spring-test</artifactId>
                <version>4.2.4.RELEASE</version>
            </dependency>
    
            <!-- junit 开发包 -->
            <dependency>
                <groupId>junit</groupId>
                <artifactId>junit</artifactId>
                <version>4.12</version>
            </dependency>
            <dependency>
                <groupId>org.apache.axis2</groupId>
                <artifactId>axis2</artifactId>
                <version>${axis2.version}</version>
            </dependency>
            <dependency>
                <groupId>org.apache.axis2</groupId>
                <artifactId>axis2-spring</artifactId>
                <version>${axis2.version}</version>
            </dependency>
            <dependency>
                <groupId>org.apache.axis2</groupId>
                <artifactId>axis2-transport-http</artifactId>
                <version>${axis2.version}</version>
            </dependency>
            <dependency>
                <groupId>org.apache.axis2</groupId>
                <artifactId>axis2-transport-local</artifactId>
                <version>${axis2.version}</version>
            </dependency>
            <dependency>
                <groupId>org.apache.axis2</groupId>
                <artifactId>axis2-transport-local</artifactId>
                <version>${axis2.version}</version>
            </dependency>
        </dependencies>
    
        <build>
            <plugins>
                <plugin>
                    <groupId>org.apache.maven.plugins</groupId>
                    <artifactId>maven-compiler-plugin</artifactId>
                    <version>3.2</version>
                    <configuration>
                        <source>1.8</source>
                        <target>1.8</target>
                        <encoding>UTF-8</encoding>
                        <showWarnings>true</showWarnings>
                    </configuration>
                </plugin>
                <!-- 运行tomcat7方法:tomcat7:run -->
                <plugin>
                    <groupId>org.apache.tomcat.maven</groupId>
                    <artifactId>tomcat7-maven-plugin</artifactId>
                    <version>2.2</version>
                    <configuration>
                        <!-- 指定端口 -->
                        <port>8080</port>
                        <!-- 请求路径 -->
                        <path>/</path>
                    </configuration>
                </plugin>
                <plugin>
                    <groupId>org.eclipse.jetty</groupId>
                    <artifactId>jetty-maven-plugin</artifactId>
                    <version>9.4.12.v20180830</version>
                    <!-- <configuration> <webApp> jetty默认contextPath为/,为了和tomcat保持一致,采用如下配置
                        <contextPath>/${project.artifactId}</contextPath> </webApp> </configuration> -->
                </plugin>
    
            </plugins>
        </build>
     

    编写服务接口

    /**
     * @author WGR
     * @create 2020/3/9 -- 20:20
     */
    public interface HelloService {
    
        public String sayHello(String info);
    }
    /**
     * @author WGR
     * @create 2020/3/9 -- 20:22
     */
    public class HelloServiceImpl implements HelloService {
        @Override
        public String sayHello(String info) {
            return "sayHello:"+info;
        }
    }

    配置服务端

    服务端的spring配置文件applicationContext.xml:

    <?xml version="1.0" encoding="UTF-8"?>
    <beans xmlns="http://www.springframework.org/schema/beans"
           xmlns:xsi="http://www.w3.org/2001/XMLSchema-instance"
           xmlns:jaxrs="http://cxf.apache.org/jaxrs"
           xsi:schemaLocation="
            http://www.springframework.org/schema/beans
            http://www.springframework.org/schema/beans/spring-beans.xsd
            http://cxf.apache.org/jaxrs
            http://cxf.apache.org/schemas/jaxrs.xsd">
    
            <bean id="SayHelloService" class="service.impl.HelloServiceImpl">
            </bean>
    
    
    </beans> 

    然后再配置services.xml,这个是重点。

    在/WEB-INF/目录下建立目录/services/axis/META-INF,然后再在这个目录下创建文件services.xml,内容如下:

    <?xml version="1.0" encoding="UTF-8"?>
    
    <service name="HelloWorld" scope="application">
        <description>web service</description>
        <parameter name="ServiceObjectSupplier" locked="false">
            org.apache.axis2.extensions.spring.receivers.SpringServletContextObjectSupplier
        </parameter>
        <parameter name="load-on-startup">true</parameter>
        <parameter name="SpringBeanName">SayHelloService</parameter>
        <messageReceivers>
            <messageReceiver mep="http://www.w3.org/2004/08/wsdl/in-only"
                             class="org.apache.axis2.rpc.receivers.RPCInOnlyMessageReceiver"/>
            <messageReceiver mep="http://www.w3.org/2004/08/wsdl/in-out"
                             class="org.apache.axis2.rpc.receivers.RPCMessageReceiver"/>
        </messageReceivers>
    
       <!-- <operation name="sayHello1">
            <messageReceiver mep="http://www.w3.org/ns/wsdl/in-out" class="org.apache.axis2.rpc.receivers.RPCMessageReceiver"/>
        </operation> -->
    
    </service> 

    再配置web.xml:

    <?xml version="1.0" encoding="UTF-8"?>
    <web-app xmlns:xsi="http://www.w3.org/2001/XMLSchema-instance"
             xmlns="http://java.sun.com/xml/ns/javaee"
             xsi:schemaLocation="http://java.sun.com/xml/ns/javaee http://java.sun.com/xml/ns/javaee/web-app_2_5.xsd"
             version="2.5">
      <display-name>Archetype Created Web Application</display-name>
      <!-- axis 配置 -->
      <servlet>
        <servlet-name>axis</servlet-name>
        <servlet-class>org.apache.axis2.transport.http.AxisServlet</servlet-class>
      </servlet>
      <servlet-mapping>
        <servlet-name>axis</servlet-name>
        <url-pattern>/services/*</url-pattern>
      </servlet-mapping>
      <!--2.spring容器配置-->
      <context-param>
        <param-name>contextConfigLocation</param-name>
        <param-value>classpath:applicationContext.xml</param-value>
      </context-param>
      <listener>
        <listener-class>org.springframework.web.context.ContextLoaderListener</listener-class>
      </listener>
    
      <!-- 欢迎页面配置 -->
      <welcome-file-list>
        <welcome-file>index.html</welcome-file>
        <welcome-file>index.jsp</welcome-file>
      </welcome-file-list>
    </web-app> 

    启动测试

    启动Spring MVC应用后,在浏览器中输入:http://localhost:8080/services/HelloWorld?wsdl

    正确的返回WSDL文件,并且里面会有我定义的一个服务:
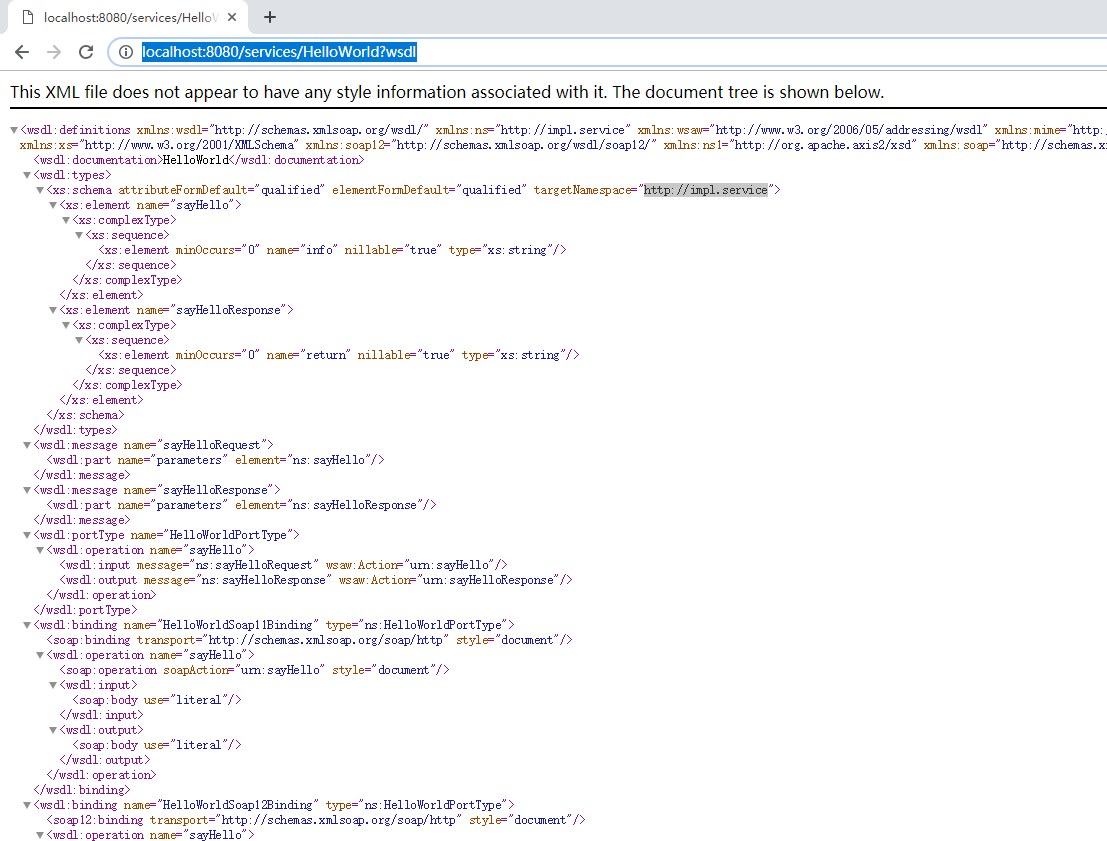
    服务器成功完成!

    客户端

    import javax.xml.namespace.QName;
    import org.apache.axis2.AxisFault;
    import org.apache.axis2.addressing.EndpointReference;
    import org.apache.axis2.client.Options;
    import org.apache.axis2.rpc.client.RPCServiceClient;
    
    /**
     * @author WGR
     * @create 2020/3/10 -- 22:27
     */
    public class HelloClient {
        private static String url = "http://localhost:8080/services/HelloWorld";
    
        public static void main(String[] args) {
            testSayHi();
        }
    
        private static void testSayHi() {
            try {
                RPCServiceClient client = new RPCServiceClient();
                Options options = client.getOptions();
                EndpointReference endpoint = new EndpointReference(url);
                options.setTo(endpoint);
                QName qname = new QName("http://impl.service", "sayHello");
                Object[] methodArgs = new Object[] { "Tom" };
                Class<?>[] returnType = new Class[] { String.class };
                String result = (String) client.invokeBlocking(qname, methodArgs, returnType)[0];
                System.out.println(result);
            } catch (AxisFault e) {
                e.printStackTrace();
            }
        }
    
    }

  • 相关阅读:
    Linq 和 Lambda 查询中按照多个值进行分组GroupBy
    enter键触发事件的清除
    3、Python 基础类型 -- List 列表类型
    2、Python 基础类型 -- String 字符串类型
    1、Python 基础类型 -- Number 数字类型
    JMeter 常用网站
    性能测试之基础理论
    JMeter 性能测试实例
    JMeter 服务器监控插件环境配置
    【C++】利用指针实现通过函数改变多个参数的值
  • 原文地址:https://www.cnblogs.com/dalianpai/p/12459403.html
Copyright © 2011-2022 走看看