很久没有写博客了。最近完成asterisk 和 jssip的库集成,浏览器支持chrome/firefox。在集成的过程中遇到了一些问题,在这儿分享出来,免得大家走弯路。
在网上看一些帖子,环境都是比较老的,对于最新的浏览器和库并不一定适配,在这儿我先系统环境介绍一下。
环境介绍:
操作系统: CentOS7.4
Asterisk: Asterisk 16.9.0
jssip库: 采用了Doubango simpl5. github的地址:https://gitee.com/msip/sipml5.git 大家可以自行去git clone. 这个代码好久都没有人维护了,最新的一个commit 是2016年的。
浏览器:chrome 版本 84.0.4147.105 FireFox: 80.0 (64 位)
安装部署:
1. CentOS7.4的操作系统的安装,略过。提醒一下,最好把Development Tools都装上。免得以后麻烦。
2. asterisk的安装,按照官方的指南进行安装就可以了。但是有几个特性一定要安装的。
res_srtp rtp加密
res_http_websocket http支持web_socket
res_pjsip_transport_websocket pjsip通道支持
codec_opus opus codec支持
3. asterisk 安装完成后,启动asterisk,我们检查安装结果
如果看到下面的显示,web socket 模块已经加载上了。
ecs-1d79-0001*CLI> module show like websocket
Module                         Description                              Use Count  Status      Support Level
res_http_websocket.so          HTTP WebSocket Support                   16         Running          extended
res_pjsip_transport_websocket.so PJSIP WebSocket Transport Support        0          Not Running          core
如果看到下面的代码,说明 srtp已经没有问题了。
ecs-1d79-0001*CLI> module show like srtp
Module                         Description                              Use Count  Status      Support Level
res_srtp.so                    Secure RTP (SRTP)                        0          Running              core
1 modules loaded
检查 opus编码的支持,opus 它适用于互联网上的交互式语音和音乐传输,但也适用于存储和流媒体应用。
     41 text  t140         t140             (Passthrough T.140 Realtime Text)
      29 audio opus         opus             (Opus Codec)
      30 image jpeg         jpeg             (JPEG image)
4. 生成签名的认证文件
如果webrtc跑在insecure模式不需要,如果跑在TLS模式,这个认证文件是必须的。生成认证的过程如下
- 创建一个文件夹 mkdir /etc/asterisk/keys
- asterisk的源代码目录下面,asterisk-16.9.0/contrib 执行脚本 : contrib/scripts/ast_tls_cert -C pbx.example.com -O "My Organization" -b 2048 -d /etc/asterisk/keys
- 下面的生成过程,我直接拷贝的官方内容,很简单一路向下,就能生成了。
$ sudo mkdir /etc/asterisk/keys
$ sudo contrib/scripts/ast_tls_cert -C pbx.example.com -O "My Organization" -b 2048 -d /etc/asterisk/keys

No config file specified, creating '/etc/asterisk/keys/tmp.cfg'
You can use this config file to create additional certs without
re-entering the information for the fields in the certificate
Creating CA key /etc/asterisk/keys/keys/ca.key
Generating RSA private key, 4096 bit long modulus
............................................................................++
.....................++
e is 65537 (0x010001)
Enter pass phrase for /etc/asterisk/keys/ca.key:********
Verifying - Enter pass phrase for /etc/asterisk/keys/ca.key:********
Creating CA certificate /etc/asterisk/keys/ca.crt
Enter pass phrase for /etc/asterisk/keys/ca.key:********
Creating certificate /etc/asterisk/keys/asterisk.key
Generating RSA private key, 1024 bit long modulus
........++++++
............++++++
e is 65537 (0x010001)
Creating signing request /etc/asterisk/keys/asterisk.csr
Creating certificate /etc/asterisk/keys/asterisk.crt
Signature ok
subject=CN = pbx.example.com, O = My Organization
Getting CA Private Key
Enter pass phrase for /etc/asterisk/keys/ca.key:********
Combining key and crt into /etc/asterisk/keys/asterisk.pem


$ ls -l /etc/asterisk/keys
total 32
-rw------- 1 root root 1204 Mar  4  2019 asterisk.crt
-rw------- 1 root root  574 Mar  4  2019 asterisk.csr
-rw------- 1 root root  887 Mar  4  2019 asterisk.key
-rw------- 1 root root 2091 Mar  4  2019 asterisk.pem
-rw------- 1 root root  149 Mar  4  2019 ca.cfg
-rw------- 1 root root 1736 Mar  4  2019 ca.crt
-rw------- 1 root root 3311 Mar  4  2019 ca.key
-rw------- 1 root root  123 Mar  4  2019 tmp.cfg
生成asterisk.key 和 asterisk.crt会用来配置 http server
5. 前序的各种工作已经完成,如果走到这儿没有问题,那么就距离成功不远了。
6. 配置/etc/asterisk/http.conf
建议把以前的http.conf做个备份,新创建一个空的http.conf,然后把下面的代码贴进去。各个字段的意思如果不明白的去谷歌或百度,这个http server 支持了inscure 和 tls两种模式了。配置完成后,重新reload res_http_websocket模块。
[general]

enabled=yes

bindaddr=0.0.0.0

bindport=8088

tlsenable=yes

tlsbindaddr=0.0.0.0:8089

tlscertfile=/etc/asterisk/keys/asterisk.crt

tlsprivatekey=/etc/asterisk/keys/asterisk.key
7. 配置分机 /etc/asterisk/sip.conf 仍然建议读者把sip.conf备份,新建一个sip.conf 把下面的脚本拷贝到空白的sip.conf中。需要修改的地方我用红色粗体标识出来了。修改完成之后,Reload就可以了。
[general]
udpbindaddr=0.0.0.0:8052
realm=xxx.xxx.xxx.xxx
transport=udp,ws,wss

localnet=xxx.xxx.xxx.xxx/24
externip=xxx.xxx.xxx.xxx
nat=force_rport,comedia


[6001]
type=friend
secret=xxxxxx
host=dynamic
username=6001
insecure=invite,port
context=from-internal
disallow=all
allow=alaw
allow=ulaw
allow=opus
encryption=yes
avpf=yes
force_avp=yes
icesupport=yes
transport=wss,ws
rtcp_mux=yes
dtlsenable=yes
directmedia=no
dtlsverify=fingerprint
dtlscertfile=/etc/asterisk/keys/asterisk.pem
dtlscafile=/etc/asterisk/keys/ca.crt
dtlssetup=actpass


[6002]
type=friend
secret=xxxxxxx
host=dynamic
username=6002
insecure=invite,port
context=from-internal
disallow=all
allow=alaw
allow=ulaw
allow=opus
encryption=yes
avpf=yes
force_avp=yes
icesupport=yes
transport=ws
rtcp_mux=yes
dtlsenable=yes
directmedia=no
dtlsverify=fingerprint
dtlscertfile=/etc/asterisk/keys/asterisk.pem
dtlscafile=/etc/asterisk/keys/ca.crt
dtlssetup=actpass
8. 需要检测我们http_server是否OK,看到下面的会先,说明成功了。
ecs-1d79-0001*CLI> http show status
HTTP Server Status:
Prefix:
Server: Asterisk/16.9.0
Server Enabled and Bound to 0.0.0.0:8088

HTTPS Server Enabled and Bound to 0.0.0.0:8089

Enabled URI's:
/httpstatus => Asterisk HTTP General Status
/phoneprov/... => Asterisk HTTP Phone Provisioning Tool
/ari/... => Asterisk RESTful API
/ws => Asterisk HTTP WebSocket

Enabled Redirects:
9. 验证https支持,没有问题说明成功了。

10. 配置sipml5的客户端
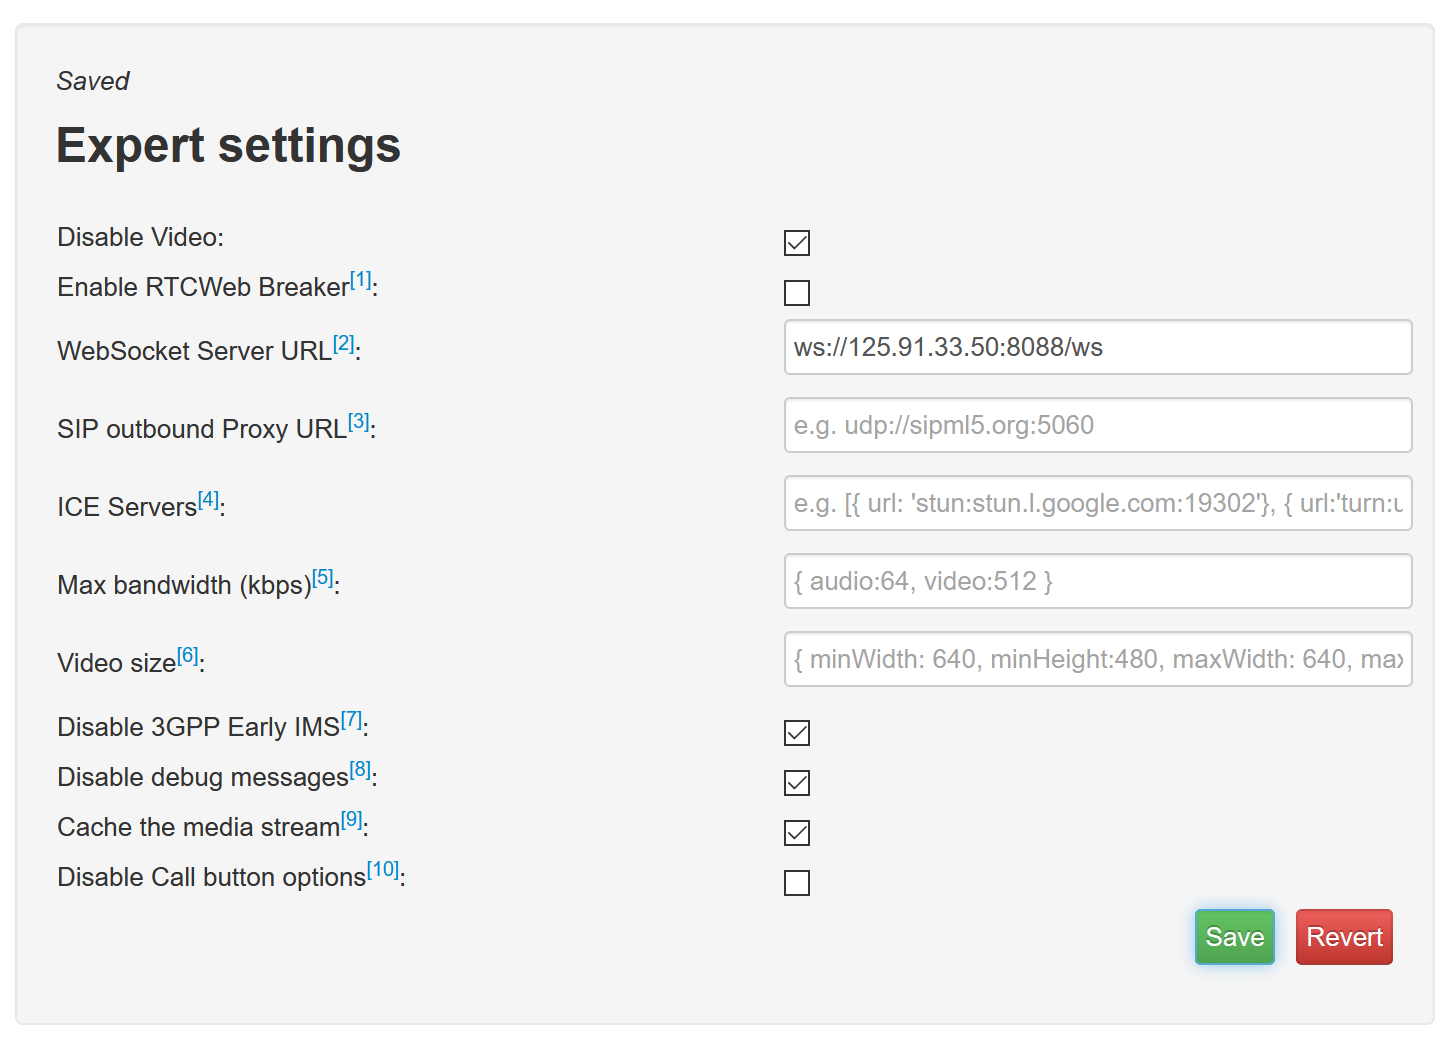
git 之后有一个call.html文件,直接通过chrome或firefox启动这个文件就可以了。按照下面的图进行配置就可以了。后面一张是专家模式。
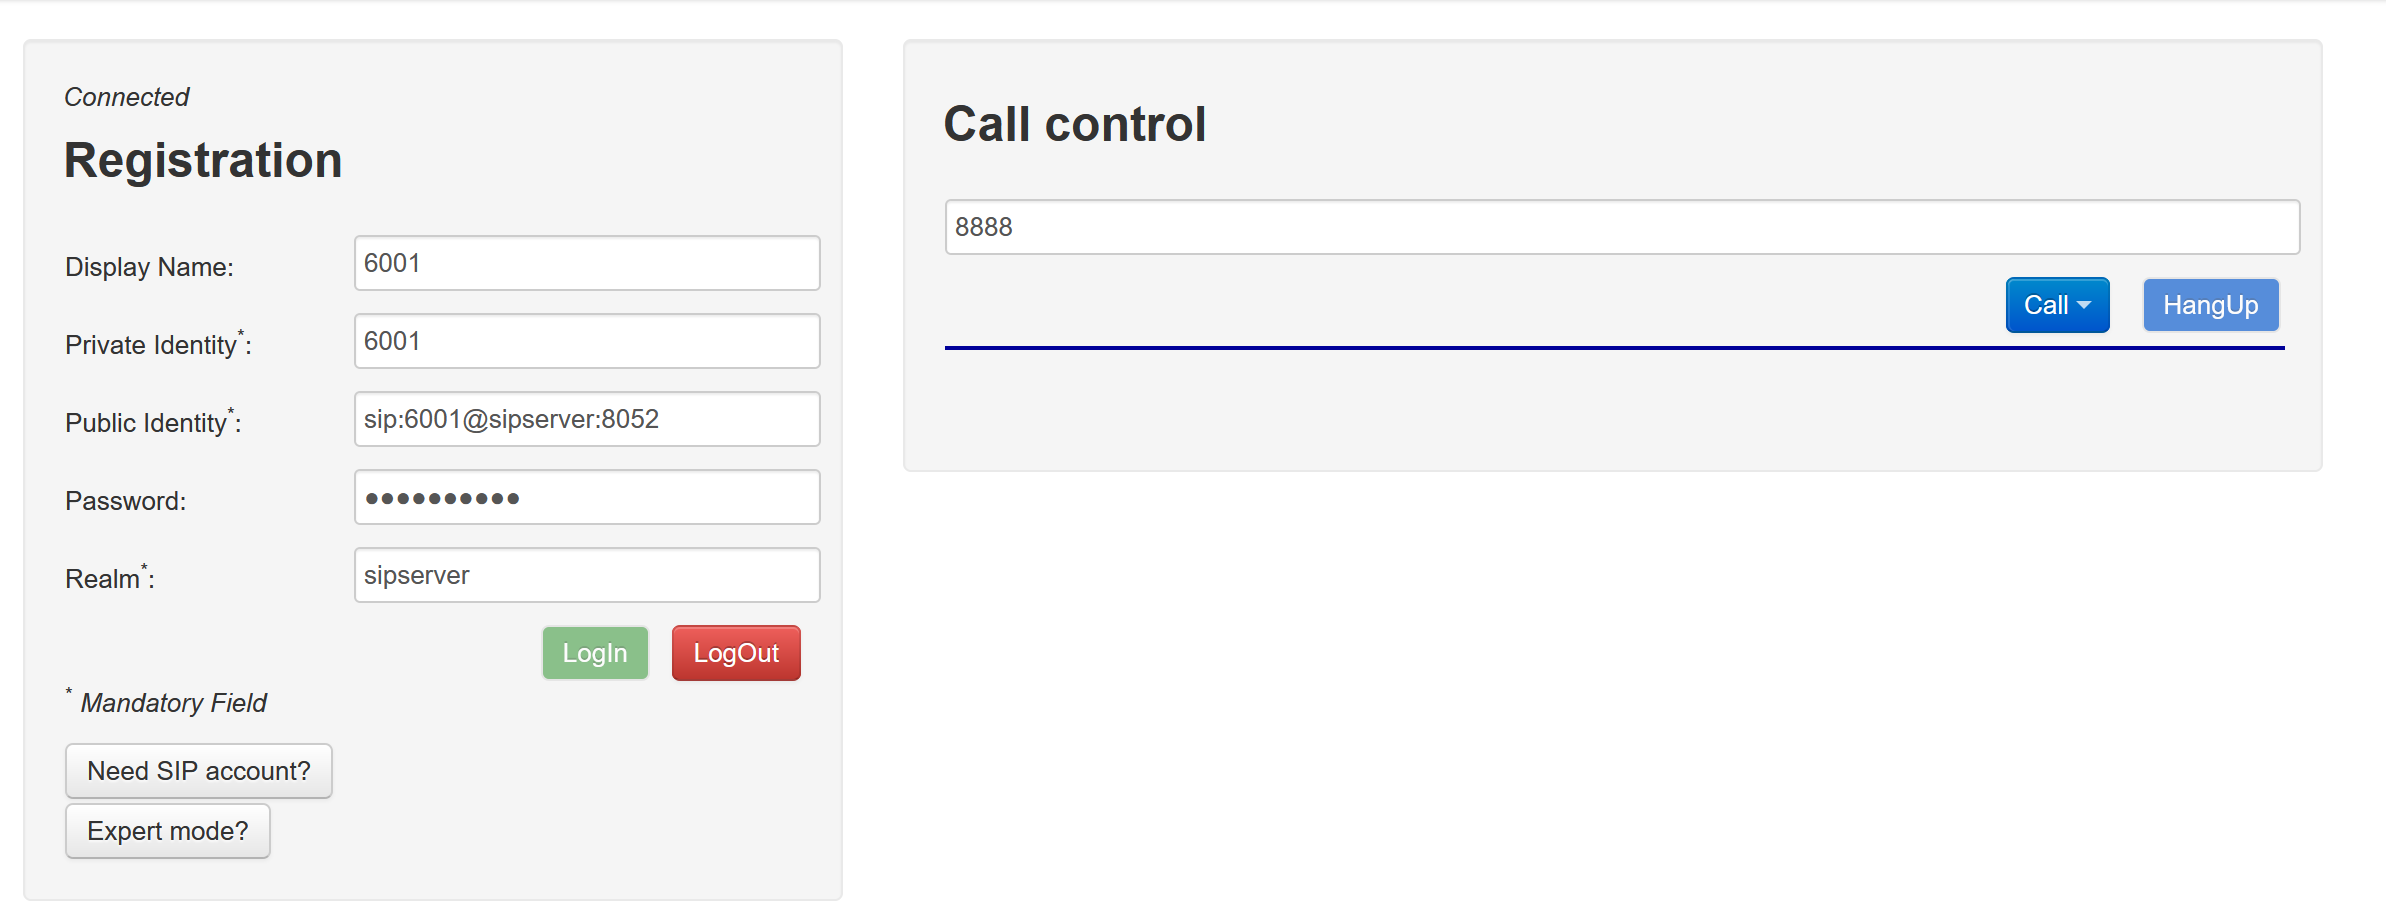
点击登录就可以了。
10. 测试外呼,然后看是否有声音,外呼平台,我让平台给我放了一个hello-world,这样就结束了。

11. 小结
在配置中过程中,走了不少弯路,也遇到不少问题。我在这儿推荐几个文档,基本上包括我遇到的问题,当然你也可以直接掠过我这个文档,直接查阅官方。
官方文档为王:
https://wiki.asterisk.org/wiki/display/AST/Configuring+Asterisk+for+WebRTC+Clients
https://www.asterisk.org/rtcp-mux-webrtc/ 这个文档给了我不少帮助,当初没有配置rtcp-mux的支持。
12. webrtc chrome api调试,非常棒的。
13. 结束了。。。