文章目录
本文转自互联网博客,在此感谢博主的总结归纳,本文只提供于巩固复习使用
本章介绍
- 获取Netty4最新版本
- 设置运行环境来构建和运行netty程序
- 创建一个基于Netty的服务器和客户端
- 拦截和处理异常
- 编写和运行Netty服务器和客户端
本章将简单介绍Netty的核心概念,这个狠心概念就是学习Netty是如何拦截和处理异常,对于刚开始学习netty的读者,利用netty的异常拦截机制来调试程序问题很有帮助。本章还会介绍其他一些核心概念,如服务器和客户端的启动以及分离通道的处理程序。本章学习一些基础以便后面章节的深入学习。本章中将编写一个基于netty的服务器和客户端来互相通信,我们首先来设置netty的开发环境。
2.1 设置开发环境
设置开发环境的步骤如下:
- 安装JDK7,下载地址http://www.oracle.com/technetwork/java/javase/archive-139210.html
- 下载netty包,下载地址http://netty.io/
- 安装Eclipse
《Netty In Action》中描述的比较多,没啥用,这里就不多说了。
本系列博客将使用Netty4,需要JDK1.7+
2.2 Netty客户端和服务器概述
本节将引导你构建一个完整的Netty服务器和客户端。一般情况下,你可能只关心编写服务器,如一个http服务器的客户端是浏览器。然后在这个例子中,你若同时实现了服务器和客户端,你将会对他们的原理更加清晰。
一个Netty程序的工作图如下
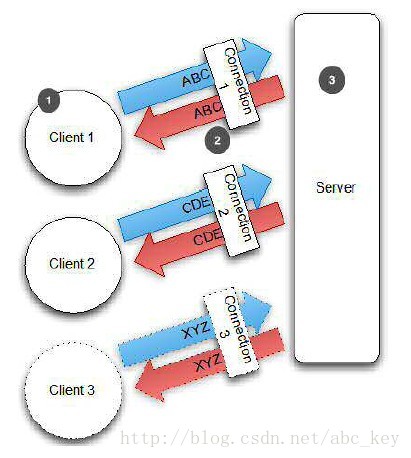
- 客户端连接到服务器
- 建立连接后,发送或接收数据
- 服务器处理所有的客户端连接
从上图中可以看出,服务器会写数据到客户端并且处理多个客户端的并发连接。从理论上来说,限制程序性能的因素只有系统资源和JVM。为了方便理解,这里举了个生活例子,在山谷或高山上大声喊,你会听见回声,回声是山返回的;在这个例子中,你是客户端,山是服务器。喊的行为就类似于一个Netty客户端将数据发送到服务器,听到回声就类似于服务器将相同的数据返回给你,你离开山谷就断开了连接,但是你可以返回进行重连服务器并且可以发送更多的数据。
虽然将相同的数据返回给客户端不是一个典型的例子,但是客户端和服务器之间数据的来来回回的传输和这个例子是一样的。本章的例子会证明这一点,它们会越来越复杂。
接下来的几节将带着你完成基于Netty的客户端和服务器的应答程序。
2.3 编写一个应答服务器
写一个Netty服务器主要由两部分组成:
- 配置服务器功能,如线程、端口
- 实现服务器处理程序,它包含业务逻辑,决定当有一个请求连接或接收数据时该做什么
2.3.1 启动服务器
通过创建ServerBootstrap对象来启动服务器,然后配置这个对象的相关选项,如端口、线程模式、事件循环,并且添加逻辑处理程序用来处理业务逻辑(下面是个简单的应答服务器例子)
package netty.example;

import io.netty.bootstrap.ServerBootstrap;
import io.netty.channel.Channel;
import io.netty.channel.ChannelFuture;
import io.netty.channel.ChannelInitializer;
import io.netty.channel.EventLoopGroup;
import io.netty.channel.nio.NioEventLoopGroup;
import io.netty.channel.socket.nio.NioServerSocketChannel;

public class EchoServer {

	private final int port;

	public EchoServer(int port) {
		this.port = port;
	}

	public void start() throws Exception {
		EventLoopGroup group = new NioEventLoopGroup();
		try {
			//create ServerBootstrap instance
			ServerBootstrap b = new ServerBootstrap();
			//Specifies NIO transport, local socket address
			//Adds handler to channel pipeline
			b.group(group).channel(NioServerSocketChannel.class).localAddress(port)
					.childHandler(new ChannelInitializer<Channel>() {
						@Override
						protected void initChannel(Channel ch) throws Exception {
							ch.pipeline().addLast(new EchoServerHandler());
						}
					});
			//Binds server, waits for server to close, and releases resources
			ChannelFuture f = b.bind().sync();
			System.out.println(EchoServer.class.getName() + "started and listen on " + f.channel().localAddress());
			f.channel().closeFuture().sync();
		} finally {
			group.shutdownGracefully().sync();
		}
	}

	public static void main(String[] args) throws Exception {
		new EchoServer(65535).start();
	}
}
从上面这个简单的服务器例子可以看出,启动服务器应先创建一个ServerBootstrap对象,因为使用NIO,所以指定NioEventLoopGroup来接受和处理新连接,指定通道类型为NioServerSocketChannel,设置InetSocketAddress让服务器监听某个端口已等待客户端连接。
接下来,调用childHandler放来指定连接后调用的ChannelHandler,这个方法传ChannelInitializer类型的参数,ChannelInitializer是个抽象类,所以需要实现initChannel方法,这个方法就是用来设置ChannelHandler。
最后绑定服务器等待直到绑定完成,调用sync()方法会阻塞直到服务器完成绑定,然后服务器等待通道关闭,因为使用sync(),所以关闭操作也会被阻塞。现在你可以关闭EventLoopGroup和释放所有资源,包括创建的线程。
这个例子中使用NIO,因为它是目前最常用的传输方式,你可能会使用NIO很长时间,但是你可以选择不同的传输实现。例如,这个例子使用OIO方式传输,你需要指定OioServerSocketChannel。Netty框架中实现了多重传输方式,将再后面讲述。
本小节重点内容:
- 创建ServerBootstrap实例来引导绑定和启动服务器
- 创建NioEventLoopGroup对象来处理事件,如接受新连接、接收数据、写数据等等
- 指定InetSocketAddress,服务器监听此端口
- 设置childHandler执行所有的连接请求
- 都设置完毕了,最后调用ServerBootstrap.bind() 方法来绑定服务器
2.3.2 实现服务器业务逻辑
Netty使用futures和回调概念,它的设计允许你处理不同的事件类型,更详细的介绍将再后面章节讲述,但是我们可以接收数据。你的channel handler必须继承ChannelInboundHandlerAdapter并且重写channelRead方法,这个方法在任何时候都会被调用来接收数据,在这个例子中接收的是字节。
下面是handler的实现,其实现的功能是将客户端发给服务器的数据返回给客户端:
package netty.example;

import io.netty.buffer.Unpooled;
import io.netty.channel.ChannelFutureListener;
import io.netty.channel.ChannelHandlerContext;
import io.netty.channel.ChannelInboundHandlerAdapter;

public class EchoServerHandler extends ChannelInboundHandlerAdapter {

	@Override
	public void channelRead(ChannelHandlerContext ctx, Object msg) throws Exception {
		System.out.println("Server received: " + msg);
		ctx.write(msg);
	}

	@Override
	public void channelReadComplete(ChannelHandlerContext ctx) throws Exception {
		ctx.writeAndFlush(Unpooled.EMPTY_BUFFER).addListener(ChannelFutureListener.CLOSE);
	}

	@Override
	public void exceptionCaught(ChannelHandlerContext ctx, Throwable cause) throws Exception {
		cause.printStackTrace();
		ctx.close();
	}
}
Netty使用多个Channel Handler来达到对事件处理的分离,因为可以很容的添加、更新、删除业务逻辑处理handler。Handler很简单,它的每个方法都可以被重写,它的所有的方法中只有channelRead方法是必须要重写的。
2.3.3 捕获异常
重写ChannelHandler的exceptionCaught方法可以捕获服务器的异常,比如客户端连接服务器后强制关闭,服务器会抛出"客户端主机强制关闭错误",通过重写exceptionCaught方法就可以处理异常,比如发生异常后关闭ChannelHandlerContext。
2.4 编写应答程序的客户端
服务器写好了,现在来写一个客户端连接服务器。应答程序的客户端包括以下几步:
- 连接服务器
- 写数据到服务器
- 等待接受服务器返回相同的数据
- 关闭连接
2.4.1 引导客户端
引导客户端启动和引导服务器很类似,客户端需同时指定host和port来告诉客户端连接哪个服务器。看下面代码:
package netty.example;

import io.netty.bootstrap.Bootstrap;
import io.netty.channel.ChannelFuture;
import io.netty.channel.ChannelInitializer;
import io.netty.channel.EventLoopGroup;
import io.netty.channel.nio.NioEventLoopGroup;
import io.netty.channel.socket.SocketChannel;
import io.netty.channel.socket.nio.NioSocketChannel;
import io.netty.example.echo.EchoClientHandler;

import java.net.InetSocketAddress;

public class EchoClient {

	private final String host;
	private final int port;

	public EchoClient(String host, int port) {
		this.host = host;
		this.port = port;
	}

	public void start() throws Exception {
		EventLoopGroup group = new NioEventLoopGroup();
		try {
			Bootstrap b = new Bootstrap();
			b.group(group).channel(NioSocketChannel.class).remoteAddress(new InetSocketAddress(host, port))
					.handler(new ChannelInitializer<SocketChannel>() {
						@Override
						protected void initChannel(SocketChannel ch) throws Exception {
							ch.pipeline().addLast(new EchoClientHandler());
						}
					});
			ChannelFuture f = b.connect().sync();
			f.channel().closeFuture().sync();
		} finally {
			group.shutdownGracefully().sync();
		}
	}

	public static void main(String[] args) throws Exception {
		new EchoClient("localhost", 20000).start();
	}
}
创建启动一个客户端包含下面几步:
- 创建Bootstrap对象用来引导启动客户端
- 创建EventLoopGroup对象并设置到Bootstrap中,EventLoopGroup可以理解为是一个线程池,这个线程池用来处理连接、接受数据、发送数据
- 创建InetSocketAddress并设置到Bootstrap中,InetSocketAddress是指定连接的服务器地址
- 添加一个ChannelHandler,客户端成功连接服务器后就会被执行
- 调用Bootstrap.connect()来连接服务器
- 最后关闭EventLoopGroup来释放资源
2.4.2 实现客户端的业务逻辑
客户端的业务逻辑的实现依然很简单,更复杂的用法将在后面章节详细介绍。和编写服务器的ChannelHandler一样,在这里将自定义一个继承SimpleChannelInboundHandler的ChannelHandler来处理业务;通过重写父类的三个方法来处理感兴趣的事件:
- channelActive():客户端连接服务器后被调用
- channelRead0():从服务器接收到数据后调用
- exceptionCaught():发生异常时被调用
实现代码如下
package netty.example;

import io.netty.buffer.ByteBuf;
import io.netty.buffer.ByteBufUtil;
import io.netty.buffer.Unpooled;
import io.netty.channel.ChannelHandlerContext;
import io.netty.channel.SimpleChannelInboundHandler;
import io.netty.util.CharsetUtil;

public class EchoClientHandler extends SimpleChannelInboundHandler<ByteBuf> {

	@Override
	public void channelActive(ChannelHandlerContext ctx) throws Exception {
		ctx.write(Unpooled.copiedBuffer("Netty rocks!",CharsetUtil.UTF_8));
	}

	@Override
	protected void channelRead0(ChannelHandlerContext ctx, ByteBuf msg) throws Exception {
		System.out.println("Client received: " + ByteBufUtil.hexDump(msg.readBytes(msg.readableBytes())));
	}

	@Override
	public void exceptionCaught(ChannelHandlerContext ctx, Throwable cause) throws Exception {
		cause.printStackTrace();
		ctx.close();
	}
}
可能你会问为什么在这里使用的是SimpleChannelInboundHandler而不使用ChannelInboundHandlerAdapter?主要原因是ChannelInboundHandlerAdapter在处理完消息后需要负责释放资源。在这里将调用ByteBuf.release()来释放资源。SimpleChannelInboundHandler会在完成channelRead0后释放消息,这是通过Netty处理所有消息的ChannelHandler实现了ReferenceCounted接口达到的。
为什么在服务器中不使用SimpleChannelInboundHandler呢?因为服务器要返回相同的消息给客户端,在服务器执行完成写操作之前不能释放调用读取到的消息,因为写操作是异步的,一旦写操作完成后,Netty中会自动释放消息。
客户端的编写完了,下面让我们来测试一下
2.5 编译和运行echo(应答)程序客户端和服务器
注意,netty4需要jdk1.7+。
本人测试,可以正常运行。
2.6 总结
本章介绍了如何编写一个简单的基于Netty的服务器和客户端并进行通信发送数据。介绍了如何创建服务器和客户端以及Netty的异常处理机制。