文章目录
本文转自互联网博客,在此感谢博主的总结归纳,本文只提供于巩固复习使用
本章内容
- Transports(传输)
- NIO(non-blocking IO,New IO), OIO(Old IO,blocking IO), Local(本地), Embedded(嵌入式)
- Use-case(用例)
- APIs(接口)
网络应用程序一个很重要的工作是传输数据。传输数据的过程不一样取决是使用哪种交通工具,但是传输的方式是一样的:都是以字节码传输。Java开发网络程序传输数据的过程和方式是被抽象了的,我们不需要关注底层接口,只需要使用Java API或其他网络框架如Netty就能达到传输数据的目的。发送数据和接收数据都是字节码。Nothing more,nothing less。
如果你曾经使用Java提供的网络接口工作过,你可能已经遇到过想从阻塞传输切换到非阻塞传输的情况,这种切换是比较困难的,因为阻塞IO和非阻塞IO使用的API有很大的差异;Netty提供了上层的传输实现接口使得这种情况变得简单。我们可以让所写的代码尽可能通用,而不会依赖一些实现相关的APIs。当我们想切换传输方式的时候不需要花很大的精力和时间来重构代码。
本章将介绍统一的API以及如何使用它们,会拿Netty的API和Java的API做比较来告诉你为什么Netty可以更容易的使用。本章也提供了一些优质的用例代码,以便最佳使用Netty。使用Netty不需要其他的网络框架或网络编程经验,若有则只是对理解netty有帮助,但不是必要的。下面让我们来看看真是世界里的传输工作。
4.1 案例研究:切换传输方式
为了让你想象如何运输,我会从一个简单的应用程序开始,这个应用程序什么都不做,只是接受客户端连接并发送“Hi!”字符串消息到客户端,发送完了就断开连接。我不会详细讲解这个过程的实现,它只是一个例子。
4.1.1 使用Java的I/O和NIO
我们将不用Netty实现这个例子,下面代码是使用阻塞IO实现的例子:
package netty.in.action;

import java.io.IOException;
import java.io.OutputStream;
import java.net.ServerSocket;
import java.net.Socket;
import java.nio.charset.Charset;

/**
 * Blocking networking without Netty
 * @author c.k
 *
 */
public class PlainOioServer {

	public void server(int port) throws Exception {
		//bind server to port
		final ServerSocket socket = new ServerSocket(port);
		try {
			while(true){
				//accept connection
				final Socket clientSocket = socket.accept();
				System.out.println("Accepted connection from " + clientSocket);
				//create new thread to handle connection
				new Thread(new Runnable() {
					@Override
					public void run() {
						OutputStream out;
						try{
							out = clientSocket.getOutputStream();
							//write message to connected client
							out.write("Hi!
".getBytes(Charset.forName("UTF-8")));
							out.flush();
							//close connection once message written and flushed
							clientSocket.close();
						}catch(IOException e){
							try {
								clientSocket.close();
							} catch (IOException e1) {
								e1.printStackTrace();
							}
						}
					}
				}).start();//start thread to begin handling
			}
		}catch(Exception e){
			e.printStackTrace();
			socket.close();
		}
	}
}
上面的方式很简洁,但是这种阻塞模式在大连接数的情况就会有很严重的问题,如客户端连接超时,服务器响应严重延迟。为了解决这种情况,我们可以使用异步网络处理所有的并发连接,但问题在于NIO和OIO的API是完全不同的,所以一个用OIO开发的网络应用程序想要使用NIO重构代码几乎是重新开发。
下面代码是使用Java NIO实现的例子:
package netty.in.action;

import java.net.InetSocketAddress;
import java.net.ServerSocket;
import java.nio.ByteBuffer;
import java.nio.channels.SelectionKey;
import java.nio.channels.Selector;
import java.nio.channels.ServerSocketChannel;
import java.nio.channels.SocketChannel;
import java.util.Iterator;
/**
 * Asynchronous networking without Netty
 * @author c.k
 *
 */
public class PlainNioServer {

	public void server(int port) throws Exception {
		System.out.println("Listening for connections on port " + port);
		//open Selector that handles channels
		Selector selector = Selector.open();
		//open ServerSocketChannel
		ServerSocketChannel serverChannel = ServerSocketChannel.open();
		//get ServerSocket
		ServerSocket serverSocket = serverChannel.socket();
		//bind server to port
		serverSocket.bind(new InetSocketAddress(port));
		//set to non-blocking
		serverChannel.configureBlocking(false);
		//register ServerSocket to selector and specify that it is interested in new accepted clients
		serverChannel.register(selector, SelectionKey.OP_ACCEPT);
		final ByteBuffer msg = ByteBuffer.wrap("Hi!
".getBytes());
		while (true) {
			//Wait for new events that are ready for process. This will block until something happens
			int n = selector.select();
			if (n > 0) {
				//Obtain all SelectionKey instances that received events
				Iterator<SelectionKey> iter = selector.selectedKeys().iterator();
				while (iter.hasNext()) {
					SelectionKey key = iter.next();
					iter.remove();
					try {
						//Check if event was because new client ready to get accepted
						if (key.isAcceptable()) {
							ServerSocketChannel server = (ServerSocketChannel) key.channel();
							SocketChannel client = server.accept();
							System.out.println("Accepted connection from " + client);
							client.configureBlocking(false);
							//Accept client and register it to selector
							client.register(selector, SelectionKey.OP_WRITE, msg.duplicate());
						}
						//Check if event was because socket is ready to write data
						if (key.isWritable()) {
							SocketChannel client = (SocketChannel) key.channel();
							ByteBuffer buff = (ByteBuffer) key.attachment();
							//write data to connected client
							while (buff.hasRemaining()) {
								if (client.write(buff) == 0) {
									break;
								}
							}
							client.close();//close client
						}
					} catch (Exception e) {
						key.cancel();
						key.channel().close();
					}
				}
			}
		}
	}
}
如你所见,即使它们实现的功能是一样,但是代码完全不同。下面我们将用Netty来实现相同的功能。
4.1.2 Netty中使用I/O和NIO
下面代码是使用Netty作为网络框架编写的一个阻塞IO例子:
package netty.in.action;

import java.net.InetSocketAddress;

import io.netty.bootstrap.ServerBootstrap;
import io.netty.buffer.ByteBuf;
import io.netty.buffer.Unpooled;
import io.netty.channel.Channel;
import io.netty.channel.ChannelFuture;
import io.netty.channel.ChannelFutureListener;
import io.netty.channel.ChannelHandlerContext;
import io.netty.channel.ChannelInboundHandlerAdapter;
import io.netty.channel.ChannelInitializer;
import io.netty.channel.EventLoopGroup;
import io.netty.channel.nio.NioEventLoopGroup;
import io.netty.channel.socket.oio.OioServerSocketChannel;
import io.netty.util.CharsetUtil;

public class NettyOioServer {

	public void server(int port) throws Exception {
		final ByteBuf buf = Unpooled.unreleasableBuffer(Unpooled.copiedBuffer("Hi!
", CharsetUtil.UTF_8));
		//事件循环组
		EventLoopGroup group = new NioEventLoopGroup();
		try {
			//用来引导服务器配置
			ServerBootstrap b = new ServerBootstrap();
			//使用OIO阻塞模式
			b.group(group).channel(OioServerSocketChannel.class).localAddress(new InetSocketAddress(port))
			//指定ChannelInitializer初始化handlers
					.childHandler(new ChannelInitializer<Channel>() {
						@Override
						protected void initChannel(Channel ch) throws Exception {
							//添加一个“入站”handler到ChannelPipeline
							ch.pipeline().addLast(new ChannelInboundHandlerAdapter() {
								@Override
								public void channelActive(ChannelHandlerContext ctx) throws Exception {
									//连接后,写消息到客户端,写完后便关闭连接
									ctx.writeAndFlush(buf.duplicate()).addListener(ChannelFutureListener.CLOSE);
								}
							});
						}
					});
			//绑定服务器接受连接
			ChannelFuture f = b.bind().sync();
			f.channel().closeFuture().sync();
		} catch (Exception e) {
			//释放所有资源
			group.shutdownGracefully();
		}
	}
}
上面代码实现功能一样,但结构清晰明了,这只是Netty的优势之一。
4.1.3 Netty中实现异步支持
下面代码是使用Netty实现异步,可以看出使用Netty由OIO切换到NIO是非常的方便。
package netty.in.action;

import io.netty.bootstrap.ServerBootstrap;
import io.netty.buffer.ByteBuf;
import io.netty.buffer.Unpooled;
import io.netty.channel.ChannelFuture;
import io.netty.channel.ChannelFutureListener;
import io.netty.channel.ChannelHandlerContext;
import io.netty.channel.ChannelInboundHandlerAdapter;
import io.netty.channel.ChannelInitializer;
import io.netty.channel.EventLoopGroup;
import io.netty.channel.nio.NioEventLoopGroup;
import io.netty.channel.socket.SocketChannel;
import io.netty.channel.socket.nio.NioServerSocketChannel;
import io.netty.util.CharsetUtil;

import java.net.InetSocketAddress;

public class NettyNioServer {

	public void server(int port) throws Exception {
		final ByteBuf buf = Unpooled.unreleasableBuffer(Unpooled.copiedBuffer("Hi!
", CharsetUtil.UTF_8));
		// 事件循环组
		EventLoopGroup group = new NioEventLoopGroup();
		try {
			// 用来引导服务器配置
			ServerBootstrap b = new ServerBootstrap();
			// 使用NIO异步模式
			b.group(group).channel(NioServerSocketChannel.class).localAddress(new InetSocketAddress(port))
			// 指定ChannelInitializer初始化handlers
					.childHandler(new ChannelInitializer<SocketChannel>() {
						@Override
						protected void initChannel(SocketChannel ch) throws Exception {
							// 添加一个“入站”handler到ChannelPipeline
							ch.pipeline().addLast(new ChannelInboundHandlerAdapter() {
								@Override
								public void channelActive(ChannelHandlerContext ctx) throws Exception {
									// 连接后,写消息到客户端,写完后便关闭连接
									ctx.writeAndFlush(buf.duplicate()).addListener(ChannelFutureListener.CLOSE);
								}
							});
						}
					});
			// 绑定服务器接受连接
			ChannelFuture f = b.bind().sync();
			f.channel().closeFuture().sync();
		} catch (Exception e) {
			// 释放所有资源
			group.shutdownGracefully();
		}
	}
}
因为Netty使用相同的API来实现每个传输,它并不关心你使用什么来实现。Netty通过操作Channel接口和ChannelPipeline、ChannelHandler来实现传输。
4.2 Transport API
传输API的核心是Channel接口,它用于所有出站的操作。Channel接口的类层次结构如下
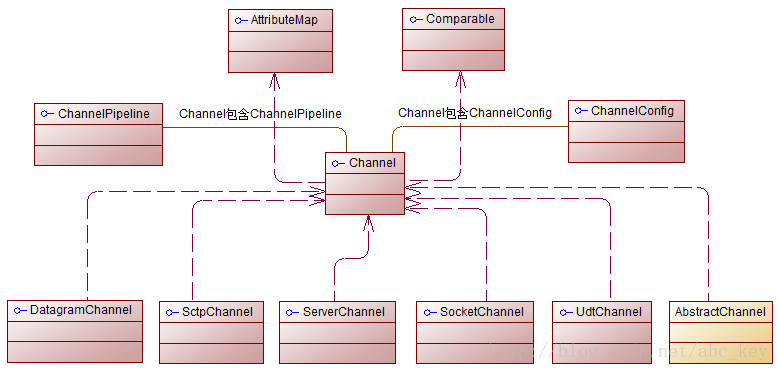
如上图所示,每个Channel都会分配一个ChannelPipeline和ChannelConfig。ChannelConfig负责设置并存储配置,并允许在运行期间更新它们。传输一般有特定的配置设置,只作用于传输,没有其他的实现。ChannelPipeline容纳了使用的ChannelHandler实例,这些ChannelHandler将处理通道传递的“入站”和“出站”数据。ChannelHandler的实现允许你改变数据状态和传输数据,本书有章节详细讲解ChannelHandler,ChannelHandler是Netty的重点概念。
现在我们可以使用ChannelHandler做下面一些事情:
- 传输数据时,将数据从一种格式转换到另一种格式
- 异常通知
- Channel变为有效或无效时获得通知
- Channel被注册或从EventLoop中注销时获得通知
- 通知用户特定事件
这些ChannelHandler实例添加到ChannelPipeline中,在ChannelPipeline中按顺序逐个执行。它类似于一个链条,有使用过Servlet的读者可能会更容易理解。
ChannelPipeline实现了拦截过滤器模式,这意味着我们连接不同的ChannelHandler来拦截并处理经过ChannelPipeline的数据或事件。可以把ChannelPipeline想象成UNIX管道,它允许不同的命令链(ChannelHandler相当于命令)。你还可以在运行时根据需要添加ChannelHandler实例到ChannelPipeline或从ChannelPipeline中删除,这能帮助我们构建高度灵活的Netty程序。此外,访问指定的ChannelPipeline和ChannelConfig,你能在Channel自身上进行操作。Channel提供了很多方法,如下列表:
- eventLoop(),返回分配给Channel的EventLoop
- pipeline(),返回分配给Channel的ChannelPipeline
- isActive(),返回Channel是否激活,已激活说明与远程连接对等
- localAddress(),返回已绑定的本地SocketAddress
- remoteAddress(),返回已绑定的远程SocketAddress
- write(),写数据到远程客户端,数据通过ChannelPipeline传输过去
后面会越来越熟悉这些方法,现在只需要记住我们的操作都是在相同的接口上运行,Netty的高灵活性让你可以以不同的传输实现进行重构。
写数据到远程已连接客户端可以调用Channel.write()方法,如下代码:
Channel channel = ...
//Create ByteBuf that holds data to write
ByteBuf buf = Unpooled.copiedBuffer("your data", CharsetUtil.UTF_8);
//Write data
ChannelFuture cf = channel.write(buf);
//Add ChannelFutureListener to get notified after write completes
cf.addListener(new ChannelFutureListener() {
	@Override
	public void operationComplete(ChannelFuture future) {
		//Write operation completes without error
		if (future.isSuccess()) {
			System.out.println(.Write successful.);
		} else {
			//Write operation completed but because of error
			System.err.println(.Write error.);
			future.cause().printStacktrace();
		}
	}
});
Channel是线程安全(thread-safe)的,它可以被多个不同的线程安全的操作,在多线程环境下,所有的方法都是安全的。正因为Channel是安全的,我们存储对Channel的引用,并在学习的时候使用它写入数据到远程已连接的客户端,使用多线程也是如此。下面的代码是一个简单的多线程例子:
final Channel channel = ...
//Create ByteBuf that holds data to write
final ByteBuf buf = Unpooled.copiedBuffer("your data",CharsetUtil.UTF_8);
//Create Runnable which writes data to channel
Runnable writer = new Runnable() {
	@Override
	public void run() {
		channel.write(buf.duplicate());
	}
};
//Obtain reference to the Executor which uses threads to execute tasks
Executor executor = Executors.newChachedThreadPool();
// write in one thread
//Hand over write task to executor for execution in thread
executor.execute(writer);
// write in another thread
//Hand over another write task to executor for execution in thread
executor.execute(writer);
此外,这种方法保证了写入的消息以相同的顺序通过写入它们的方法。想了解所有方法的使用可以参考Netty API文档。
4.3 Netty包含的传输实现
Netty自带了一些传输协议的实现,虽然没有支持所有的传输协议,但是其自带的已足够我们来使用。Netty应用程序的传输协议依赖于底层协议,本节我们将学习Netty中的传输协议。
Netty中的传输方式有如下几种:
- NIO,io.netty.channel.socket.nio,基于java.nio.channels的工具包,使用选择器作为基础的方法。
- OIO,io.netty.channel.socket.oio,基于java.net的工具包,使用阻塞流。
- Local,io.netty.channel.local,用来在虚拟机之间本地通信。
- Embedded,io.netty.channel.embedded,嵌入传输,它允许在没有真正网络的运输中使用ChannelHandler,可以非常有用的来测试ChannelHandler的实现。
4.3.1 NIO - Nonblocking I/O
NIO传输是目前最常用的方式,它通过使用选择器提供了完全异步的方式操作所有的I/O,NIO从Java 1.4才被提供。NIO中,我们可以注册一个通道或获得某个通道的改变的状态,通道状态有下面几种改变:
- 一个新的Channel被接受并已准备好
- Channel连接完成
- Channel中有数据并已准备好读取
- Channel发送数据出去
处理完改变的状态后需重新设置他们的状态,用一个线程来检查是否有已准备好的Channel,如果有则执行相关事件。在这里可能只同时一个注册的事件而忽略其他的。选择器所支持的操作在SelectionKey中定义,具体如下:
- OP_ACCEPT,有新连接时得到通知
- OP_CONNECT,连接完成后得到通知
- OP_READ,准备好读取数据时得到通知
- OP_WRITE,写入数据到通道时得到通知
Netty中的NIO传输就是基于这样的模型来接收和发送数据,通过封装将自己的接口提供给用户使用,这完全隐藏了内部实现。如前面所说,Netty隐藏内部的实现细节,将抽象出来的API暴露出来供使用,下面是处理流程图:
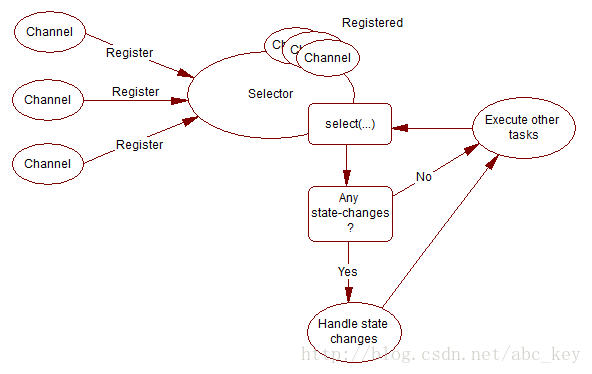
NIO在处理过程也会有一定的延迟,若连接数不大的话,延迟一般在毫秒级,但是其吞吐量依然比OIO模式的要高。Netty中的NIO传输是“zero-file-copy”,也就是零文件复制,这种机制可以让程序速度更快,更高效的从文件系统中传输内容,零复制就是我们的应用程序不会将发送的数据先复制到JVM堆栈在进行处理,而是直接从内核空间操作。接下来我们将讨论OIO传输,它是阻塞的。
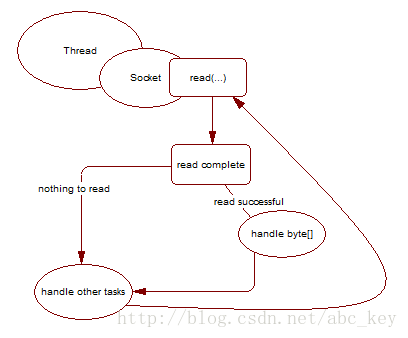
4.3.2 OIO - Old blocking I/O
OIO就是java中提供的Socket接口,java最开始只提供了阻塞的Socket,阻塞会导致程序性能低。下面是OIO的处理流程图,若想详细了解,可以参阅其他相关资料。
4.3.3 Local - In VM transport
Netty包含了本地传输,这个传输实现使用相同的API用于虚拟机之间的通信,传输是完全异步的。每个Channel使用唯一的SocketAddress,客户端通过使用SocketAddress进行连接,在服务器会被注册为长期运行,一旦通道关闭,它会自动注销,客户端无法再使用它。
连接到本地传输服务器的行为与其他的传输实现几乎是相同的,需要注意的一个重点是只能在本地的服务器和客户端上使用它们。Local未绑定任何Socket,值提供JVM进程之间的通信。
4.3.4 Embedded transport
Netty还包括嵌入传输,与之前讲述的其他传输实现比较,它是不是一个真的传输呢?若不是一个真的传输,我们用它可以做什么呢?Embedded transport允许更容易的使用不同的ChannelHandler之间的交互,这也更容易嵌入到其他的ChannelHandler实例并像一个辅助类一样使用它们。它一般用来测试特定的ChannelHandler实现,也可以在ChannelHandler中重新使用一些ChannelHandler来进行扩展,为了实现这样的目的,它自带了一个具体的Channel实现,即:EmbeddedChannel。
4.4 每种传输方式在什么时候使用?
不多加赘述,看下面列表:
- OIO,在低连接数、需要低延迟时、阻塞时使用
- NIO,在高连接数时使用
- Local,在同一个JVM内通信时使用
- Embedded,测试ChannelHandler时使用