Scrapy框架详解及其基本使用
-
scrapy框架原理
Scrapy是一个为了爬取网站数据,提取结构性数据而编写的应用框架。 其可以应用在数据挖掘,信息处理或存储历史数据等一系列的程序中。
其最初是为了页面抓取 (更确切来说, 网络抓取 )所设计的, 也可以应用在获取API所返回的数据(例如 Amazon Associates Web Services ) 或者通用的网络爬虫。Scrapy用途广泛,可以用于数据挖掘、监测和自动化测试。Scrapy 使用了 Twisted异步网络库来处理网络通讯。整体架构大致如下
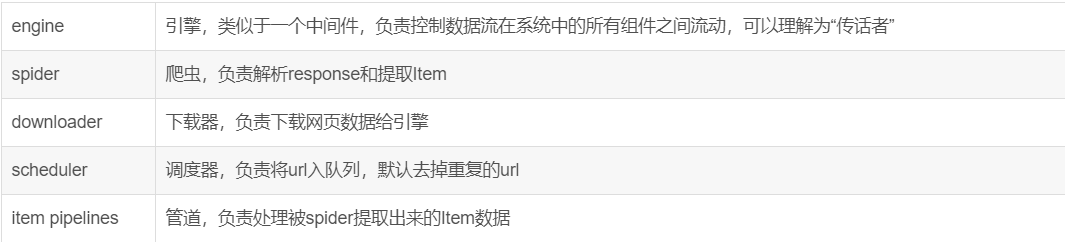

Scrapy主要包括了以下组件:
-
- 引擎(Scrapy)
用来处理整个系统的数据流处理, 触发事务(框架核心) - 调度器(Scheduler)
用来接受引擎发过来的请求, 压入队列中, 并在引擎再次请求的时候返回. 可以想像成一个URL(抓取网页的网址或者说是链接)的优先队列, 由它来决定下一个要抓取的网址是什么, 同时去除重复的网址 - 下载器(Downloader)
用于下载网页内容, 并将网页内容返回给蜘蛛(Scrapy下载器是建立在twisted这个高效的异步模型上的) - 爬虫(Spiders)
爬虫是主要干活的, 用于从特定的网页中提取自己需要的信息, 即所谓的实体(Item)。用户也可以从中提取出链接,让Scrapy继续抓取下一个页面 - 项目管道(Pipeline)
负责处理爬虫从网页中抽取的实体,主要的功能是持久化实体、验证实体的有效性、清除不需要的信息。当页面被爬虫解析后,将被发送到项目管道,并经过几个特定的次序处理数据。 - 下载器中间件(Downloader Middlewares)
位于Scrapy引擎和下载器之间的框架,主要是处理Scrapy引擎与下载器之间的请求及响应。 - 爬虫中间件(Spider Middlewares)
介于Scrapy引擎和爬虫之间的框架,主要工作是处理蜘蛛的响应输入和请求输出。 - 调度中间件(Scheduler Middewares)
介于Scrapy引擎和调度之间的中间件,从Scrapy引擎发送到调度的请求和响应。
- 引擎(Scrapy)
Scrapy运行流程大概如下:
1、从spider中获取到初始url给引擎,告诉引擎帮我给调度器;
2、引擎将初始url给调度器,调度器安排入队列;
3、调度器告诉引擎已经安排好,并把url给引擎,告诉引擎,给下载器进行下载;
4、引擎将url给下载器,下载器下载页面源码;
5、下载器告诉引擎已经下载好了,并把页面源码response给到引擎;
6、引擎拿着response给到spider,spider解析数据、提取数据;
7、spider将提取到的数据给到引擎,告诉引擎,帮我把新的url给到调度器入队列,把信息给到Item Pipelines进行保存;
8、Item Pipelines将提取到的数据保存,保存好后告诉引擎,可以进行下一个url的提取了;
9、循环3-8步,直到调度器中没有url,关闭网站(若url下载失败了,会返回重新下载)。
-
基本使用
-
创建项目的基本过程
Scrapy:
    # 创建项目,在当前目录中创建中创建一个项目文件(类似于Django)
    scrapy startproject sp1
        生成目录如下:
            sp1
                - sp1
                    - spiders          目录,放置创建的爬虫应用
                    - middlewares.py    中间件
                    - items.py          格式化,与pipelines.py一同做持久化
                    - pipelines.py      持久化
                    - settings.py       配置文件
                - scrapy.cfg            配置

    # 创建爬虫应用
    cd sp1
    scrapy genspider xiaohuar xiaohuar.com      # 创建了xiaohuar.py
    scrapy genspider baidu baidu.com        # 创建了baidu.py

    # 展示爬虫应用列表
    scrapy list

    # 执行爬虫,进入project
    scrapy crawl baidu
    scrapy crawl baidu --nolog
文件说明:
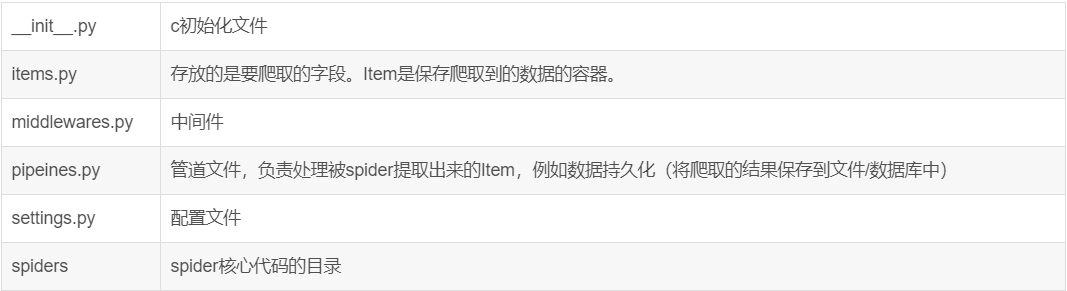
注意:一般创建爬虫文件时,以网站域名命名
-
项目实战
-
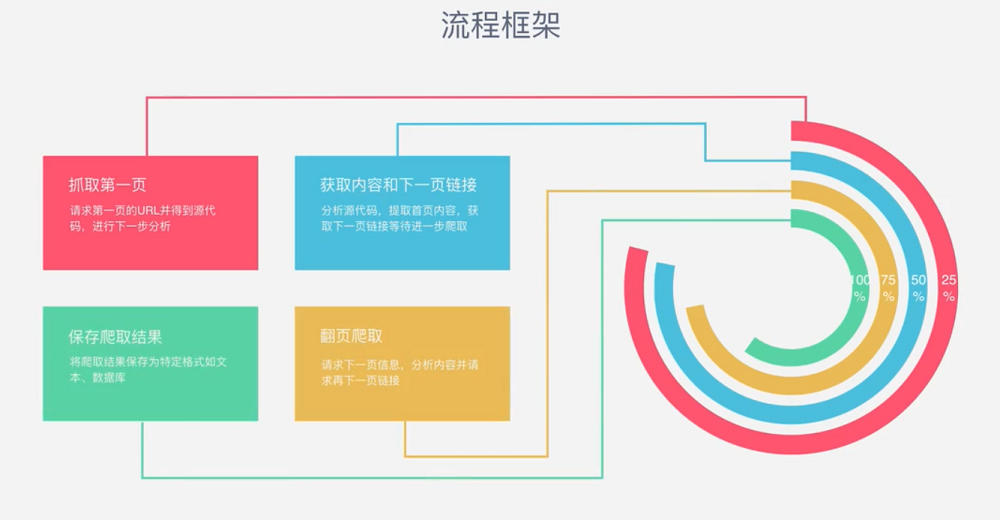
实战目标:对目标站点所有语录,作者,标签进行爬取并存如MongoDB中
-
目标站点分析:Quates to scrape
-
流程框架:
-
爬虫实战
-
明确目标--->items.py(明确想要抓取的目标,定义需要爬取的信息(字段))
# -*- coding: utf-8 -*- import scrapy
class QuoteItem(scrapy.Item): # define the fields for your item here like: # name = scrapy.Field() text = scrapy.Field() #语录内容 author = scrapy.Field() #作者 tags = scrapy.Field() #标签 -
制作爬虫--->quotes.py(解析数据,并提取信息和新的url)
# -*- coding: utf-8 -*-
import scrapy

from quotetutorial.items import QuoteItem

class QuotesSpider(scrapy.Spider):
    name = 'quotes'
    allowed_domains = ['quotes.toscrape.com']
    start_urls = ['http://quotes.toscrape.com/']

    def parse(self, response):
        #print(response.text)
        quotes = response.css('.quote')     #获取每行的全部信息
        for quote in quotes:
            item = QuoteItem()                #创建获取对象
            text = quote.css('.text::text').extract_first()     #*::text 用于获取文本信息,axtract_first() 用于获得第一个文本信息*
            author = quote.css('.author::text').extract_first()
            tags = quote.css('.tags .tag::text').extract()      #没有指定获取第一个--->获取所有满足条件的
            item['text'] = text
            item['author'] = author
            item['tags'] = tags
            yield item

        next = response.css('.pager .next a::attr(href)').extract_first()        #获取元素属性信息
        url = response.urljoin(next)        #把连接拼接起来
        yield scrapy.Request(url=url,callback=self.parse)        #回调函数
-
存储内容--->pipelines.py(设计管道存储内容。当spider收集好Item后,会将Item(由字典组成的列表)传递到Item Pipeline,这些Item Pipeline组件按定义的顺序处理Item)
# -*- coding: utf-8 -*-
import pymongo

from scrapy.exceptions import DropItem

class TextPipeline(object):        #对语录进行处理,当长度超过50时,截断然后在后面加*...*

    def __init__(self):
        self.limit =50

    def process_item(self, item, spider):
        if item['text']:
            if len(item['text']) > self.limit:
                item['text'] = item['text'][0:self.limit].rstrip() + '...'
            return item
        else:
            return DropItem('Miss Text')

class MongoPipeline(object):        #链接数据库
    def __init__(self ,mongo_uri, mongo_db):
        self.mongo_uri = mongo_uri
        self.mongo_db = mongo_db

    @classmethod
    def from_crawler(cls, crawler):        #从ettings中拿到需要的配置信息(类方法)
        return cls(
            mongo_uri=crawler.settings.get('MONGO_URI'),
            mongo_db=crawler.settings.get('MONGO_DB')
        )

    def open_spider(self,spider):       #初始化数据库
        self.client = pymongo.MongoClient(self.mongo_uri)
        self.db = self.client[self.mongo_db]

    def process_item(self, item ,spider): #向数据库插入数据
        name = item.__class__.__name__
        self.db[name].insert(dict(item))
        return item

    def close_spider(self ,spider):
         self.client.close()
-
相关配置--->settings.py(为了启动Item Pipelines组件,必须将类添加到settings.py的ITEM_PIPELINES中,此处只有一个pipeline类,因此找到ITEM_PIPELINES,打开代码)
# -*- coding: utf-8 -*-

# Scrapy settings for quotetutorial project
#
# For simplicity, this file contains only settings considered important or
# commonly used. You can find more settings consulting the documentation:
#
#     https://doc.scrapy.org/en/latest/topics/settings.html
#     https://doc.scrapy.org/en/latest/topics/downloader-middleware.html
#     https://doc.scrapy.org/en/latest/topics/spider-middleware.html

BOT_NAME = 'quotetutorial'

SPIDER_MODULES = ['quotetutorial.spiders']
NEWSPIDER_MODULE = 'quotetutorial.spiders'

MONGO_URI = 'localhost'
MONGO_DB = 'quotestutorial'

# Crawl responsibly by identifying yourself (and your website) on the user-agent
#USER_AGENT = 'quotetutorial (+http://www.yourdomain.com)'

# Obey robots.txt rules
ROBOTSTXT_OBEY = True

# Configure maximum concurrent requests performed by Scrapy (default: 16)
#CONCURRENT_REQUESTS = 32

# Configure a delay for requests for the same website (default: 0)
# See https://doc.scrapy.org/en/latest/topics/settings.html#download-delay
# See also autothrottle settings and docs
#DOWNLOAD_DELAY = 3
# The download delay setting will honor only one of:
#CONCURRENT_REQUESTS_PER_DOMAIN = 16
#CONCURRENT_REQUESTS_PER_IP = 16

# Disable cookies (enabled by default)
#COOKIES_ENABLED = False

# Disable Telnet Console (enabled by default)
#TELNETCONSOLE_ENABLED = False

# Override the default request headers:
#DEFAULT_REQUEST_HEADERS = {
#   'Accept': 'text/html,application/xhtml+xml,application/xml;q=0.9,*/*;q=0.8',
#   'Accept-Language': 'en',
#}

# Enable or disable spider middlewares
# See https://doc.scrapy.org/en/latest/topics/spider-middleware.html
#SPIDER_MIDDLEWARES = {
#    'quotetutorial.middlewares.QuotetutorialSpiderMiddleware': 543,
#}

# Enable or disable downloader middlewares
# See https://doc.scrapy.org/en/latest/topics/downloader-middleware.html
#DOWNLOADER_MIDDLEWARES = {
#    'quotetutorial.middlewares.QuotetutorialDownloaderMiddleware': 543,
#}

# Enable or disable extensions
# See https://doc.scrapy.org/en/latest/topics/extensions.html
#EXTENSIONS = {
#    'scrapy.extensions.telnet.TelnetConsole': None,
#}

# Configure item pipelines
# See https://doc.scrapy.org/en/latest/topics/item-pipeline.html
ITEM_PIPELINES = {
   'quotetutorial.pipelines.TextPipeline': 300,
   'quotetutorial.pipelines.MongoPipeline': 400,
}

# Enable and configure the AutoThrottle extension (disabled by default)
# See https://doc.scrapy.org/en/latest/topics/autothrottle.html
#AUTOTHROTTLE_ENABLED = True
# The initial download delay
#AUTOTHROTTLE_START_DELAY = 5
# The maximum download delay to be set in case of high latencies
#AUTOTHROTTLE_MAX_DELAY = 60
# The average number of requests Scrapy should be sending in parallel to
# each remote server
#AUTOTHROTTLE_TARGET_CONCURRENCY = 1.0
# Enable showing throttling stats for every response received:
#AUTOTHROTTLE_DEBUG = False

# Enable and configure HTTP caching (disabled by default)
# See https://doc.scrapy.org/en/latest/topics/downloader-middleware.html#httpcache-middleware-settings
#HTTPCACHE_ENABLED = True
#HTTPCACHE_EXPIRATION_SECS = 0
#HTTPCACHE_DIR = 'httpcache'
#HTTPCACHE_IGNORE_HTTP_CODES = []
#HTTPCACHE_STORAGE = 'scrapy.extensions.httpcache.FilesystemCacheStorage'
注意:如果有多个item pipelines的话(多种保存方式),需要在ITEM_PIPELINES中配置类,后面的“300”随意设置。
分配给每个类的整型值,确定了它们的运行顺序。数值越低,组件的优先级越高,运行顺序越靠前。
-
启动项目:
scrapy crawl quotes
-
把获得的内容保存
scrapy crawl quotes -o quotes.{json | jl | csv | xml | pickle | marshal}
-