1. Frame
每个视图都有一个frame属性,它是CGRect结构,它描述了视图所在的矩形在其父视图中的位置。
(屏幕坐标系默认的原点在左上角,x轴向右伸展,y轴向下伸展)
设置frame通常通过视图的指定初始化器initWithFrame
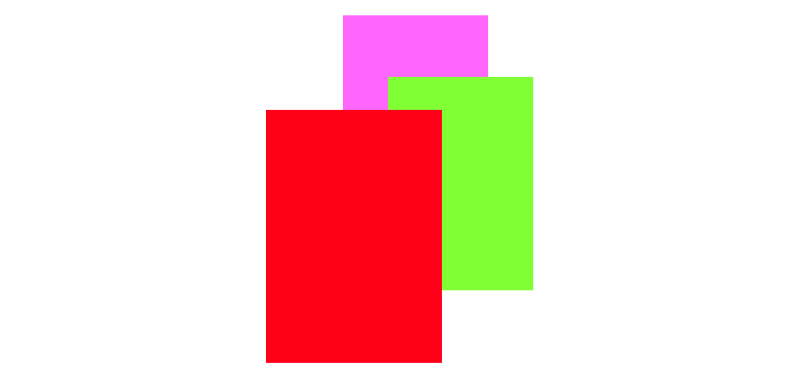
下面来看个例子,该例子初始化了3个相互叠加的矩形区域
(Objective-C代码)
UIView* v1 = [[UIView alloc] initWithFrame:CGRectMake(113, 111, 132, 194)];
v1.backgroundColor = [UIColor colorWithRed:1 green:.4 blue:1 alpha:1];
UIView* v2 = [[UIView alloc] initWithFrame:CGRectMake(41, 56, 132, 194)];
v2.backgroundColor = [UIColor colorWithRed:.5 green:1 blue:0 alpha:1];
UIView* v3 = [[UIView alloc] initWithFrame:CGRectMake(43, 197, 160, 230)];
v3.backgroundColor = [UIColor colorWithRed:1 green:0 blue:0 alpha:1];

[mainview addSubview: v1];
[v1 addSubview: v2];
[mainview addSubview: v3];
(Swift代码 iOS9)
let v1 = UIView(frame:CGRectMake(113, 111, 132, 194))
v1.backgroundColor = UIColor(red: 1, green: 0.4, blue: 1, alpha: 1)
let v2 = UIView(frame:CGRectMake(41, 56, 132, 194))
v2.backgroundColor = UIColor(red: 0.5, green: 1, blue: 0, alpha: 1)
let v3 = UIView(frame:CGRectMake(43, 197, 160, 230))
v3.backgroundColor = UIColor(red: 1, green: 0, blue: 0, alpha: 1)

mainview.addSubview(v1)
v1.addSubview(v2)
mainview.addSubview(v3)
运行结果:
2. Bounds
Bounds也是CGRect结构,和Frame不同,它描述的是视图自身的矩形区域,是相对于自身的坐标系而言的。
下面的例子创建了2个叠加的矩形视图,子视图为绿色较小的那个
(Objective-C代码)
UIView* v1 = [[UIView alloc] initWithFrame:CGRectMake(113, 111, 132, 194)];
v1.backgroundColor = [UIColor colorWithRed:1 green:.4 blue:1 alpha:1];

// 在一个视图内部画图时,通常需要使用该视图的bounds
UIView* v2 = [[UIView alloc] initWithFrame:CGRectInset(v1.bounds, 10, 10)];
v2.backgroundColor = [UIColor colorWithRed:.5 green:1 blue:0 alpha:1];

[mainview addSubview: v1];
[v1 addSubview: v2];
(Swift代码 iOS9)
let v1 = UIView(frame:CGRectMake(113, 111, 132, 194))
v1.backgroundColor = UIColor(red: 1, green: 0.4, blue: 1, alpha: 1)

// 在一个视图内部画图时,通常需要使用该视图的bounds
let v2 = UIView(frame:v1.bounds.insetBy(dx: 10, dy: 10))
v2.backgroundColor = UIColor(red: 0.5, green: 1, blue: 0, alpha: 1)

mainview.addSubview(v1)
v1.addSubview(v2)
运行结果:

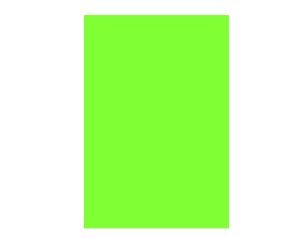
下面的例子通过改变绿色子视图的bounds将父视图完全覆盖
(Objective-C代码)
UIView* v1 = [[UIView alloc] initWithFrame:CGRectMake(113, 111, 132, 194)];
v1.backgroundColor = [UIColor colorWithRed:1 green:.4 blue:1 alpha:1];

UIView* v2 = [[UIView alloc] initWithFrame:CGRectInset(v1.bounds, 10, 10)];
v2.backgroundColor = [UIColor colorWithRed:.5 green:1 blue:0 alpha:1];

[mainview addSubview: v1];
[v1 addSubview: v2];

// 重定义子视图的bounds
CGRect r = v2.bounds;
r.size.height += 20;
r.size.width += 20;
v2.bounds = r;
(Swift代码 iOS9)
let v1 = UIView(frame:CGRectMake(113, 111, 132, 194))
v1.backgroundColor = UIColor(red: 1, green: 0.4, blue: 1, alpha: 1)

let v2 = UIView(frame:v1.bounds.insetBy(dx: 10, dy: 10))
v2.backgroundColor = UIColor(red: 0.5, green: 1, blue: 0, alpha: 1)

mainview.addSubview(v1)
v1.addSubview(v2)

v2.bounds.size.height += 20
v2.bounds.size.width += 20
运行结果:
下面的例子,紫色父视图的原点进行少量偏移
(Objective-C代码)
UIView* v1 = [[UIView alloc] initWithFrame:CGRectMake(113, 111, 132, 194)];
v1.backgroundColor = [UIColor colorWithRed:1 green:.4 blue:1 alpha:1];

UIView* v2 = [[UIView alloc] initWithFrame:CGRectInset(v1.bounds, 10, 10)];
v2.backgroundColor = [UIColor colorWithRed:.5 green:1 blue:0 alpha:1];

[mainview addSubview: v1];
[v1 addSubview: v2];

// 改变父视图的原点坐标
CGRect r = v1.bounds;
r.origin.x += 10;
r.origin.y += 10;
v1.bounds = r;
(Swift代码 iOS9)
let v1 = UIView(frame:CGRectMake(113, 111, 132, 194))
v1.backgroundColor = UIColor(red: 1, green: 0.4, blue: 1, alpha: 1)

let v2 = UIView(frame:v1.bounds.insetBy(dx: 10, dy: 10))
v2.backgroundColor = UIColor(red: 0.5, green: 1, blue: 0, alpha: 1)

mainview.addSubview(v1)
v1.addSubview(v2)

// 改变父视图的原点坐标
v1.bounds.origin.x += 10
v1.bounds.origin.y += 10
运行结果:

3. Center
Center即视图的中心点位置坐标
4. 关于主窗口和设备屏幕
设备屏幕(UIScreen.mainScreen())没有frame, 但它有bounds。
主窗口没有父视图,但是它的frame可以设为屏幕的bounds。
let w = UIWindow(frame: UIScreen.mainScreen().bounds)
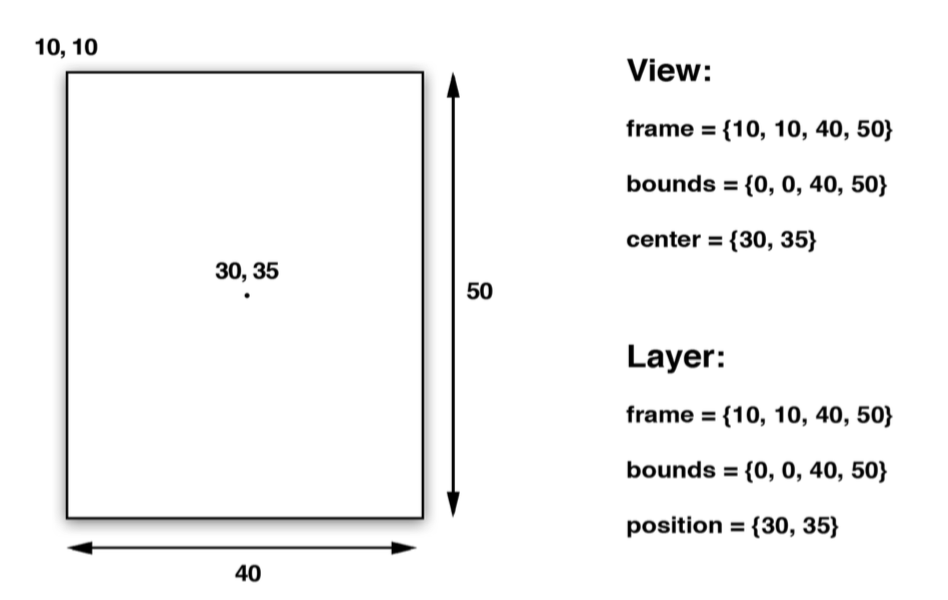
5. 关于frame和bounds的区别
一言以蔽之,就是前者相对于父视图,而后者相对于自身。
我们还是用图片来看一下吧,这样更直观
在视图未旋转的情况下,它们差不多,坐标稍有区别,如下图:
而在视图作了类似旋转的transform之后,它们的坐标则有很大的差别了,见下图:
