在前面两篇文章中,我介绍了基于IdentityServer4的一个Identity Service的实现,并且实现了一个Weather API和基于Ocelot的API网关,然后实现了通过Ocelot API网关整合Identity Service做身份认证的API请求。今天,我们进入前端开发,设计一个简单的Angular SPA,并在Angular SPA上调用受Ocelot API网关和Identity Service保护的Weather API。
回顾
- 《Angular SPA基于Ocelot API网关与IdentityServer4的身份认证与授权(一)》
- 《Angular SPA基于Ocelot API网关与IdentityServer4的身份认证与授权(二)》
Angular SPA的实现
我们搭建一个Angular SPA的应用程序,第一步先实现一些基础功能,比如页面布局和客户端路由;第二步先将Ocelot API网关中设置的身份认证功能关闭,并设计一个Component,在Component中调用未受保护的Weather API,此时可以毫无阻拦地在Angular SPA中调用Weather API并将结果显示在页面上;第三步,我们在Ocelot API网关上开启身份认证,然后修改Angular SPA,使其提供登录按钮以实现用户登录与身份认证,进而访问受保护的Weather API。在进行接下来的实操演练之前,请确保已经安装Angular 8 CLI。
基础功能的实现
在文件系统中,使用ng new命令,新建一个Angular 8的单页面应用,为了有比较好的界面布局,我使用了Bootstrap。方法很简单,在项目目录下,执行npm install --save bootstrap,然后,打开angular.json文件,将bootstrap的js和css添加到配置中:
"styles": [
    "src/styles.css",
    "node_modules/bootstrap/dist/css/bootstrap.min.css"
],
"scripts": [
    "node_modules/bootstrap/dist/js/bootstrap.min.js"
]
然后,修改app.component.html,使用下面代码覆盖:
<nav class="navbar navbar-expand-md navbar-dark bg-dark">
  <a class="navbar-brand" href="#">Identity Demo</a>
  <button class="navbar-toggler" type="button" data-toggle="collapse" data-target="#navbarSupportedContent" aria-controls="navbarSupportedContent" aria-expanded="false" aria-label="Toggle navigation">
    <span class="navbar-toggler-icon"></span>
  </button>

  <div class="collapse navbar-collapse" id="navbarSupportedContent">
    <ul class="navbar-nav mr-auto">
      <li class="nav-item active">
        <a class="nav-link" href="#">首页 <span class="sr-only">(current)</span></a>
      </li>
      <li class="nav-item">
        <a class="nav-link" href="#">API</a>
      </li>
      <li class="nav-item">
        <a class="nav-link" href="#">关于</a>
      </li>

    </ul>
    <form class="form-inline my-2 my-md-0">
      <ul class="navbar-nav mr-auto">
        <a class="nav-link" href="javascript:void(0)">登录</a>
      </ul>
    </form>
  </div>
</nav>
ng serve跑起来,得到一个具有标题栏的空页面:
接下来,使用ng g c命令创建3个component,分别是HomeComponent,ApiComponent和AboutComponent,并且修改app.modules.ts文件,将这三个components加入到router中:
import { BrowserModule } from '@angular/platform-browser';
import { NgModule } from '@angular/core';
import { Routes, RouterModule } from '@angular/router';

import { AppComponent } from './app.component';
import { HomeComponent } from './home/home.component';
import { ApiComponent } from './api/api.component';
import { AboutComponent } from './about/about.component';

const appRoutes: Routes = [
  { path: 'about', component: AboutComponent },
  { path: 'home', component: HomeComponent },
  { path: 'api', component: ApiComponent },
  { path: '**', component: HomeComponent }
];

@NgModule({
  declarations: [
    AppComponent,
    HomeComponent,
    ApiComponent,
    AboutComponent
  ],
  imports: [
    BrowserModule,
    RouterModule.forRoot(
      appRoutes,
      { enableTracing: false }
    )
  ],
  providers: [],
  bootstrap: [AppComponent]
})
export class AppModule { }
然后,在app.component.html中,加入:
<router-outlet></router-outlet>
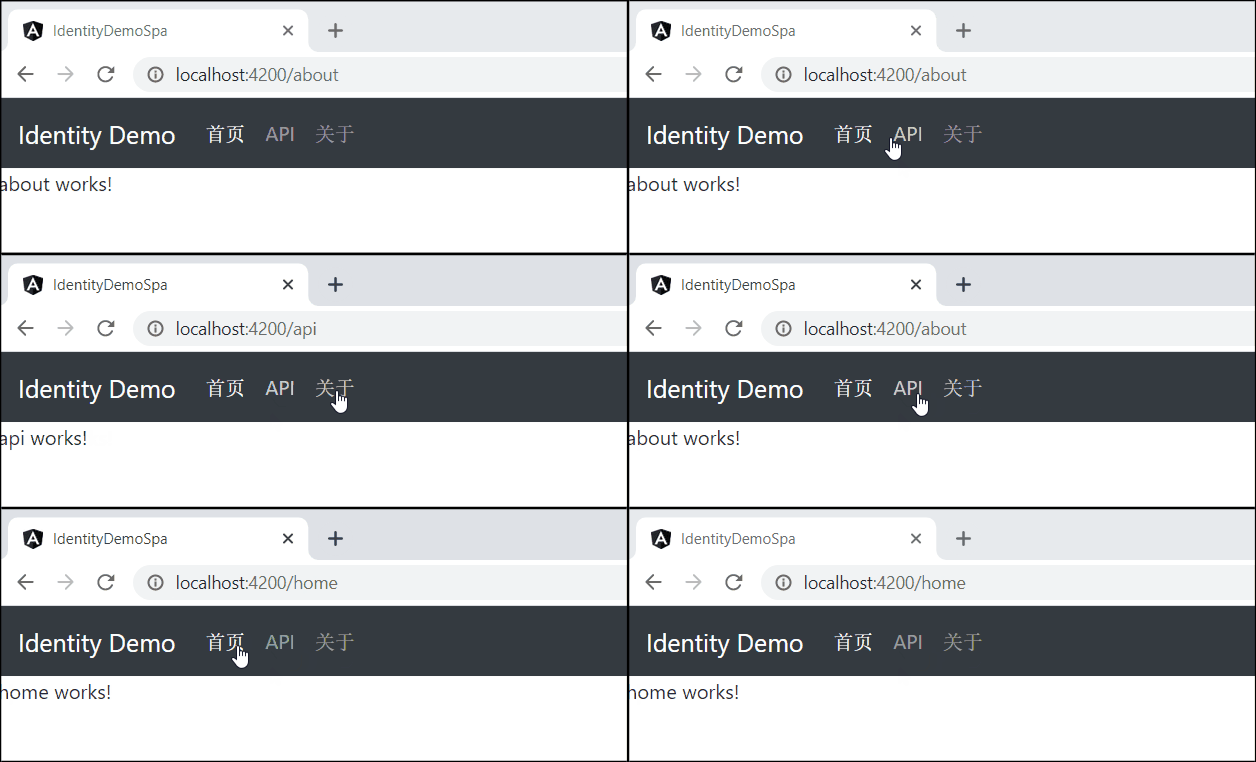
再次运行站点,可以看到,我们已经可以通过菜单来切换component了:
在Angular页面中调用API显示结果
Angular调用API的方法我就不详细介绍了,Angular的官方文档有很详细的内容可以参考。在这个演练中,我们需要注意的是,首先将上篇文章中对于Weather API的认证功能关闭,以便测试API的调用是否成功。关闭认证功能其实很简单,只需要将Ocelot API网关中有关Ocelot的配置的相关节点注释掉就行了:
{
  "ReRoutes": [
    {
      "DownstreamPathTemplate": "/weatherforecast",
      "DownstreamScheme": "http",
      "DownstreamHostAndPorts": [
        {
          "Host": "localhost",
          "Port": 5000
        }
      ],
      "UpstreamPathTemplate": "/api/weather",
      "UpstreamHttpMethod": [ "Get" ],
      //"AuthenticationOptions": {
      //  "AuthenticationProviderKey": "AuthKey",
      //  "AllowedScopes": []
      //}
    }
  ]
}
接下来修改Angular单页面应用,在app.module.ts中加入HttpClientModule:
imports: [
    BrowserModule,
    HttpClientModule,
    RouterModule.forRoot(
      appRoutes,
      { enableTracing: false }
    )
  ],
然后实现一个调用Weather API的Service(服务):
import { Injectable } from '@angular/core';
import { HttpClient } from '@angular/common/http';
import { WeatherData } from '../models/weather-data';
import { Observable } from 'rxjs';

@Injectable({
  providedIn: 'root'
})
export class WeatherService {

  constructor(private httpClient: HttpClient) { }

  getWeather(): Observable<WeatherData[]> {
    return this.httpClient.get<WeatherData[]>('http://localhost:9000/api/weather');
  }
}
在这个Service实现中,没有加入异常处理部分,因为作为一个研究性质的项目,没有必要进行异常处理,到浏览器的调试窗口查看错误信息就行。上面的代码引用了一个类型,就是WeatherData,它其实非常简单,对应着Weather API所返回的数据模型:
export class WeatherData {
    constructor(public temperatureF: number,
        public temperatureC: number,
        private summary: string,
        private date: string) { }
}
现在,修改api.component.ts,通过调用这个WeatherService来获取Weather API的数据:
import { Component, OnInit } from '@angular/core';
import { WeatherService } from '../services/weather.service';
import { WeatherData } from '../models/weather-data';

@Component({
  selector: 'app-api',
  templateUrl: './api.component.html',
  styleUrls: ['./api.component.css']
})
export class ApiComponent implements OnInit {

  data: WeatherData[];

  constructor(private api: WeatherService) { }

  ngOnInit() {
    this.api.getWeather()
      .subscribe(ret => this.data = ret);
  }
}
并显示在前端:
<div class="container" *ngIf="data">
    <table class="table table-striped">
        <thead>
          <tr>
            <th scope="col">Summary</th>
            <th scope="col">TempF</th>
            <th scope="col">TempC</th>
            <th scope="col">Date</th>
          </tr>
        </thead>
        <tbody>
          <tr *ngFor="let d of data">
            <td>{{d.summary}}</td>
            <td>{{d.temperatureF}}</td>
            <td>{{d.temperatureC}}</td>
            <td>{{d.date}}</td>
          </tr>
        </tbody>
      </table>
</div>
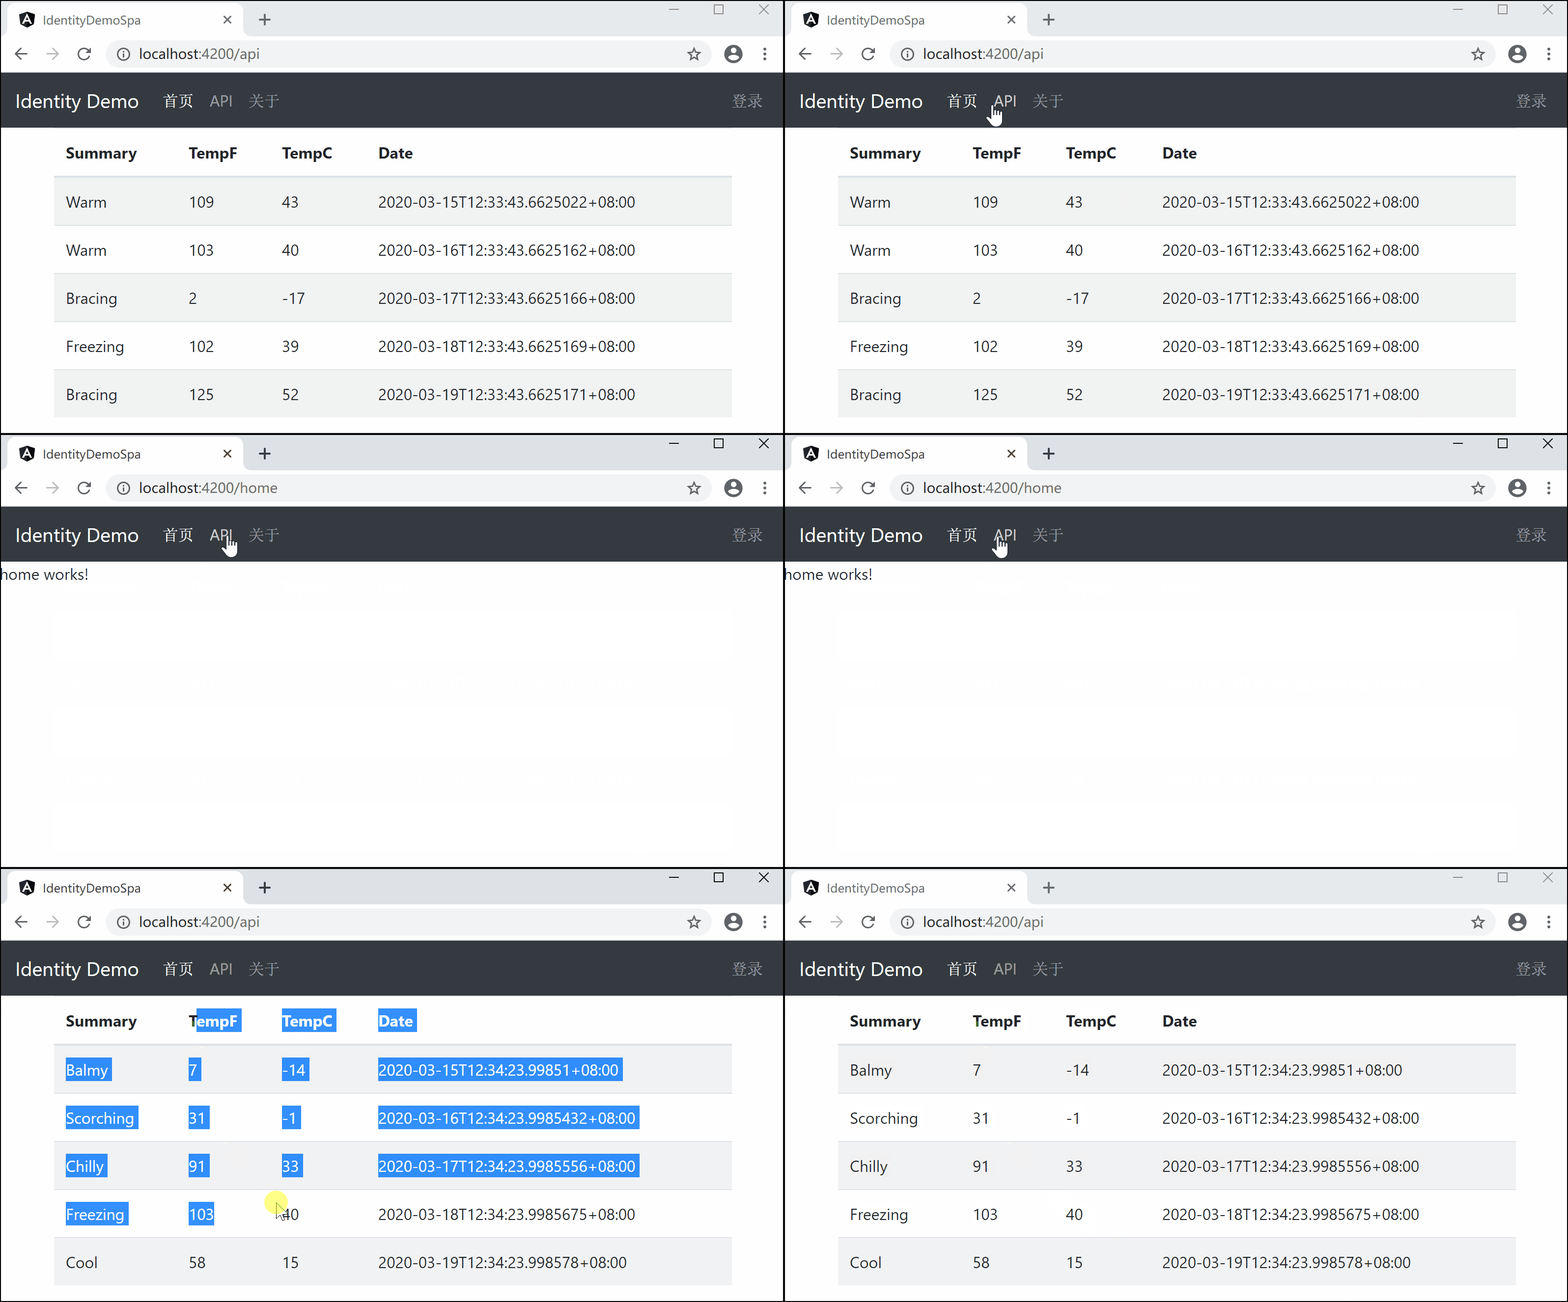
完成之后,启动Weather API和Ocelot API网关,然后运行Angular单页面应用,我们已经可以在API这个页面显示调用结果了:
开启身份认证
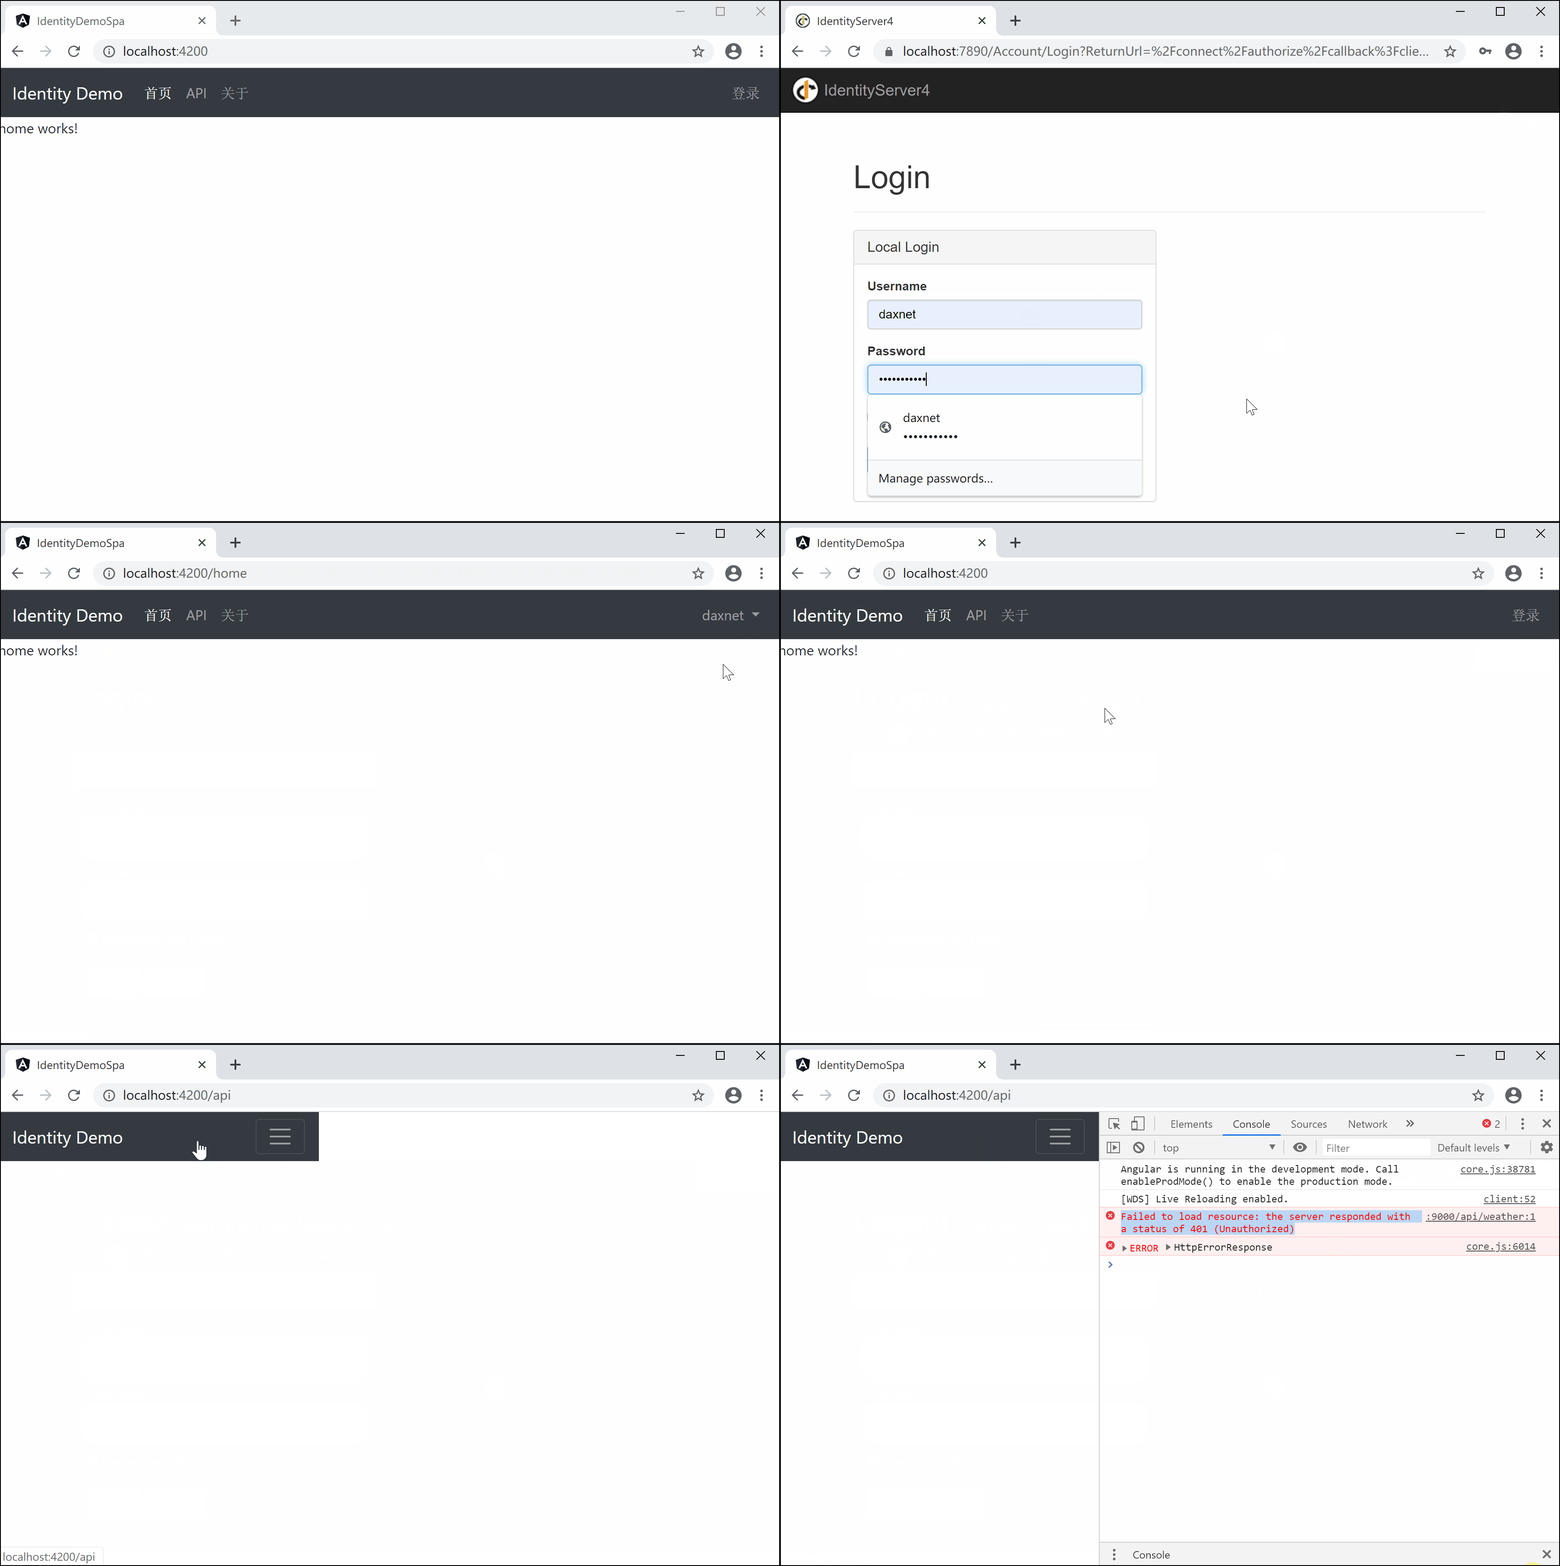
在Ocelot API网关的配置中,打开被注释掉的部分,重新启用身份认证功能,再次刷新Angular页面,发现页面已经打不开了,在开发者工具的Console中输出了错误信息:401 (Unauthorized),表示身份认证部分已经起作用了。
下面我们来解决这个问题。既然是需要身份认证才能访问Weather API,那么我们就在Angular页面上实现登录功能。首先在Angular单页面应用中安装oidc-client,oidc-client是一款为Javascript应用程序提供OpenID Connect和OAuth2协议支持的框架,在Angular中使用也非常的方便。用npm install来安装这个库:
npm install oidc-client
然后,实现一个用于身份认证的Service:
import { Injectable } from '@angular/core';
import { BehaviorSubject } from 'rxjs';
import { UserManager, UserManagerSettings, User } from 'oidc-client';

@Injectable({
  providedIn: 'root'
})
export class AuthService {

  private authStatusSource = new BehaviorSubject<boolean>(false);
  private userNameStatusSource = new BehaviorSubject<string>('');
  private userManager = new UserManager(this.getUserManagerSettings());
  private user: User | null;

  authStatus$ = this.authStatusSource.asObservable();
  userNameStatus$ = this.userNameStatusSource.asObservable();

  constructor() {
    this.userManager.getUser().then(user => {
      this.user = user;
      this.authStatusSource.next(this.isAuthenticated());
      this.userNameStatusSource.next(this.user.profile.name);
    });
  }

  async login() {
    await this.userManager.signinRedirect();
  }

  async logout() {
    await this.userManager.signoutRedirect();
  }

  async completeAuthentication() {
    this.user = await this.userManager.signinRedirectCallback();
    this.authStatusSource.next(this.isAuthenticated());
    this.userNameStatusSource.next(this.user.profile.name);
  }

  isAuthenticated(): boolean {
    return this.user != null && !this.user.expired;
  }

  get authorizationHeaderValue(): string {
    return `${this.user.token_type} ${this.user.access_token}`;
  }

  private getUserManagerSettings(): UserManagerSettings {
    return {
      authority: 'http://localhost:7889',
      client_id: 'angular',
      redirect_uri: 'http://localhost:4200/auth-callback',
      post_logout_redirect_uri: 'http://localhost:4200/',
      response_type: 'id_token token',
      scope: 'openid profile email api.weather.full_access',
      filterProtocolClaims: true,
      loadUserInfo: true,
      automaticSilentRenew: true,
      silent_redirect_uri: 'http://localhost:4200/silent-refresh.html'
    };
  }
}
AuthService为Angular应用程序提供了用户身份认证的基本功能,比如登录、注销,以及判断是否经过身份认证(isAuthenticated)等。需要注意的是getUserManagerSettings方法,它为oidc-client提供了基本的参数配置,其中的authority为Identity Service的URL;redirect_uri为认证完成后,Identity Service需要返回到哪个页面上;post_logout_redirect_uri表示用户注销以后,需要返回到哪个页面上;client_id和scope为Identity Service中为Angular应用所配置的Client的ClientId和Scope(参考Identity Service中的Config.cs文件)。
接下来,修改app.component.html,将原来的“登录”按钮改为:
<form class="form-inline my-2 my-md-0">
    <ul class="navbar-nav mr-auto">
    <a *ngIf="!isAuthenticated" class="nav-link" href="javascript:void(0)" (click)="onLogin()">登录</a>
    <li *ngIf="isAuthenticated" class="nav-item dropdown">
      <a class="nav-link dropdown-toggle" href="#" id="navbarDropdown" role="button" data-toggle="dropdown"
        aria-haspopup="true" aria-expanded="false">
        {{userName}}
      </a>
      <div class="dropdown-menu" aria-labelledby="navbarDropdown">
        <a class="dropdown-item" href="javascript:void(0)" (click)="onLogOut()">注销</a>
      </div>
    </li>
    </ul>
</form>
然后,修改app.component.ts,完成登录和注销部分的代码:
import { Component, OnInit, OnDestroy } from '@angular/core';
import { AuthService } from './services/auth.service';
import { Subscription } from 'rxjs';

@Component({
  selector: 'app-root',
  templateUrl: './app.component.html',
  styleUrls: ['./app.component.css']
})
export class AppComponent implements OnInit, OnDestroy {
  title = 'identity-demo-spa';

  isAuthenticated: boolean;
  authStatusSubscription: Subscription;
  userNameSubscription: Subscription;
  userName: string;

  constructor(private authService: AuthService) { }

  ngOnDestroy(): void {
    this.authStatusSubscription.unsubscribe();
    this.userNameSubscription.unsubscribe();
  }

  ngOnInit(): void {
    this.authStatusSubscription = this.authService.authStatus$.subscribe(status => this.isAuthenticated = status);
    this.userNameSubscription = this.authService.userNameStatus$.subscribe(status => this.userName = status);
  }

  async onLogin() {
    await this.authService.login();
  }

  async onLogOut() {
    await this.authService.logout();
  }
}
我们还需要增加一个新的component:AuthCallbackComponent,用来接收登录成功之后的回调,它会通知AuthService以更新登录状态和用户信息:
import { Component, OnInit } from '@angular/core';
import { AuthService } from '../services/auth.service';
import { Router, ActivatedRoute } from '@angular/router';

@Component({
  selector: 'app-auth-callback',
  templateUrl: './auth-callback.component.html',
  styleUrls: ['./auth-callback.component.css']
})
export class AuthCallbackComponent implements OnInit {

  constructor(private authService: AuthService, private router: Router, private route: ActivatedRoute) { }

  async ngOnInit() {
    await this.authService.completeAuthentication();
    this.router.navigate(['/home']);
  }

}
最后将AuthCallbackComponent添加到Route中:
const appRoutes: Routes = [
  { path: 'about', component: AboutComponent },
  { path: 'home', component: HomeComponent },
  { path: 'api', component: ApiComponent },
  { path: 'auth-callback', component: AuthCallbackComponent },
  { path: '**', component: HomeComponent }
];
重新运行Angular应用,你会看到以下效果:
现在我们就可以在Angular的页面中完成用户登录和注销了。如你所见:
- 登录界面来自Identity Service,本身也是由IdentityServer4提供的界面,开发者可以自己修改Identity Service来定制界面
- 登录成功后,原本的“登录”按钮变成了显示用户名称的下拉菜单,选择菜单就可以点击“注销”按钮退出登录
- 此时访问API页面,仍然无法正确调用Weather API,因为我们还没有将Access Token传入API调用
登录状态下的API调用
接下来,我们将Access Token传入,使得Angular应用可以使用登录用户获取的Access Token正确调用Weather API。修改AuthService如下:
export class WeatherService {

  constructor(private httpClient: HttpClient, private authService: AuthService) { }

  getWeather(): Observable<WeatherData[]> {
    const authHeaderValue = this.authService.authorizationHeaderValue;
    const httpOptions = {
      headers: new HttpHeaders({
        'Content-Type': 'application/json',
        Authorization: authHeaderValue
      })
    };

    return this.httpClient.get<WeatherData[]>('http://localhost:9000/api/weather', httpOptions);
  }
}
再次运行Angular应用,可以看到,已经可以在登录的状态下成功调用Weather API。你也可以试试,在退出登录的状态下,是否还能正确调用API。
小结
本文详细介绍了Angular单页面应用作为Ocelot API网关的客户端,通过Identity Service进行身份认证和API调用的整个过程。当然,很多细节部分没有做到那么完美,本身也是为了能够演示开发过程中遇到的问题。从下一讲开始,我会开始介绍基于Ocelot API网关的授权问题。
源代码
访问以下Github地址以获取源代码:


