安装包获取
|
Nagios |
https://sourceforge.net/projects/nagios/files/ |
|
Nagios Plugins |
https://www.nagios.org/downloads/nagios-plugins/ |
|
nagios.zip |
百度网盘-Linux-安装包-nagios |
规划
|
主机名 |
角色 |
IP地址 |
|
nagios |
nagios监控服务器 |
192.168.233.160 |
|
RS01 |
nagios客户(被监控)端 |
192.168.233.159 |
|
RS02 |
nagios客户(被监控)端 |
192.168.233.158 |
服务器端安装
准备工作
|
调整字符集 |
echo 'export LC_ALL=C'>> /etc/profile echo $LC_ALL source /etc/profile cd ~ |
|
关闭防火墙 |
|
|
关闭selinux |
setenforce 0 getenforce |
|
时间同步 |
echo '*/10 * * * * /usr/sbin/ntpdate pool.ntp.org >/dev/null 2>&1'>>/var/spool/cron/root |
|
安装所需基础软件包 |
yum install gcc glibc glibc-common -y yum install gd gd-devel -y yum install httpd php php-gd –y yum install mysql* -y 【非必须,如果要监控数据库会用到,不安这个的话无法安监控数据库的插件,也就无法监控数据库】 |
|
创建nagios需要的用户和组 |
useradd -m nagios useradd apache groupadd nagcmd usermod -a -G nagcmd nagios usermod -a -G nagcmd apache |
安装配置
|
开始安装 |
cd /home/zhang/tools unzip oldboy_training_nagios_soft.zip tar xf nagios-3.5.1.tar.gz cd nagios ./configure --with-command-group=nagcmd make all make install make install-init && make install-config && make install-commandmode |
|
安装nagios web配置文件 |
make install-webconf 执行后显示: [root@zhang nagios]# make install-webconf /usr/bin/install -c -m 644 sample-config/httpd.conf /etc/httpd/conf.d/nagios.conf *** Nagios/Apache conf file installed *** # 就是这个文件/etc/httpd/conf.d/nagios.conf |
|
创建nagios web监控界面登入时需要的用户名和密码 |
# -b:非交互 nagios配置文件把密码路径指定在了这个文件下 htpasswd -cb /usr/local/nagios/etc/htpasswd.users zhang 123456 |
|
添加监控报警的邮件地址 |
yum install sendmail -y /etc/init.d/sendmail start vi /usr/local/nagios/etc/objects/contacts.cfg nagios@localhost = 15666661331@163.com chkconfig sendmail on |
|
安装nagios插件软件包 |
cd ../ yum install -y perl-devel tar xf nagios-plugins-1.4.16.tar.gz cd nagios-plugins-1.4.16 ./configure --with-nagios-user=nagios --with-nagios-group=nagios --enable-perl-modules --with-mysql=/usr/local/mysql make 此编译如遇到make :***[all] Error 2 则configure加:--with-mysql=/usr/local/mysql;指定mysql路径 亲测,这个解决方法不对。应是perl-devel的问题。建议重新安装下所需基础包。 make install |
|
查看插件个数 |
cd ../ ls /usr/local/nagios/libexec/|wc -l |
|
配置nagios开机自启 |
chkconfig --add nagios chkconfig nagios on |
|
验证nagios配置文件(检查语法)2种 |
/usr/local/nagios/bin/nagios -v /usr/local/nagios/etc/nagios.cfg [root@zhang tools]# /etc/init.d/nagios checkconfig Running configuration check... OK. |
|
浏览器端: |
http://192.168.233.160/nagios oldboy 123456 |
|
安装NRPE |
之所以服务端也安装NRPE 一是是因为要在…/nagios/libexec/目录下生成check_nrpe命令; 二是服务端也要通过NRPE进行监控: http://down.51cto.com/data/165101 tar xf nrpe-2.12.tar.gz cd nrpe-2.12 ./configure make all make install-plugin make install-daemon make install-daemon-config cd .. |
|
启动 |
Nagios是不会监听端口的,因为不会有程序发数据给它。 /etc/init.d/httpd start /etc/init.d/nagios start lsof -i :80 ps aux |grep nagios |
|
配置账号权限: |
[root@nagios etc]# egrep -v "^#|^$" cgi.cfg main_config_file=/usr/local/nagios/etc/nagios.cfg physical_html_path=/usr/local/nagios/share url_html_path=/nagios show_context_help=0 use_pending_states=1 use_authentication=1 use_ssl_authentication=0 authorized_for_system_information=nagiosadmin,admin authorized_for_configuration_information=nagiosadmin,admin authorized_for_system_commands=nagiosadmin,admin authorized_for_all_services=nagiosadmin,admin authorized_for_all_hosts=nagiosadmin,admin authorized_for_all_service_commands=nagiosadmin,admin authorized_for_all_host_commands=nagiosadmin,admin authorized_for_read_only=xiaomin,chenkaixiong,chengcai #注:只给chengcai账号只读权限,如果想给该账号更多权限,可根据配置添加。 default_statusmap_layout=5 default_statuswrl_layout=4 ping_syntax=/bin/ping-n -U -c 5 $HOSTADDRESS$ refresh_rate=90 escape_html_tags=1 action_url_target=_blank notes_url_target=_blank lock_author_names=1 |
|
至此,服务端安装部分暂时告一段落,,, |
|
客户端配置及安装
|
准备工作 |
同服务端=调整字符集+关闭防火+关闭selinux+时间同步 |
|
上传软件包 |
rz nagios.zip |
|
创建用户 |
useradd -M nagios -s /sbin/nologin |
|
安装perl |
yum install -y perl-devel perl-CPAN openssl* yum install -y mysql-server # 这是为了解决报错 |
|
安装Nagios Plugins |
tar xf nagios-plugins-1.4.16.tar.gz cd nagios-plugins-1.4.16 ./configure --with-nagios-user=nagios --with-nagios-group=nagios --enable-perl-modules make && make install cd .. ls /usr/local/nagios/libexec/|wc -l |
|
安装nrpe |
tar xf nrpe-2.12.tar.gz cd nrpe-2.12 ./configure make all make install-plugin make install-daemon make install-daemon-config cd .. |
|
安装iostat #for monitor iostat |
wget http://www.cpan.org/authors/id/T/TO/TONVOON/Nagios-Plugin-0.34.tar.gz wget http://www.cpan.org/authors/id/S/SF/SFINK/Math-Calc-Units-1.07.tar.gz wgethttp://www.cpan.org/authors/id/A/AB/ABIGAIL/Regexp-Common-2017060201.tar.gz wget http://search.cpan.org/CPAN/authors/id/K/KA/KASEI/Class-Accessor-0.31.tar.gz wget http://mirror.thekeelecentre.com/distfiles/Params-Validate-0.91.tar.gz
tar xf Params-Validate-0.91.tar.gz cd Params-Validate-0.91 perl Makefile.PL make make install cd .. tar xf Class-Accessor-0.31.tar.gz cd Class-Accessor-0.31 perl Makefile.PL make && make install cd .. tar xf Config-Tiny-2.12.tar.gz cd Config-Tiny-2.12 perl Makefile.PL echo $? make && make install cd .. tar xf Math-Calc-Units-1.07.tar.gz cd Math-Calc-Units-1.07 perl Makefile.PL make && make install echo $? cd .. tar xf Regexp-Common-2017060201.tar.gz cd Regexp-Common-2017060201 perl Makefile.PL make && make install echo $? cd .. tar xf Nagios-Plugin-0.34.tar.gz cd Nagios-Plugin-0.34 perl Makefile.PL make make install echo $? cd .. yum install -y sysstat |
|
配置开发的几个基础脚本 nagios自己的内存和IO监控性能不是很好,这里用自己做的插件 |
cp check_memory.pl /usr/local/nagios/libexec/ cp check_iostat /usr/local/nagios/libexec/ chmod 755 /usr/local/nagios/libexec/check_memory.pl chmod 755 /usr/local/nagios/libexec/check_iostat yum install -y dos2unix dos2unix /usr/local/nagios/libexec/check_iostat dos2unix /usr/local/nagios/libexec/check_memory.pl 1当前路径为软件包的路径 2把写好的脚本放到nagios脚本目录下 3授权使脚本可执行 3使用dos2unix使之成为Unix的脚本格式 |
|
配置nrpe |
cd /usr/local/nagios/etc cp nrpe.cfg{,.bak} sed -ri 's@^allowed_hosts.*@&,10.0.0.1@g' nrpe.cfg sed -ri '199,203d' nrpe.cfg #也可用替代第三条: perl -pi -e 's/allowed_hosts=127.0.0.1/allowed_hosts=192.168.233.160/g' /usr/local/nagios/etc/nrpe.cfg #先备份 # 79行允许10.0.0.1监控 #注释或干脆干掉199-203行。 #如果机器大于500台做集群或分布式监控时,可以使用多个nagios server,ip要用逗号隔开。 |
|
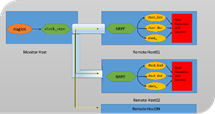
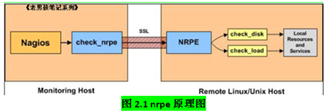
echo "command[check_load]=/usr/local/nagios/libexec/check_load -w 15,10,6 -c 30,25,20" >>nrpe.cfg echo "command[check_mem]=/usr/local/nagios/libexec/check_memory.pl -w 6% -c 3%" >>nrpe.cfg echo "command[check_disk]=/usr/local/nagios/libexec/check_disk -w 20% -c 8% -p /" >>nrpe.cfg echo "command[check_swap]=/usr/local/nagios/libexec/check_swap -w 20% -c 10%" >>nrpe.cfg echo "command[check_iostat]=/usr/local/nagios/libexec/check_iostat -w 6 -c 10" >>nrpe.cfg # -w警告; -c严重警告。 上面依次对负载,内存,硬盘,虚拟内存,磁盘IO的监控,这些都是本地的服务(我们这里称之为被动监控),由nagios服务器端通过nrpe插件定时去client的nrpe服务定期获取信息。原理:
|
|
|
启动nagios client |
/usr/local/nagios/bin/nrpe -c /usr/local/nagios/etc/nrpe.cfg -d echo "# nagios nrpe process cmd" >>/etc/rc.local echo "/usr/local/nagios/bin/nrpe -c /usr/local/nagios/etc/nrpe.cfg -d" >>/etc/rc.local tail -2 /etc/rc.local # -c:指定配置文件 -d:daemon #检查 |
|
检查 |
ps -ef|grep nagios lsof -i tcp:5666 netstat -lnt |
|
提示 |
如果客户端nrpe改了配置文件,这样重启: pkill nrpe && /usr/local/nagios/bin/nrpe -c /usr/local/nagios/etc/nrpe.cfg -d |
|
至此,客户端配置完毕 |
配置server端nagios监控的服务
|
Nagios安装生成的文件 |
[root@nagios nagios]# pwd /usr/local/nagios [root@nagios nagios]# tree -L 1 . |-- bin |-- etc |-- libexec # nagios调用的插件库 |-- sbin # CGI程序 |-- share # Nagios界面展示的php程序等内容的目录,被Nagios在httpd配置文件目录生成的配置文件所调用 `-- var # 日志和数据 6 directories, 0 files |
|
配置文件di目录 |
[root@nagios nagios]# tree etc/ etc/ |-- cgi.cfg # 被主配置文件包含 |-- nagios.cfg # 主配置文件 |-- objects # 被主配置文件包含 | |-- commands.cfg # 存放Nagios命令相关配置(也可指定commands目录),这里的命令不是系统命令 | |-- contacts.cfg | |-- localhost.cfg # 对本机的监控,我们不使用它进行监控,而是将本机当成客户端来监控 | |-- printer.cfg # 打印机 | |-- switch.cfg # 交换机 | |-- templates.cfg # 模板配置文件 | |-- timeperiods.cfg | `-- windows.cfg # windows `-- resource.cfg # 被主配置文件包含,这里面是Nagios内置变量的定义,如$USER1$,$USER2$,$USER3$等 |
|
追加注释 |
services.cfg:存放具体被监控的服务相关的配置内容(对哪些服务进行监控),上百台以上可指定services目录,默认不存在; hosts.cfg:存放具体被监控的主机相关配置,上百台以上可指定hosts目录,默认不存在; contacts.cfg:存放报警联系人相关配置的文件; timeperiods.cfg:存放报警周期时间等相关配置; template.cfg:模板配置文件,模板的存在是为了方便的配置服务器配置,类似shell里的函数功能 |
|
配置主配置文件nagios.cfg |
添加: vi /usr/local/nagios/etc/nagios.cfg +34 #added by zhang at 2016 cfg_file=/usr/local/nagios/etc/objects/hosts.cfg cfg_file=/usr/local/nagios/etc/objects/services.cfg cfg_dir=/usr/local/nagios/etc/objects/services #cfg_file=/usr/local/nagios/etc/objects/localhost.cfg 或: [root@nagios etc]# sed -ri '33acfg_file=/usr/local/nagios/etc/objects/hosts.cfg' nagios.cfg sed -ri '33acfg_file=/usr/local/nagios/etc/objects/services.cfg' nagios.cfg sed -ri 's@#(cfg_dir=/usr/local/nagios/etc/servers)@1@g' nagios.cfg sed -ri 's@cfg_file=/usr/local/nagios/etc/objects/localhost.cfg@#&@g' nagios.cfg #cfg_dir作为备用增加一个service目录,在目录下的文件只要符合*.cfg就可以被nagios加载,使用脚本批量部署时非常方便的随机命名配置。 注释掉,从而统一监控 |
|
mkdir /usr/local/nagios/etc/objects/services chown -R nagios.nagios /usr/local/nagios/etc/objects/services cd objects/ head -51 localhost.cfg >hosts.cfg chown -R nagios.nagios hosts.cfg touch /usr/local/nagios/etc/objects/services.cfg # 暂时留空 chown -R nagios.nagios /usr/local/nagios/etc/objects/services.cfg #生成hosts.cfg 、services.cfg 文件,services 目录,并更改 #前51行有些主机模板 |
nagios被动模式实例配置细节
监控客户端服务器磁盘分区,load负载,men内存,swap、磁盘IO
|
配置hosts.cfg #添加客户端主机和主机组 |
[root@nagios objects]# vim hosts.cfg define host{ use linux-server host_name 02-client1 alias 02-client1 address 192.168.233.158 } define host{ use linux-server host_name 01-nagios alias 01-nagios address 192.168.233.160 # 将本机也加入监控 } define hostgroup{ hostgroup_name linux-servers alias Linux Servers members 02-client1,01-nagios # 再将两个客户端加入一个组 } #一个host标签就是一个被监控的主机 use表示一个使用名为linux-server的模板,该模板就是和hosts.cfg在同一个目录下的timeperiods.cfg,在该文件中可以搜索到linux-server定义的属性。也可以将该模板中定义的属性写在define #对于host{}标签,如果在该标签中定义了Linux-server的属性,那么就以该标签中的内容为准;如果没定义就会到模板配置文件中找。使用模板配置文件的好处就在于在现在这个标签内只需定义四行即可。 |
|
检查语法1 |
两种方式: /usr/local/nagios/bin/nagios -v /usr/local/nagios/etc/nagios.cfg /etc/init.d/nagios checkconfig [root@nagios objects]# /etc/init.d/nagios checkconfig ... Error: There are no services defined! # 这就是错误,没有定义服务。 ... #下面就是统计的 Total Warnings: 2 # 警告无所谓 Total Errors: 1 # 但是错误一定要解决 #其实第二种就是调用第一种的命令,但是它将信息都定义到了/dev/null中了,根本看不出来什么地方出错了,因此我们可以修改启动脚本中的内容: [root@nagios objects]# vim /etc/init.d/nagios +183 checkconfig) printf "Running configuration check..." $NagiosBin -v $NagiosCfgFile # 后面的重定向去掉 #既然语法检查出没有定义服务,那我们就定义一个服务,接下来添加一个监控的服务配置到services.cfg |
|
添加监控的服务 |
[root@nagios objects]# vi services.cfg define service { use generic-service host_name 158-RS02,159-RS01,nagios service_description Disk Partition check_command check_nrpe!check_disk #在commond.cfg中被定义 } define service { use generic-service host_name 158-RS02,159-RS01,nagios service_description Current Load check_command check_nrpe!check_load } define service { use generic-service host_name 158-RS02,159-RS01,nagios service_description MEM Useage check_command check_nrpe!check_mem } define service { use generic-service host_name 158-RS02,159-RS01,nagios service_description Nei Cun check_command check_nrpe!check_swap } define service { use generic-service host_name 158-RS02,159-RS01,nagios service_description IO Stat check_command check_nrpe!check_iostat!5!10 #还可以这样用。。。。 } # check_load这个模块就是我远程客户端(此处是192.168.233.158/159)的nrpe.cfg定义的commod中括号里面的check_load |
|
检查语法2 |
[root@nagios objects]# /etc/init.d/nagios checkconfig Checking services... Error: Service check command 'check_nrpe' specified in service 'Current Load' for host '158-RS02' not defined anywhere! Error: Service check command 'check_nrpe' specified in service 'Disk Partition' for host '158-RS02' not defined anywhere! Error: Service check command 'check_nrpe' specified in service 'MEM Useage' for host '158-RS02' not defined anywhere! Error: Service check command 'check_nrpe' specified in service 'Current Load' for host '159-RS01' not defined anywhere! Error: Service check command 'check_nrpe' specified in service 'Disk Partition' for host '159-RS01' not defined anywhere! Error: Service check command 'check_nrpe' specified in service 'MEM Useage' for host '159-RS01' not defined anywhere! Error: Service check command 'check_nrpe' specified in service 'Current Load' for host 'nagios' not defined anywhere! Error: Service check command 'check_nrpe' specified in service 'Disk Partition' for host 'nagios' not defined anywhere! Error: Service check command 'check_nrpe' specified in service 'MEM Useage' for host 'nagios' not defined anywhere! ....省略.... Total Warnings: 0 Total Errors: 9 ....省略.... # check_nrpe:Nagios的命令,所以我们需要在commands.cfg文件中定义 # check_disk:调用客户端配置文件nrpe.cfg中[check_disk]标签后面的命令 |
|
定义commands.cfg |
[root@nagios objects]# vi commands.cfg #shitf +G切到末尾加入下面的内容 # 'check_nrpe' command definition define command{ command_name check_nrpe command_line $USER1$/check_nrpe -H $HOSTADDRESS$ -c $ARG1$ #在services.cfg文件中被调用。 } #-c:指定一个参数,这个参数就是check_disk等。 # 其实定义这么多的参数无非就是为了执行这一条命令: [root@nagios objects]# /usr/local/nagios/libexec/check_nrpe -H 10.0.0.2 -c check_disk DISK OK - free space: / 57841 MB (95% inode=97%);| /=2760MB;51080;58742;0;63851 |
|
启动nagios |
[root@nagios objects]# /etc/init.d/nagios start 修改完配置文件重启不要再用restart了,用reload。 [root@nagios objects]# /etc/init.d/nagios reload Running configuration check...done. Reloading nagios configuration...done |
|
浏览器端 |
http://192.168.233.160/nagios/ oldboy 123456 |
|
浏览器端2 |
我们点击左边的services,下方会出现报错信息,解决办法就是编辑cgi.cfg:
#从以上信息可以看出nagiosadmin就是Nagios的管理员,我们现在是没有权限,因此我们可以将nagiosadmin改为我们一开始添加的认证的用户oldboy。当然也可以使用nagiosadmin作为认证用户。 |
|
解决办法 |
[root@nagios etc]# sed -i 's/nagiosadmin/oldboy/g' cgi.cfg 或 #[root@nagios etc]# sed -i 's/nagiosadmin/oldboy,nagiosadmin/g' cgi.cfg [root@nagios etc]# /etc/init.d/nagios reload Running configuration check...done. Reloading nagios configuration...done [root@nagios etc]# grep oldboy cgi.cfg authorized_for_system_information=oldboy authorized_for_configuration_information=oldboy authorized_for_system_commands=oldboy authorized_for_all_services=oldboy authorized_for_all_hosts=oldboy authorized_for_all_service_commands=oldboy authorized_for_all_host_commands=oldboy |
|
排错 |
PENDING IO PENDING N/A 0d 0h 8m 41s+ 1/3 Service check scheduled for Thu Nov 3 12:41:40 CST 2016 #不要着急,看检查时间 (1) 客户端获取值失败: [root@client1 ~]# /usr/local/nagios/libexec/check_nrpe -H 10.0.0.2 -c check_disk CHECK_NRPE: Error - Could not complete SSL handshake. # 握手失败 # 这种问题的解决办法很简单,只需要执行下面这条命令即可: [root@client1 ~]# /usr/local/nagios/libexec/check_nrpe -H 127.0.0.1 -c check_disk # 如果能够获得值,那就是没有添加网卡地址,在nrpe.cfg中修改allowed_hosts=127.0.0.1这一行 (2) 状态为CRITICAL Connection refused by host
/usr/local/nagios/libexec/check_nrpe -H 192.168.233.158 -c check_disk # 当然ip和参数都可以改,通过该命令就能得到答案,因为改命令就是Nagios获取监控值的过程 CHECK_NRPE:Error – Could not complete SSL handshake 查看客户端nrpe.cfg allowed_hosts=ip地址 这一行加没加nagios-server的ip (3) 命令行执行能够获取数值,但是web界面却获取不到 没有这个模块的信息。 两种错误方向 define service { use generic-service host_name 02-client1,01-nagios service_description Disk Partition #描述有可能错了 check_command check_nrpe!check_disk #参数定义错了 } 没有主机信息: 检查客户端ip地址,别把"."写成"," 改完配置文件别忘记pkill nrpe && /usr/local/nagios/bin/nrpe -c /usr/local/nagios/etc/nrpe.cfg -d (4) :Unable to read output
# 出现这种问题的原因就是获取值的插件不存在,或者没有执行权限,或者是这插件就是有问题的,总之就是插件的错。 command[check_mem]=/usr/local/nagios/libexec/check_memory.pl -w 6% -c 3% # check_memory.pl就是插件 [root@nagios libexec]# chmod +x check_memory.pl # 执行该命令,如果还是不行,那就是插件本身的问题了 (5)NREP:Commod 'check_load' not defined 检查客户端commod后面的模块名 (6) [root@zhang libexec]# /usr/local/nagios/libexec/check_nrpe -H 127.0.0.1 -c check_disk Connection refused by host 解决: 在此目录创建一个index.html文件: /var/www/html 重启httpd和nagios服务,等待几分钟警告就自动清除了。 [root@zhang etc]# cd /var/www/ [root@zhang www]# cd html/ [root@zhang html]# ll total 0 [root@zhang html]# touch /var/www/html/index.html [root@zhang html]# /etc/init.d/nagios restart Running configuration check...done. Stopping nagios: /etc/init.d/httpd restartdone. Starting nagios: done. [root@zhang html]# /etc/init.d/httpd restart Stopping httpd: [ OK ] Starting httpd: httpd: Could not reliably determine the server's fully qualified domain name, using 172.17.212.25 for ServerName [ OK ] [root@zhang html]# /usr/local/nagios/libexec/check_http -I 127.0.0.1 HTTP OK: HTTP/1.1 200 OK - 266 bytes in 0.001 second response time |time=0.000713s;;;0.000000 size=266B;;;0 不行的时候一定一定看 [root@zhang services]# /usr/local/nagios/bin/nagios -v /usr/local/nagios/etc/nagios.cfg
Nagios Core 3.5.1 Copyright (c) 2009-2011 Nagios Core Development Team and Community Contributors Copyright (c) 1999-2009 Ethan Galstad Last Modified: 08-30-2013 License: GPL
Website: http://www.nagios.org Reading configuration data... Read main config file okay... Processing object config file '/usr/local/nagios/etc/objects/commands.cfg'... Error: Unexpected EOF in file '/usr/local/nagios/etc/objects/commands.cfg' on line 243 - check for a missing closing bracket. Error processing object config files! ############# 有明确的错误指示 #################### #######意思是check for a missing closing bracket. 检查缺少的关闭括号。 ###### ***> One or more problems was encountered while processing the config files...
Check your configuration file(s) to ensure that they contain valid directives and data defintions. If you are upgrading from a previous version of Nagios, you should be aware that some variables/definitions may have been removed or modified in this version. Make sure to read the HTML documentation regarding the config files, as well as the 'Whats New' section to find out what has changed. |
|
排错思路 |
(2) 在服务器端执行: /usr/local/nagios/libexec/check_nrpe -H 【被监控主机地址】-c【获取值的命令】 (3) 在客户端本地执行: /usr/local/nagios/libexec/check_nrpe -H 127.0.0.1 -c【获取值的命令】 #127.0.0.1也可换做本机ip如:192.168.233.158 (4)执行nrpe.cfg配置文件中的获取值的命令: command[check_disk]=/usr/local/nagios/libexec/check_disk -w 20% -c 8% -p / # 执行该命令 老男孩老师补几个提醒: (1) 检查客户端系统自带的防火强,是否drop了5666端口; (2) nrpe添加完命令后,有没有真正重启; ps -ef |grep nrpe pkill nrpe ps -ef |grep nrpe /usr/local/nagios/bin/nrpe -c /usr/local/nagios/etc/nrpe.cfg -d ps -ef |grep nrpe (3) nrpe.cfg配置文件中的allow_hosts这行的ip千万不要加错了。 |
|
被动模式监控端口 |
其实这也是主动和被动出问题时排错的一个思路落实到具体案例的过程。 被动模式就要在客户端进行 1) 先测试命令在命令行是否执行成功: [root@client1 etc]# /usr/local/nagios/libexec/check_tcp -H 10.0.0.2 -p 80 TCP OK - 0.000 second response time on port 80|time=0.000132s;;;0.000000;10.000000 2) 然后加入到nrpe.cfg中:
[root@client1 etc]# echo "command[check_port_80]=/usr/local/nagios/libexec/check_tcp -H 10.0.0.2 -p 80 -w 5 -c 10" >>nrpe.cfg 3) 重启服务:
ps aux|grep nrpe pkill nrpe ps aux|grep nrpe /usr/local/nagios/bin/nrpe -c /usr/local/nagios/etc/nrpe.cfg -d ps aux|grep nrpe 4) 在服务端命令测试:
[root@nagios libexec]# ./check_nrpe -H 10.0.0.2 -c check_port_80 TCP OK - 0.000 second response time on port 80|time=0.000162s;5.000000;10.000000;0.000000;10.000000 5) 添加一个services:
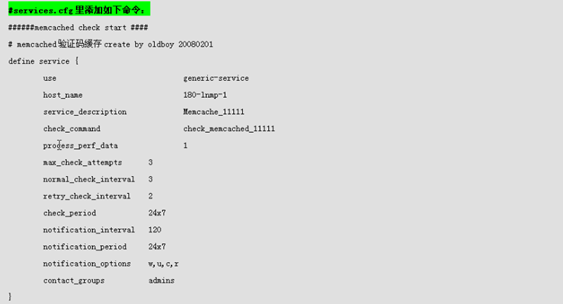
[root@nagios etc]# vim servers/http.cfg define service { use generic-service host_name 02-client1 service_description blog_prot_80_passive check_command check_nrpe!check_port_80 max_check_attempts 3 normal_check_interval 2 retry_check_interval 1 check_period 24x7 notification_interval 30 notification_period 24x7 notification_options w,u,c,r contact_groups admins } 6) 重载配置文件
[root@nagios etc]# /etc/init.d/nagios checkconfig [root@nagios etc]# /etc/init.d/nagios reload 222.png-4.3kB
1.7 服务分组 |
主动监控
从nagios服务器端发起的监控行为,此类业务一般都是开启了对外提供服务的业务
通过URL及端口方式监控客户端主机提供的服务
|
监控模式 |
按照监控的行为,老男孩老师把Nagios的监控分为主动监控和被动监控(NRPE半被动和NSCA全被动)。 (1) 主动监控:所谓的主动模式就是Nagios服务器端发起的监控,如URL地址、端口监控等。主动模式获取值的命令无需经过nrpe,Nagios自身能够直接发起,也就是说不需要在客户端安装任何插件。当然,主动监控模式也能配置成被动模式。 (2) 半被动监控:我们把对负载、内存、硬盘、虚拟内存、磁盘IO、温度、风扇转速等这些本地资源而非系统对外提供的服务的监控称为半被动模式。半被动模式的特点是对于这些本地资源的监控一般由Nagios插件定时去连接client的NRPE服务,定期获取信息发回Nagios服务器端。基本上只要安装了类似NRPE的agent端,且通过插件的方式的监控我们都认为是半被动监控。 上面讲到的都是被动模式。 |
|
如何选择主动和被动? |
(1) 对于本地资源的监控,一般都使用被动模式。如负载、磁盘、内存、虚拟内存、磁盘IO、温度、风扇等的监控(我们也可以通过snmp来监控部分系统资源); (2) 对于web服务、数据库这种能对外提供服务的监控,一般采用主动模式。如监控http、ssh、MySQL、rsync等服务; (3) 主动和被动是相对的,并且是可以相互转换的。即主动模式的服务可以改成被动的;而被动模式有时也可以改为主动。 总之: (a) 主动模式就和NRPE无关了,就是利用服务端本地插件直接获取信息; (b) 被动模式则是Nagios主程序通过check_nrpe插件和客户端NRPE进程沟通,调用本地插件获取数据。 |
|
常用插件 |
主动模式有check_tcp和check_http这两个非常常用的插件,一个是检查端口,另一个则是检查URL,它们都能够使用–help查看使用帮助。 [root@nagios libexec]# ./check_http --help [root@nagios libexec]# ./check_tcp –help #######以下是最基本的使用方法######## [root@nagios libexec]# ./check_tcp -H 10.0.0.2 -p 22 TCP OK - 0.000 second response time on port 22|time=0.000299s;;;0.000000;10.000000 [root@nagios libexec]# ./check_http -I 10.0.0.2 HTTP OK: HTTP/1.1 200 OK - 248 bytes in 0.024 second response time |time=0.023816s;;;0.000000 size=248B;;;0 |
|
主动模式的监控配置过程 |
(1) 在服务端的命令行把要监控的命令先调试好; (2) 在commands.cfg中定义Nagios命令,同时调用命令行的插件; (3) 在服务的配置文件中定义要监控的服务,调用commands.cfg中定义Nagios的监控命令。 |
|
对域名的监控 |
先说说使用主配置文件包含一个目录的好处: (1) 该目录下的所有所有以.cfg为后缀的配置文件都会被Nagios加载,因此当我们不想使用其中的配置文件时,只需要改变其后缀名即可; (2) 我们一个以一个服务名为目录名,下面的配置文件都是监控这个服务的;还可以以一个主机命名,下面的配置文件都是监控这个主机的。可以根据业务需要进行配置。 ########################################################################################################### 添加一个服务:: vi services.cfg #对域名的监控 define service { use generic-service host_name 158-RS02 service_description baidu check_command check_weburl!-H www.baidu.com #在commands.cfg中定义services.cfg中添加的check_weburl vi commands.cfg # 'check_weburl' command definition define command{ command_name check_weburl command_line $USER1$/check_http $ARG1$ -w 10 -c 30 } "commands.cfg" 249L, 8029C written |
|
ip地址形式监控 |
# 对ip地址的监控: define service { use generic-service host_name 158-RS02 service_description blog_url check_command check_weburl!-I 192.168.233.158 max_check_attempts 3 normal_check_interval 2 retry_check_interval 1 check_period 24x7 notification_interval 30 notification_period 24x7 notification_options w,u,c,r contact_groups admins } |
|
对url地址的监控 |
#对某一url地址的监控 define service { use generic-service host_name 158-RS02 service_description blog_url-1 check_command check_weburl!-H www.eitnatian.org.com/ -u /zhang/test.html #-u url=PATH |
|
对特殊带传参的URL的监控 |
和上面一样只加 –u 的话不可以; 当该URI有特殊符号,也就是没有做伪静态时,使用这个URL一定要用引号一起来不然就会报错: define service { use generic-service host_name 158-RS02 service_description blog_url check_command check_weburl!-H blog.etiantian.org -u "/main_free.jsp?dirId=32234&gId=3" |
|
关于本地hosts |
编辑hosts文件,域名都有公网DNS解析了,为什么还要添加hosts呢?因为使用公网DNS很容易误报,如果监控服务器本身DNS出问题了就会导致误报。缺点是不能监控到DNS导致的域名解析故障。 |
|
做一个小总结 |
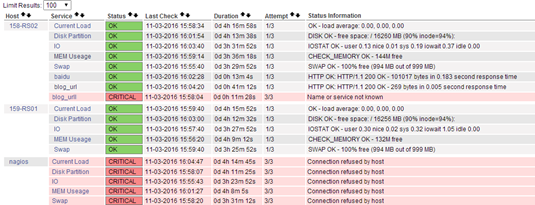
blog_urll不行是因为根本没有在/etc/hosts中解析这个地址,又况且这个地址根本不存在。。。 nagios本机不行是因为根本没配置自己客户端的nrpe。 |
|
监控任意端口 |
例如:80 110 25 8080 873
|
|
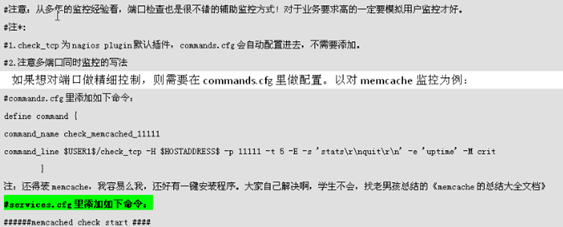
监控端口使用的是check_tcp这个插件,这个命令已经在commands.cfg中定义了,我们直接拿来用就行。比如监听80端口:
[root@nagios etc]# vim servers/http.cfg define service { use generic-service host_name 158-RS02 service_description blog_prot_80 check_command check_tcp!80 max_check_attempts 3 normal_check_interval 2 retry_check_interval 1 check_period 24x7 notification_interval 30 notification_period 24x7 notification_options w,u,c,r contact_groups admins } # check_tcp模块系统已经在commands.cfg中默认定义了。监控多个端口后面加!端口就行了 # 重载配置文件
[root@nagios etc]# /etc/init.d/nagios checkconfig [root@nagios etc]# /etc/init.d/nagios reload 所有端口都可以这么监控,只需要改个描述和端口号即可。 |
|
|
集群节点控制 |
利用别名实现对集群下面同一个节点的URL监控,因为相同的域名下所有节点都是一样的,这是就可以通过别名区分同一个域名解析下的所有主机: web1 blog.etiantian.org,blog1.etiantian.org web2 blog.etiantian.org,blog2.etiantian.org |
Nagios的优化调试
|
优化配置nagios启动 |
脚本检查nagios语法,前面已提及《检查语法1》 |
|
重启 |
reload |
|
日志 |
/usr/local/nagios/var/nagios.log |
|
被动模式排错 |
Nagios的图形监控【服务端】
|
yum安装pnp软件需要的基础包 |
虽然能显示能报警,但是企业工作中需要一个历史趋势图。Nagios本身只是实现了核心功能,因此它不具备出图的能力,和Nagios配合出图的工具有很多,但是最好的还是pnp。想要使用pnp出图,但是也需要其他软件的支持。我们先安装图形显示管理的依赖库: yum install –y cairo pango zlib zlib-devel freetype freetype-devel gd gd-devel |
|
install libart_lgpl by rrdtool |
pnp出图实际上是利用rrdtool(轮询的数据库工具)这个软件,但是安装之前我们先安装rrdtool的依赖库。我们可以使用yum install libart_lgpl libart_lgpl-devel安装,这里我们使用编译安装的方式(软件包中都有): cd /home/zhang/tools/nagios tar xf libart_lgpl-2.3.17.tar.gz cd libart_lgpl-2.3.17 ./configure make && make install cp –r /usr/local/include/libart-2.0/ /usr/include/ cd .. |
|
install rrdtools |
安装rrdtools,rrdtools是真正画图的软件,这个工具虽然冷门,但是很多软件的画图都是靠它,config时可能会有个RRDs的警告,不用管: tar xf rrdtool-1.2.14.tar.gz cd rrdtool-1.2.14 ./configure –prefix=/usr/local/rrdtool –disable-python –disable-tcl make && make install cd .. ll /usr/local/rrdtool/bin/ # 3个程序 |
|
install Pnp |
现在才是真正的安装pnp,pnp的作用就是收集数据然后告诉rrdtool,然后rrdtool画完图后还要通过pnp进行展示: tar xf pnp-0.4.14.tar.gz cd pnp-0.4.14 ./configure –with-rrdtool=/usr/local/rrdtool/bin/rrdtool –with-perfdata-dir=/usr/local/nagios/share/perfdata make all make install make install-config make install-init PHP提供了一个perl脚本,可以用下面的命令查到。 ll /usr/local/nagios/libexec/|grep process # 画图的命令# 出图的路径 编译时如果出现如下错误,解决办法:yum install perl-Time-HiRes –y checking for Perl Module Time::HiRes... no configure: error: Perl Module Time::HiRes not available |
|
nagios出图的配置 |
软件都准备好了,接下来要做的就是编辑主配置文件: cd /usr/local/nagios/etc/ cp nagios.cfg nagios.cfg.bak sed –ri 's@(^pro.*=).*@11@g' nagios.cfg sed –ri 's@^#(host_perfdata_c.*)@1@g' nagios.cfg sed –ri 's@^#(service_perfdata_c.*)@1@g' nagios.cfg # 这是修改后的内容 process_performance_data=1 1记录数据,0不记录数据 host_perfdata_command=process-host-perfdata service_perfdata_command=process-service-perfdata |
|
修改commands.cfg文件 |
# 将这两段内容删除约227-238行: # 'process-host-perfdata' command definition define command{ command_name process-host-perfdata command_line /usr/bin/printf "%b" "$LASTHOSTCHECK$ $HOSTNAME$ $HOSTSTATE$ $HOSTATTEMPT$ $HOSTSTATETYPE$ $HOSTEXECUTIONTIME$ $HOSTOUTPUT$ $HOSTPERFDATA$ " >> /usr/local/nagios/var/host-perfdata.out } # 'process-service-perfdata' command definition define command{ command_name process-service-perfdata command_line /usr/bin/printf "%b" "$LASTSERVICECHECK$ $HOSTNAME$ $SERVICEDESC$ $SERVICESTATE$ $SERVICEATTEMPT$ $SERVICESTATETYPE$ $SERVICEEXECUTIONTIME$ $SERVICELATENCY$ $SERVICEOUTPUT$ $SERVICEPERFDATA$ " >> /usr/local/nagios/var/service-perfdata.out } # 替换成: #add by zhang 201611 # 'process-host-perfdata' command definition define command{ command_name process-host-perfdata command_line /usr/local/nagios/libexec/process_perfdata.pl } # 'process-service-perfdata' command definition define command{ command_name process-service-perfdata command_line /usr/local/nagios/libexec/process_perfdata.pl } # /usr/local/nagios/libexec可以用$USER1$进行替换 |
|
检查语法,重启 |
/etc/init.d/nagios checkconfig /etc/init.d/nagios reload |
|
访问 |
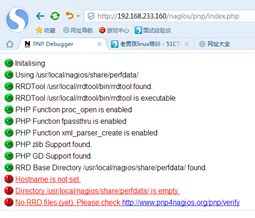
重载配置文件后访问192.168.233.160/nagios/pnp/index.php,出现以下界面表示安装成功 |
|
效果 |
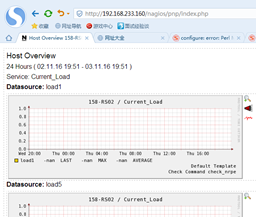
######会出现1图,多等会就好了2图,不行的话在检查下上面nagios出图的配置,看有没有没改过来的。####### 我操作时process_performance_data=1---->0没改好。等了几分钟都不行。
|
配置各个服务及主机出监控状态图 |
|
|
出图的路径 |
/usr/local/nagios/share/perfdata |
|
服务出图记录数据设置 |
vi services.cfg 末尾加 process_perf_data 1 也可在模板中加,见下文【2服务】 |
|
主机出图记录数据设置 |
vi hosts.cfg 末尾加 process_perf_data 1 也可在模板中加,见下文【2服务】 |
|
整合监控与趋势图 |
目前【主机和主机的服务】的监控和趋势图二者是分离的,我们现在要将它们结合起来。整合PnP的 url超链接到nagios图形显示界面里 提示:这会在主机或对应服务前面出现一个趋势图图标,点击就是对应的服务图形监控状态趋势 |
|
1主机 |
方法1:增加一个小模板,找个地方放下就行。 vi /usr/lcoal/nagios/etc/objects/hosts.cfg #graphic for hosts create by zhang! define hostextinfo{ host_name 158-RS02,159-RS01,nagios action_url /nagios/pnp/index.php?host=$HOSTNAME$ } 方法2:直接在hosts.cfg里define hosts中加参数 define host{ use linux-server host_name 159-RS01 alias 159-RS01 address 192.168.233.159 process_perf_data 1 action_url /nagios/pnp/index.php?host=$HOSTNAME$ } 方法3在模板中加入,主机调用的那个模板就在哪个模板中加入 [root@nagios etc]# vim objects/templates.cfg define host{ name linux-server use generic-host ..........省略........ process_perf_data 1 # 这个参数也可在这加 action_url /nagios/pnp/index.php?host=$HOSTNAME$ #########################意思就是把host交给php程序。本例采用方法1 |
|
2服务 |
方法1服务配置文件中.shift+G切至末尾,添加: #add qushitu logo define serviceextinfo { host_name 158-RS02 service_description Swap Useage action_url /nagios/pnp/index.php?host=$HOSTNAME$&srv=$SERVICEDESC$ } define serviceextinfo { host_name 158-RS02 service_description http_80 action_url /nagios/pnp/index.php?host=$HOSTNAME$&srv=$SERVICEDESC$ } 方法2:在服务中插入语句 [root@nagios objects]# vim services.cfg define service { use generic-service host_name 02-client1,01-nagios service_description Disk Partition check_command check_nrpe!check_disk action_url /nagios/pnp/index.php?host=$HOSTNAME$&srv=$SERVICEDESC$ # 增加一行 } 方法3在模板中加入,主机调用的那个模板就在哪个模板中加入 ##################本例采用方法2 |
Nagios报警
|
分类 |
邮件报警:这是必须会的,生产环境中应尽量使用自己公司的信箱作为报警信箱,或者建立一个邮箱组(邮件列表)。尽量不用非公司信箱作为报警信箱,如126、qq等,因为这些信箱是免费的,对报警的频率等会有限制,很有可能会拒收或当成垃圾邮件,导致报警延时或无法收到。适用于重要且不紧急的业务报警; 邮件转短信报警:收到邮件会短信提醒,就相当于短信报警的功能。这是由邮箱提供商提供的一个功能,但报警内容长度有限制; http短信网关:有专门的公司提供直接发送信息到手机的短信网关,常用的报警就是一个URL地址携带信息,收短信费。这是推荐的报警方式; 购买短信猫:类似于手机终端一样的客户端硬件设备,早期报警选用的方式,收短信费; 电话语音报警:先将报警语音录下来,报警时直接打电话到报警负责人,播放报警语音;也可以用语音识别软件,将文字识别为语音; QQ/微信:模拟QQ,微信发信息的功能,QQ不太稳定;微信实际上就是将微信和邮箱绑定,当邮箱收到邮件时,微信会提醒 在生产环境中,一般会根据业务的紧急程度不同,多个报警策略结合使用。对于不需要紧急处理的业务一般选择邮件报警,如内存、磁盘空间的剩余率;对于重要且紧急的业务,会使用邮件加上短信同时报警。使用邮件报警便于记录故障详细信息,短息报警时及时提醒,优点是及时。短信报警的缺点是报警内容有限,所以在工作中如果接到严重报警时,我们紧急处理之前也会开启邮件系统先查看邮件细节。
其中http短信网关是老男孩老师最优先推荐使用的短信报警方式,原因: (1) 简单、易用; (2) 稳定、可靠; (3) 收费合理,类似个人手机一样,收取发送费用。
老男孩老师的思想:花一定的费用把业务做到最好是正常工作的思维,如果总想着免费,那么如果业务报警收不到,损失可能会更大。 |
|
报警分级 |
A类:磁盘空间、cpu、内存报警等为一般报警,运维内部采取常规处理方式; B类:网站域名不能打开为严重报警,需协调技术部相关人员会诊处理。 若收到A类报警,原则上限制处理时间,但以不影响服务为前提,进行即使处理;或收到B类报警短信,值班人员需在10分钟内邮件周知运维全体同事及相关技术人员,并解决。纯值班人员可能没有处理权限,只能电话及邮件周知运维人员,有的公司根据业务分配好报警的人 |
|
配置报警 |
配置报警就是配置contacts.cfg文件。可以将公司所有的运维人员都加入到这个文件中,如果有需要还可以分组。 |
这块不是太好了解,短信网关和邮件报警后面有个报警过程可以参考。 |
|
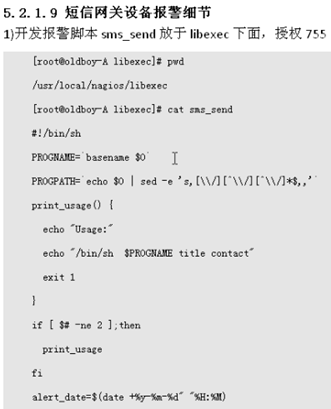
短信网关报警http://oldboy.blog.51cto.com/2561410/1339446 |
|
|
1定义脚本 |
|
|
|
|
|
2 添加联系人及联系组 |
编辑contacts.cfg define contact{ contact_name oldboy-pager use generic-contact alias Nagios users pager 15666661331 } define contactgroup{ contactgroup_name admins #service中contactgrop 中调用这个组名 alias Nagios Administrators members nagiosadmin,oldboy-pager #如果有多个联系人,用逗号隔开 } |
|
3定义报警的命令 |
编辑commands.cfg define command { command_name notify-host-by-pager command_line $USER1$/sms_send "$HOSTSTATE$ alert for $HOSTNAME$" $CONTACTOAGER$ } define command { command_name notify-service-by-pager command_line $USER1$/sms_send "$HOSTALIAS$/$SERVICEDESC$ is $SERVICESTATE$" $CONTACTOAGER$ } # sms_send是脚本里定义好了 |
|
4调整联系人模板contacts.cfg |
##################添加上面定义好报警的命令==绿色部分(来自于commands.cfg)####################### define contact{ name generic-contact service_notification_period 24x7 host_notification_period 24x7 service_notification_options w,u,c,r,f,s host_notification_options d,u,r,f,s service_notification_commands notify-service-by-email,notify-service-by-pager host_notification_commands notify-host-by-email,notify-host-by-pager register 0 } |
|
5配置 hosts.cfg和service.cfg |
添加报警联系人及组,或者在模板中添加,内容都是: contact_groups admins,group1,group2,user1 |
邮件报警 |
|
|
联系人contact.cfg |
define contact{ contact_name nagiosadmin ; Short name of user use generic-contact ; Inherit default values from generic-contact template (defined above) alias Nagios Admin ; Full name of user email 15666661331@163.com ; <<***** CHANGE THIS TO YOUR EMAIL ADDRESS ****** } define contactgroup{ contactgroup_name admins #service中contactgrop 中调用这个组名 alias Nagios Administrators members nagiosadmin #如果有多个联系人,用逗号隔开 } #service中contactgrop 中调用这个组名,如果service.cfg使用(use)模板(generic-service)的话,这个contact_grop是在template.cfg中定义好了的,如果被监控的服务想给多个组报警,拿在services.cfgz中contact_grop后面加上本配置文件contact.cfg中定义的的联系人组就OK了。(上面那个就只是一个admins组,)我们还可以定义领导组,技术组,业务组,开发组等。组里的成员当然也要在本配置文件中定义:define contact,格式和nagiosadmin那个差不多就行。 #调用的generic-contact 在templates.cfg中被定义好了,模板中服务的通知命令,有主机的通知命令,而这些命令又在comands.cfg中被定义了, |
|
模板templates.cfg |
# Generic contact definition template – This is NOT a real contact, just a template! define contact{ name generic-contact ; The name of this contact template service_notification_period 24x7 ; service notifications can be sent anytime host_notification_period 24x7 ; host notifications can be sent anytime service_notification_options w,u,c,r,f,s ; send notifications for all service states, flapping events, and scheduled downtime e vents host_notification_options d,u,r,f,s ; send notifications for all host states, flapping events, and scheduled downtime even ts service_notification_commands notify-service-by-email ; send service notifications via email host_notification_commands notify-host-by-email ; send host notifications via email register 0 ; DONT REGISTER THIS DEFINITION – ITS NOT A REAL CONTACT, JUST A TEMPLATE! } #服务的通知命令notify-service-by-email #主机的通知命令notify-host-by-email 已经在commands.cfg中定义好了 |
|
定义报警动作、主题及内容配置commands.cfg |
# 'notify-host-by-email' command definition define command{ command_name notify-host-by-email #command_line /usr/bin/printf "%b" "***** Nagios ***** Notification Type: $NOTIFICATIONTYPE$ Host: $HOSTNAME$ State: $HOSTSTATE$ Address: $HOSTADDRESS$ Info: $HOSTOUTPUT$ Date/Time: $LONGDATETIME$ " | /bin/mail –s "** $NOTIFICATIONTYPE$ Host Alert: $HOSTNAME$ is $HOSTSTATE$ **" $CONTACTEMAIL$ } # 'notify-service-by-email' command definition define command{ command_name notify-service-by-email command_line /usr/bin/printf "%b" "***** Nagios ***** Notification Type: $NOTIFICATIONTYPE$ Service: $SERVICEDESC$ Host: $HOSTALIAS$ Address: $HOSTADDRESS$ State: $SERVICESTATE$ Date/Time: $LONGDATETIME$ Additional Info: $SERVICEOUTPUT$ " | /bin/mail –s "** $NOTIFICATIONTYPE$ Service Alert: $HOSTALIAS$/$SERVICEDESC$ is $SERVICESTATE$ **" $CONTACTEMAIL$ } 这里是默认的配置 ############内容可以自定义######################## |
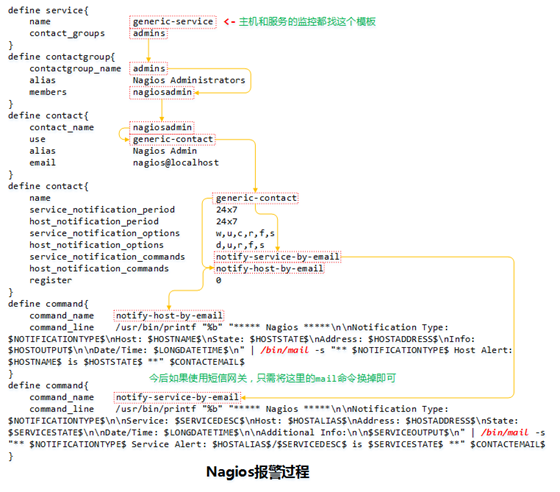
报警的过程 |
|
|
templates.cfg: [root@nagios objects]# cat templates.cfg define contact{ name generic-contact # 这是联系人的模板 service_notification_period 24x7 host_notification_period 24x7 service_notification_options w,u,c,r,f,s host_notification_options d,u,r,f,s service_notification_commands notify-service-by-email # 这是服务发送Email的命令,在command.cfg中定义 host_notification_commands notify-host-by-email # 这是主机报警的命令,同上 register 0 } contacts.cfg: [root@nagios objects]# vim contacts.cfg define contact{ contact_name nagiosadmin # 联系人的名字 use generic-contact # 使用的模板,联系人模板从这里引用 alias Nagios Admin email nagios@localhost #可写联系人的多个邮件地址 } define contactgroup{ # 联系人组 contactgroup_name admins # 可以向这个组内的所有成员报警 alias Nagios Administrators members nagiosadmin # 组中的成员 } 每个contact就是有一个联系人;每个contactgroup就是一个联系人组 可以定义多个联系人组,把相关的联系人加进来 如:定义一个运维组 define contactgroup{ # 联系人组 contactgroup_name yunwei # 可以向这个组内的所有成员报警 alias Nagios Administrators members zhansan,lisi,wanger,huangwu# 组中的成员用contact定义。 } commands.cfg: [root@nagios objects]# vim commands.cfg # 'notify-host-by-email' command definition define command{ command_name notify-host-by-email # 主机报警的命令,最终调用的是系统的mail命令 command_line /usr/bin/printf "%b" "***** Nagios ***** Notification Type: $NOTIFICATIONTYPE$ Host: $HOSTNAME$ State: $HOSTSTATE$ Address: $HOSTADDRESS$ Info: $HOSTOUTPUT$ Date/Time: $LONGDATETIME$ " | /bin/mail -s "** $NOTIFICATIONTYPE$ Host Alert: $HOSTNAME$ is $HOSTSTATE$ **" $CONTACTEMAIL$ } # 'notify-service-by-email' command definition define command{ command_name notify-service-by-email # 服务报警的命令 command_line /usr/bin/printf "%b" "***** Nagios ***** Notification Type: $NOTIFICATIONTYPE$ Service: $SERVICEDESC$ Host: $HOSTALIAS$ Address: $HOSTADDRESS$ State: $SERVICESTATE$ Date/Time: $LONGDATETIME$ Additional Info: $SERVICEOUTPUT$ " | /bin/mail -s "** $NOTIFICATIONTYPE$ Service Alert: $HOSTALIAS$/$SERVICEDESC$ is $SERVICESTATE$ **" $CONTACTEMAIL$ } |
|
|
|
主机和服务监控的重要参数
|
主机: |
define host { # 定义主机 use linux-server # 主机使用的模板,详见templates.cfg host_name 02-client1 # 这个主机名和关键,很多监控的定义都会引用这个主机名 alias 02-client1 # 主机别名 address 10.0.0.2 # ip check_command check-host-alive # 检测主机存活的命令,来自commands.cfg max_check_attempts 3 # 故障后的最大检测次数 normal_check_interval 2 # 正常的检查间隔,默认单位为分钟 retry_check_interval 1 # 故障后重试的检查间隔,默认单位为分钟 check_period 24x7 # 检查周期24x7,具体详见timeperiods.cfg notification_interval 30 # 故障后,两次报警的通知间隔,默认单位为分钟 notification_period 24x7 # 一天之内通知的周期,如全天、半天等,详见timeperiods.cfg notification_options d,u,r # 哪些问题会报警,d-down,u-unreachable(不可达),r-recovery(主机恢复) contact_groups admins # 报警到admins用户组,在contacts.cfg中定义 } |
|
服务 |
define service { use generic-service host_name 02-client1 service_description blog_prot_80_passive # 报警服务的描述 check_command check_nrpe!check_port_80 # 检查服务的命令 max_check_attempts 3 normal_check_interval 2 retry_check_interval 1 check_period 24x7 notification_interval 30 notification_period 24x7 notification_options w,u,c,r # w-warning,u-unknown(状态不知道),c-critical(特别严重),r-recovery(恢复) contact_groups admins process_perf_data 1 # PNP出图记录数据相关 } |
|
服务模板 |
不管是服务还是主机,一半只会定义前四项,其他参数都会定义在模板文件中。如果我们对监控的服务进行分类的话,甚至可以只写两行。我们来看看模板文件中的内容:
[root@nagios objects]# vim templates.cfg define service{ name generic-service # 这就是服务的模板 active_checks_enabled 1 passive_checks_enabled 1 parallelize_check 1 obsess_over_service 1 check_freshness 0 notifications_enabled 1 event_handler_enabled 1 flap_detection_enabled 1 failure_prediction_enabled 1 process_perf_data 1 retain_status_information 1 retain_nonstatus_information 1 is_volatile 0 check_period 24x7 max_check_attempts 3 normal_check_interval 10 retry_check_interval 2 contact_groups admins notification_options w,u,c,r notification_interval 60 notification_period 24x7 register 0 } |
|
联系人模板 |
模板文件名为contacts.cfg,记录报警信息发送的对象: [root@nagios objects]# vim contacts.cfg define contact{ contact_name nagiosadmin # 联系人的名字 use generic-contact # 使用的模板 alias Nagios Admin email nagios@localhost } define contactgroup{ # 联系人组 contactgroup_name admins # 可以向这个组内的所有成员报警 alias Nagios Administrators members nagiosadmin # 组中的成员 } # 可以添加一个运维组,将所有运维人员都添加到该组中;还可以添加一个老大的邮箱,当某些报警信息不希望老大收到时就不把他写上去。 |
Nagios插件开发
|
自定义开发插件 |
自定义插件可以使用任意语言开发,只要能在命令行给出结果,就能够使用Nagios监控。什么是插件呢?我们在前文安装的nagios-plugins-1.4.16.tar.gz,这个软件包就是Nagios的插件安装包,插件都安装…/nagios/libexec目录下。只所以使用自定义插件的原因有: (1) Nagios自带的插件满足不了需要; (2) 由于插件是我们写的,因此它有哪些缺点和BUG我们都清楚。 |
|
写自定义插件的规则 |
(1) 插件要有一个退出状态码,它用于被Nagios主程序作为判断被监控系统服务状态的依据; (2) 插件在控制台打印的第一行数据,该数据可以被Nagios主程序作为被监控系统服务状态的补充说明,会显示在管理界面。
Nagios主程序可识别的状态码和说明如下: OK:退出状态码0,表示服务正常工作; WARNING:退出状态码1,表示服务处于警告状态; CRITICAL:退出状态码2,表示服务处于严重状态; UNKNOWN:退出状态码3,表示服务处于未知状态。 状态码定义的方法可以在libexec目录下执行head -7 utils.sh: [root@nagios libexec]# head -7 utils.sh #! /bin/sh STATE_OK=0 STATE_WARNING=1 STATE_CRITICAL=2 STATE_UNKNOWN=3 STATE_DEPENDENT=4
不同语言的系统退出函数示例如下: Java:System.exit(int status) php:exit(status) python:sys.exit(int status) C/C++:return int status bash:exit int status 不同语言打印第一行数据: Java:System.out.println(String msg) php:echo msg python:printf msg C/C++:printf("%s",msg) bash:echo msg(printf) |
使用shell开发第一个插件,监控passwd文件的变化 |
|
|
先写脚本 |
[root@client1 ~]# md5sum /etc/passwd >/etc/oldboy.md5 [root@client1 ~]# cd /usr/local/nagios/libexec/ [root@client1 libexec]# vim check_passwd #!/bin/bash char=`md5sum -c /etc/oldboy.md5|grep "OK"|wc -l` if [ $char -eq 1 ];then echo "passwd is ok" exit 0 else echo "passwd is changed" exit 2 fi [root@client1 libexec]# chmod +x check_passwd |
|
添加到监控,只能使用被动监控 |
[root@client1 ~]# echo "command[check_passwd]=/usr/local/nagios/libexec/check_passwd" >>/usr/local/nagios/etc/nrpe.cfg [root@client1 libexec]# pkill nrpe [root@client1 libexec]# ps aux|grep nrpe [root@client1 libexec]# /usr/local/nagios/bin/nrpe -c /usr/local/nagios/etc/nrpe.cfg -d [root@nagios nagios]# ./libexec/check_nrpe -H 10.0.0.2 -c check_passwd # 在服务器端先测试 [root@nagios nagios]# vim etc/objects/services.cfg # 在服务端配置 define service { use generic-service host_name 02-client1 service_description passwd check_command check_nrpe!check_passwd } [root@nagios nagios]# /etc/init.d/nagios checkconfig [root@nagios nagios]# /etc/init.d/nagios reload |
|
最终结果: |
|
|
nagios监控web/mysql多角度实战分享 |
|
|
主从同步及延迟 |
http://oldboy.blog.51cto.com/2561410/619293 |
|
监控mysql服务是否正常 |
http://oldboy.blog.51cto.com/2561410/618372 |
